Introduction
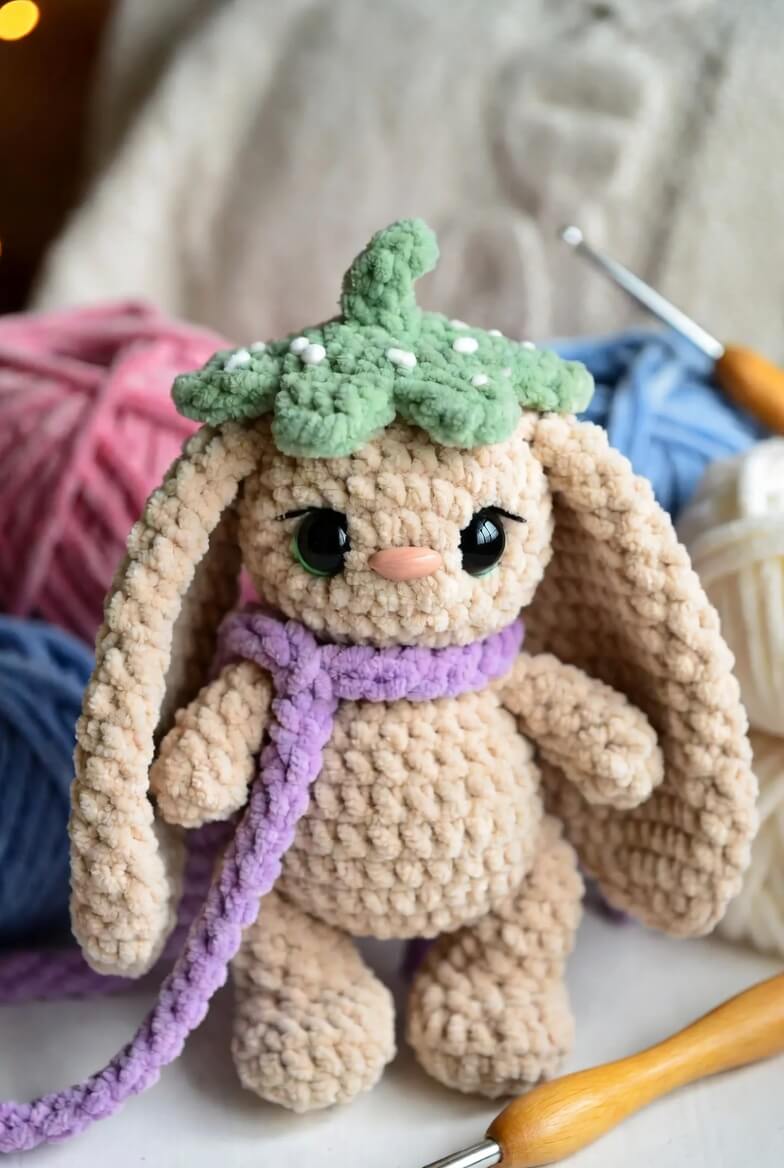
A rabbit’s ears can hang below its feet, so their attachment points must carry more weight than the head seam suggests. This bunny amigurumi crochet pattern produces a 21 cm chenille rabbit with a fitted leaf cap, lavender scarf, long ears, and embroidered lashes. You will need super-bulky yarn, a 5 mm hook, 16 mm eyes, and intermediate amigurumi skills. The finished toy works as a stable seated display piece.
The Design: What Makes Clover the Bunny Different
Clover uses a separate head and body because the scarf needs a defined neck channel rather than a continuous egg-shaped torso. The head reaches a 36-stitch plateau, giving enough width for 16 mm eyes without pushing them into the ear seams. Long ears begin with a rounded 18-stitch tip, then narrow toward the base so their weight hangs downward instead of pulling the head sideways. The five-part cap is assembled around a small stem, which lets each leaf overlap the crown while leaving the ears visible. A common mistake in a floppy ear bunny crochet pattern is placing both ears too far back. That shifts the visual center behind the eyes and makes the rabbit appear to lean. This chenille bunny amigurumi corrects that problem through measured attachment rows and a wider lower body.
Project Info at a Glance
| Skill Level | Time | Finished Size | Hook | Best For |
|---|---|---|---|---|
| Intermediate | 6–8 hours | Approximately 21 cm seated | 5 mm | Nursery display, seasonal decor, photographed collections |
Materials and Tools
Yarn
- Warm cream — super-bulky chenille — approximately 100 g — Himalaya Dolphin Baby, Premier Parfait Chunky, or a comparable velvet yarn.
- Sage green — super-bulky chenille — approximately 18 g — use for the leaf cap and stem.
- Lavender — super-bulky chenille — approximately 12 g — use for the scarf.
- Pale peach — small quantity of smooth DK yarn or embroidery thread — use for the nose and cheek patches.
- White — small quantity of smooth yarn — use for cap dots.
- Black — embroidery thread — use for lashes and facial details.
Tools
- 5 mm crochet hook
- 16 mm safety eyes, preferably with green or clear rims
- Polyester stuffing
- Blunt tapestry needle
- Locking stitch markers
- Long sewing pins
- Scissors
The hook, yarn category, eye size, and finished measurement follow published specifications for a 21 cm chenille bunny. The main-yarn allocation is higher than a plain rabbit because Clover includes four substantial limbs and two ears.
Abbreviations
- MR — magic ring
- sc — single crochet
- inc — two single crochet stitches in one stitch
- dec — single crochet two stitches together
- sl st — slip stitch
- ch — chain
- BLO — back loop only
For an invisible decrease, insert the hook through the front loops of the next two stitches, yarn over, pull through both front loops, then complete one single crochet.
Pattern — Step by Step
Work in a continuous spiral unless a section states otherwise. Mark the first stitch of every round. This bunny amigurumi crochet pattern uses a 36-stitch plateau for the medium-sized head and body.
Head
Yarn: warm cream — Source basis: standard amigurumi math.
R1: 6 sc in MR (6)
R2: inc ×6 (12)
R3: (sc, inc) ×6 (18)
R4: (2 sc, inc) ×6 (24)
R5: (3 sc, inc) ×6 (30)
R6: (4 sc, inc) ×6 (36)
R7–R12: sc around (36)
R13: (4 sc, dec) ×6 (30)
R14: (3 sc, dec) ×6 (24)
Insert the 16 mm eyes between R9 and R10 with eight visible stitches between the posts. Add the eye backs before further decreases. Embroider one short upper lash at each outer eye corner.
R15: (2 sc, dec) ×6 (18)
R16: (sc, dec) ×6 (12)
Stuff the crown firmly, then add smaller pieces around the eyes to prevent dents.
R17: dec ×6 (6)
Fasten off. Leave a 25 cm tail and close through the front loops.
Body
Yarn: warm cream — Source basis: standard amigurumi math.
R1: 6 sc in MR (6)
R2: inc ×6 (12)
R3: (sc, inc) ×6 (18)
R4: (2 sc, inc) ×6 (24)
R5: (3 sc, inc) ×6 (30)
R6: (4 sc, inc) ×6 (36)
R7–R11: sc around (36)
R12: (4 sc, dec) ×6 (30)
R13–R14: sc around (30)
R15: (3 sc, dec) ×6 (24)
R16: sc around (24)
R17: (2 sc, dec) ×6 (18)
Stuff the lower body firmly enough to hold a seated position. Keep the neck area slightly softer for sewing.
R18: (sc, dec) ×6 (12)
R19: dec ×6 (6)
Fasten off. Leave a 30 cm tail for attaching the body to the head.
Arms (Make 2)
Yarn: warm cream — Source basis: standard amigurumi math.
R1: 6 sc in MR (6)
R2: inc ×6 (12)
R3–R5: sc around (12)
R6: dec ×6 (6)
R7–R10: sc around (6)
Stuff only R1–R5. Leave the upper section flat so the arms lie against the torso.
Fasten off. Leave a 20 cm sewing tail.
Back Legs (Make 2)
Yarn: warm cream — Source basis: standard amigurumi math.
R1: 6 sc in MR (6)
R2: inc ×6 (12)
R3: (sc, inc) ×6 (18)
R4–R6: sc around (18)
R7: (sc, dec) ×6 (12)
R8–R11: sc around (12)
R12: dec ×6 (6)
Stuff the feet firmly through R7. Use less filling in the upper legs so they can angle forward.
Fasten off. Leave a 25 cm tail.
Long Ears (Make 2)
Yarn: warm cream — Reference comparison: published bunny ears are commonly worked separately in spiral rounds.
R1: 6 sc in MR (6)
R2: inc ×6 (12)
R3: (sc, inc) ×6 (18)
R4–R10: sc around (18)
R11: (sc, dec) ×6 (12)
R12–R19: sc around (12)
R20: dec ×6 (6)
R21–R23: sc around (6)
Do not stuff. Flatten each ear, then turn the lower seam toward the back before pinning.
Fasten off. Leave a 30 cm tail for reinforced attachment.
Muzzle
Yarn: warm cream — Source basis: standard amigurumi math.
R1: 6 sc in MR (6)
R2: inc ×6 (12)
R3: sc around (12)
Add a small pinch of stuffing. Embroider the peach nose across two central stitches before sewing.
Fasten off. Leave a 20 cm tail.
Cheek Patches (Make 2)
Yarn: pale peach smooth yarn — Source basis: standard flat-circle math.
R1: 6 sc in MR (6)
R2: inc ×6 (12)
Join with a sl st. Fasten off and leave a 12 cm tail. Flatten each circle before attachment.
Tail
Yarn: warm cream — Source basis: standard amigurumi math.
R1: 6 sc in MR (6)
R2: inc ×6 (12)
R3: sc around (12)
R4: dec ×6 (6)
Add a small amount of stuffing.
Fasten off. Leave a 15 cm tail.
Leaf-Cap Lobes (Make 5)
Yarn: sage green — Source basis: standard amigurumi math.
R1: 6 sc in MR (6)
R2: inc ×6 (12)
R3–R4: sc around (12)
R5: dec ×6 (6)
R6–R8: sc around (6)
Do not stuff. Flatten each lobe and arrange the five pieces like an overlapping star.
Fasten off. Leave a 20 cm tail on each piece.
Cap Stem
Yarn: sage green — Source basis: standard narrow-tube construction.
R1: 6 sc in MR (6)
R2–R6: sc around (6)
Add no stuffing. Bend the finished stem slightly toward one side.
Fasten off. Leave a 15 cm tail.
White Cap Dots (Make 6)
Yarn: white smooth yarn.
For each dot, make 4 sc in an MR, close the ring, and join with a sl st (4).
Fasten off. Leave a 10 cm tail and sew the dots at irregular intervals across the green lobes.
Lavender Scarf
Yarn: lavender chenille — Source basis: measured accessory construction.
Ch 5.
Row 1: sc in second ch from hook and across (4)
Rows 2–70: ch 1, turn, sc across (4)
Check the length around the finished neck after Row 60. The photographed style needs one short wrapped section and one long hanging end.
Fasten off. Weave in both ends through at least 5 cm of fabric.
Assembly
- Pin the head to the body with the head’s closing point centered directly over the body’s upper opening.
- Sew the neck twice around, passing through one head stitch and one body stitch on each movement.
- Place the muzzle between the eyes with its upper edge near R11, then sew around its complete circumference.
- Attach the cheek patches beside the lower muzzle without covering the eye posts.
- Pin the arms to body R13, leaving approximately eight stitches across the front chest.
- Position the back legs between body R5 and R9, angled forward until both feet touch the same horizontal surface.
- Sew the ears between head R4 and R7, spacing their inner edges approximately six stitches apart.
- Attach the tail to the center back between body R7 and R10.
- Overlap the five green lobes around the cap stem, join them into one unit, then tack the cap to the crown at four points.
- Wrap the scarf once around the neck, stitch the crossing point discreetly, and weave every remaining tail into the stuffed sections.
The completed rabbit should sit without support and retain two freely hanging ears.
7 Technical Tips
- Marker drift: Chenille can hide the first stitch and shift the face by several stitches. Place a locking marker through both loops and count every completed round before moving it.
- Soft crown: An underfilled head collapses around 16 mm eyes. Pack small pieces of filling behind and above each eye until the crown rebounds under light thumb pressure.
- Visible decrease gaps: Standard decreases can expose stuffing between plush stitches. Work each decrease through front loops only and keep the loop height below 5 mm.
- Late eye placement: Installing the eyes after R14 leaves too little access for the washers. Fit both posts between R9 and R10 before the head drops below 24 stitches.
- Velvet tension changes: Pulling chenille too tightly can strip its pile from the core. Stop tightening when the stitch closes around the 5 mm hook shaft.
- Uneven legs: Sewing one leg before comparing both positions can produce a tilted seated base. Pin both legs first and test the rabbit on a flat table before making permanent stitches.
- Loose tails: Short woven ends can work outward through plush fabric. Carry each tail at least 5 cm through the stuffing, reverse direction once, then trim it after the yarn retracts.
Conclusion
Check the seated balance before trimming the final assembly tails, then record any hook or tension changes beside the pattern. The next practical step is to crochet one ear first and measure it against the intended 21 cm body; chenille brands can change the ear length by several centimeters. Save the finished bunny amigurumi crochet pattern project to Pinterest and post a front and side view on Instagram with #LeafCapBunny. The side photograph confirms whether the legs, tail, and weighted ears are positioned correctly. For this rabbit specifically, would you angle the five cap leaves downward over the forehead or keep them flat across the crown?









