Introduction
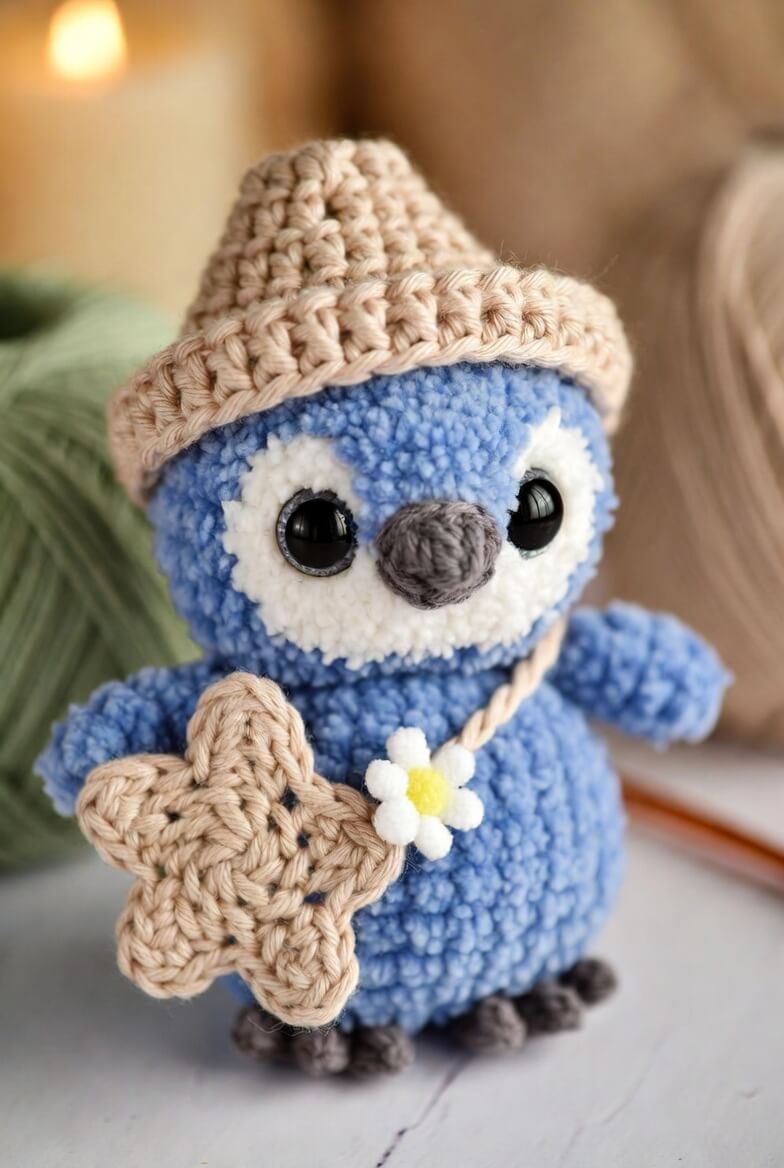
An owl’s face must remain visible even when a nightcap drops across the forehead. This blue owl amigurumi crochet pattern sets the brim above a separate cream mask and balances the hat with a lightweight star. Use chunky chenille, a 4 mm hook and 18 mm safety eyes. The completed owl measures approximately 22–23 cm tall and is an intermediate project intended for stable display and removable accessories.
The Design: What Makes Nova the Owl Different
Nova’s head and body are worked as one continuous shape. This removes a neck seam that could buckle beneath the weight of the hat, while the lower body remains broad enough to rest on two feet and a small tail. A cream facial panel is sewn over the blue surface, creating the wide connected eye marking visible in the reference image.
The wings are shallow flattened pieces rather than fully stuffed cylinders. Their lower edges can angle outward without rotating the body. A textured oatmeal nightcap uses a fitted brim and tapered crown, while its braided cord keeps the star close to the owl’s chest. One common mistake in an owl with nightcap amigurumi is sizing the hat before attaching the eyes and facial panel. The added layers change the head circumference. Complete the face first, then test the brim directly above the eye marking before working the crown.
Project Info at a Glance
| Skill Level | Time | Finished Size | Hook | Best For |
|---|---|---|---|---|
| Intermediate | 9–11 hours | Approximately 22–23 cm tall | 4 mm | Celestial displays, nursery shelves and sleep-themed amigurumi collections |
Materials and Tools
Yarn
- Cornflower blue — chunky chenille yarn — approximately 120 g — for the combined body and wings
- Cream white — chunky chenille or smooth Aran yarn — approximately 45 g — for the facial panel
- Oatmeal beige — worsted or Aran yarn — approximately 60 g — for the nightcap, cord and star
- Charcoal gray — worsted yarn — approximately 15 g — for the beak, feet and tail
- White — DK or worsted yarn — approximately 5 g — for the daisy petals
- Yellow — DK or worsted yarn — approximately 2 g — for the flower center
- Black — embroidery yarn — approximately 1 g — for optional star stitches and facial details
Yarn use changes with gauge, stuffing firmness and hat length. Keep an additional 20 g of oatmeal yarn available when the brim requires more than 48 stitches.
Tools
- 4 mm crochet hook
- Optional 3.5 mm crochet hook for the smooth-yarn accessories
- 18 mm safety eyes
- Polyester stuffing
- Yarn needle
- Locking stitch markers
- Dressmaking pins
- Scissors
- Row counter
- Flexible measuring tape
Replace plastic eyes with firmly embroidered eyes when the finished owl is intended for a child under three.
Abbreviations
- MR — magic ring
- sc — single crochet
- inc — two single crochets in one stitch
- dec — invisible decrease over the next two stitches
- sl st — slip stitch
- ch — chain
- BLO — back loop only
- FLO — front loop only
- hdc — half double crochet
- dc — double crochet
- tr — treble crochet
- st/sts — stitch or stitches
An invisible decrease is worked through the front loops of the next two stitches before completing one single crochet.
Pattern — Step by Step
Work in a continuous spiral unless a section states otherwise. Mark the first stitch of every round.
Combined Head and Body
Yarn: cornflower blue.
R1: 6 sc in MR (6)
R2: inc ×6 (12)
R3: (sc, inc) ×6 (18)
R4: (2 sc, inc) ×6 (24)
R5: (3 sc, inc) ×6 (30)
R6: (4 sc, inc) ×6 (36)
R7: (5 sc, inc) ×6 (42)
R8–R16: sc around (42)
Place the safety-eye posts between R12 and R13 with approximately nine visible stitches between them. Do not attach the washers until the facial panel has been pinned.
R17: (5 sc, dec) ×6 (36)
R18–R20: sc around (36)
R21: (4 sc, dec) ×6 (30)
R22–R24: sc around (30)
R25: (4 sc, inc) ×6 (36)
R26–R32: sc around (36)
R33: (4 sc, dec) ×6 (30)
R34: (3 sc, dec) ×6 (24)
Stuff the head firmly around the eye posts. Fill the lower body in small sections and press its base against a level surface while adding stuffing.
R35: (2 sc, dec) ×6 (18)
R36: (sc, dec) ×6 (12)
R37: dec ×6 (6)
Fasten off. Leave a 20 cm tail and close the opening through the front loops.
Facial Panel
Yarn: cream white — worked as two joined circles.
First circle:
R1: 6 sc in MR (6)
R2: inc ×6 (12)
R3: (sc, inc) ×6 (18)
R4: (2 sc, inc) ×6 (24)
Fasten off.
Second circle:
R1: 6 sc in MR (6)
R2: inc ×6 (12)
R3: (sc, inc) ×6 (18)
R4: (2 sc, inc) ×6 (24)
Do not fasten off. Overlap the two circles by approximately four stitches and join them with four sc through both layers.
Work one round of sc around the outside edge of the connected shape, skipping the internal overlap. Join with a sl st.
Fasten off. Leave a 40 cm sewing tail.
Pass the eye posts through the cream panel before attaching their washers. Trim or fold the inner panel edges when the center overlap rises above the beak position.
Beak
Yarn: charcoal gray.
R1: 6 sc in MR (6)
R2: (sc, inc) ×3 (9)
R3: sc around (9)
R4: (2 sc, inc) ×3 (12)
R5: sc around (12)
Stuff lightly. Flatten the open edge into an oval so the beak projects forward rather than downward.
Fasten off. Leave a 30 cm sewing tail.
Wings — Make 2
Yarn: cornflower blue.
R1: 6 sc in MR (6)
R2: inc ×6 (12)
R3: (sc, inc) ×6 (18)
R4: (2 sc, inc) ×6 (24)
R5–R7: sc around (24)
R8: (2 sc, dec) ×6 (18)
R9–R11: sc around (18)
R12: (sc, dec) ×6 (12)
Add only a thin layer of stuffing to the rounded end. Keep the upper half flat.
Flatten the opening and work 6 sc through both layers (6).
Fasten off. Leave a 30 cm sewing tail.
Feet — Make 2
Yarn: charcoal gray.
R1: 6 sc in MR (6)
R2: inc ×6 (12)
R3–R4: sc around (12)
R5: dec ×6 (6)
Stuff lightly. Fasten off, leaving a 25 cm tail.
Thread the tail through the center of the foot and wrap it firmly around the piece twice to divide it into two rounded toes. Make a third smaller toe with one straight embroidered stitch at the front center.
Tail
Yarn: charcoal gray.
R1: 6 sc in MR (6)
R2: inc ×6 (12)
R3–R4: sc around (12)
R5: (sc, dec) ×4 (8)
R6: sc around (8)
Stuff lightly and flatten the opening.
Fasten off. Leave a 25 cm sewing tail.
Nightcap Brim
Yarn: oatmeal beige. Work in joined rounds.
Ch 48. Join with a sl st, taking care not to twist.
R1: Ch 1, sc around, join with sl st (48)
R2: BLO sc around, join with sl st (48)
R3: (7 sc, inc) ×6, join with sl st (54)
R4: sc around, join with sl st (54)
Test the brim on the completed head. It should rest above the cream panel without covering either eye.
Nightcap Crown
Continue with oatmeal beige.
R5: (7 sc, dec) ×6 (48)
R6–R7: sc around (48)
R8: (6 sc, dec) ×6 (42)
R9–R10: sc around (42)
R11: (5 sc, dec) ×6 (36)
R12–R13: sc around (36)
R14: (4 sc, dec) ×6 (30)
R15–R16: sc around (30)
R17: (3 sc, dec) ×6 (24)
R18–R20: sc around (24)
R21: (2 sc, dec) ×6 (18)
R22–R24: sc around (18)
R25: (sc, dec) ×6 (12)
R26–R28: sc around (12)
R29: dec ×6 (6)
Fasten off. Leave a 15 cm tail and close the top.
Do not stuff the crown. Fold its narrow end backward and tack it to R17 with two removable stitches to reproduce the bent shape.
Braided Chin Cord
Yarn: oatmeal beige.
Cut nine strands measuring 50 cm each. Divide them into three groups of three and braid until the finished cord measures approximately 32 cm.
Tie both ends firmly. Sew one end beneath the right side of the hat brim and leave the opposite end available for the flower and star attachment.
Star — Make 2 Panels
Yarn: oatmeal beige. Work in joined rounds.
R1: 5 sc in MR, join with sl st (5)
R2: inc ×5, join with sl st (10)
R3: (sc, inc) ×5, join with sl st (15)
Star points:
Repeat five times: ch 7, starting in the second ch from the hook work sl st, sc, hdc, dc, tr, tr; skip two stitches of R3 and sl st in the next stitch.
Fasten off the first panel. Leave a 50 cm tail on the second panel.
Place the panels together with their wrong sides facing. Whipstitch around every point, adding a thin layer of stuffing before closing the final point.
Embroider six to eight short black star stitches across the front panel when speckled detailing is preferred.
Daisy
Begin with yellow and change to white.
R1: With yellow, 6 sc in MR (6).
R2: Change to white. (Sl st, ch 3, 2 hdc in the second ch from the hook, sl st in the same base stitch) ×6.
Pull the center ring closed.
Fasten off. Leave a 20 cm sewing tail.
Assembly
- Pin the cream facial panel over R8–R18 of the body. Pass both eye posts through the panel and confirm that approximately nine visible stitches remain between them.
- Attach the safety-eye washers only after the panel lies flat. Sew around its complete outer edge through the back loops.
- Center the gray beak between the eyes with its upper seam near R14. Add a small amount of stuffing before closing the final 2 cm.
- Attach the wings across approximately R21–R27 of the combined body. Sew only the flattened upper edges so the rounded ends can angle outward.
- Place the feet beneath the front body edge with approximately eight body stitches between them. Reinforce each seam with a second pass.
- Sew the tail to the lower rear center near R32. Its tip should touch the working surface and create a third support point.
- Pull the nightcap over the head and center its widest section above the facial panel. Tack the brim behind both sides of the head when permanent placement is required.
- Attach the braided cord beneath the hat brim. Let it cross the front-right side of the body without passing over the beak or eye panel.
- Sew the daisy approximately 4 cm above the lower end of the cord. Attach the star below it so one point faces upward and the remaining points remain visible.
- Set the owl on a level surface, adjust the feet and tail, then weave every yarn end through at least four changes of direction inside a stuffed section.
The completed owl should stand without leaning, with the hat brim above both eyes and the star resting against the lower-left side of the body.
7 Technical Tips
- Covered eyes: A brim placed below R8 can overlap the top of the cream panel. Test the 48-stitch chain above both eye posts before joining it into a ring.
- Facial-panel puckering: An overlap wider than four stitches raises the center between the eyes. Join the two circles through exactly four stitches and pin the complete edge before sewing.
- Forward body tilt: Feet placed more than 2 cm behind the front center line cannot counter the star’s weight. Pin both feet under the front third of the body and use the tail as the rear support.
- Collapsed beak: Leaving the 12-stitch beak empty causes its tip to fold beneath the eyes. Add a piece of stuffing approximately the size of a grape before closing the seam.
- Twisted hat crown: A missed decrease rotates the narrow end and changes the direction of its fold. Count every shaping round and confirm each stage decreases by six stitches.
- Uneven star points: One chain longer than seven stitches produces a visibly oversized point. Count all five point chains and compare both panels before joining their edges.
- Loose cord attachment: A single sewing pass can pull through the brim under the stuffed star’s weight. Sew the cord through three adjacent brim stitches and knot the yarn inside the hat.
Conclusion
Finish the face before sizing the nightcap, because the cream panel and eye washers add measurable depth to the head. Next, test the brim above the eyes and mark its center front with a locking stitch marker before beginning the decrease rounds. The feet and tail must touch the surface at the same time, while the star should rest against the body without pulling the cord sideways. Save this blue owl amigurumi crochet pattern to Pinterest, then share the completed owl on Instagram with #NovaNightOwl. Did you leave the nightcap removable, or tack its brim behind both sides of the head?









