Introduction
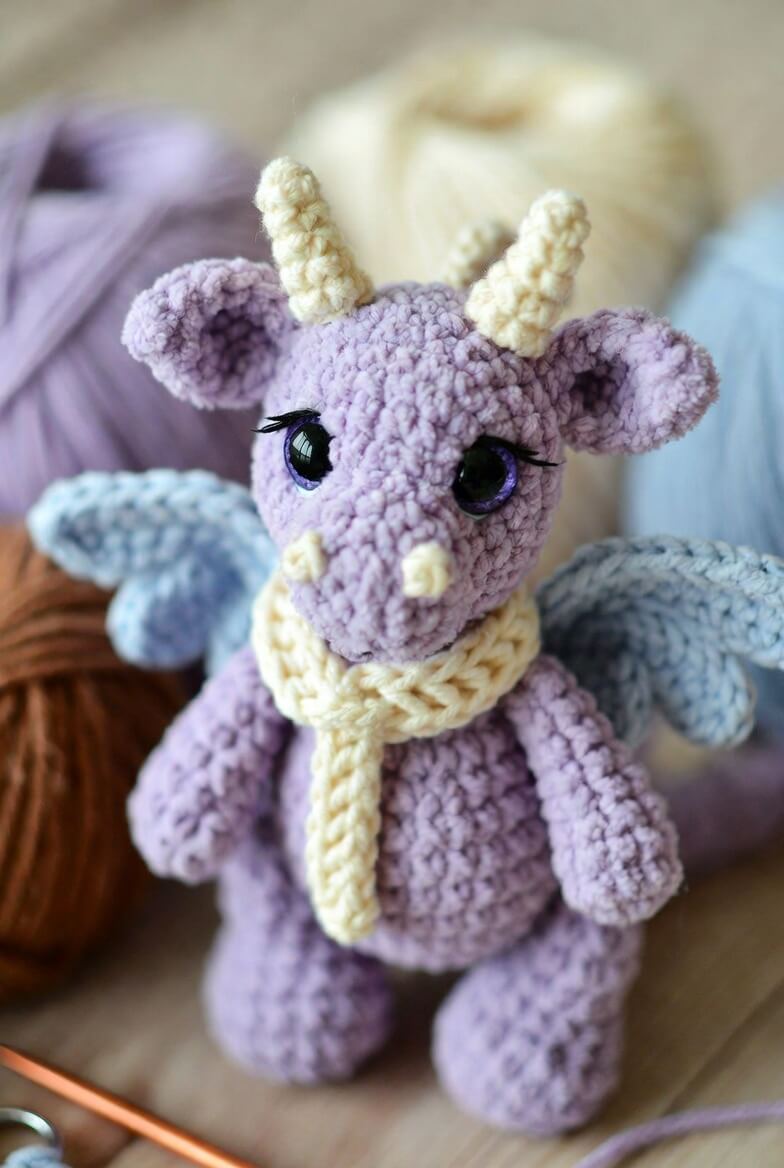
A young dragon’s horns must lean away from its wings, or the three silhouettes collapse into one crowded shape. This baby dragon amigurumi crochet pattern uses light worsted yarn, a 3 mm hook and separately formed features to create a figure approximately 22 cm tall. The intermediate project includes a shaped muzzle, standing legs, mirrored wings and a removable scarf. Its broad feet support display without wire.
The Design: What Makes This Baby Dragon Different
The head reaches a 36-stitch plateau before narrowing into a defined neck, giving enough width for large eyes, side ears and two horn roots. A separate elongated muzzle projects from the face rather than appearing as a flat appliqué. That decision produces the photographed dragon profile and creates space for raised nostrils. The blue-gray wings are worked in mirrored rows so their shaped edges point downward on both sides. Broad back legs carry the weight of the head, while a tapered tail stabilizes the rear. This purple dragon crochet pattern also uses a ribbed cream scarf to cover the neck join without restricting the arms. A common error in a crochet dragon with wings is sewing both wings from the same orientation. One wing then displays its reverse side and twists away from the body.
Project Info at a Glance
| Skill Level | Time | Finished Size | Hook | Best For |
|---|---|---|---|---|
| Intermediate | 11–14 hours | Approximately 22 cm | 3 mm | Fantasy displays, dragon collections and handmade market stock |
The finished height, hook size and 15 mm eye specification are based on a documented light-worsted dragon of comparable scale. Finished dimensions will change when yarn thickness or tension changes.
Materials and Tools
Yarn
- Dusty lavender — light worsted or DK weight — approximately 100 g — Stylecraft Special DK, Paintbox Yarns Cotton DK or a comparable matte yarn
- Pale blue-gray — light worsted or DK weight — approximately 30 g — used for both wings
- Cream — light worsted or DK weight — approximately 30 g — used for horns, nostrils and scarf
- Violet — embroidery yarn — approximately 2 g — used around the eyes and for cheek patches
- Black — embroidery yarn — approximately 1 g — used for eyelashes and eye definition
Tools
- 3 mm crochet hook
- 15 mm safety eyes
- Polyester stuffing, approximately 70 g
- Yarn needle
- Locking stitch markers
- Dressmaking pins
- Scissors
Abbreviations
- MR — magic ring
- sc — single crochet
- inc — two single crochet stitches in one stitch
- dec — invisible decrease over two stitches
- sl st — slip stitch
- ch — chain
- hdc — half double crochet
- dc — double crochet
- tr — treble crochet
- BLO — back loop only
- FLO — front loop only
Work an invisible decrease through the front loops of the next two stitches before completing one single crochet through both loops.
Pattern — Step by Step
Work all three-dimensional pieces in a continuous spiral unless joined rounds or rows are stated. Place a marker in the first stitch of each round.
Head
Yarn: dusty lavender — standard six-stitch amigurumi shaping.
R1: 6 sc in MR (6)
R2: inc ×6 (12)
R3: (sc, inc) ×6 (18)
R4: (2 sc, inc) ×6 (24)
R5: (3 sc, inc) ×6 (30)
R6: (4 sc, inc) ×6 (36)
R7–R15: sc around (36)
R16: (4 sc, dec) ×6 (30)
R17: sc around (30)
R18: (3 sc, dec) ×6 (24)
R19: sc around (24)
R20: (2 sc, dec) ×6 (18)
R21: (sc, dec) ×6 (12)
R22: dec ×6 (6)
R23: draw the yarn through the front loops and close (6)
Insert the eyes between R11 and R12 with seven visible stitches between the posts. Stuff after R18, pressing small pieces around the eye washers to keep the face symmetrical.
Fasten off. Leave a 25 cm tail.
Body
Yarn: dusty lavender — standard six-stitch amigurumi shaping.
R1: 6 sc in MR (6)
R2: inc ×6 (12)
R3: (sc, inc) ×6 (18)
R4: (2 sc, inc) ×6 (24)
R5: (3 sc, inc) ×6 (30)
R6: (4 sc, inc) ×6 (36)
R7–R15: sc around (36)
R16: (4 sc, dec) ×6 (30)
R17–R19: sc around (30)
R20: (3 sc, dec) ×6 (24)
R21–R22: sc around (24)
R23: (2 sc, dec) ×6 (18)
R24: sc around (18)
Fill the lower body firmly. Keep the final two rounds moderately packed so the neck remains level rather than domed.
Fasten off. Leave a 30 cm sewing tail.
Arms (Make 2)
Yarn: dusty lavender — standard amigurumi math.
R1: 6 sc in MR (6)
R2: inc ×6 (12)
R3–R5: sc around (12)
R6: (2 sc, dec) ×3 (9)
R7–R13: sc around (9)
R14: (sc, dec) ×3 (6)
Stuff through R7 only. Leave the upper section flexible so each arm can hang beside the body.
Flatten the opening and work 3 sc through both layers. Fasten off, leaving a 22 cm tail.
Back Legs (Make 2)
Yarn: dusty lavender — wide-foot construction.
R1: 6 sc in MR (6)
R2: inc ×6 (12)
R3: (sc, inc) ×6 (18)
R4–R7: sc around (18)
R8: (sc, dec) ×6 (12)
R9–R12: sc around (12)
R13: dec ×6 (6)
Pack the feet firmly through R8. Add less stuffing above that point so each leg can sit flush against the lower body.
Fasten off. Leave a 25 cm tail.
Muzzle
Yarn: dusty lavender — elongated oval shaping.
R1: 6 sc in MR (6)
R2: inc ×6 (12)
R3: (sc, inc) ×6 (18)
R4: (2 sc, inc) ×6 (24)
R5–R7: sc around (24)
R8: (2 sc, dec) ×6 (18)
R9: sc around (18)
R10: (sc, dec) ×6 (12)
Stuff the front half firmly and the attachment edge lightly. Shape the muzzle into a horizontal oval before sewing.
Fasten off. Leave a 30 cm tail.
Nostrils (Make 2)
Yarn: cream — small raised circles.
R1: 6 sc in MR (6)
R2: sc around (6)
Do not stuff. Flatten each piece into a small oval.
Fasten off. Leave a 12 cm tail.
Ears (Make 2)
Yarn: dusty lavender — flattened cup construction.
R1: 6 sc in MR (6)
R2: inc ×6 (12)
R3: (sc, inc) ×6 (18)
R4–R6: sc around (18)
R7: (4 sc, dec) ×3 (15)
R8: sc around (15)
R9: (3 sc, dec) ×3 (12)
Do not stuff. Press the center inward and fold the lower edge by 5 mm to form a shallow ear cup.
Flatten the base and work 6 sc through both layers. Fasten off, leaving a 25 cm tail.
Horns (Make 2)
Yarn: cream — narrow conical shaping.
R1: 6 sc in MR (6)
R2: sc around (6)
R3: (sc, inc) ×3 (9)
R4–R6: sc around (9)
R7: (2 sc, inc) ×3 (12)
R8–R10: sc around (12)
R11: sc around (12)
Stuff in 5 mm portions so the tip remains defined. Bend each horn slightly outward while shaping the filling.
Fasten off. Leave a 25 cm tail.
Wings (Make 2 Mirrored Pieces)
Yarn: pale blue-gray — worked in rows. Reverse all shaping for the second wing.
First Wing
Row 1: ch 13, sc in second ch from hook and across (12)
Row 2: ch 1, turn, inc, 10 sc, inc (14)
Row 3: ch 1, turn, sc across (14)
Row 4: ch 1, turn, inc, 12 sc, inc (16)
Row 5: ch 1, turn, sc across (16)
Row 6: ch 1, turn, skip first stitch, 15 sc (15)
Row 7: ch 1, turn, skip first stitch, 14 sc (14)
Row 8: ch 1, turn, skip first stitch, 13 sc (13)
Row 9: ch 1, turn, sc, hdc, 2 dc, 2 tr, 2 dc, 2 hdc, 3 sc (13)
Row 10: ch 1, turn, sl st, sc, hdc, dc, sl st, sc, hdc, dc, sl st, 4 sc (13)
Second Wing
Repeat Rows 1–8. For Row 9, work 3 sc, 2 hdc, 2 dc, 2 tr, 2 dc, hdc, sc (13). For Row 10, work 4 sc, sl st, dc, hdc, sc, sl st, dc, hdc, sc, sl st (13).
Block both wings flat. Do not stuff. The shaped lower points must face the tail when the wings are attached.
Fasten off each wing, leaving a 35 cm tail.
Tail
Yarn: dusty lavender — tapered spiral construction.
R1: 6 sc in MR (6)
R2: sc around (6)
R3: inc ×6 (12)
R4–R6: sc around (12)
R7: (sc, inc) ×6 (18)
R8–R11: sc around (18)
R12: (sc, dec) ×6 (12)
R13–R15: sc around (12)
R16: dec ×6 (6)
Stuff the base firmly and the final 5 cm lightly. Curve the tip upward before closing.
Fasten off. Leave a 30 cm tail.
Cheek Patches (Make 2)
Yarn: violet — flat-circle construction.
R1: 6 sc in MR (6)
R2: inc ×6 (12)
Flatten each circle and stretch it into a shallow oval during attachment.
Join with a sl st. Fasten off, leaving a 15 cm tail.
Eye Rings and Eyelashes
Thread violet yarn through the head and work close surface stitches around the lower outer half of each safety eye. Keep every stitch within 2 mm of the plastic edge. Add three black eyelash stitches outside each eye, making the center lash approximately 8 mm long.
Cream Scarf
Yarn: cream — worked in ribbed rows.
Row 1: ch 7, sc in second ch from hook and across (6)
Row 2–Row 48: ch 1, turn, BLO sc across (6)
Border: ch 1, work sc evenly around all four edges, placing 3 sc in each corner.
The scarf should measure approximately 4 cm wide and 38 cm long before assembly. Add four short cream fringe strands to each end when a fringed finish is preferred.
Fasten off. Weave in both tails.
Assembly
- Pin the head centrally over the body’s 18-stitch opening. Sew around the neck twice and add filling through the final 2 cm before closing.
- Place the muzzle between head R11 and R18. Its widest line should sit directly below the safety eyes.
- Sew the nostrils to the upper third of the muzzle with approximately five muzzle stitches between their inner edges.
- Attach the violet cheek patches below and outside the eyes, then complete the embroidered eye rings and eyelashes.
- Pin the horns between head R4 and R7 with six visible stitches between their bases. Angle each tip outward by approximately 10 degrees.
- Sew the ears between head R7 and R11, placing each root about two stitches outside its nearest horn.
- Attach the arms at body R18 and the back legs across body R4 to R11. Set the dragon on a flat surface before securing the second leg.
- Position the mirrored wings between body R10 and R18. Leave a 3 cm gap between their upper inner corners so they do not overlap.
- Sew the tail to the center back between body R6 and R11. Rest its lower curve on the work surface to create a third rear support point.
- Wrap the scarf once around the neck and cross the ends at the front. Bury every remaining yarn tail through at least 5 cm of stuffed fabric.
The completed dragon should stand on both feet and the lower tail without an internal support.
7 Technical Tips
- Rotated muzzle: A muzzle shifted by two stitches makes both nostrils appear off-center. Mark the vertical facial center from the midpoint between the eyes before pinning the piece.
- Loose neck stuffing: A soft upper body allows the horned head to lean forward. Pack the final 3 cm of the torso until moderate thumb pressure creates less than 5 mm of compression.
- Visible decrease holes: Ordinary decreases can expose filling around the head and body. Work through front loops only and reduce the hook to 2.75 mm when a gap exceeds 2 mm.
- Late eye installation: Safety-eye washers become difficult to fit after the head decreases below 24 stitches. Install both 15 mm eyes before completing R19.
- Reversed wings: Two identically shaped pieces will not display matching front surfaces. Lay both wings beside the body with their lower points facing the tail before sewing either one.
- Uneven horn angles: A difference greater than 5 degrees is visible from the front. Pin both horns, photograph the head straight on and compare the tip positions before stitching.
- Unstable leg placement: A 4 mm difference between foot levels makes the dragon rock. Test both feet and the lower tail against a hard table before knotting any attachment seam.
Conclusion
Check the horn and wing spacing before closing the final seams. The horns need a clear outline above the ears, while each wing should remain visible beyond the shoulders without pushing an arm forward. Crochet the first back leg next and record its finished length from the magic ring to the final round; use that measurement when shaping the second leg. Save this baby dragon amigurumi crochet pattern to a Pinterest fantasy-pattern board, then share the finished figure on Instagram with #LavenderBabyDragon. Include the yarn weight, hook size and final standing height in the caption. Did you angle the blue-gray wings upward, or keep them low behind the dragon’s shoulders?









