Introduction
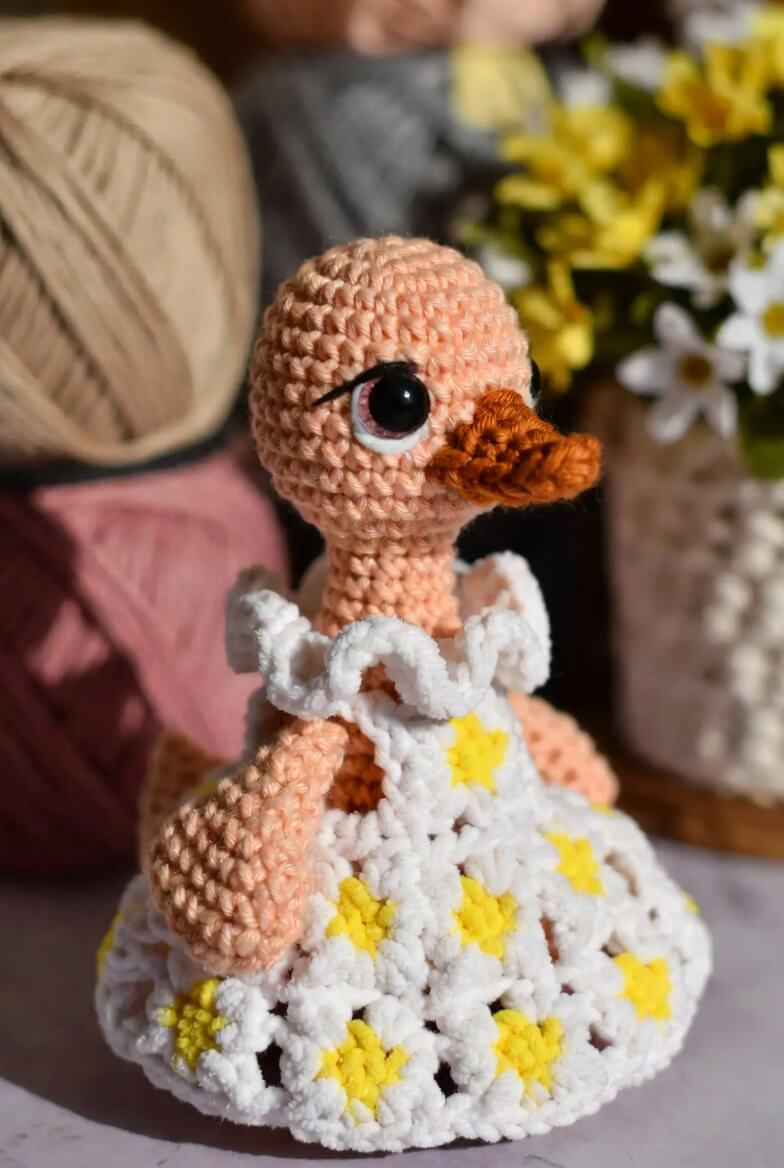
A duck’s bill must remain wider than its neck even after a flower collar is fitted beneath the head. This duck amigurumi crochet pattern uses DK cotton, a 3.5 mm hook and 15 mm safety eyes to create a figure approximately 23–25 cm tall. The intermediate project includes a shaped head, long neck, wings and modular daisy dress. Its removable garment also gives you direct access to the body seams.
The Design: What Makes Daisybell the Duck Different
Daisybell has a narrow cylindrical neck rather than the compressed head-and-body join used in many duck patterns. That choice leaves enough vertical space for the raised flower collar while keeping the face above the dress. The bill is crocheted as a shallow oval and folded, producing a recognisable duck profile without a thick stuffed muzzle. A 36-stitch head balances the large eyes but does not overpower the openwork skirt. The crochet duck in a dress also uses two differently posed wings: one hangs beside the skirt, while the other bends toward the bodice. A frequent error in a daisy duck crochet pattern is attaching the garment before checking neck alignment. Even a two-stitch rotation can place the dress opening under one wing instead of at the back. Pin the head, neck and dress centre lines together before any final seam is closed.
Project Info at a Glance
| Skill Level | Time | Finished Size | Hook | Best For |
|---|---|---|---|---|
| Intermediate | 10–13 hours | Approximately 23–25 cm | 3.5 mm | Display dolls and seasonal decor |
Materials and Tools
Yarn
- Peach — DK cotton or smooth light worsted — approximately 65 g — Scheepjes Catona, YarnArt Jeans or Paintbox Cotton DK.
- White — matching weight — approximately 45 g — used for eye surrounds, daisy petals, bodice and skirt.
- Yellow — matching weight — approximately 12 g — used for flower centres.
- Burnt orange — matching weight — approximately 10 g — used for the bill.
- Black — embroidery cotton — less than 1 g — used for eyelashes.
Tools
- 3.5 mm crochet hook
- 15 mm safety eyes
- Polyester stuffing
- Yarn needle
- Locking stitch markers
- Sewing pins
- Two 8 mm buttons for the optional dress closure
- Scissors
Replace plastic eyes and buttons with embroidered details when the finished object is intended for a child under three.
Abbreviations
- MR — magic ring
- sc — single crochet
- inc — two single crochet stitches in one stitch
- dec — invisible decrease over two stitches
- sl st — slip stitch
- ch — chain
- hdc — half double crochet
- dc — double crochet
- BLO — back loop only
- FO — fasten off
Work an invisible decrease through the front loops of the next two stitches, then complete one single crochet through both loops.
Pattern — Step by Step
Work the stuffed sections in a continuous spiral unless another method is stated. Move the stitch marker after every completed round.
Head
Yarn: peach — original shaping based on standard six-stitch amigurumi expansion.
R1: 6 sc in MR (6)
R2: inc × 6 (12)
R3: (sc, inc) × 6 (18)
R4: (2 sc, inc) × 6 (24)
R5: (3 sc, inc) × 6 (30)
R6: (4 sc, inc) × 6 (36)
R7–R14: sc around (36)
Place the safety eyes between R10 and R11, 8 visible stitches apart. Do not attach the washers until both eye patches have been tested around them.
R15: (4 sc, dec) × 6 (30)
R16: (3 sc, dec) × 6 (24)
R17: (2 sc, dec) × 6 (18)
Stuff firmly around the eye stems. Keep the lower opening circular for the neck seam.
R18: (sc, dec) × 6 (12)
R19: dec × 6 (6)
Fasten off. Draw the final six stitches closed and leave a 30 cm tail.
Body
Yarn: peach — medium 36-stitch plateau.
R1: 6 sc in MR (6)
R2: inc × 6 (12)
R3: (sc, inc) × 6 (18)
R4: (2 sc, inc) × 6 (24)
R5: (3 sc, inc) × 6 (30)
R6: (4 sc, inc) × 6 (36)
R7–R14: sc around (36)
R15: (4 sc, dec) × 6 (30)
R16–R18: sc around (30)
R19: (3 sc, dec) × 6 (24)
R20–R21: sc around (24)
R22: (2 sc, dec) × 6 (18)
Stuff the lower half firmly and the shoulder area moderately.
R23: (sc, dec) × 6 (12)
R24: dec × 6 (6)
Fasten off. Close the opening and leave a 35 cm assembly tail.
Neck
Yarn: peach. The narrow tube supports the head above the dress collar.
R1: 6 sc in MR (6)
R2: inc × 6 (12)
R3: (sc, inc) × 6 (18)
R4–R16: sc around (18)
R17: (sc, dec) × 6 (12)
Insert stuffing in small pieces. The finished tube should resist bending but should not become wider than 4 cm.
R18: dec × 6 (6)
Fasten off. Leave a 40 cm tail for joining the neck to the head.
Wings — Make 2
Yarn: peach. Shape one wing before sewing to create the raised pose.
R1: 6 sc in MR (6)
R2: inc × 6 (12)
R3: (sc, inc) × 6 (18)
R4–R7: sc around (18)
R8: (sc, dec) × 6 (12)
R9–R12: sc around (12)
R13: (2 sc, dec) × 3 (9)
Stuff the rounded tip only. Flatten the open edge.
R14: sc through both layers to close (4)
Fasten off. Leave a 30 cm tail on each wing.
Eye Patches — Make 2
Yarn: white. These flat rings reproduce the white borders visible around the eyes.
R1: 6 sc in MR (6)
R2: inc × 6 (12)
R3: (sc, inc) × 6 (18)
Fasten off. Stretch each circle gently around one eye position before installing the safety-eye washer. Sew only the outer edge to the head.
Beak
Yarn: burnt orange. Work around both sides of the foundation chain.
R1: ch 7; starting in the second ch from the hook, 5 sc, 3 sc in the final ch, work along the opposite side with 4 sc, inc (14)
R2: inc, 4 sc, inc × 3, 4 sc, inc × 2 (20)
R3–R4: sc around (20)
R5: (3 sc, dec) × 4 (16)
Do not stuff. Flatten the bill so the upper and lower layers align.
Fasten off. Leave a 35 cm tail.
Cheek Patches — Make 2
Yarn: peach in a slightly lighter tone, or use the main peach yarn for a low-contrast result.
R1: 6 sc in MR (6)
R2: inc × 6 (12)
Fasten off. Leave a 15 cm tail. Press each circle flat and position it beneath the outside corner of an eye patch.
Daisy Squares — Make 8
Yarn: yellow and white. Work each square in joined rounds.
R1: With yellow, 6 sc in MR, join with sl st (6)
R2: ch 1, inc × 6, join (12)
R3: Change to white; repeat [sl st in next st, ch 3, 2 dc in next st, ch 3, sl st in next st] four times to form four petals.
R4: Work behind the petals; repeat [ch 3, sc into the back of the next petal] four times.
R5: Into each ch-3 space work [3 dc, ch 2, 3 dc] to form four corners. Join with sl st.
R6: Work 3 sc across each side and [sc, ch 2, sc] in every corner space (20 sc plus four corner spaces).
Fasten off. Block each square to approximately 5 × 5 cm.
Dress Bodice
Yarn: white. Work in turning rows.
Row 1: ch 31; starting in the second ch, 30 sc (30)
Row 2: ch 1, turn, 30 sc (30)
Row 3: ch 1, turn, (4 sc, dec) × 5 (25)
Row 4: ch 1, turn, 25 sc (25)
Row 5: ch 1, turn, (3 sc, dec) × 5 (20)
Row 6: ch 1, turn, 20 sc (20)
Row 7: ch 1, turn, (2 sc, dec) × 5 (15)
Row 8–R10: ch 1, turn, 15 sc (15)
Fasten off. Leave a 35 cm tail.
Daisy Skirt
Use the eight completed daisy squares.
Arrange five squares around the lower row and three squares above them. Rotate the upper squares so their centres sit over the joins in the lower row. Whipstitch touching edges with white yarn, leaving a 4 cm opening at the back. Add one round of sc around the waist edge, spacing 30 sc evenly. Work two rounds of 30 sc, then attach the waist edge to the lower edge of the bodice.
Raised Daisy Collar
Yarn: white.
Join yarn to the upper bodice edge. Repeat [sl st in next st, ch 5, 3 dc in the same st, ch 5, sl st in next st] around the neckline to form approximately seven raised petals. Fasten off and arrange the petals so they curve away from the neck.
Back Closure Loops
Yarn: white.
Join yarn at the upper right back edge. Ch 6, sl st into the same edge stitch and fasten off. Repeat at the waist. Sew one button opposite each loop, or close the back permanently with mattress stitch.
Eyelashes
Yarn: black embroidery cotton.
Make one 12 mm upper-lid stitch above each eye. Add two outer lashes measuring 9 mm and 11 mm. Pass the yarn through the stuffed head before trimming so the knot remains inside.
Assembly
- Sew the lower end of the neck to the centre of the body, passing through complete stitches from both pieces.
- Position the head on the upper neck opening and check that the face points directly away from the body’s round marker line.
- Attach the eye patches, install the safety-eye washers and sew the outer patch edges flat.
- Place the cheek patches beneath the eyes, then sew the flattened beak between R11 and R14 of the head.
- Attach the left wing vertically between body R12 and R18 so its rounded end rests beside the skirt.
- Bend the right wing at its midpoint and sew the fold with two hidden stitches before attaching it toward the bodice.
- Join the eight daisy squares, complete the skirt waist and sew it to the bodice.
- Fit the dress over the body, centre the back opening and fasten the two loops or close the seam permanently.
- Crochet the raised neckline petals directly onto the bodice, keeping the back closure free.
- Embroider the eyelashes, weave every remaining tail through at least three internal stitch paths and trim the ends.
The finished duck should stand approximately 23–25 cm tall, with the flower skirt resting level around the base.
7 Technical Tips
- Rotated facial centre: A displaced round marker can shift the bill toward one eye. Mark the exact midpoint between the safety eyes before pinning the beak.
- Collapsing neck: Loose stuffing lets the 18-stitch neck bend beneath the 36-stitch head. Insert fibre in pieces no larger than 2 cm and test the neck after every three rounds of filling.
- Visible decrease ridges: Ordinary decreases can form diagonal bars on the peach head. Work through the front loops only and keep the loop height below 4 mm.
- Eye-patch distortion: Installing the eye washer before testing the white circle can stretch the patch unevenly. Place the patch first and confirm that at least one white stitch remains visible around the full eye.
- Unequal daisy squares: A variation greater than 5 mm makes the skirt hem buckle. Block all eight squares to the same 5 × 5 cm measurement before joining them.
- Restricted wing movement: Sewing through both surfaces of a flattened wing can make the arm project rigidly. Catch only the rear layer along the upper 3 cm of the seam.
- Loose yarn tails: Smooth cotton ends shorter than 8 cm may pull through open flower spaces. Weave each tail behind solid stitches rather than through chain arches.
Conclusion
Place the finished figure on a level surface and inspect the three main centre lines: bill, neck and back dress opening. The daisy squares should form an even lower edge, while the raised collar must sit below the beak without pushing the head backward. Record the finished height, actual yarn usage and square dimensions before making a second version. Pin the completed flower dress amigurumi project to Pinterest, then share a front and back view on Instagram with #DaisybellDuck. The next practical step is to test one spare daisy square as a matching bag or hat panel. Should Daisybell’s raised wing touch the centre flower or remain beside the neckline?









