Introduction
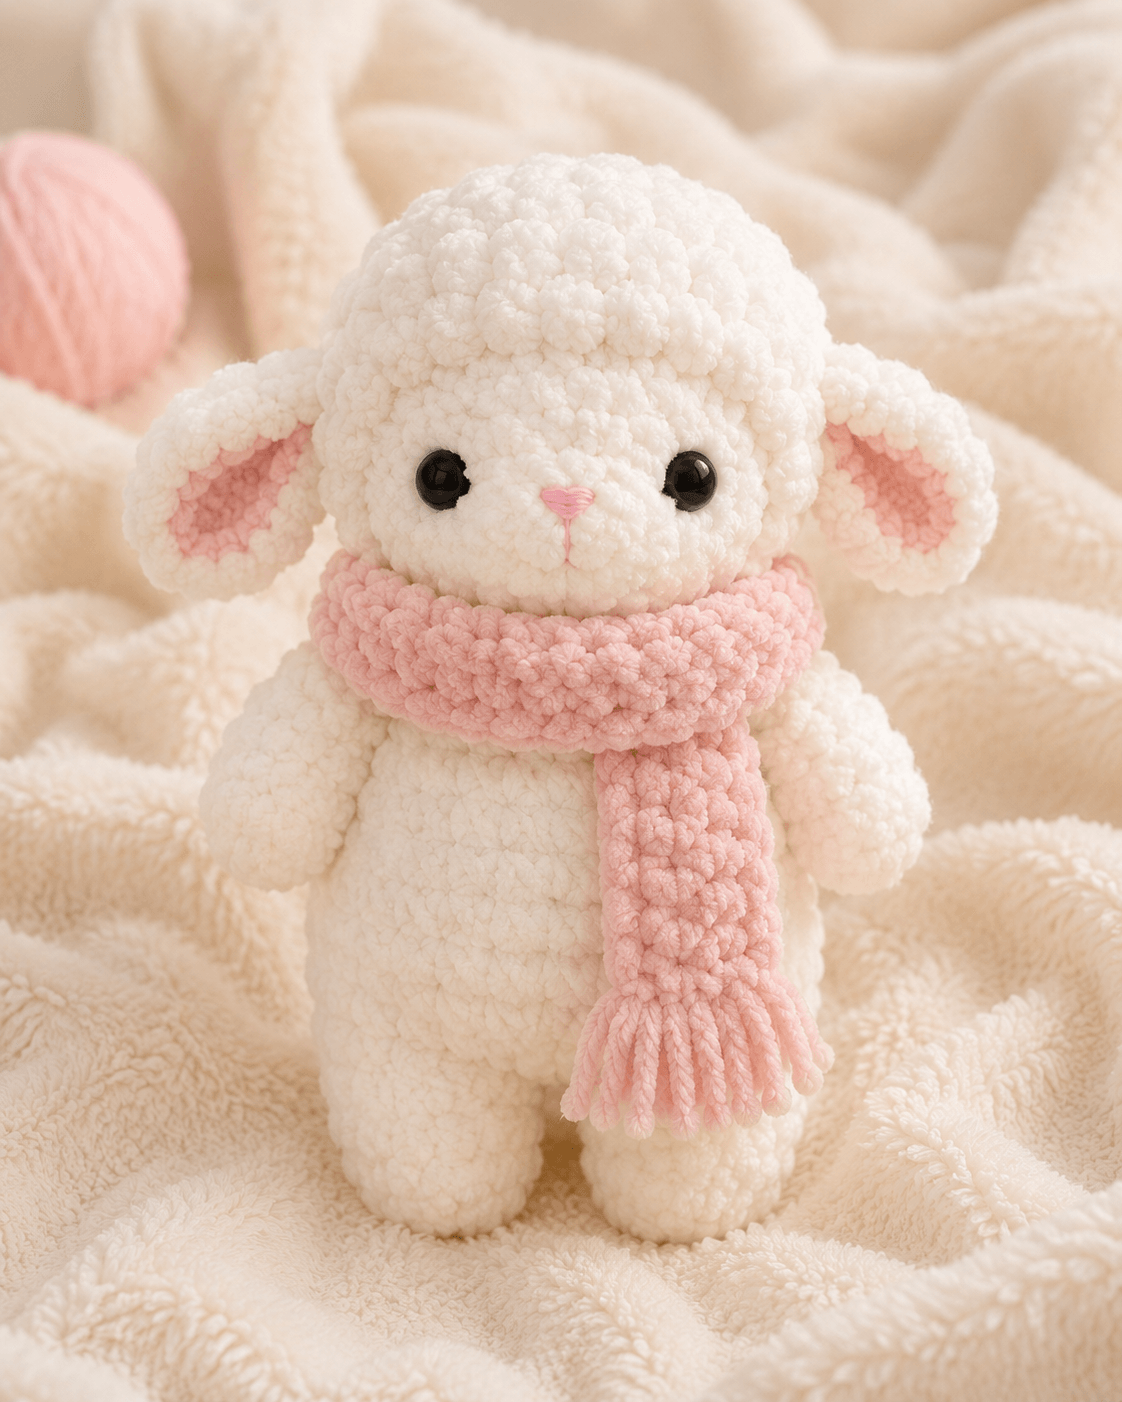
A lamb’s ears drop below the widest part of its fleece, so their attachment line controls the entire silhouette. This lamb amigurumi crochet pattern uses super-bulky chenille, a 4 mm hook, 14 mm eyes, and a removable pink scarf to produce a toy about 28 cm tall. The project suits an intermediate maker and creates a stable standing figure that works well as nursery décor.
The Design: What Makes This Lamb Different
The head is built as a smooth sphere and covered with a separate textured cap rather than crocheting bobbles into every head round. That choice keeps the face compact while creating a clear fleece boundary above the eyes. Low-set, layered ears widen the head without making the lamb look like a rabbit. A broad cylindrical body supports the oversized head, and the legs finish with flat lower rounds so the figure can stand after assembly. In this chunky lamb crochet pattern, the arms remain lightly stuffed to hang beside the torso instead of projecting forward. The removable scarf adds the strongest accent color without interrupting the white body. A frequent mistake in a velvet lamb amigurumi is sewing the ears too high; that placement narrows the skull and hides the lamb’s characteristic horizontal head shape.
Project Info at a Glance
| Skill Level | Time | Finished Size | Hook | Best For |
|---|---|---|---|---|
| Intermediate | 7–9 hours | About 28 cm | 4.0 mm | Nursery display and seasonal décor |
Materials and Tools
Yarn
- Warm white — category 6 super-bulky chenille — approximately 180 g — Himalaya Dolphin Baby or a comparable dense chenille.
- Blush pink — category 6 super-bulky chenille — approximately 65 g — use the same yarn family for matching gauge.
- Black — smooth DK cotton — less than 1 g — used only when embroidered eyes replace safety eyes.
- Pink embroidery thread — six-strand cotton — less than 1 g — for the nose and mouth.
Tools
- 4.0 mm crochet hook
- Two 14 mm safety eyes
- Polyester stuffing, approximately 90–110 g
- Yarn needle with a large eye
- Locking stitch markers
- Sharp scissors
- Long pins for placement
Safety eyes are not suitable for a toy intended for a child under three. Replace them with firmly embroidered eyes when the finished lamb will be handled by an infant or pet.
Abbreviations
- MR — magic ring
- sc — single crochet
- inc — two single crochets in one stitch
- dec — invisible single-crochet decrease
- sl st — slip stitch
- ch — chain
- BLO — back loop only
- FLO — front loop only
- hdc — half double crochet
An invisible decrease is worked through the front loops of the next two stitches before completing one single crochet through both loops.
Pattern — Step by Step
Work all stuffed pieces in a continuous spiral unless a joined round or turned row is stated. Place a marker in the first stitch and move it after every round.
Head
Yarn: warm white. Original shaping based on standard six-stitch amigurumi expansion.
R1: 6 sc in MR (6)
R2: inc ×6 (12)
R3: (sc, inc) ×6 (18)
R4: (2 sc, inc) ×6 (24)
R5: (3 sc, inc) ×6 (30)
R6: (4 sc, inc) ×6 (36)
R7–R13: sc around (36)
R14: (4 sc, dec) ×6 (30)
Insert the 14 mm eyes between R10 and R11, approximately nine visible stitches apart. Add the washers before further decreasing.
R15: (3 sc, dec) ×6 (24)
R16: (2 sc, dec) ×6 (18)
Stuff the head firmly, concentrating filling at the upper sides rather than behind the muzzle.
R17: (sc, dec) ×6 (12)
R18: dec ×6 (6)
R19: sc around (6)
R20: dec ×3 (3)
R21: close the remaining opening.
Fasten off and weave in the tail.
Muzzle
Yarn: warm white. Make one.
R1: 6 sc in MR (6)
R2: inc ×6 (12)
R3: (sc, inc) ×6 (18)
R4–R5: sc around (18)
R6: (sc, dec) ×6 (12)
Add a small amount of stuffing. The muzzle should remain shallow.
Fasten off, leaving a 25 cm sewing tail.
Fleece Cap
Yarn: warm white. The cap is a separate shell that creates the raised wool line visible in the photograph.
R1: 6 sc in MR (6)
R2: inc ×6 (12)
R3: (sc, inc) ×6 (18)
R4: (2 sc, inc) ×6 (24)
R5: (3 sc, inc) ×6 (30)
R6: (4 sc, inc) ×6 (36)
R7: FLO (sl st, ch 2, hdc in the same stitch, sl st in the next stitch) ×18 (36 base stitches)
R8: Work behind R7 into the unused back loops: sc around (36)
Fasten off, leaving a 40 cm tail. The decorative loops from R7 form an irregular fleece edge across the forehead.
Body
Yarn: warm white. Use the full 36-stitch plateau for a medium plush body.
R1: 6 sc in MR (6)
R2: inc ×6 (12)
R3: (sc, inc) ×6 (18)
R4: (2 sc, inc) ×6 (24)
R5: (3 sc, inc) ×6 (30)
R6: (4 sc, inc) ×6 (36)
R7–R15: sc around (36)
R16: (4 sc, dec) ×6 (30)
R17–R19: sc around (30)
R20: (3 sc, dec) ×6 (24)
R21–R22: sc around (24)
R23: (2 sc, dec) ×6 (18)
Stuff the lower body firmly and the neck area more densely. A firm neck limits head movement after sewing.
R24: (sc, dec) ×6 (12)
R25: sc around (12)
Fasten off, leaving a 40 cm tail for joining the head.
Arms (Make 2)
Yarn: warm white.
R1: 6 sc in MR (6)
R2: inc ×6 (12)
R3–R5: sc around (12)
R6: (2 sc, dec) ×3 (9)
R7–R13: sc around (9)
Stuff only the lower two-thirds. Flatten the opening and work 4 sc through both layers.
Fasten off, leaving a 25 cm tail.
Back Legs (Make 2)
Yarn: warm white. These legs support the standing pose.
R1: 6 sc in MR (6)
R2: inc ×6 (12)
R3: (sc, inc) ×6 (18)
R4: BLO sc around (18)
R5–R7: sc around (18)
R8: (sc, dec) ×6 (12)
R9–R14: sc around (12)
Stuff firmly through R10. Add less filling at the top so the seam can sit flat against the body.
Flatten the opening and work 6 sc through both layers. Fasten off, leaving a 30 cm tail.
Outer Ears (Make 2)
Yarn: warm white.
R1: 6 sc in MR (6)
R2: inc ×6 (12)
R3: (sc, inc) ×6 (18)
R4–R6: sc around (18)
R7: (sc, dec) ×6 (12)
R8–R9: sc around (12)
Do not stuff. Flatten each ear and work 6 sc through both layers. Fasten off, leaving a 30 cm tail.
Inner Ear Patches (Make 2)
Yarn: blush pink. Work in turned rows.
Row 1: ch 5, sc in the second ch from the hook and across (4)
Row 2: ch 1, turn, inc, 2 sc, inc (6)
Rows 3–5: ch 1, turn, sc across (6)
Row 6: ch 1, turn, dec, 2 sc, dec (4)
Row 7: ch 1, turn, dec ×2 (2)
Fasten off, leaving a 20 cm tail. Sew one patch to the center of each outer ear without stretching either layer.
Cheek Patches (Make 2)
Yarn: blush pink. These optional flat circles create a stronger illustrated expression.
R1: 6 sc in MR (6)
R2: inc ×6 (12)
Join with a sl st. Fasten off, leaving a 15 cm sewing tail. The photographed lamb has very subtle cheeks, so omit these circles for the closest match or attach them lightly below the outer corners of the eyes.
Tail
Yarn: warm white.
R1: 6 sc in MR (6)
R2: inc ×6 (12)
R3–R4: sc around (12)
R5: dec ×6 (6)
Add a small amount of stuffing. Fasten off, leaving a 20 cm tail.
Pink Scarf
Yarn: blush pink. Work in turned rows.
Row 1: ch 8, sc in the second ch from the hook and across (7)
Rows 2–57: ch 1, turn, BLO sc across (7)
Fasten off and weave in both ends. Cut fourteen strands measuring 12 cm each. Fold two strands together and attach one pair through each stitch at both short ends, producing seven fringe groups per end. Trim the finished fringe to 4.5 cm.
Assembly
- Center the head opening over the body’s 12-stitch neck and sew through every body stitch twice.
- Place the fleece cap over the top of the head with its decorative edge crossing the forehead between R7 and R8 of the head.
- Stitch the cap around its back edge, then secure several hidden points across the crown to stop rotation.
- Pin the muzzle between the eyes with its upper edge approximately one round below the eye line; sew around it while adding the final stuffing.
- Embroider a horizontal pink nose 1.2 cm wide, then add one vertical stitch and two short curved mouth stitches.
- Attach each ear beneath the fleece edge, with the upper base level with the eyes and the tips angled slightly downward.
- Sew the arms to the body between R19 and R21, leaving roughly nine body stitches between their front edges.
- Pin the legs beneath the lower body, check that both feet touch a flat surface, and sew each top edge through two body rounds.
- Attach the tail at the center back between body R8 and R10.
- Wrap the scarf once around the neck, cross the ends at the front, and pass one end beneath the other without stitching it to the lamb.
The completed figure should stand at approximately 28 cm when made at the stated yarn scale and tension.
7 Technical Tips
- Spiral drift: A missing stitch marker can move the decrease line several stitches sideways before the head closes. Place a locking marker in the first stitch of every round rather than relying on the visible yarn spiral.
- Soft neck: Loose stuffing in the upper 3 cm of the body causes the head to tilt after the scarf is added. Pack the neck until finger pressure produces no cavity, but stop before the stitches spread.
- Visible decrease bars: Standard decreases create horizontal ridges in pale chenille. Work each decrease through the front loops only and keep the final yarn-over slightly tighter than an ordinary single crochet.
- Misaligned eyes: Attaching the washers before checking the muzzle can leave the face off-center. Temporarily place both eyes between R10 and R11, pin the muzzle, and confirm the nine-stitch eye spacing first.
- Uneven velvet tension: Pulling chenille tightly can strip the pile from its core or produce holes beside increases. Keep each working loop near the 4 mm shaft diameter and remake any stitch whose core thread becomes exposed.
- Rotated legs: Sewing one leg before positioning the second often creates a rocking base. Pin both legs, set the lamb on a table, and keep the outer edges approximately 8 cm apart before stitching.
- Loose woven tails: Chenille ends can retreat through the fabric because the pile compresses. Weave each tail in three directions across at least 5 cm, split through an internal stuffing layer, then trim after applying light tension.
Conclusion
Check the standing balance before trimming yarn tails or setting the scarf’s final fringe length. The lower body should rest between the legs rather than behind them, and both ear tips should fall near the muzzle’s horizontal center. Photograph the finished lamb from the front and side so any rotation in the fleece cap, muzzle, or legs is visible. Correct those placements before the final knots are buried. Save the lamb amigurumi crochet pattern to Pinterest, then share the completed version on Instagram with #BlushScarfLamb. For the next version, record the finished height and actual yarn usage. Should this lamb’s ears hang level with the eyes or one round lower?









