Introduction
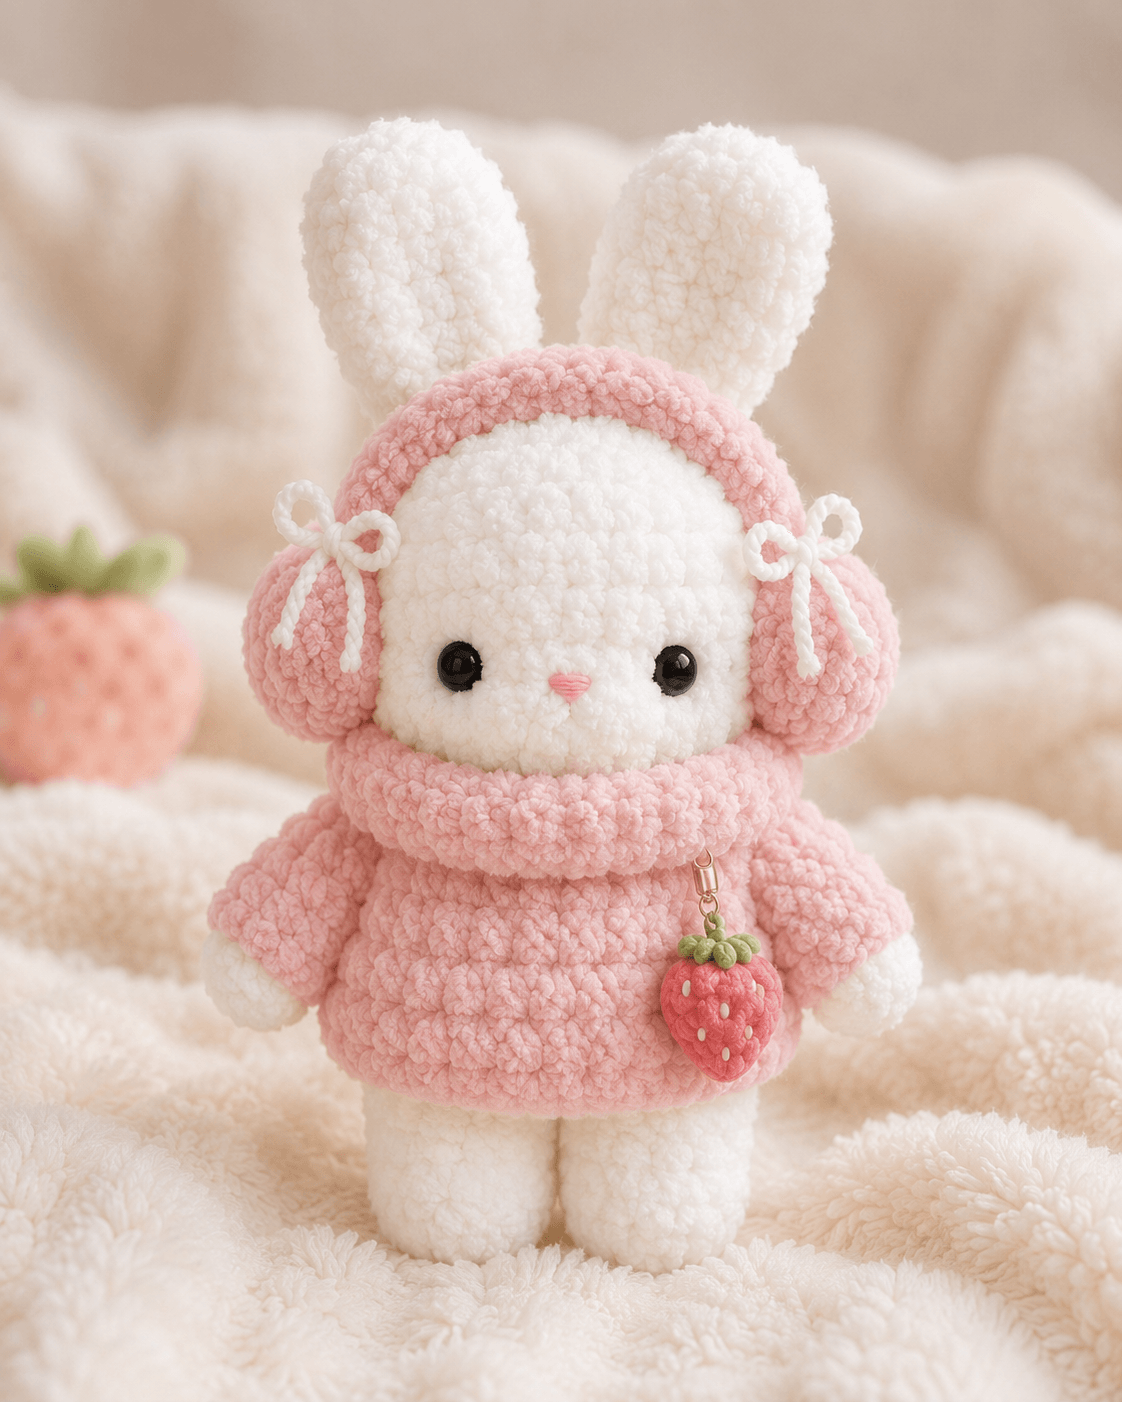
A rabbit’s ears cannot disappear inside winter earmuffs, so this construction places the band in front of them instead. This winter bunny amigurumi crochet pattern uses chunky chenille yarn, a 4 mm hook and 9 mm safety eyes to produce a figure about 26 cm tall. The project suits an intermediate maker and provides a practical way to practise fitted accessories without altering the core bunny body.
The Design: What Makes the Winter Bunny Different
The head uses a 36-stitch plateau, giving the face enough width for large eyes while keeping the muzzle compact. Both ears are lightly stuffed at their tips and left flatter at the bases, which lets them remain upright behind the earmuff band. The body has a rounded sweater silhouette rather than a narrow rabbit torso; that extra width supports the cowl and prevents the strawberry charm from pulling the figure forward. Separate white legs create a visible boundary below the pink garment. A frequent mistake in a crochet bunny with earmuffs is sewing the pads too high, where they cover the ear bases instead of sitting beside the cheeks. This chunky bunny amigurumi avoids that problem by placing the pad centres level with the eyes and positioning the band afterward.
Project Info at a Glance
| Skill Level | Time | Finished Size | Hook | Best For |
|---|---|---|---|---|
| Intermediate | 7–9 hours | Approximately 26 cm | 4 mm | Accessory shaping and chenille-yarn practice |
Materials and Tools
Yarn
- White — chunky chenille yarn — approximately 70 g — Himalaya Dolphin Baby, Premier Parfait Chunky or a comparable yarn.
- Blush pink — chunky chenille yarn — approximately 50 g — use the same yarn line as the white.
- Strawberry red — DK cotton — approximately 5 g — Scheepjes Catona or a comparable smooth cotton.
- Leaf green — DK cotton — approximately 2 g.
- Embroidery pink — cotton strand — less than 1 g for the nose.
- White cotton — DK or sport weight — approximately 3 g for the earmuff ties and strawberry seeds.
Tools
- 4 mm crochet hook for all chunky chenille pieces.
- 2.5 mm crochet hook for the strawberry charm and leaf cap.
- 9 mm safety eyes, one pair.
- Polyester stuffing, approximately 55–65 g.
- Yarn needle with a large eye.
- Locking stitch markers.
- Dressmaking pins.
- Small lobster clasp or split ring for the charm.
Abbreviations
- MR — magic ring
- sc — single crochet
- inc — two single crochets in one stitch
- dec — single-crochet decrease
- sl st — slip stitch
- ch — chain
- BLO — back loop only
- FLO — front loop only
For an invisible decrease, insert the hook through the front loops of the next two stitches, yarn over, pull through both front loops, then finish the single crochet.
Pattern — Step by Step
Work in a continuous spiral unless a section states otherwise. Place the marker in the first stitch of every round.
Head
Yarn: white — shaping uses standard six-point amigurumi math.
R1: 6 sc in MR (6)
R2: inc ×6 (12)
R3: (1 sc, inc) ×6 (18)
R4: (2 sc, inc) ×6 (24)
R5: (3 sc, inc) ×6 (30)
R6: (4 sc, inc) ×6 (36)
R7–R13: sc around (36)
R14: (4 sc, dec) ×6 (30)
R15: (3 sc, dec) ×6 (24)
R16: (2 sc, dec) ×6 (18)
Insert the 9 mm safety eyes between R10 and R11, 7 visible stitches apart. Embroider the nose between R11 and R12. Stuff the head firmly, adding small pieces around the eye posts.
R17: (1 sc, dec) ×6 (12)
R18: dec ×6 (6)
Fasten off. Leave a 20 cm tail and close the opening through the front loops.
Cheek Patches (Make 2)
Yarn: pale pink DK cotton — flat-circle construction.
R1: 6 sc in MR (6)
R2: inc ×6 (12)
Fasten off. Leave a 15 cm tail. Flatten each circle and sew it below the outer edge of one eye; omit the patches when an all-white face is preferred.
Body in Sweater Pink
Yarn: blush pink — shaping uses standard six-point amigurumi math.
R1: 6 sc in MR (6)
R2: inc ×6 (12)
R3: (1 sc, inc) ×6 (18)
R4: (2 sc, inc) ×6 (24)
R5: (3 sc, inc) ×6 (30)
R6: (4 sc, inc) ×6 (36)
R7–R12: sc around (36)
R13: (4 sc, dec) ×6 (30)
R14–R15: sc around (30)
R16: (3 sc, dec) ×6 (24)
R17: sc around (24)
R18: (2 sc, dec) ×6 (18)
Stuff the lower half firmly. Use less stuffing near the neck so the head seam remains flat.
R19: (1 sc, dec) ×6 (12)
R20: dec ×6 (6)
Fasten off. Leave a 25 cm tail for attaching the head.
Front Legs and Sleeved Arms (Make 2)
Begin with white, then change to blush pink.
R1: 6 sc in MR with white (6)
R2: inc ×6 (12)
R3–R4: sc around (12)
R5: (2 sc, dec) ×3 (9)
R6: change to blush pink, BLO sc around (9)
R7–R10: sc around (9)
R11: (1 sc, dec) ×3 (6)
Stuff the white paw firmly and place only a small amount of stuffing in the sleeve. Flatten the final round.
Fasten off. Leave a 25 cm tail for sewing.
Back Legs (Make 2)
Yarn: white.
R1: 6 sc in MR (6)
R2: inc ×6 (12)
R3: (1 sc, inc) ×6 (18)
R4–R7: sc around (18)
R8: (1 sc, dec) ×6 (12)
R9–R11: sc around (12)
R12: dec ×6 (6)
Stuff each leg firmly through R8. Keep the final three rounds slightly softer so the legs can be sewn beneath the body without creating a hard ridge.
Fasten off. Leave a 30 cm tail.
Upright Ears (Make 2)
Yarn: white. Both ears use a 12-stitch central plateau rather than the 36-stitch body plateau because they are narrow appendages.
R1: 6 sc in MR (6)
R2: inc ×6 (12)
R3–R10: sc around (12)
R11: (2 sc, dec) ×3 (9)
R12–R14: sc around (9)
R15: (1 sc, dec) ×3 (6)
Add a small amount of stuffing to the top third only. Flatten the base and align the final three stitches with the next three stitches.
Fasten off. Leave a 30 cm tail.
Earmuff Pads (Make 2)
Yarn: blush pink.
R1: 6 sc in MR (6)
R2: inc ×6 (12)
R3: (1 sc, inc) ×6 (18)
R4–R5: sc around (18)
R6: (1 sc, dec) ×6 (12)
R7: dec ×6 (6)
Stuff each pad lightly. The finished pad should remain rounded but compress when pressed against the head.
Fasten off. Leave a 25 cm tail.
Earmuff Band
Yarn: blush pink. Work in joined rows.
Row 1: ch 31, sc in second ch from hook and across (30)
Row 2: ch 1, turn, sc across (30)
Row 3: ch 1, turn, sc across (30)
Fasten off. Leave a 30 cm tail. Measure the strip across the head before sewing; chenille yarn can alter the finished length by several centimetres.
Earmuff Ties (Make 2)
Yarn: white DK cotton.
Ch 22. Sl st in the second chain from the hook and in each remaining chain (21).
Fasten off. Leave a 15 cm tail. Tie each cord into a small bow only after it has been secured beside an earmuff pad.
Thick Cowl
Yarn: blush pink. Work in joined rounds.
Ch 37 and join with sl st, taking care not to twist.
R1: ch 1, sc in each chain, join (36)
R2: ch 1, BLO sc around, join (36)
R3–R5: ch 1, sc around, join (36)
Fasten off. Weave in both tails. Fold the top edge outward by approximately 1.5 cm after placing the cowl around the neck.
Strawberry Charm
Yarn: strawberry red DK cotton; 2.5 mm hook.
R1: 6 sc in MR (6)
R2: inc ×6 (12)
R3: (1 sc, inc) ×6 (18)
R4–R5: sc around (18)
R6: (1 sc, dec) ×6 (12)
R7: sc around (12)
R8: dec ×6 (6)
R9: sc around (6)
Stuff lightly before R8. Embroider six to eight white seed stitches across the red surface.
Fasten off. Leave a 15 cm tail and close the opening.
Strawberry Leaf Cap
Yarn: leaf green DK cotton.
R1: 6 sc in MR (6)
R2: (sl st, ch 3, sl st in second ch from hook, sc in next ch, sl st in next base stitch) ×3
Fasten off. Leave a 15 cm tail. Sew the leaf cap to the strawberry and attach the clasp through the centre.
Assembly
- Sew the head to the body through the 12-stitch neck area, adding a final pinch of stuffing before closing the seam.
- Pin the ears to the top of the head between head rounds 3 and 6, leaving approximately four stitches between their inner edges.
- Sew each ear base twice across the same line so the upright position does not depend on stuffing alone.
- Attach the cheek patches below the eyes, then complete the nose with three or four horizontal pink stitches and one short vertical stitch.
- Sew the arms to the sides of the body between body rounds 15 and 17, keeping the white paws angled slightly forward.
- Attach the back legs beneath body rounds 5 through 8, with a gap of two to three stitches between the inner edges.
- Place the cowl around the neck and tack its lower edge to the body at the back and both sides.
- Position each earmuff pad beside the face with its centre level with the safety eyes, then stitch it to the head.
- Run the earmuff band in front of the ear bases, sew each end behind a pad and attach one white bow beside each pad.
- Clip the strawberry charm to the lower edge of the cowl and weave every remaining yarn tail through at least five centimetres of dense fabric.
The completed figure should stand at approximately 26 cm when measured from the feet to the tips of the ears.
7 Technical Tips
- Marker drift: Chenille stitches can hide the first stitch and move the apparent round opening. Use a locking marker in the first stitch and a second marker every six stitches during increase and decrease rounds.
- Soft neck failure: Loose stuffing directly below the head causes the neck seam to fold. Pack the upper body to roughly 80 percent of the firmness used in the head, then add stuffing through the final seam.
- Visible decrease gaps: Standard decreases can expose stuffing between the front-facing loops. Work every head and body decrease through the front loops only.
- Incorrect eye timing: Installing the eyes after R16 leaves too little access for the washers. Insert them between R10 and R11 before the head opening decreases below 24 stitches.
- Velvet tension changes: Pulling one round tighter than the next can make the head lean. Measure six stitches across the plateau; they should remain within approximately 5 mm of the same width on each checked round.
- Uneven accessory placement: Sewing one earmuff before checking the second can shift the face visually. Pin both pad centres level with the eyes and compare them from the front, top and side before stitching.
- Escaping yarn tails: Chenille ends can work loose because the core is smooth. Weave each structural tail in three directions across at least five centimetres, then split the tail and knot the strands inside the fabric.
Conclusion
Check the ear spacing, pad height and leg alignment before treating the winter bunny as finished. The next concrete step is to work a six-stitch yarn sample with the selected chenille and compare its density with the head fabric; a loose sample calls for a smaller hook. Photograph the figure from the front and one three-quarter angle for Pinterest, then share the finished winter bunny amigurumi crochet pattern project on Instagram with #WinterEarmuffBunny. Which detail will define your version: longer ears, a wider cowl or a second strawberry charm attached to the opposite side?









