Introduction
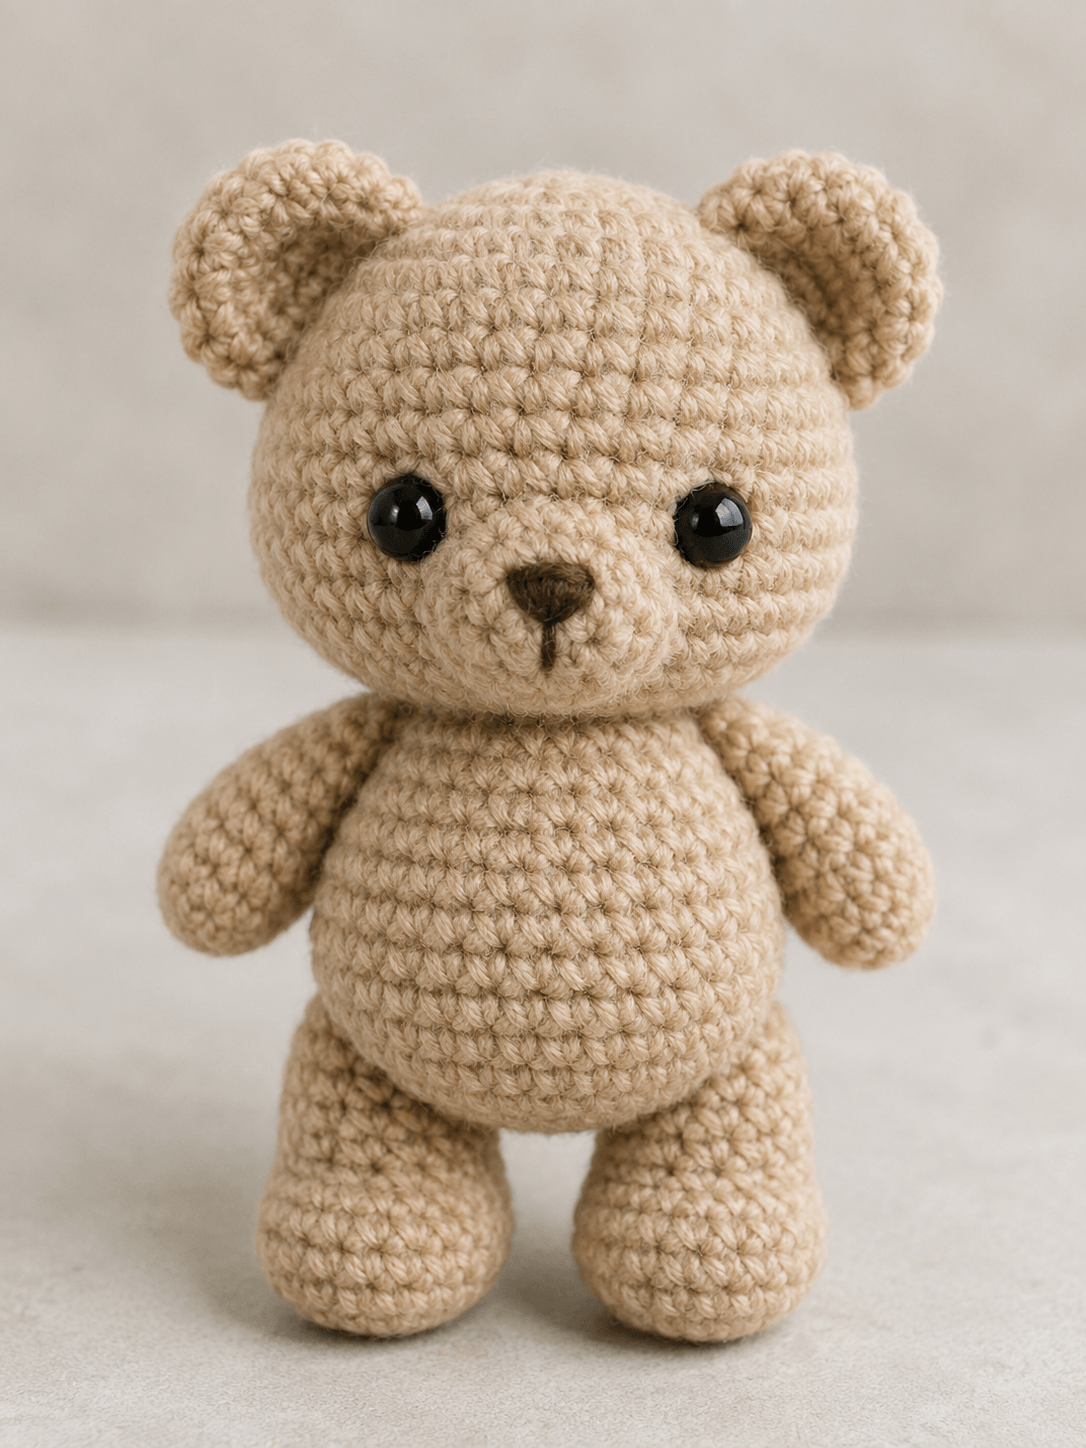
A teddy bear stops reading as a bear when its ears sit too low or its muzzle lies flat against the face. This teddy bear amigurumi crochet pattern uses worsted yarn, a 3.75 mm hook and separate shaped components to control both features. The finished figure measures approximately 25 cm and requires intermediate assembly skills. Broad feet also let it stand during product photography without an internal frame.
The Design: What Makes This Teddy Bear Different
The head expands to 42 stitches, creating the broad forehead visible in the reference image without making the body equally wide. A separate shallow muzzle supplies projection and gives the embroidered nose a firm base. Each ear is worked as a lightly cupped circle rather than a flat disc; this preserves the rounded outer edge associated with a classic amigurumi bear. The legs begin with wide feet and narrow above the ankle, allowing the standing crochet bear to rest on four broad contact areas. One frequent error is sewing the arms directly beneath the head. That position compresses the shoulders and makes the body appear triangular. Set the arms below the neck seam, angle them slightly forward and leave enough clearance for the upper body to remain visible.
Project Info at a Glance
| Skill Level | Time | Finished Size | Hook | Best For |
|---|---|---|---|---|
| Intermediate | 7–9 hours | Approximately 25 cm | 3.75 mm | Display, photography and decorative toy collections |
The selected scale follows indexed 25 cm teddy listings. The hook, yarn weight and eye diameter come from a published worsted-weight pattern that specifies a 3.75 mm hook and 12 mm safety eyes.
Materials and Tools
Yarn
- Light beige — worsted/category 4 — approximately 120 g — Paintbox Yarns Simply Aran, Stylecraft Special Aran or a similar smooth yarn
- Dark brown — DK or worsted — less than 5 g — tightly twisted cotton or acrylic for the nose and mouth
Choose a yarn with visible stitch definition. The photographed bear has a lightly fibrous surface, but the individual single crochet stitches remain distinct. Brushed mohair and dense chenille obscure the round boundaries required for measured eye placement. A published teddy pattern uses about 120 g of size-four yarn, while a larger Stone Washed XL version reports 150 g.
Tools
- 3.75 mm crochet hook
- Two 12 mm black safety eyes
- Polyester fiberfill
- Blunt yarn needle
- Locking stitch markers
- Dressmaking pins
- Scissors
Use embroidered eyes instead of safety eyes when the finished item will be handled by a child under three. Plastic eye backs remain internal components rather than removable decorative buttons, but they are still unsuitable for that age group.
Abbreviations
- MR — magic ring
- sc — single crochet
- inc — work two single crochet stitches in one stitch
- dec — single crochet two stitches together
- sl st — slip stitch
- ch — chain
- BLO — back loop only
- FO — fasten off
For an invisible decrease, insert the hook through the front loops of the next two stitches, yarn over, pull through both loops and complete one single crochet.
Pattern — Step by Step
Work in a continuous spiral unless a section states otherwise. Mark the first stitch of every round. This original construction uses six-stitch increase and decrease intervals, with a 42-stitch plateau for the large head and body.
Head
Yarn: light beige — Source: standard six-increase amigurumi construction, scaled to the photographed head.
R1: 6 sc in MR (6)
R2: inc ×6 (12)
R3: (sc, inc) ×6 (18)
R4: (2 sc, inc) ×6 (24)
R5: (3 sc, inc) ×6 (30)
R6: (4 sc, inc) ×6 (36)
R7: (5 sc, inc) ×6 (42)
R8–R14: sc around (42)
R15: (5 sc, dec) ×6 (36)
R16: sc around (36)
Insert the 12 mm eyes between R11 and R12. Leave seven visible stitches between their inner edges, then check the position with the muzzle pinned below them.
R17: (4 sc, dec) ×6 (30)
R18: (3 sc, dec) ×6 (24)
R19: (2 sc, dec) ×6 (18)
Stuff the upper dome first. Pack small pieces around the eye posts without forcing the eyes outward.
R20: (sc, dec) ×6 (12)
R21: dec ×6 (6)
Fasten off. Leave a 20 cm tail, pass it through the front loops of the remaining stitches and close the opening.
Body
Yarn: light beige — Source: standard amigurumi math with a 42-stitch large-size plateau.
R1: 6 sc in MR (6)
R2: inc ×6 (12)
R3: (sc, inc) ×6 (18)
R4: (2 sc, inc) ×6 (24)
R5: (3 sc, inc) ×6 (30)
R6: (4 sc, inc) ×6 (36)
R7: (5 sc, inc) ×6 (42)
R8–R13: sc around (42)
R14: (5 sc, dec) ×6 (36)
R15–R16: sc around (36)
R17: (4 sc, dec) ×6 (30)
R18: sc around (30)
R19: (3 sc, dec) ×6 (24)
R20: (2 sc, dec) ×6 (18)
Fill the lower body firmly. Keep the top three rounds slightly softer so the head can settle against the neck seam.
R21: (sc, dec) ×6 (12)
R22: dec ×6 (6)
Fasten off. Leave a 30 cm tail for sewing the body to the head.
Arms — Make 2
Yarn: light beige — Source: original shaping based on the short tapered arms visible in the photo.
R1: 6 sc in MR (6)
R2: inc ×6 (12)
R3: (sc, inc) ×6 (18)
R4–R6: sc around (18)
R7: (sc, dec) ×6 (12)
R8–R12: sc around (12)
R13: (2 sc, dec) ×3 (9)
Stuff the hand and lower arm firmly. Place only a thin layer of filling in the final three rounds so the shoulder lies flat.
Flatten the opening and work 4 sc through both layers (4). Fasten off. Leave a 25 cm sewing tail.
Back Legs — Make 2
Yarn: light beige — Source: original broad-foot construction.
R1: 6 sc in MR (6)
R2: inc ×6 (12)
R3: (sc, inc) ×6 (18)
R4: (2 sc, inc) ×6 (24)
R5: BLO sc around (24)
R6–R7: sc around (24)
R8: (2 sc, dec) ×6 (18)
R9: sc around (18)
R10: (sc, dec) ×6 (12)
R11–R14: sc around (12)
Pack R1–R8 firmly, shaping the foot into a broad oval. Add lighter stuffing above R10 to retain a defined ankle.
Flatten the opening and work 6 sc through both layers (6). Fasten off. Leave a 30 cm sewing tail.
Ears — Make 2
Yarn: light beige — Published bear patterns commonly use unstuffed circular ears that expand from 6 to 18 stitches.
R1: 6 sc in MR (6)
R2: inc ×6 (12)
R3: (sc, inc) ×6 (18)
R4: (2 sc, inc) ×6 (24)
R5: sc around (24)
Do not stuff. Fold the circle slightly so the final round curves inward and forms a shallow cup.
Fasten off. Leave a 30 cm tail for sewing.
Muzzle
Yarn: light beige — Source: original shallow-dome construction.
R1: 6 sc in MR (6)
R2: inc ×6 (12)
R3: (sc, inc) ×6 (18)
R4: (2 sc, inc) ×6 (24)
R5–R6: sc around (24)
Add enough stuffing to raise the center by approximately 15 mm. Keep the outer round flat against the head.
Fasten off. Leave a 35 cm tail for sewing.
Cheek Patches — Make 2
Yarn: light beige — Source: standard flat-circle math. These pieces are optional because they match the head color.
R1: 6 sc in MR (6)
R2: inc ×6 (12)
Join with a sl st. Fasten off and leave a 15 cm sewing tail. Press each patch flat before positioning it beside the muzzle.
Tail
Yarn: light beige — Source: original compact spherical tail.
R1: 6 sc in MR (6)
R2: inc ×6 (12)
R3: (sc, inc) ×6 (18)
R4–R5: sc around (18)
R6: (sc, dec) ×6 (12)
R7: dec ×6 (6)
Stuff lightly before the final decrease round.
Fasten off. Leave a 25 cm tail for attachment.
Assembly
- Pin the head to the narrow end of the body with the face centered over the belly. Sew one complete circuit through corresponding head and body stitches.
- Make a second neck circuit 3 mm outside the first seam. This limits sideways movement without creating a visible collar.
- Center the muzzle beneath the eyes, placing its top edge one round below the eye line. Pin it at the top, bottom and both sides.
- Sew three-quarters of the muzzle perimeter, add the final stuffing and close the remaining section with small horizontal stitches.
- Embroider a dark brown inverted triangle measuring approximately 12 mm wide. Work one vertical stitch beneath it and divide the lower end into two short mouth lines.
- Attach the optional cheek patches beside the muzzle. Use matching yarn and catch only the outer loops so the seam remains flat.
- Pin the arms between body rounds 17 and 19. Angle each arm forward by about 10 degrees before sewing through the flattened upper edge.
- Set the legs beneath the lower third of the body with approximately 18 mm between their inner edges. Test the stance on a flat surface before completing the seams.
- Sew the ears between head rounds 5 and 9. Keep their upper edges approximately 20 mm apart and point each cupped opening slightly forward.
- Attach the tail to the center back between body rounds 9 and 12, then bury all remaining yarn tails through at least 4 cm of stuffed fabric.
The completed bear should stand approximately 25 cm high with both feet resting fully on the work surface.
7 Technical Tips
- Spiral-round drift: Move the stitch marker after the first stitch of every round. Losing one stitch at R8 can shift the facial center by more than 10 mm before the head closes.
- Flattened forehead: Add stuffing in pieces no larger than a walnut. One oversized clump creates a hard ridge across the 42-stitch plateau.
- Visible decrease lines: Work decreases through front loops only and keep the working yarn beneath the hook shaft. Standard decreases form bars that remain visible around the lower head.
- Incorrect eye timing: Install the safety-eye backs before completing R17. A 30-stitch opening gives insufficient finger clearance for controlled pressure on a 12 mm washer.
- Loose worsted tension: Keep stitch openings below 1 mm when the fabric is stretched lightly. Larger gaps expose fiberfill around the muzzle and feet.
- Rotated limb placement: Pin both legs at four points and measure the 18 mm inner gap before sewing. A difference of one body stitch can make the bear lean sideways.
- Escaping tails: Pass each sewing tail through at least two changes of direction inside the stuffing. A single straight pass can work back through the fabric under repeated handling.
Conclusion
Measure the finished head width, total height and distance between the feet before changing yarn brands. Those three figures show whether a later bear differs because of gauge, stuffing or assembly placement. For the next version, alter only one variable: hook size, yarn thickness or eye spacing. Pin this teddy bear amigurumi crochet pattern with a full front view, then post a side profile on Instagram using #ClassicStandingTeddy. The side image should show the muzzle projection and arm angle clearly. Which ear treatment fits your bear more accurately: a shallow forward-facing cup or a flatter circle sewn against the head?
Sources
- Etsy teddy pattern: yarn, hook, yarn quantity and eye size
- Ravelry classic teddy bear specifications
- Published 42-stitch head and circular ear construction
- Published teddy-bear head and body count reference
- Teddy bear yarn-consumption reference









