Introduction
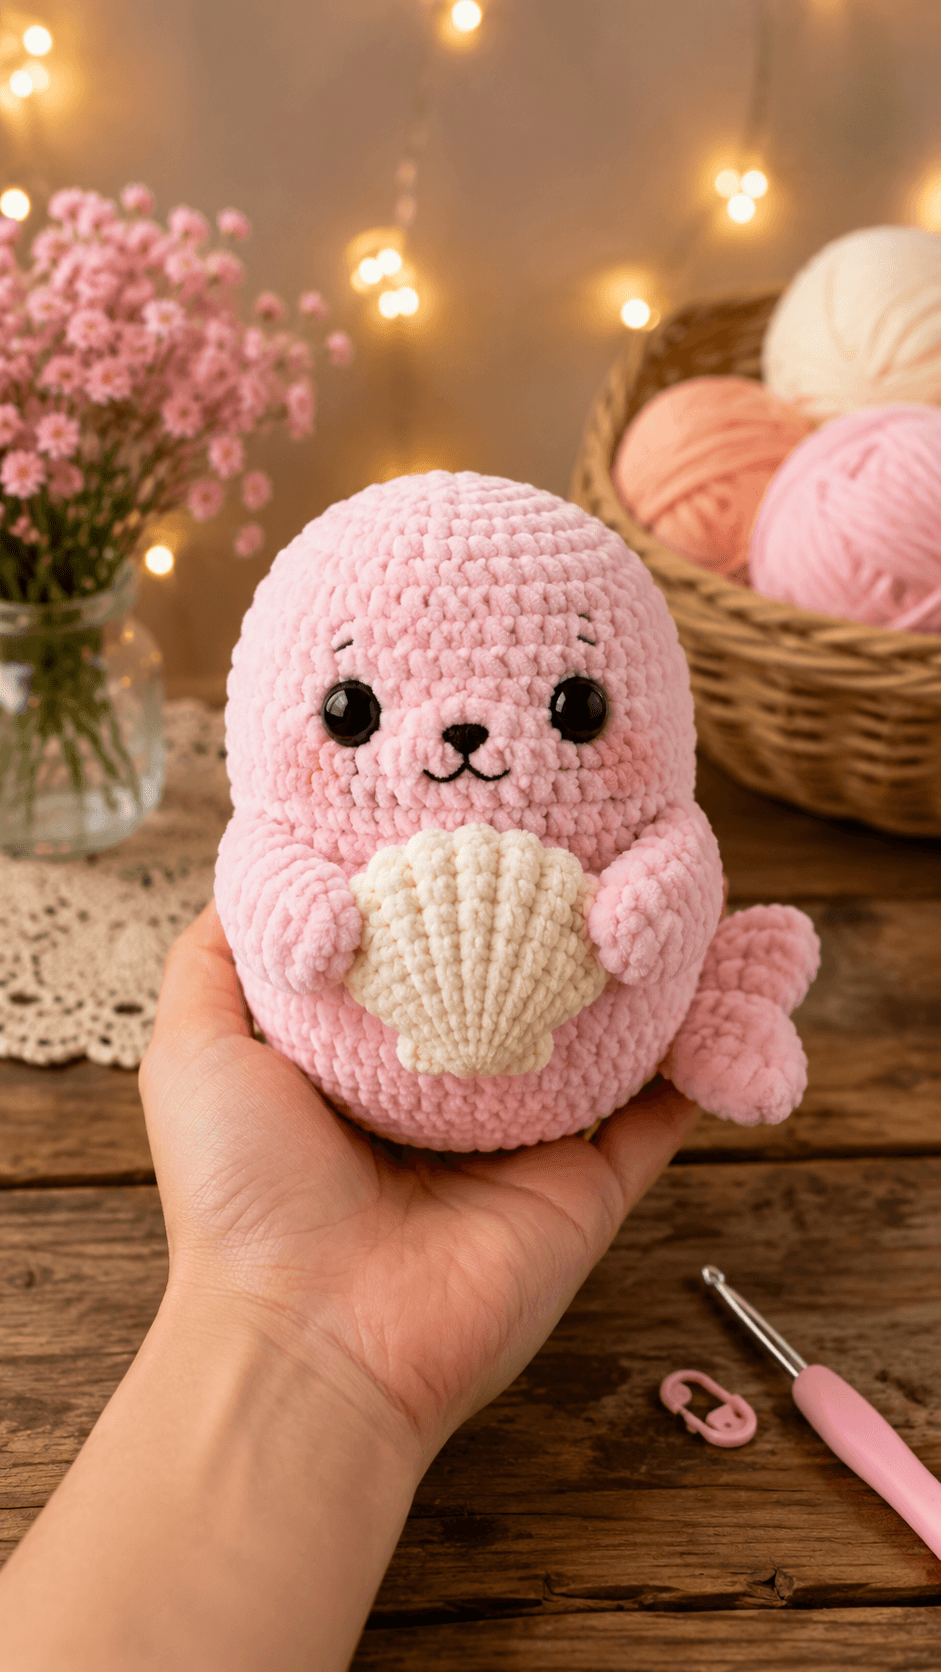
A seal’s rear flippers divide into two visible lobes, and hiding that split changes the animal’s silhouette. This pink seal amigurumi crochet pattern uses chunky chenille yarn, a 4.5 mm hook, 14 mm safety eyes, and firm polyester filling to make an approximately 18 cm sitting figure. The intermediate project includes a ribbed cream seashell that supports the front flippers and keeps their placement symmetrical.
The Design: What Makes This Seal Different
The head and body are crocheted separately because the photographed seal needs a round face above a narrower neck. A one-piece oval would pull the eyes toward the sides and remove the visible chin line. The body reaches a 36-stitch plateau, giving the plush seal pattern enough lower width to sit upright without weighted pellets. Two rear flippers attach beside a short central tail base, preserving the divided hind-flipper structure associated with a seal. The front flippers curve toward the shell rather than hanging vertically. That angle frames the accessory and prevents the arms from reading as bear limbs. A frequent mistake in a chunky seal amigurumi is placing the muzzle too low. When its lower edge reaches the neck seam, the face becomes elongated, so the muzzle must remain centered between the eyes and the lower head decrease rounds.
Project Info at a Glance
| Skill Level | Working Time | Finished Size | Hook | Best For |
|---|---|---|---|---|
| Intermediate | 7–9 hours | Approximately 18 cm sitting | 4.5 mm | Ocean displays, nursery shelves, market stock |
Materials and Tools
Yarn
- Pale pink — chunky chenille or velvet yarn — approximately 65 g — Bernat Baby Velvet, Premier Parfait Chunky, Himalaya Dolphin Baby, or a similar yarn.
- Cream — chunky chenille or velvet yarn — approximately 18 g — use for the muzzle and seashell.
- Blush pink — smooth DK cotton yarn — approximately 2 g — use for the flat cheek patches when visible contrast is required.
- Black — smooth cotton embroidery yarn — approximately 1 g — use for the nose, mouth, and eyebrows.
Tools
- 4.5 mm crochet hook
- 14 mm safety eyes
- Polyester stuffing, approximately 55–70 g
- Large-eye yarn needle
- Two locking stitch markers
- Long sewing pins
- Sharp scissors
- Optional fabric glue for securing hidden chenille ends
Replace plastic eyes with embroidered eyes when the finished object is intended for a child under three years old.
Abbreviations
- MR — magic ring
- sc — single crochet
- inc — two single crochets in one stitch
- dec — single crochet decrease
- sl st — slip stitch
- ch — chain
- BLO — back loop only
- FLO — front loop only
- hdc — half double crochet
- st/sts — stitch/stitches
An invisible decrease is made through the front loops of the next two stitches before completing one single crochet.
Pattern — Step by Step
Work in a continuous spiral unless rows or joined rounds are stated. Place a marker in the first stitch and move it after every completed round.
Head
Yarn: pale pink — standard six-stitch amigurumi sphere progression.
R1: 6 sc in MR (6)
R2: inc ×6 (12)
R3: (1 sc, inc) ×6 (18)
R4: (2 sc, inc) ×6 (24)
R5: (3 sc, inc) ×6 (30)
R6: (4 sc, inc) ×6 (36)
R7–R12: 36 sc (36)
R13: (4 sc, dec) ×6 (30)
R14: (3 sc, dec) ×6 (24)
Insert the 14 mm safety eyes between R9 and R10. Leave five visible stitches between their inner edges and check that both washers sit on the same round.
R15: (2 sc, dec) ×6 (18)
R16: (1 sc, dec) ×6 (12)
Stuff the crown first, then fill the side walls. Keep the front center slightly softer so the muzzle can sit against the fabric without a gap.
R17: dec ×6 (6)
R18: 6 sc (6)
Fasten off. Leave a 25 cm tail, thread it through the front loops of R18, and close the opening.
Body
Yarn: pale pink — standard six-stitch oval body progression.
R1: 6 sc in MR (6)
R2: inc ×6 (12)
R3: (1 sc, inc) ×6 (18)
R4: (2 sc, inc) ×6 (24)
R5: (3 sc, inc) ×6 (30)
R6: (4 sc, inc) ×6 (36)
R7–R17: 36 sc (36)
R18: (4 sc, dec) ×6 (30)
R19: (3 sc, dec) ×6 (24)
Press the base against a flat surface while adding stuffing. Pack the lower three rounds more firmly than the upper body so the seal remains upright.
R20: (2 sc, dec) ×6 (18)
R21: (1 sc, dec) ×6 (12)
R22: dec ×6 (6)
R23: 6 sc (6)
Fasten off. Leave a 35 cm tail for joining the body to the head.
Front Flippers — Make 2
Yarn: pale pink.
R1: 6 sc in MR (6)
R2: inc ×6 (12)
R3: (1 sc, inc) ×6 (18)
R4–R5: 18 sc (18)
R6: (1 sc, dec) ×6 (12)
R7–R9: 12 sc (12)
R10: dec ×6 (6)
Stuff only the rounded end. Leave the upper half nearly flat so it bends toward the shell rather than projecting forward.
Fasten off. Leave a 25 cm sewing tail.
Back Flippers — Make 2
Yarn: pale pink.
R1: 6 sc in MR (6)
R2: inc ×6 (12)
R3: (1 sc, inc) ×6 (18)
R4–R5: 18 sc (18)
R6: (1 sc, dec) ×6 (12)
R7: 12 sc (12)
Do not stuff. Flatten each piece and rotate it so the final round forms the inner attachment edge.
R8: 6 sc through both layers (6)
Fasten off. Leave a 30 cm tail for attaching each flipper to the lower rear body.
Tail Base
Yarn: pale pink.
R1: 6 sc in MR (6)
R2: inc ×6 (12)
R3: (1 sc, inc) ×6 (18)
R4–R5: 18 sc (18)
R6: (1 sc, dec) ×6 (12)
Add a small amount of stuffing. The piece should form a short rounded connector, not a third rear flipper.
Fasten off. Leave a 25 cm tail.
Muzzle
Yarn: cream.
R1: 6 sc in MR (6)
R2: inc ×6 (12)
R3: (1 sc, inc) ×6 (18)
R4: 18 sc (18)
R5: (1 sc, dec) ×6 (12)
Add a thin, evenly distributed layer of stuffing. Avoid forming a pointed center.
Fasten off. Leave a 30 cm sewing tail.
Cheek Patches — Make 2
Yarn: blush pink DK cotton held single.
R1: 6 sc in MR (6)
R2: inc ×6 (12)
Join with a sl st. Fasten off and leave a 15 cm tail. Flatten each circle before assembly.
Seashell Front Panel
Yarn: cream. Turn after every row. The increases create the fan shape visible in the photograph.
Row 1: ch 2, 2 sc in second ch from hook (2)
Row 2: ch 1, turn, inc ×2 (4)
Row 3: ch 1, turn, (1 sc, inc) ×2 (6)
Row 4: ch 1, turn, (2 sc, inc) ×2 (8)
Row 5: ch 1, turn, (3 sc, inc) ×2 (10)
Row 6: ch 1, turn, (4 sc, inc) ×2 (12)
Row 7: ch 1, turn, (5 sc, inc) ×2 (14)
Row 8: ch 1, turn, 14 sc BLO (14)
Row 9: ch 1, turn, 14 sc BLO (14)
Row 10: ch 1, turn, 14 sc BLO (14)
Row 11: ch 1, turn, 14 sc BLO (14)
Row 12: ch 1, turn, 14 sc BLO (14)
Row 13: ch 1, turn, (5 sc, dec) ×2 (12)
Row 14: ch 1, turn, (4 sc, dec) ×2 (10)
Row 15: ch 1, turn, (3 sc, dec) ×2 (8)
Row 16: ch 1, turn, (2 sc, dec) ×2 (6)
Row 17: ch 1, turn, (1 sc, dec) ×2 (4)
Row 18: ch 1, turn, dec ×2 (2)
Fasten off. Leave a 30 cm tail. The BLO rows form raised ribs across the shell.
Seashell Back Panel
Yarn: cream. Work the same shape without BLO ridges.
Row 1: ch 2, 2 sc in second ch from hook (2)
Row 2: ch 1, turn, inc ×2 (4)
Row 3: ch 1, turn, (1 sc, inc) ×2 (6)
Row 4: ch 1, turn, (2 sc, inc) ×2 (8)
Row 5: ch 1, turn, (3 sc, inc) ×2 (10)
Row 6: ch 1, turn, (4 sc, inc) ×2 (12)
Row 7: ch 1, turn, (5 sc, inc) ×2 (14)
Row 8–R12: ch 1, turn, 14 sc (14)
Row 13: ch 1, turn, (5 sc, dec) ×2 (12)
Row 14: ch 1, turn, (4 sc, dec) ×2 (10)
Row 15: ch 1, turn, (3 sc, dec) ×2 (8)
Row 16: ch 1, turn, (2 sc, dec) ×2 (6)
Row 17: ch 1, turn, (1 sc, dec) ×2 (4)
Row 18: ch 1, turn, dec ×2 (2)
Fasten off. Leave a 30 cm tail.
Seashell Lower Hinge
Yarn: cream.
Ch 7.
Row 1: starting in the second ch from the hook, 6 sc (6)
Row 2: ch 1, turn, 6 sc BLO (6)
Row 3: ch 1, turn, 6 sc BLO (6)
Fasten off. Leave a 20 cm tail.
Assembly
- Place the head above the body with the eye line parallel to the flattened base. Sew the body opening to the lower head across two complete passes.
- Pin the muzzle between the eyes, covering approximately R10–R14. Sew around three quarters of its edge, adjust the stuffing, and close the remaining section.
- Embroider a triangular nose approximately three stitches wide at the center of the muzzle. Add one vertical stitch below it and two curved mouth lines extending toward the lower sides.
- Form each eyebrow with one short black stitch approximately two rounds above the eye. Angle the outer ends upward by no more than one stitch height.
- Attach the cheek patches beside the lower eye edges. Keep the inner edge of each circle at least one stitch away from the muzzle seam.
- Pin the tail base to the lower rear body across approximately R7–R11. Sew its stuffed edge to the body without closing the outer opening against the fabric.
- Place one back flipper on each side of the tail base. Angle their rounded ends outward and sew the six-stitch flattened edges to the body.
- Join the seashell panels with wrong sides together. Sew around the outer edge, add a thin layer of stuffing, and attach the hinge across the lower six stitches.
- Position the shell on the center front of the body with its widest point near R13. Stitch the back panel to the body at four hidden anchor points.
- Attach the front flippers at the upper body sides. Curve their ends over the shell edges, sew each upper section to the body, and add one hidden tack through each flipper tip and shell.
The completed seal should stand on its flattened body base with both rear flippers visible and the shell centered below the muzzle.
7 Technical Tips
- Move the stitch marker after every round. A lost round boundary shifts one eye higher when placement is measured from an incorrect spiral start.
- Pack the lowest 4 cm of the body firmly. Loose base stuffing lets the separate head pull the seal backward.
- Use invisible decreases on all visible pink sections. Standard decreases can open two adjacent loops and expose white filling along the forehead or body sides.
- Install both eyes before R15 of the head. The opening becomes too narrow for 14 mm washers after the stitch count drops below 24.
- Measure six chenille stitches before continuing past R6. A width greater than approximately 5 cm indicates tension loose enough to create gaps after stuffing.
- Pin each back flipper at two points 2 cm apart. A single pin allows the flattened attachment edge to rotate while it is sewn.
- Weave structural tails through at least 5 cm of stuffed fabric. Short chenille ends can slip from the fabric core when the shell or flippers are pulled.
Conclusion
Inspect the seal from the front before cutting the final yarn tails. Both eyes should sit on one round, the muzzle should remain above the neck seam, and the seashell should cover the center body without hiding the rear-flipper silhouette. Record the final height and remaining yarn weight because different chenille brands can change the 18 cm target. The next step is to photograph one front view and one rear view against a plain background. Save the project to Pinterest and share the finished piece on Instagram with #PinkShellSeal. Use the same notes when making a second pink seal amigurumi crochet pattern. Did the shell ribs stay vertical, or did the front panel twist after assembly?









