Introduction
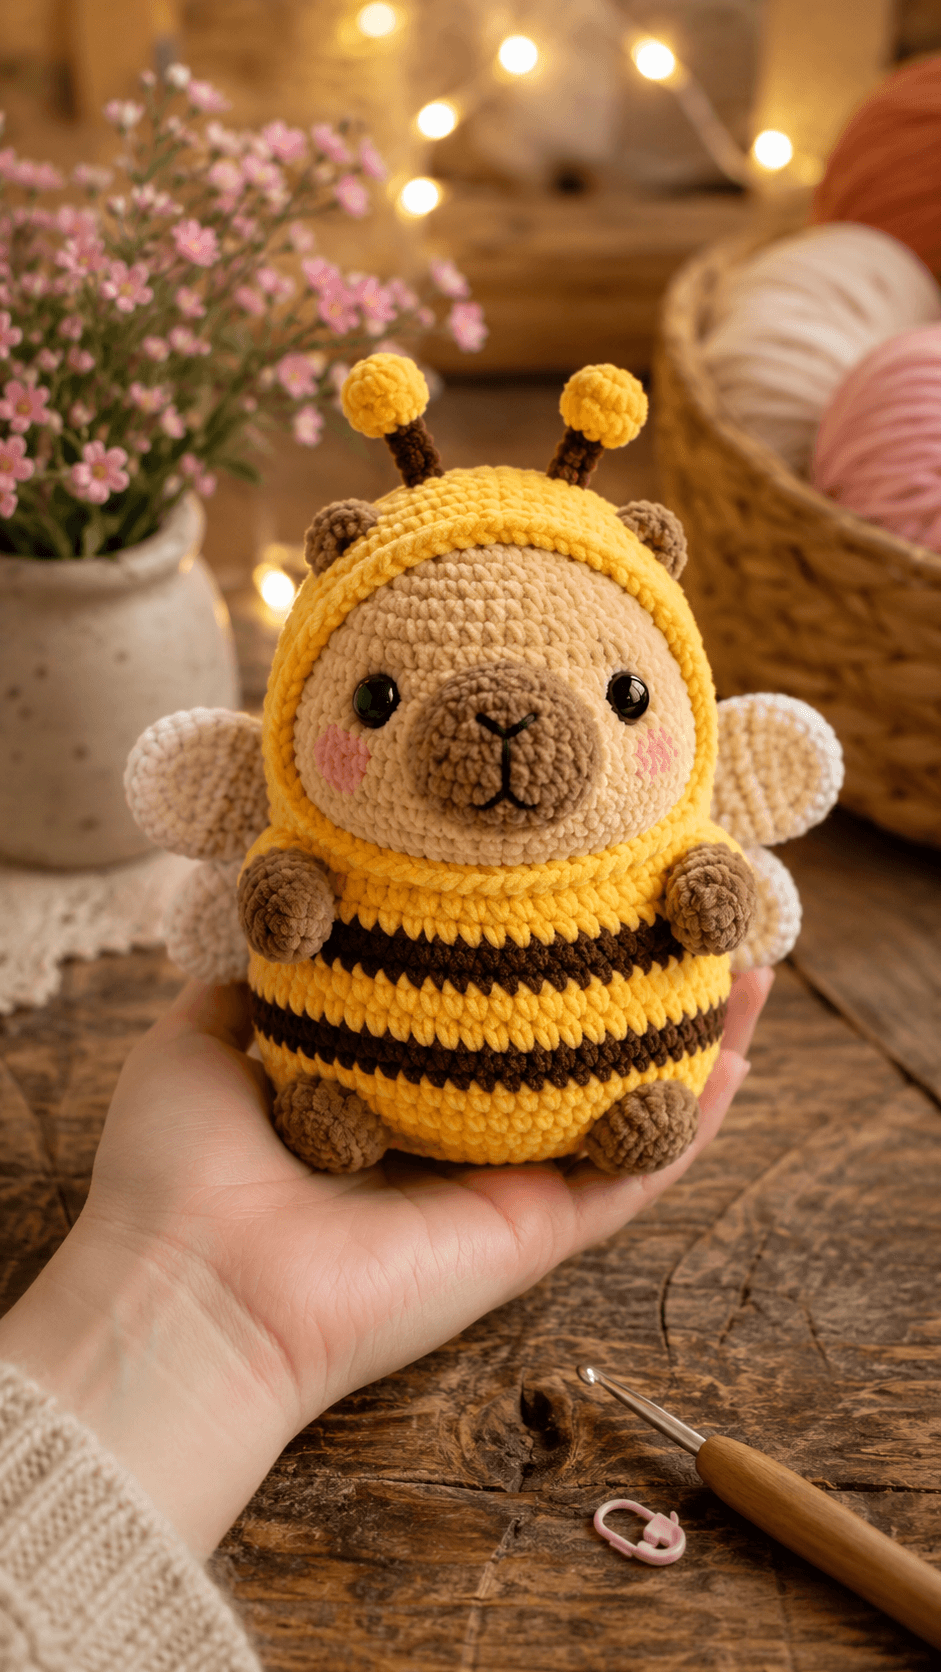
A bear’s ears must remain visible through the bee hood, or the finished figure reads as an insect rather than a bear. This bee bear amigurumi crochet pattern uses chunky chenille yarn, a 4 mm hook, 12 mm eyes, and firm polyester stuffing to produce an approximately 18 cm sitting toy. The project suits an intermediate maker and creates a stable display piece with a removable-looking costume structure.
The Design: What Makes the Bee Bear Different
The head is worked separately from the hood so the cream bear face retains a clean circular outline. A fitted yellow frame then surrounds the face without covering the rounded ears. This construction also gives the antennae a stronger attachment point than sewing them directly into a softly stuffed head. The body reaches a 36-stitch plateau, creating enough width for two readable dark stripes and a stable seated base. Small back legs sit low on the body, while the front paws overlap the costume front. That arrangement matches the compact proportions of a chunky bee bear crochet project. A common error is placing the wings too far apart. Wide spacing makes the white pieces resemble side fins, so both wings should begin close to the center back and angle outward.
Project Info at a Glance
| Skill Level | Time | Finished Size | Hook | Best For |
|---|---|---|---|---|
| Intermediate | 7–9 hours | Approximately 18 cm sitting | 4 mm | Nursery display, seasonal markets, desk decor |
Materials and Tools
Yarn
- Golden yellow — chunky chenille — approximately 65 g — Himalaya Dolphin Baby, Premier Parfait Chunky, or equivalent.
- Cream — chunky chenille — approximately 55 g — use for the head, wings, and pale body details.
- Medium brown — chunky chenille — approximately 25 g — use for the muzzle, ears, paws, and feet.
- Dark brown — chunky chenille — approximately 15 g — use for the body stripes and antenna stems.
- White — chunky chenille — approximately 15 g — use for both wings.
- Pink — smooth DK yarn — approximately 2 g — use for the cheek patches.
- Black — cotton embroidery thread — a short length for the nose and mouth.
Tools
- 4 mm crochet hook
- 12 mm safety eyes
- Polyester stuffing, approximately 55–70 g
- Yarn needle with a large eye
- Stitch markers
- Sharp scissors
- Long sewing pins
Plastic eyes are not suitable for a toy intended for a child under three. Embroider the eyes with black yarn when small-part safety is required.
Abbreviations
- MR — magic ring
- sc — single crochet
- inc — two single crochets in one stitch
- dec — single crochet decrease
- sl st — slip stitch
- ch — chain
- BLO — back loop only
- hdc — half double crochet
- st/sts — stitch/stitches
An invisible decrease is worked through the front loops of the next two stitches before completing one single crochet.
Pattern — Step by Step
Work in a continuous spiral unless a joined round or row is stated. Mark the first stitch of every round.
Head
Yarn: cream — based on standard six-stitch amigurumi sphere shaping.
R1: 6 sc in MR (6)
R2: inc ×6 (12)
R3: (1 sc, inc) ×6 (18)
R4: (2 sc, inc) ×6 (24)
R5: (3 sc, inc) ×6 (30)
R6: (4 sc, inc) ×6 (36)
R7–R12: 36 sc (36)
R13: (4 sc, dec) ×6 (30)
R14: (3 sc, dec) ×6 (24)
Insert the 12 mm eyes between R9 and R10, leaving six visible stitches between the stems. Begin stuffing the crown and side walls.
R15: (2 sc, dec) ×6 (18)
R16: (1 sc, dec) ×6 (12)
Add small pieces of stuffing around the eye backs and fill the center firmly without flattening the face.
R17: dec ×6 (6)
R18: 6 sc (6)
Fasten off. Leave a 20 cm tail, thread through the front loops, pull closed, and secure.
Body
Yarn: begin in yellow; use dark brown for the two stripes.
R1: 6 sc in MR (6)
R2: inc ×6 (12)
R3: (1 sc, inc) ×6 (18)
R4: (2 sc, inc) ×6 (24)
R5: (3 sc, inc) ×6 (30)
R6: (4 sc, inc) ×6 (36)
R7–R9: 36 sc in yellow (36)
R10–R11: 36 sc in dark brown (36)
R12–R14: 36 sc in yellow (36)
R15–R16: 36 sc in dark brown (36)
R17: 36 sc in yellow (36)
R18: (4 sc, dec) ×6 (30)
R19: (3 sc, dec) ×6 (24)
Stuff the lower body firmly. Place extra filling against the base and less directly beneath the neck opening.
R20: (2 sc, dec) ×6 (18)
R21: (1 sc, dec) ×6 (12)
R22: dec ×6 (6)
R23: 6 sc (6)
Fasten off. Leave a 30 cm tail for attaching the body to the head.
Front Paws — Make 2
Yarn: medium brown.
R1: 6 sc in MR (6)
R2: inc ×6 (12)
R3–R4: 12 sc (12)
R5: (1 sc, dec) ×4 (8)
R6–R7: 8 sc (8)
Stuff only the rounded paw end. Flatten the final opening.
R8: 4 sc through both layers (4)
Fasten off. Leave a 20 cm sewing tail.
Back Legs — Make 2
Yarn: medium brown.
R1: 6 sc in MR (6)
R2: inc ×6 (12)
R3: (1 sc, inc) ×6 (18)
R4–R5: 18 sc (18)
R6: (1 sc, dec) ×6 (12)
R7: 12 sc (12)
R8: dec ×6 (6)
Stuff the foot firmly before R8. The piece should remain rounded rather than pointed.
Fasten off. Leave a 25 cm tail.
Bear Ears — Make 2
Yarn: medium brown.
R1: 6 sc in MR (6)
R2: inc ×6 (12)
R3: (1 sc, inc) ×6 (18)
R4: 18 sc (18)
R5: (1 sc, dec) ×6 (12)
Do not stuff. Fold each ear into a shallow cup.
Fasten off. Leave a 20 cm tail.
Muzzle
Yarn: medium brown.
R1: 6 sc in MR (6)
R2: inc ×6 (12)
R3: (1 sc, inc) ×6 (18)
R4: 18 sc (18)
R5: (1 sc, dec) ×6 (12)
Add a thin layer of stuffing. Too much filling will cover the lower edges of the eyes.
Fasten off. Leave a 25 cm tail.
Cheek Patches — Make 2
Yarn: pink DK yarn held single.
R1: 6 sc in MR (6)
R2: inc ×6 (12)
Join with a sl st. Fasten off and leave a 15 cm tail. Keep both circles flat.
Wings — Make 2
Yarn: white.
R1: 6 sc in MR (6)
R2: inc ×6 (12)
R3: (1 sc, inc) ×6 (18)
R4–R5: 18 sc (18)
R6: (1 sc, dec) ×6 (12)
R7: 12 sc (12)
Do not stuff. Flatten the wing so it forms a thick oval.
R8: 6 sc through both layers (6)
Fasten off. Leave a 25 cm tail.
Hood
Yarn: golden yellow. The hood is worked from the crown downward and remains open across the face.
R1: 6 sc in MR (6)
R2: inc ×6 (12)
R3: (1 sc, inc) ×6 (18)
R4: (2 sc, inc) ×6 (24)
R5: (3 sc, inc) ×6 (30)
R6: (4 sc, inc) ×6 (36)
R7–R8: 36 sc (36)
Switch from rounds to rows to form the face opening.
Row 9: ch 1, turn, 28 sc (28)
Row 10: ch 1, turn, 28 sc (28)
Row 11: ch 1, turn, 28 sc (28)
Row 12: ch 1, turn, 28 sc (28)
Fasten off. Leave a 35 cm tail. Place the hood over the head with the unworked eight-stitch opening centered beneath the chin.
Hood Face Edging
Yarn: golden yellow.
Join yarn at the lower right corner of the face opening. Work evenly around the opening using approximately 38 sc, placing one additional sc in each upper corner. Join with a sl st.
Fasten off. Leave a 15 cm tail and weave it into the inside of the hood.
Collar
Yarn: golden yellow.
Ch 31.
Row 1: starting in the second ch from the hook, 30 sc (30)
Row 2: ch 1, turn, 30 sc BLO (30)
Row 3: ch 1, turn, 30 sc BLO (30)
Fasten off. Leave a 25 cm tail. The strip should fit around the neck without compressing the head-to-body seam.
Antenna Stems — Make 2
Yarn: dark brown.
R1: 6 sc in MR (6)
R2–R6: 6 sc (6)
Do not stuff. Insert a folded strand of dark yarn when extra stiffness is needed.
Fasten off. Leave a 20 cm tail.
Antenna Tips — Make 2
Yarn: golden yellow.
R1: 6 sc in MR (6)
R2: inc ×6 (12)
R3–R4: 12 sc (12)
R5: dec ×6 (6)
Add a small pinch of stuffing before closing.
Fasten off. Leave a 15 cm tail. Sew one tip to the open end of each antenna stem.
Assembly
- Position the head on the body with the face centered over the yellow section between the upper stripe and the neck opening. Sew twice around the joint, passing through complete stitches rather than surface fibers.
- Place the hood over the head. Align the center of R1 with the top center of the head and position the lower opening beneath the chin.
- Sew the hood to the head along the face opening and lower edge. Leave the crown slightly loose so the chenille fabric does not pull the face upward.
- Pin the bear ears through the hood at approximately the R4–R7 area of the head. Keep their inner edges about seven stitches apart, then sew through the ear, hood, and head fabric.
- Center the muzzle between the eyes, with its upper edge near R10 and its lower edge near R14. Sew around the perimeter while adding the last small amount of stuffing.
- Embroider a horizontal black nose approximately three stitches wide. Bring one vertical line down two rounds, then form two short curved mouth lines.
- Place each cheek patch beside the muzzle and one round below the center of the eyes. Sew around the outer loops with pink yarn.
- Attach the back legs to the lower front sides of the body across R5–R9. Sew the front paws over the upper yellow section at a slight inward angle.
- Pin the wings to the center back between approximately R11 and R16. Leave two stitches between their upper inner corners, then sew along each flattened edge.
- Wrap the collar around the neck and join its short ends at the back. Sew the antennae to the hood between R2 and R4, approximately six stitches apart, then weave every remaining tail through several interior stitches.
The completed figure should sit without support, with both stripes level and both wings visible from the front three-quarter view.
7 Technical Tips
- Use a stitch marker at every first stitch. Losing the start point during a stripe change produces a diagonal dark band instead of a level ring.
- Keep the base stuffing firmer than the neck stuffing. A soft lower body causes the 18 cm bear to roll backward under the weight of its hooded head.
- Work every decrease through front loops only. A conventional decrease leaves a wider opening that can expose white filling along the cream head.
- Install the eyes before decreasing below 24 stitches. After R14, there is not enough room to press 12 mm washers into place without distorting the face.
- Test the chenille tension across six stitches. A span wider than 4 cm with the selected yarn indicates fabric loose enough for stuffing to show.
- Pin each wing at three points before sewing. Attaching only the upper corner allows the lower half to twist forward and cover the body stripe.
- Weave each structural tail through at least 4 cm of stuffed fabric. A short tail can pull free where the antennae or legs are handled repeatedly.
Conclusion
Check the finished toy from the front, back, and both sides before trimming any remaining yarn ends. The eyes should sit on one horizontal line, the muzzle should cover the center of the lower face, and the dark stripes should meet cleanly at the back. Photograph the completed bee bear beside a ruler to record how your yarn choice changed the 18 cm target size. Save the image to Pinterest and share the front and back views on Instagram with #ChunkyBeeBear. The next practical step is to record the yarn weight left from each color for a second bee bear amigurumi crochet pattern. Did your bear’s ears sit inside the hood opening or project through its upper edge?









