Introduction
A hedgehog’s face must remain smooth while its spines expand behind the ears, and that boundary controls the entire construction. This hedgehog amigurumi free crochet pattern uses DK cotton, a 3 mm hook, 9 mm eyes, and a separate textured spine cap to produce an 18 cm seated figure. The project suits an intermediate maker and creates a stable display toy with a removable-looking but firmly sewn daisy.
The Design: What Makes the Daisy Hedgehog Different
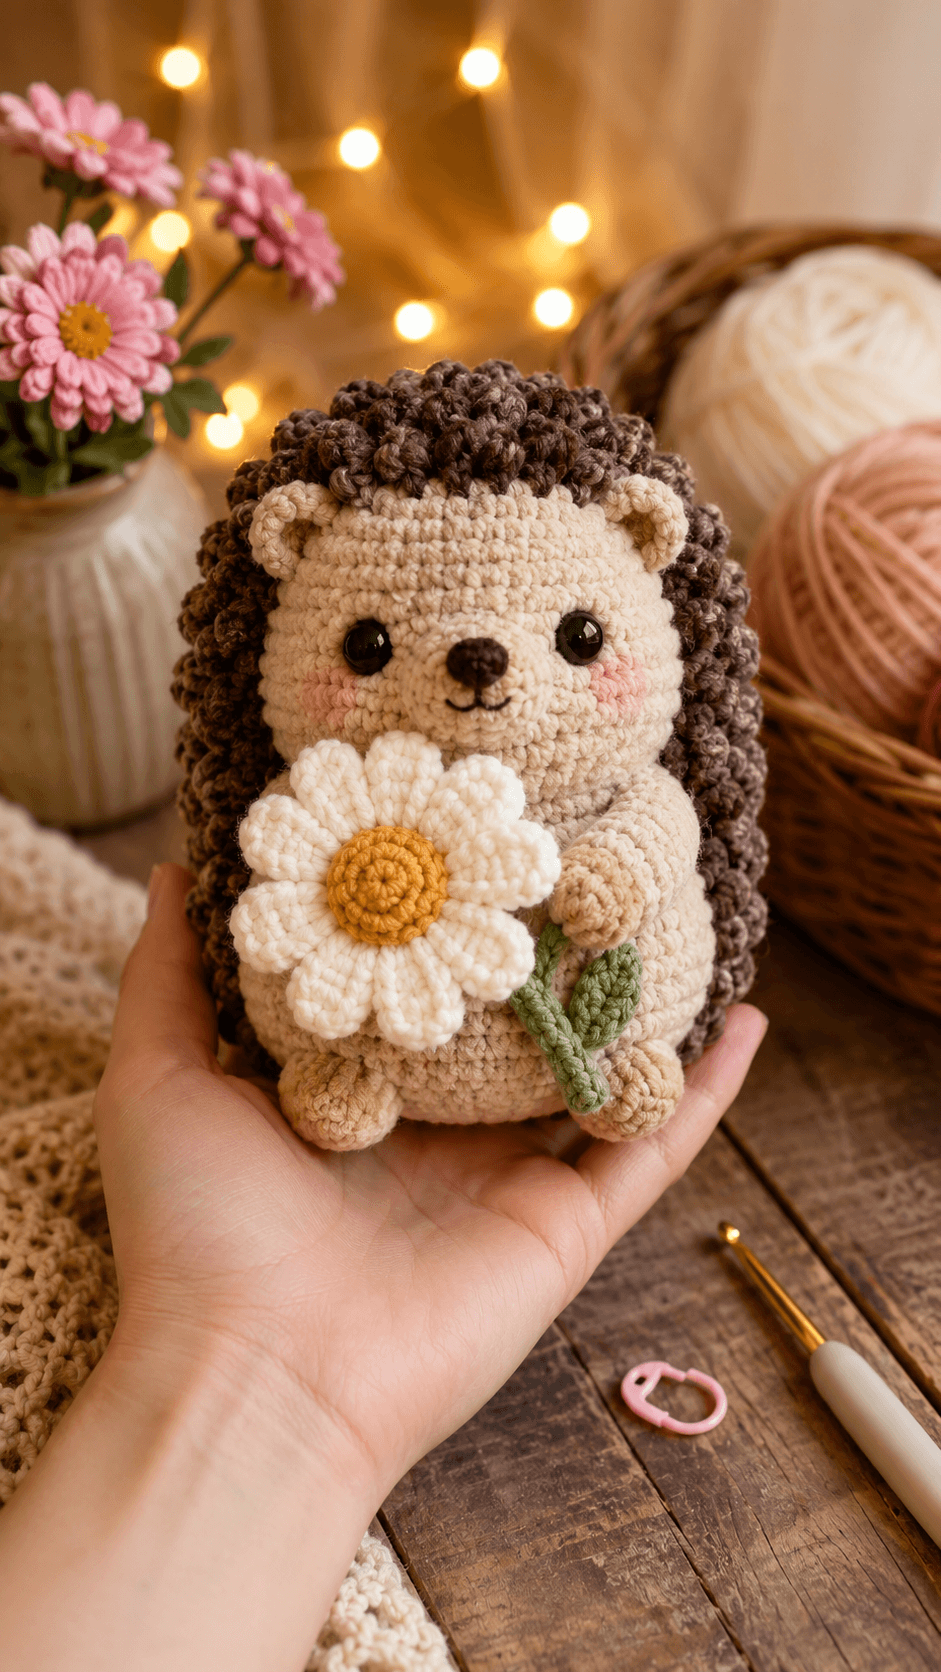
The head and body each stop at a 36-stitch plateau, giving the figure the compact proportions visible in the reference photo. A projecting muzzle is made separately because face embroidery placed directly on a sphere tends to flatten the profile. The spine layer is also independent: its lower edge can be pinned around the ears and cheeks without pulling the beige head out of shape. Short, lightly stuffed legs form a broad sitting base, while the daisy covers the body seam and adds controlled asymmetry. A common mistake in a crochet hedgehog pattern is extending dark spine stitches too far across the forehead. That narrows the face and crowds the eyes. This daisy hedgehog amigurumi keeps a clear beige brow line and uses a loop-stitch hedgehog cap only across the crown, back, and sides.
Project Info at a Glance
| Skill Level | Time | Finished Size | Hook | Best For |
|---|---|---|---|---|
| Intermediate | 7–9 hours | Approximately 18 cm seated | 3 mm | Woodland displays, nursery shelving, seasonal photography |
Materials and Tools
Yarn
- Warm beige — DK cotton — approximately 35 g — Paintbox Cotton DK or YarnArt Jeans
- Dark brown — DK cotton — approximately 30 g — Scheepjes Catona or Paintbox Cotton DK
- Cream white — DK cotton — approximately 8 g — for the daisy petals
- Mustard yellow — DK cotton — approximately 4 g — for the flower center
- Sage green — DK cotton — approximately 6 g — for the stem and leaves
- Blush pink — DK cotton — approximately 2 g — for cheek patches
- Black or very dark brown — DK cotton or embroidery thread — approximately 1 g — for the nose and mouth
Tools
- 3 mm crochet hook
- Two 9 mm safety eyes
- Polyester stuffing
- Yarn needle
- Locking stitch markers
- Straight pins
- Scissors
Safety eyes are small components and are not suitable for a toy intended for a child under three. Embroider the eyes when removable plastic parts are unsuitable.
Abbreviations
- MR — magic ring
- sc — single crochet
- inc — two single crochets in one stitch
- dec — single crochet decrease
- sl st — slip stitch
- ch — chain
- BLO — back loop only
- FLO — front loop only
- hdc — half double crochet
- dc — double crochet
- lp st — loop stitch
For an invisible decrease, insert the hook through the front loops of the next two stitches, yarn over, pull through both front loops, yarn over again, and complete the single crochet.
Pattern — Step by Step
Work in a continuous spiral unless a section states otherwise. Move the stitch marker after every completed round.
Head
Yarn: warm beige — original six-stitch amigurumi shaping.
R1: 6 sc in MR (6)
R2: inc ×6 (12)
R3: (1 sc, inc) ×6 (18)
R4: (2 sc, inc) ×6 (24)
R5: (3 sc, inc) ×6 (30)
R6: (4 sc, inc) ×6 (36)
R7–R13: sc around (36)
R14: (4 sc, dec) ×6 (30)
R15: (3 sc, dec) ×6 (24)
Insert the safety eyes between R10 and R11 with nine visible stitches between the stems. Check that the muzzle will sit centrally below them. Begin firm, even stuffing.
R16: (2 sc, dec) ×6 (18)
R17: (1 sc, dec) ×6 (12)
R18: dec ×6 (6)
Fasten off. Close the opening and weave the yarn tail through the center.
Body
Yarn: warm beige — original six-stitch amigurumi shaping.
R1: 6 sc in MR (6)
R2: inc ×6 (12)
R3: (1 sc, inc) ×6 (18)
R4: (2 sc, inc) ×6 (24)
R5: (3 sc, inc) ×6 (30)
R6: (4 sc, inc) ×6 (36)
R7–R13: sc around (36)
R14: (4 sc, dec) ×6 (30)
R15–R16: sc around (30)
R17: (3 sc, dec) ×6 (24)
R18: sc around (24)
R19: (2 sc, dec) ×6 (18)
Stuff the lower half firmly enough to hold a seated shape. Keep the neck opening moderately firm rather than rigid.
R20: (1 sc, dec) ×6 (12)
R21: dec ×6 (6)
Fasten off. Leave a 30 cm tail for sewing the head to the body.
Arms (Make 2)
Yarn: warm beige.
R1: 6 sc in MR (6)
R2: inc ×6 (12)
R3–R5: sc around (12)
R6: (2 sc, dec) ×3 (9)
R7–R11: sc around (9)
Stuff only the lower 3 cm. Flatten the final round so the arms lie against the flower.
Fasten off. Leave a 20 cm tail on each arm.
Back Legs and Feet (Make 2)
Yarn: warm beige.
R1: 6 sc in MR (6)
R2: inc ×6 (12)
R3: (1 sc, inc) ×6 (18)
R4–R5: sc around (18)
R6: (1 sc, dec) ×6 (12)
R7–R8: sc around (12)
Stuff each foot firmly at the toe and lightly at the open edge.
Fasten off. Leave a 25 cm tail for attachment.
Ears (Make 2)
Yarn: warm beige.
R1: 6 sc in MR (6)
R2: inc ×6 (12)
R3: (1 sc, inc) ×6 (18)
Fold the circle in half. Work 8 sc through both layers, leaving the final edge slightly curved. Fasten off and leave a 15 cm tail.
Muzzle
Yarn: warm beige.
R1: 6 sc in MR (6)
R2: inc ×6 (12)
R3: (1 sc, inc) ×6 (18)
R4–R5: sc around (18)
R6: (1 sc, dec) ×6 (12)
Add a small amount of stuffing. The muzzle should project about 2 cm from the face without becoming spherical.
Fasten off. Leave a 25 cm sewing tail.
Nose
Yarn: dark brown or black.
R1: 6 sc in MR (6)
R2: inc ×6 (12)
R3: sc around (12)
R4: dec ×6 (6)
Add a pinch of stuffing. Fasten off and leave a 15 cm tail.
Cheek Patches (Make 2)
Yarn: blush pink.
R1: 6 sc in MR (6)
R2: inc ×6 (12)
Join with a sl st. Fasten off and leave a 12 cm tail. Flatten each circle before sewing.
Spine Cap
Yarn: dark brown. The cap uses a 36-stitch plateau to match the medium head.
R1: 6 sc in MR (6)
R2: inc ×6 (12)
R3: (1 sc, inc) ×6 (18)
R4: (2 sc, inc) ×6 (24)
R5: (3 sc, inc) ×6 (30)
R6: (4 sc, inc) ×6 (36)
R7–R12: sc around (36)
Fasten off and leave a 40 cm tail. Place the cap over the crown with its front edge approximately two rounds above the eyes.
Textured Spines
Yarn: dark brown. Work across the outer surface of the completed cap.
Attach the yarn near the center of R1. Work one loop stitch in every available stitch, following a spiral path toward R12. Form each loop around two fingers so the loops measure approximately 1.5 cm. Slip stitch into the next stitch after the final loop.
Fasten off and weave both ends into the cap. Leave the loops intact for the rounded texture shown in the photograph.
Daisy Center
Yarn: mustard yellow.
R1: 6 sc in MR (6)
R2: inc ×6 (12)
R3: (1 sc, inc) ×6 (18)
R4: sc around in BLO (18)
R5: (1 sc, dec) ×6 (12)
Add a thin layer of stuffing so the center remains slightly domed.
Fasten off. Leave a 20 cm tail.
Daisy Petals (Make 10)
Yarn: cream white.
R1: 6 sc in MR (6)
R2: inc ×6 (12)
R3–R5: sc around (12)
R6: (2 sc, dec) ×3 (9)
R7: sc around (9)
Do not stuff. Flatten each petal and work 4 sc through both layers. Fasten off with an 18 cm tail.
Flower Stem
Yarn: sage green.
R1: 6 sc in MR (6)
R2–R18: sc around (6)
Do not stuff. Insert a doubled yarn strand through the tube when additional stiffness is needed.
Fasten off. Leave a 20 cm tail.
Leaves (Make 2)
Yarn: sage green. Work in rows.
Row 1: ch 7
Row 2: starting in second ch from hook, sl st, sc, hdc, dc, hdc, 3 sc in final chain; continue along the opposite side with hdc, dc, hdc, sc, sl st.
Fasten off. Leave a 15 cm tail. Pinch the lower 1 cm before sewing it to the stem.
Assembly
- Place the head over the body opening. Sew through one full stitch from each piece, adding small amounts of stuffing around the neck before closing the seam.
- Pin the spine cap to the crown. Keep the front edge about two rounds above the eyes and the lower edge behind the cheek line, then sew it in place.
- Attach the ears between head R6 and R9. Position each ear partly under the spine edge so only the rounded beige section remains visible.
- Sew the muzzle between the eyes, spanning approximately head R10 to R14. Add stuffing before closing the final 2 cm of the seam.
- Attach the nose at the center of the muzzle. Embroider one vertical line measuring 8 mm, then form two curved mouth lines extending about 6 mm to each side.
- Sew the cheek patches beside the muzzle, with each upper edge level with the lower third of the eyes.
- Attach the legs across body R5 to R9. Angle the toes outward by approximately 20 degrees so the figure rests on three points: two feet and the lower body.
- Sew the daisy petals evenly around the yellow center. Attach the stem behind the flower and add one leaf on each side, offset by about 2 cm.
- Pin the flower diagonally across the front of the body. Sew the left arm over two petals and place the right arm around the stem.
- Weave each remaining tail through at least four internal stitch paths, trim it, and pull the fabric gently so the cut end retracts.
The completed hedgehog should sit without support and hold the daisy against the center of its body.
7 Technical Tips
- Stitch-marker drift: A missing marker can shift facial placement by two or three stitches. Count every sixth round and return the marker to the first stitch immediately.
- Understuffed neck: A neck gap wider than 1 cm allows the head to tilt forward. Add stuffing in pieces no larger than a walnut before closing the final seam.
- Visible decrease ridges: Standard decreases leave horizontal bars across the beige face and body. Work through the front loops only and keep the final yarn-over at normal tension.
- Late eye placement: Eye washers cannot be attached after the head closes. Fit both eyes after R15 and compare their height before pressing either washer fully into place.
- Uneven loop tension: Loops ranging from 1 to 3 cm produce a lopsided spine cap. Wrap every loop around the same two fingers and keep the working strand close to the hook.
- Unpinned components: Sewing the muzzle from one side without pins can rotate it by 5 mm or more. Use four pins at the top, bottom, left, and right before starting the seam.
- Escaping yarn tails: A tail woven through only one stitch path may work loose under handling. Change direction four times inside the stuffed section before trimming the yarn.
Conclusion
The finished figure depends on three measured relationships: a 36-stitch head, a spine edge held above the eyes, and a flower wide enough to overlap both arms. Block the leaves lightly, inspect the mouth from the front, and add one hidden stitch where the stem crosses the body if it shifts during handling. Photograph the hedgehog at eye level so the muzzle, cheeks, and daisy remain visible. Save the project to Pinterest and share the finished version on Instagram with #DaisyHedgehogPattern. The next practical step is to prepare the beige head and brown spine cap together, checking their circumferences before assembly. Which spine treatment will your hedgehog use: intact loops, clipped loops, or compact bobbles?









