Introduction
A calf’s muzzle projects beyond its cheeks, but its horns must stay narrow enough to avoid overpowering the ears. This plush cow amigurumi crochet pattern uses chenille yarn, a 4 mm hook and separate facial pieces to reproduce those proportions. The finished cow measures approximately 26 cm tall, requires intermediate crochet skills and stands securely on two broad hooves for nursery display or a farm-animal collection.
The Design: What Makes This Cow Different
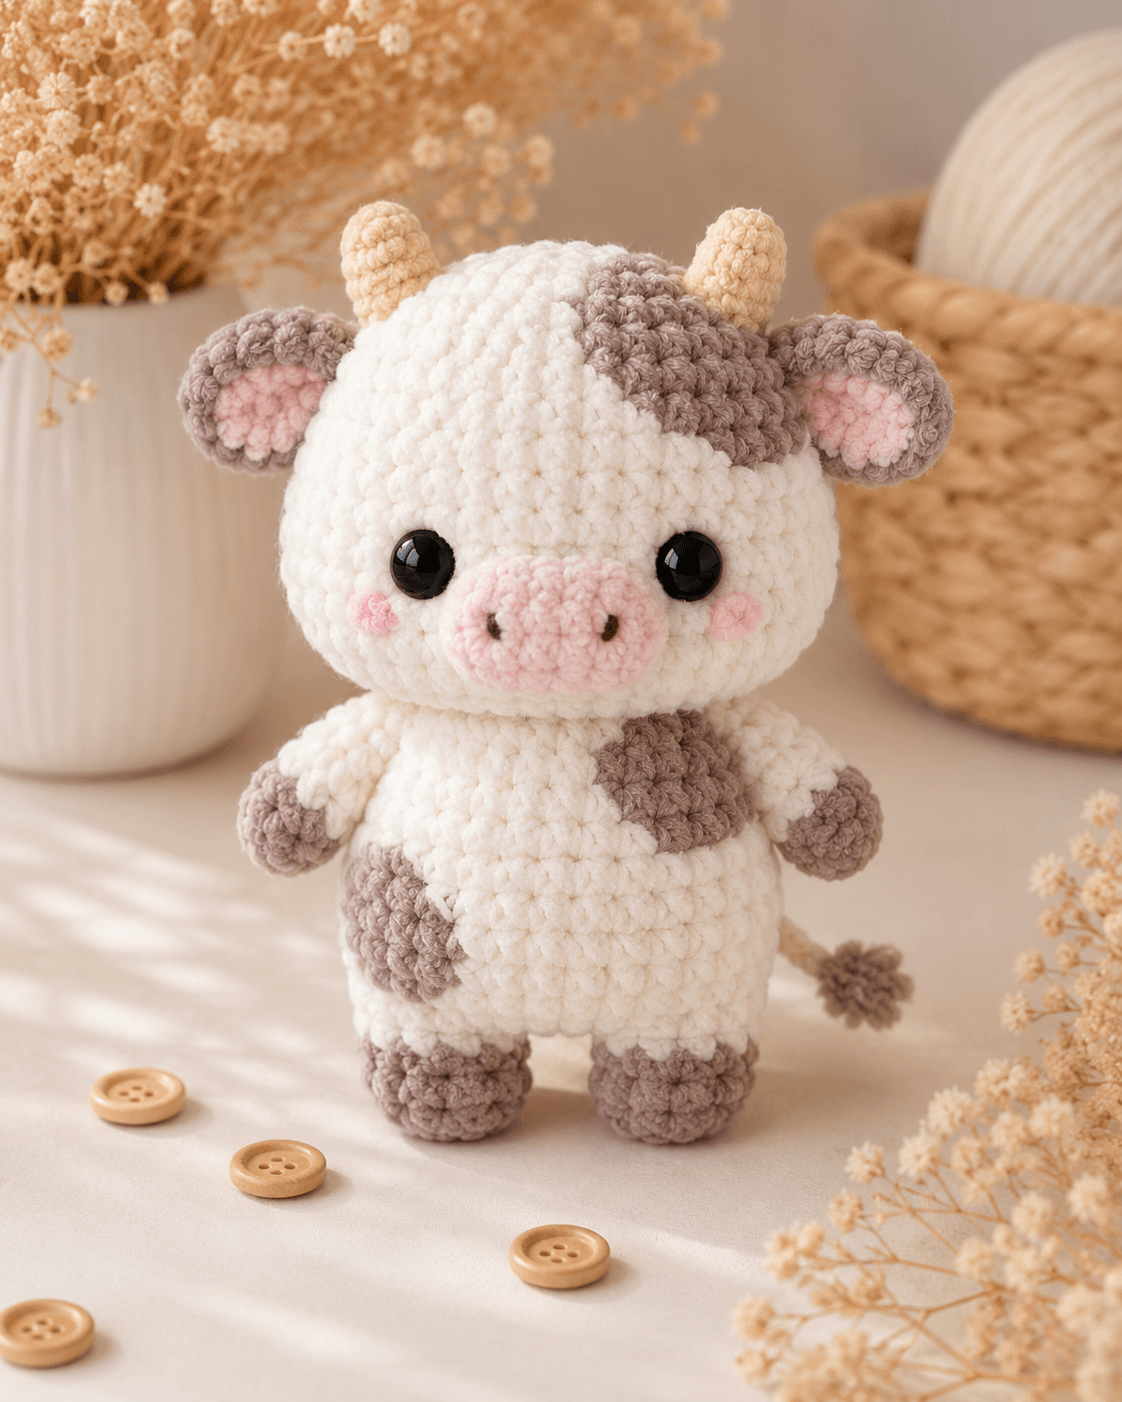
The head reaches a 42-stitch plateau, providing enough width for large eyes, a raised oval muzzle and low-set ears. A separate gray patch crosses the upper-right side of the face instead of being introduced through repeated color changes. That method creates a cleaner irregular marking and prevents carried yarn from tightening the head.
The body uses a 36-stitch plateau and tapers toward the neck, placing most of the stuffing directly above the hooves. Small arms sit at the upper sides rather than across the chest, while rounded back-leg patches reproduce the photographed marking. The horns are intentionally shorter than the ears. Longer horns shift the design toward an adult bull and interfere with the compact calf proportion. One frequent error in a chenille cow crochet pattern is attaching the muzzle too high, which crowds the eyes and removes the visible forehead area.
Project Info at a Glance
| Skill Level | Working Time | Finished Size | Hook | Best For |
|---|---|---|---|---|
| Intermediate | 8–10 hours | Approximately 26 cm | 4 mm | Farm sets, nursery display and handmade gifts |
The finished measurement assumes super-bulky chenille yarn and firm amigurumi tension. Individual gauge, stuffing density and yarn brand can change the final height by 2–3 cm.
Materials and Tools
Yarn
- Cream white — super-bulky chenille — approximately 120 g — Premier Parfait Chunky, Himalaya Dolphin Baby or a comparable plush yarn
- Warm gray — super-bulky chenille — approximately 45 g — used for the head patch, ears, arms, spots, hooves and tail tuft
- Pale pink — bulky or doubled DK yarn — approximately 15 g — used for the muzzle, inner ears and cheeks
- Light tan — bulky yarn — approximately 10 g — used for the horns
- Dark brown — embroidery thread — less than 2 g — used for the nostrils
Tools
- 4 mm crochet hook
- 14 mm black safety eyes
- Polyester fiberfill
- Yarn needle
- Locking stitch markers
- Long sewing pins
- Scissors
- Row counter
Replace plastic safety eyes with embroidered eyes when making the cow for a child younger than three years.
Abbreviations
- MR — magic ring
- sc — single crochet
- inc — two single crochets in one stitch
- dec — single crochet decrease
- sl st — slip stitch
- ch — chain
- BLO — back loop only
- FLO — front loop only
- FO — fasten off
Work an invisible decrease through the front loops of the next two stitches to limit gaps around stuffed sections.
Pattern — Step by Step
Work in a continuous spiral unless a section states otherwise. Place a stitch marker in the first stitch of each round. Count every completed round before moving the marker because chenille fibers can conceal skipped stitches.
Head
Yarn: cream white. Standard six-stitch amigurumi expansion.
- R1: 6 sc in MR (6)
- R2: inc ×6 (12)
- R3: (sc, inc) ×6 (18)
- R4: (2 sc, inc) ×6 (24)
- R5: (3 sc, inc) ×6 (30)
- R6: (4 sc, inc) ×6 (36)
- R7: (5 sc, inc) ×6 (42)
- R8–R16: sc around (42)
- R17: (5 sc, dec) ×6 (36)
- R18: (4 sc, dec) ×6 (30)
- R19: (3 sc, dec) ×6 (24)
- R20: (2 sc, dec) ×6 (18)
- R21: (sc, dec) ×6 (12)
- R22: dec ×6 (6)
Insert the 14 mm safety eyes between R12 and R13 with nine visible stitches between the posts. Begin stuffing after R18. Add small pieces around the eye backs to maintain an even facial curve.
Fasten off. Close the six remaining stitches and hide the yarn tail inside the head.
Body
Yarn: cream white.
- R1: 6 sc in MR (6)
- R2: inc ×6 (12)
- R3: (sc, inc) ×6 (18)
- R4: (2 sc, inc) ×6 (24)
- R5: (3 sc, inc) ×6 (30)
- R6: (4 sc, inc) ×6 (36)
- R7–R13: sc around (36)
- R14: (4 sc, dec) ×6 (30)
- R15–R17: sc around (30)
- R18: (3 sc, dec) ×6 (24)
- R19–R21: sc around (24)
Stuff the lower body firmly and distribute the filling toward the sides. Leave the final two rounds moderately soft so the neck edge can sit against the head.
Fasten off. Leave a 35 cm tail for sewing.
Arms — Make Two
Begin with warm gray and change to cream white.
- R1: 6 sc in MR (6)
- R2: inc ×6 (12)
- R3–R5: sc around (12)
- R6: (2 sc, dec) ×3 (9)
- R7: change to cream white, sc around (9)
- R8–R11: sc around (9)
Stuff the gray end lightly. Leave the cream upper section unstuffed so it can lie flat against the body.
Fasten off. Leave a 25 cm sewing tail.
Back Legs — Make Two
Begin with warm gray and change to cream white.
- R1: 6 sc in MR (6)
- R2: inc ×6 (12)
- R3: (sc, inc) ×6 (18)
- R4–R6: sc around (18)
- R7: (sc, dec) ×6 (12)
- R8: change to cream white, BLO sc around (12)
- R9–R12: sc around (12)
Pack the gray hoof firmly. Add less stuffing to the cream section so the leg does not become wider than the hoof.
Fasten off. Leave a 30 cm sewing tail.
Outer Ears — Make Two
Yarn: warm gray.
- R1: 6 sc in MR (6)
- R2: inc ×6 (12)
- R3: (sc, inc) ×6 (18)
- R4–R5: sc around (18)
- R6: (sc, dec) ×6 (12)
Do not stuff. Flatten each ear without pressing out the rounded outer edge.
Fasten off. Leave a 25 cm sewing tail.
Inner Ears — Make Two
Yarn: pale pink. Work as flat circles.
- R1: 6 sc in MR (6)
- R2: inc ×6 (12)
- R3: (sc, inc) ×6 (18)
Fasten off. Leave a 20 cm tail. Sew one pink circle inside each gray ear, keeping a narrow gray border visible.
Horns — Make Two
Yarn: light tan.
- R1: 6 sc in MR (6)
- R2: inc ×6 (12)
- R3–R5: sc around (12)
- R6: (2 sc, dec) ×3 (9)
- R7–R8: sc around (9)
- R9: (sc, dec) ×3 (6)
Stuff lightly. Shape each horn into a short rounded cone rather than a pointed spike.
Fasten off. Leave a 20 cm sewing tail.
Muzzle
Yarn: pale pink. Work around both sides of the starting chain to form an oval.
- R1: ch 7, sc in the second chain from the hook, 4 sc, 3 sc in the final chain; continue along the opposite side, 4 sc, inc (14)
- R2: inc, 4 sc, inc ×3, 4 sc, inc ×2 (20)
- R3: sc, inc, 4 sc, (sc, inc) ×3, 4 sc, (sc, inc) ×2 (26)
- R4–R5: sc around (26)
Add a thin layer of stuffing. The muzzle should project approximately 2 cm from the face without becoming spherical.
Fasten off. Leave a 35 cm sewing tail.
Cheek Patches — Make Two
Yarn: pale pink.
- R1: 6 sc in MR (6)
- R2: inc ×6 (12)
Fasten off. Leave a 15 cm sewing tail. Flatten each circle before positioning it beside the muzzle.
Head Patch
Yarn: warm gray. Work in turned rows to create an irregular forehead marking.
- Row 1: ch 9, sc in the second chain from the hook and across (8)
- Row 2: ch 1, turn, inc, 6 sc, inc (10)
- Row 3: ch 1, turn, sc across (10)
- Row 4: ch 1, turn, dec, 6 sc, dec (8)
- Row 5: ch 1, turn, sc across (8)
- Row 6: ch 1, turn, dec, 4 sc, dec (6)
- Row 7: ch 1, turn, sc across (6)
Fasten off. Leave a 35 cm tail. The wider edge sits near the top of the head, while the narrow edge points toward the right eye.
Chest Patch
Yarn: warm gray.
- R1: 6 sc in MR (6)
- R2: inc ×6 (12)
- R3: (sc, inc) ×6 (18)
- R4: (2 sc, inc) ×6 (24)
Fasten off. Leave a 30 cm tail. Pin the circle slightly off-center and stretch it into an oval during sewing.
Side Body Patch
Yarn: warm gray.
- R1: 6 sc in MR (6)
- R2: inc ×6 (12)
- R3: (sc, inc) ×6 (18)
Fasten off. Leave a 25 cm tail. Attach the patch to the lower-left side of the body.
Tail
Begin with cream white.
- R1: 6 sc in MR (6)
- R2–R10: sc around (6)
Do not stuff the tail stem.
Fasten off. Leave a 25 cm sewing tail.
Tail Tuft
Yarn: warm gray.
- R1: 6 sc in MR (6)
- R2: inc ×6 (12)
- R3: sc around (12)
- R4: dec ×6 (6)
Stuff lightly before closing.
Fasten off. Leave a 15 cm tail and sew the tuft to the end of the cream tail stem.
Nostrils
Use dark brown embroidery thread.
Make two short vertical stitches across the center of the muzzle. Place the nostrils approximately 3 cm apart and keep both stitches below the muzzle’s horizontal midpoint.
Assembly
- Pin the head to the body with the eye line centered above the chest. Sew through every body stitch and the corresponding head fabric.
- Attach the back legs beneath the body with approximately 1 cm between their inner edges. Place both hooves flat on the work surface before tightening the stitches.
- Pin the muzzle between R13 and R17 of the head. Sew around the complete edge while keeping the oval level.
- Attach the cheek patches beside the muzzle and one round below the eyes. Leave two visible cream stitches between each cheek and muzzle.
- Sew the head patch across the upper-right forehead. Keep its narrow end at least one full round above the right safety eye.
- Attach the ears between R7 and R10 of the head. Angle the openings slightly forward so the pink centers remain visible.
- Sew one horn inside each ear. Leave approximately one stitch of cream head fabric between the horn and ear attachment.
- Attach the arms between R16 and R18 of the body. Angle each arm downward by approximately 30 degrees.
- Sew the chest and side patches flat against the body. Add the tail to the lower back and place its tuft slightly to one side.
- Embroider the nostrils, weave all remaining tails through at least 4 cm of stuffed fabric and reshape the head and hooves.
The finished cow should stand with both hooves level, the muzzle centered and the horns visible above the ears.
7 Technical Tips
- Spiral rotation: Move the stitch marker after every completed round. A two-stitch shift can rotate the muzzle away from the center of the chest.
- Unstable lower body: Add stuffing until the widest body round compresses by no more than 1 cm. A soft base allows the heavy head to pull the cow forward.
- Open decrease gaps: Work every decrease through the front loops only. Two-loop decreases can reveal pale stuffing between gray or pink chenille stitches.
- Incorrect eye timing: Install the safety-eye washers before completing R18 of the head. The opening becomes difficult to access after the stitch count drops below 30.
- Loose chenille tension: Keep each stitch tight enough that the hook meets light resistance when entering the next loop. Oversized loops distort the edge of the muzzle and spots.
- Uneven horn placement: Measure both horn bases from the center of the head before sewing. A difference of one stitch becomes visible because the horns stand vertically.
- Escaping yarn tails: Pass each sewing tail through the stuffed piece in three directions before trimming. A single straight pass can pull free when the ears or tail are repositioned.
Positioning the Cow Markings
The gray markings should appear irregular without hiding the cow’s primary structure. Place the forehead patch on one side rather than centering it between the horns. Its upper edge may extend beneath the right horn, but the lower point should stop above the eye.
Pin every body marking before sewing the first patch. The chest circle sits high on the torso, while the side patch belongs near the widest body rounds. When both markings are placed at the same height, the design looks banded instead of naturally spotted.
Use small stitches around each patch and catch only the outer loops. Pulling deeply through the body compresses the edge and creates a groove around the marking. The maker should rotate the cow after every four or five sewing stitches to check that the patch remains flat.
Shaping the Muzzle
The muzzle controls most of the cow’s facial proportion. Stuff it lightly enough to keep the oval shape, then press the center before pinning. Excess filling turns the piece into a ball and pushes the nostrils toward the outer edge.
Position the upper muzzle edge below the eye posts rather than between them. Approximately one round of cream fabric should remain visible between each eye and the pink oval. This gap keeps the eyes separate from the facial feature and leaves space for the cheek patches.
Begin sewing at the lower center, work toward one side and stop halfway. Check the angle before completing the second half. A muzzle tilted by even one stitch makes the nostrils appear uneven after embroidery.
Changing the Finished Size
For a smaller cow, use worsted-weight yarn with a 3–3.5 mm hook while retaining the written stitch counts. The finished figure will be shorter and the separate patches will require less yarn. Safety eyes between 10 and 12 mm usually suit that reduced scale.
To reduce the pattern structurally, stop the head after the 36-stitch increase round and stop the body at 30 stitches. Remove one plain round from every arm and leg. The muzzle should end after its 20-stitch round so it remains proportional to the narrower face.
A larger version requires more than adding rounds to the head. When the head increases to 48 stitches, raise the body plateau to 42 stitches and the hooves to 24 stitches. Wider supporting parts distribute the added weight and limit forward leaning.
Working with Chenille Yarn
Chenille fibers can obscure the top loops, particularly when cream yarn is worked under warm indoor light. Count each round before moving the marker and confirm the total with a row counter. Use the hook tip to locate the stitch opening rather than separating the fibers with force.
Close each magic ring in two stages. Pull the center partly closed, work the second round and then tighten the remaining opening. One hard pull can strip the plush coating from the internal thread.
Do not reuse a section that has lost its fiber after unraveling. Exposed yarn cores form narrow areas that become more visible after stuffing. Place new yarn joins on the back of the head or body and knot the internal ends before continuing.
The smaller hook creates dense fabric suitable for a stuffed plush cow amigurumi crochet pattern. When stuffing remains visible between stitches, reduce the hook by 0.5 mm instead of pulling every stitch excessively tight.
Conclusion
Inspect the cow from the front before trimming the final sewing tails. Both horns should stand at the same height, the pink muzzle should remain level, and the gray forehead patch must stop above the right eye. Photograph the completed plush cow amigurumi crochet pattern against a plain surface so the cream body and warm-gray markings stay distinct. Save the project image to Pinterest and share it on Instagram with #PatchworkCalf. Record the finished height, hook size and eye spacing before making another version. Would you place the next cow’s large head patch on the opposite side or keep the photographed arrangement?









