Introduction
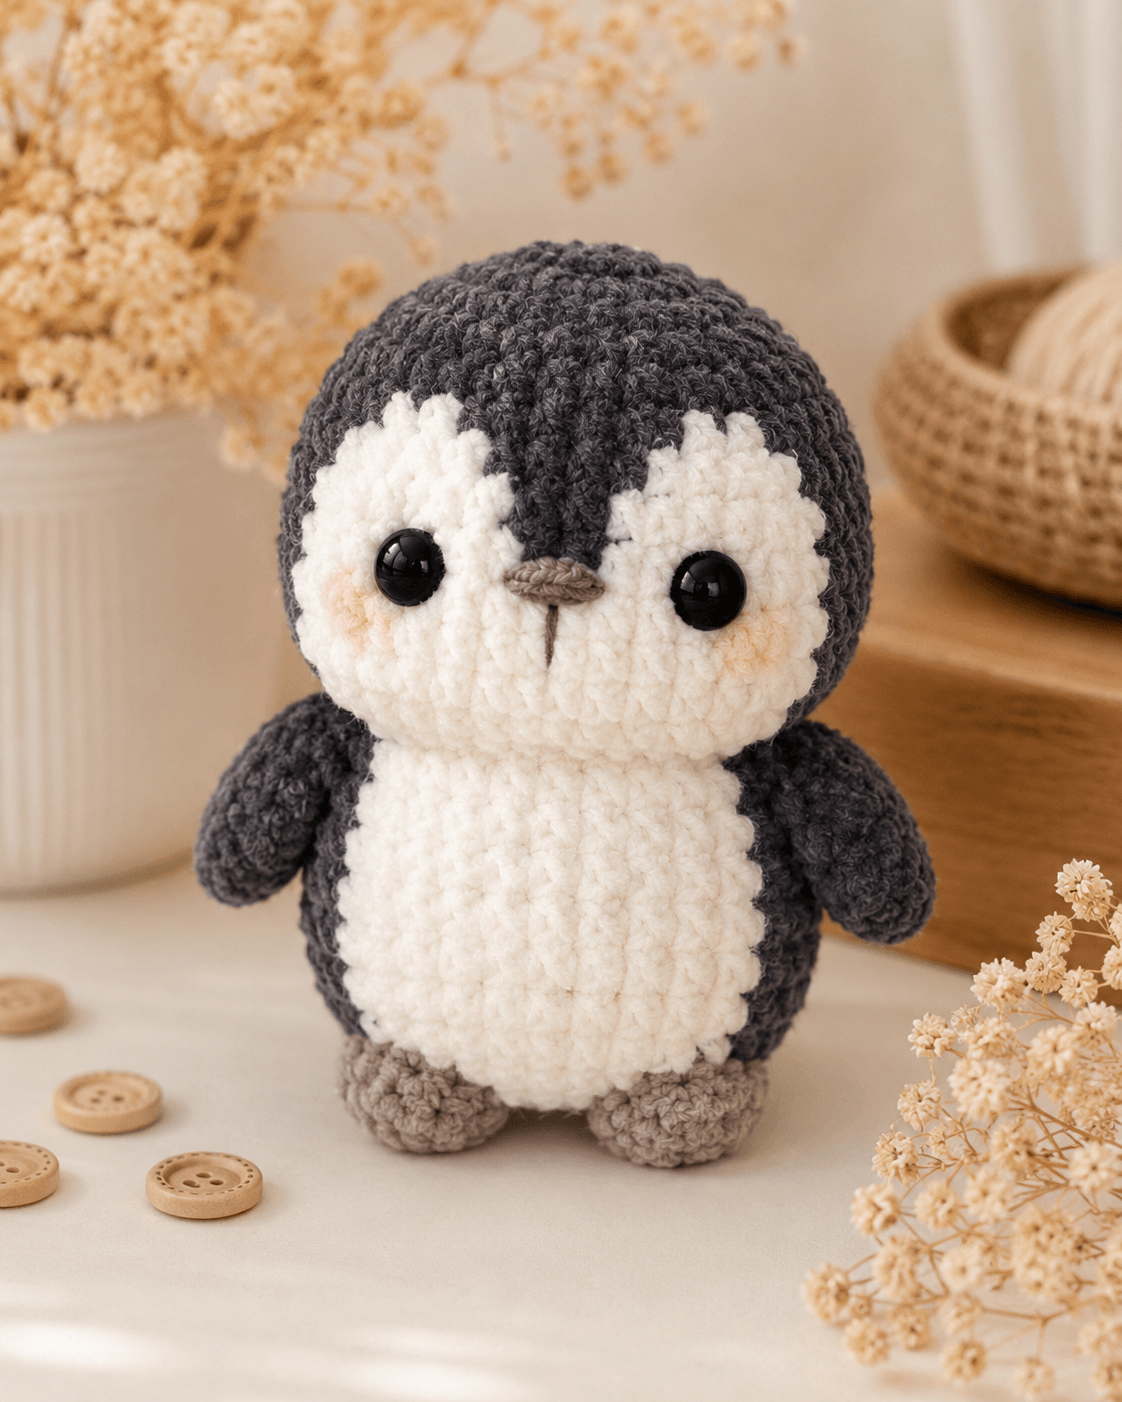
A penguin’s white face does not form a circle; it rises around the eyes and drops beneath a dark central forehead point. This penguin amigurumi crochet pattern recreates that structure with super-bulky chenille, a 5 mm hook and two shaped face panels. The finished 25–28 cm figure suits intermediate makers and stands without wire because its stuffed feet and compact body distribute the head weight across a broad base.
The Design: What Makes Pebble the Penguin Different
Pebble uses a 42-stitch head plateau to hold two cream face panels without narrowing the charcoal crown. Their inner edges meet below the beak but separate above it, leaving the pointed forehead marking visible. A 36-stitch body keeps the silhouette compact while providing enough surface for the broad white belly. Each wing is crocheted as a lightly stuffed tapered oval, then sewn at a downward angle so it reads as a flipper rather than an arm. The feet use a back-loop round to define flat soles and reduce sideways rolling. One common failure in a chunky penguin crochet pattern is placing the belly too high. That position erases the short white neck section and makes the face appear connected directly to the torso. Leave one complete cream row visible between the lower face and the belly patch.
Project Info at a Glance
| Skill Level | Time | Finished Size | Hook | Best For |
|---|---|---|---|---|
| Intermediate | 7–9 hours | 25–28 cm | 5 mm | Nursery displays, winter decor and supervised play |
Materials and Tools
Yarn
- Charcoal gray — super-bulky chenille — approximately 100–120 g — Premier Parfait Chunky, Himalaya Dolphin Baby or an equivalent yarn.
- Cream white — super-bulky chenille — approximately 65–80 g — use the same yarn line as the charcoal yarn.
- Taupe — bulky or super-bulky chenille — approximately 15–20 g — used for the feet and beak.
- Pale peach — DK cotton or smooth acrylic — less than 5 g — used for the cheek patches.
- Dark brown — embroidery cotton — approximately 50 cm — used for the short mouth line.
Tools
- 5 mm crochet hook
- 15 mm black safety eyes
- Polyester stuffing, approximately 100–130 g
- Large-eye yarn needle
- Locking stitch markers
- Dressmaking pins
- Scissors
Plastic safety eyes are not suitable for children younger than three years. Substitute tightly embroidered eyes when the finished penguin is intended for a young child.
Abbreviations
- MR — magic ring
- sc — single crochet
- inc — work 2 sc in one stitch
- dec — single crochet decrease
- sl st — slip stitch
- ch — chain
- BLO — back loop only
- FLO — front loop only
- hdc — half double crochet
For an invisible decrease, insert the hook through the front loops of the next two stitches, yarn over, pull through both front loops, then complete one single crochet.
Pattern — Step by Step
Work in a continuous spiral unless a section states otherwise. Move the stitch marker after the last stitch of every round.
Head
Yarn: charcoal gray — standard six-stitch amigurumi geometry.
R1: 6 sc in MR (6)
R2: inc ×6 (12)
R3: (1 sc, inc) ×6 (18)
R4: (2 sc, inc) ×6 (24)
R5: (3 sc, inc) ×6 (30)
R6: (4 sc, inc) ×6 (36)
R7: (5 sc, inc) ×6 (42)
R8–R14: 42 sc (42)
R15: (5 sc, dec) ×6 (36)
R16: (4 sc, dec) ×6 (30)
R17: (3 sc, dec) ×6 (24)
R18: (2 sc, dec) ×6 (18)
R19: (1 sc, dec) ×6 (12)
R20: dec ×6 (6)
Do not install the eyes until both face panels are pinned. Begin stuffing after R16. Pack the crown firmly and add smaller pieces behind the face to preserve the rounded cheeks.
Fasten off. Leave a 20 cm tail and close the final six front loops.
Left Face Panel
Yarn: cream white — worked as a shaped oval.
Ch 7.
R1: Starting in the second ch from the hook, 5 sc, 3 sc in the final ch, continue along the opposite side, 4 sc, inc (14)
R2: inc, 4 sc, inc ×3, 4 sc, inc ×2 (20)
R3: 1 sc, inc, 4 sc, (1 sc, inc) ×3, 4 sc, (1 sc, inc) ×2 (26)
R4: 2 sc, inc, 4 sc, (2 sc, inc) ×3, 4 sc, (2 sc, inc) ×2 (32)
Join with a sl st. Fasten off and leave a 35 cm sewing tail.
Right Face Panel
Yarn: cream white — repeat the shaped oval instructions.
Ch 7.
R1: Starting in the second ch from the hook, 5 sc, 3 sc in the final ch, continue along the opposite side, 4 sc, inc (14)
R2: inc, 4 sc, inc ×3, 4 sc, inc ×2 (20)
R3: 1 sc, inc, 4 sc, (1 sc, inc) ×3, 4 sc, (1 sc, inc) ×2 (26)
R4: 2 sc, inc, 4 sc, (2 sc, inc) ×3, 4 sc, (2 sc, inc) ×2 (32)
Join with a sl st. Fasten off and leave a 35 cm sewing tail.
Pin the panels across head R9–R15. Their lower inner edges should overlap by approximately 8 mm, while the upper inner edges should remain 3–4 stitches apart. This opening forms the charcoal forehead point. Install the 15 mm eyes through the panels and head between head R11 and R12, leaving eight visible head stitches between the eye posts. Sew through the outer panel loops.
Body
Yarn: charcoal gray — standard six-stitch amigurumi geometry.
R1: 6 sc in MR (6)
R2: inc ×6 (12)
R3: (1 sc, inc) ×6 (18)
R4: (2 sc, inc) ×6 (24)
R5: (3 sc, inc) ×6 (30)
R6: (4 sc, inc) ×6 (36)
R7–R13: 36 sc (36)
R14: (4 sc, dec) ×6 (30)
R15–R16: 30 sc (30)
R17: (3 sc, dec) ×6 (24)
R18–R19: 24 sc (24)
R20: (2 sc, dec) ×6 (18)
R21: (1 sc, dec) ×6 (12)
R22: dec ×6 (6)
Pack the first thirteen rounds firmly. Reduce the stuffing pressure above R17 so the neck seam can remain flat.
Fasten off. Leave a 35 cm tail for attaching the head.
Belly Patch
Yarn: cream white — worked as a flat oval.
Ch 9.
R1: Starting in the second ch from the hook, 7 sc, 3 sc in the final ch, continue along the opposite side, 6 sc, inc (18)
R2: inc, 6 sc, inc ×3, 6 sc, inc ×2 (24)
R3: 1 sc, inc, 6 sc, (1 sc, inc) ×3, 6 sc, (1 sc, inc) ×2 (30)
R4: 2 sc, inc, 6 sc, (2 sc, inc) ×3, 6 sc, (2 sc, inc) ×2 (36)
R5: 3 sc, inc, 6 sc, (3 sc, inc) ×3, 6 sc, (3 sc, inc) ×2 (42)
Join with a sl st. Fasten off and leave a 40 cm sewing tail.
Pin the belly vertically across body R5–R17. Keep its lower edge one round above the feet and its upper edge below the neck seam.
Wings — Make 2
Yarn: charcoal gray — tapered oval construction.
R1: 6 sc in MR (6)
R2: inc ×6 (12)
R3–R5: 12 sc (12)
R6: (2 sc, dec) ×3 (9)
R7–R9: 9 sc (9)
R10: (1 sc, dec) ×3 (6)
Add a small amount of stuffing to R1–R5 only. Flatten the upper opening and crochet 3 sc through both layers.
Fasten off. Leave a 25 cm sewing tail.
Feet — Make 2
Yarn: taupe — flat-soled construction.
R1: 6 sc in MR (6)
R2: inc ×6 (12)
R3: (1 sc, inc) ×6 (18)
R4: BLO 18 sc (18)
R5–R6: 18 sc (18)
R7: (1 sc, dec) ×6 (12)
R8: 12 sc (12)
Stuff the first six rounds firmly. Flatten the opening horizontally and work 6 sc through both layers.
Fasten off. Leave a 25 cm sewing tail.
Beak
Yarn: taupe — worked as a narrow oval.
Ch 5.
R1: Starting in the second ch from the hook, 3 sc, 3 sc in the final ch, continue along the opposite side, 2 sc, inc (10)
R2: 10 sc (10)
Flatten the beak without stuffing. The finished piece should measure approximately 22–25 mm across.
Fasten off. Leave a 20 cm sewing tail.
Cheek Patches — Make 2
Yarn: pale peach DK yarn — standard flat-circle math.
R1: 6 sc in MR (6)
R2: inc ×6 (12)
Join with a sl st. Fasten off and leave a 15 cm sewing tail. Each patch should measure approximately 18 mm across.
Optional Tail
Yarn: charcoal gray — small tapered piece hidden behind the body in the reference view.
R1: 6 sc in MR (6)
R2: inc ×6 (12)
R3–R4: 12 sc (12)
R5: (1 sc, dec) ×4 (8)
R6: 8 sc (8)
Stuff lightly, flatten the opening and crochet 4 sc through both layers.
Fasten off. Leave a 20 cm sewing tail.
Mouth Line
Thread the needle with dark brown embroidery cotton. Bring the yarn out directly beneath the center of the beak and make one vertical stitch measuring 10–12 mm. Return the yarn through the same lower hole and secure it inside the head.
Assembly
- Pin the head to the body with the charcoal forehead point centered above the belly. Sew twice around the neck opening.
- Add small pieces of stuffing through the remaining neck gap, then close the seam without compressing the cream face panels.
- Sew the belly patch through its outer loops, keeping the long axis aligned with the center front of the body.
- Attach the beak over the overlapping lower edges of the face panels. Its center should sit one round below the eye posts.
- Sew the cheek patches one round below the eyes and approximately one stitch outside each eye’s outer edge.
- Embroider the vertical mouth line beneath the center of the beak after both cheeks have been secured.
- Attach the wings between body R14 and R17. Angle each wing downward by approximately 20 degrees.
- Sew the feet across body R4–R8, leaving three visible body stitches between their inner edges.
- Attach the optional tail at the center back between body R6 and R8. Keep its tip angled downward so it does not push the body forward.
- Weave each chenille tail through at least three changes of direction, trim it inside the stuffed fabric and move the surrounding pile over the exit point.
The completed penguin should stand with both feet flat, the belly centered and the wings hanging at matching angles.
7 Technical Tips
- Head-round drift: A misplaced round marker shifts the forehead point away from the beak. Count all 42 stitches after every plateau round.
- Loose face edges: Gaps wider than 3 mm expose charcoal stitches around the cream panels. Place a pin through every fourth outer loop before sewing.
- Visible decrease holes: Standard decreases can open the chenille fabric and reveal stuffing. Work each head and body decrease through the front loops only.
- Late eye installation: Safety-eye washers cannot be added after the head closes. Fit both 15 mm eyes before starting head R16.
- Rotating wings: A single straight seam allows the flippers to twist forward. Add one concealed anchor stitch 15 mm below each wing attachment.
- Uneven foot pressure: A 5 mm height difference can make the body lean sideways. Pin both feet and test the penguin on a level surface before sewing.
- Escaping yarn tails: Chenille ends woven in one direction can slide through the fabric. Carry each tail through at least 5 cm of stuffing and reverse direction three times.
Conclusion
Place the assembled figure on a level surface before trimming the final yarn tails. Both taupe feet should carry equal weight, the cream belly should remain centered and the forehead point should end directly above the beak. Record the yarn brand, hook size and finished height on the working copy because chenille thickness changes the scale significantly. The next step is to photograph the penguin from the front and both sides so the wing angles can be checked. Share the finished project on Pinterest and Instagram with #PebblePenguinPattern. This penguin amigurumi crochet pattern can also be tested in smooth worsted yarn. Did you make Pebble’s forehead point narrow or broad?









