Introduction
A lamb’s fleece grows outward while its muzzle stays visually flat, so the two surfaces cannot use the same stitch texture. This plush lamb amigurumi crochet pattern combines bobble-stitch fleece, smooth facial rounds and super-bulky chenille yarn. Made with a 4 mm hook, it produces a standing lamb about 25 cm tall. The pattern suits intermediate crocheters and creates a stable nursery display or handmade farm-animal gift.
The Design: What Makes This Lamb Different
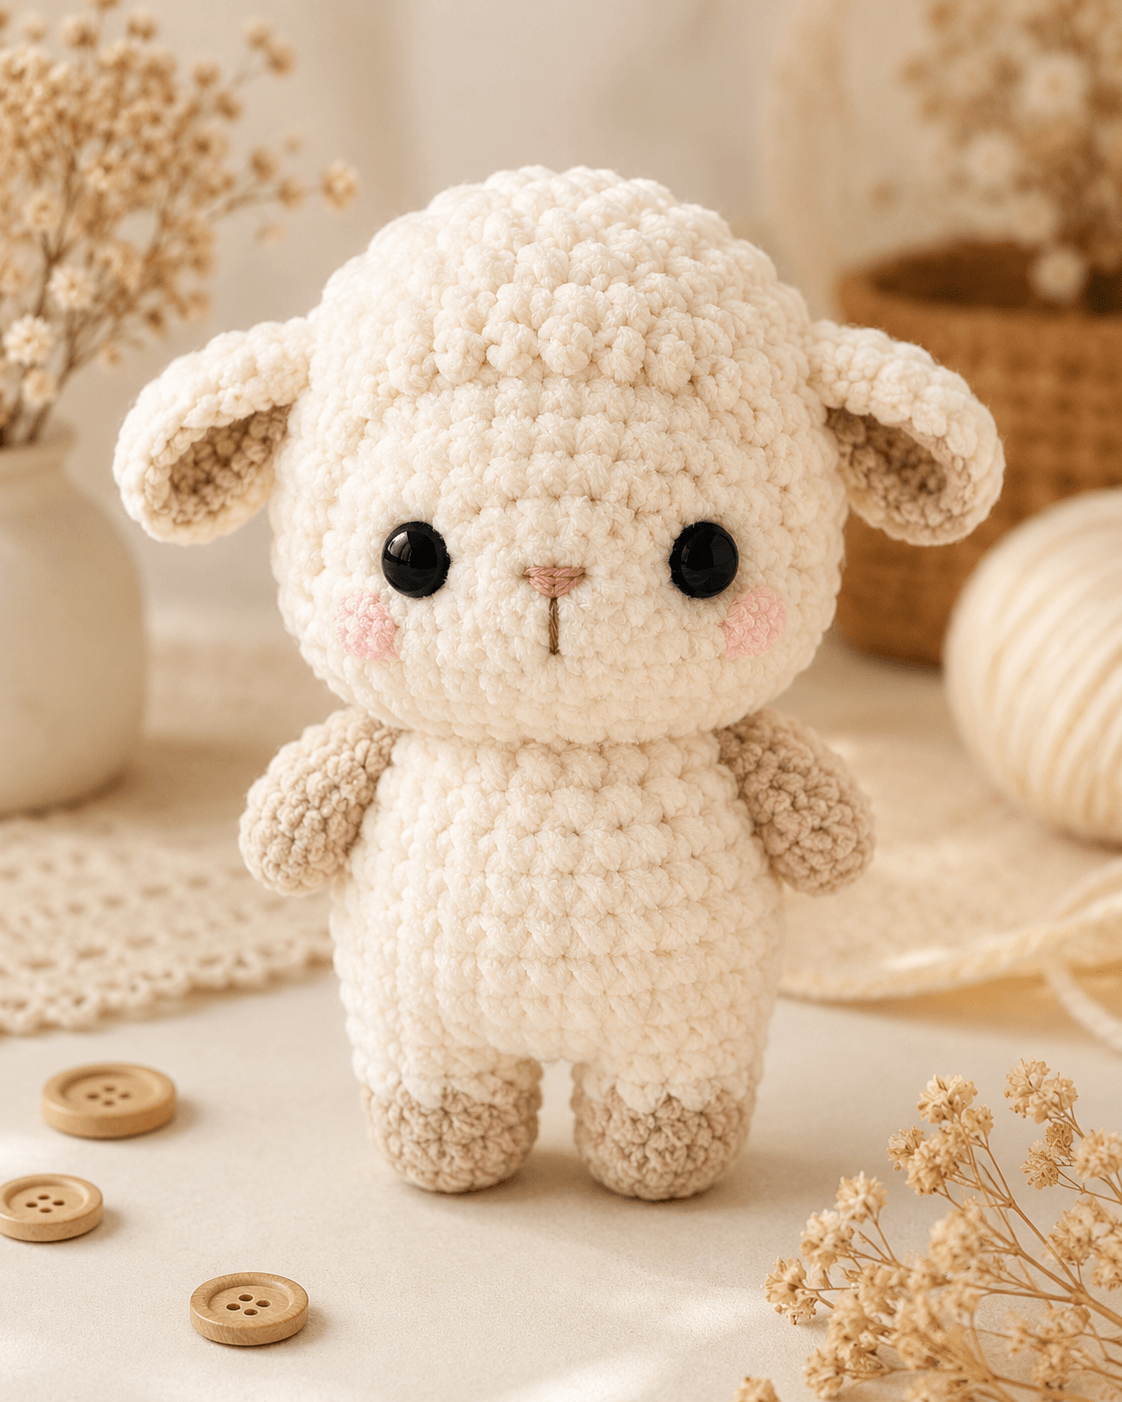
The head uses a 42-stitch plateau to support the broad wool cap, widely spaced eyes and low horizontal ears. Bobble stitches cover the upper head without crossing the face, preserving the short muzzle associated with a young lamb. A separate body reaches 36 stitches, giving the figure a narrower torso and enough weight over the legs to stand.
Drooping ears are worked as shallow cups rather than flat leaves. That construction exposes the taupe inner ear while the cream edge bends forward. The arms remain small and angled away from the body, matching the photographed pose instead of creating long hanging limbs. A common error in a sheep crochet pattern is spreading the fleece texture across every surface. When bobbles cover the cheeks, eye placement becomes uneven and the embroidered nose disappears into the fabric.
Project Info at a Glance
| Skill Level | Working Time | Finished Size | Hook | Best For |
|---|---|---|---|---|
| Intermediate | 8–10 hours | Approximately 25 cm | 4 mm | Nursery decor, farm sets and handmade gifts |
Published lamb patterns vary widely by yarn and construction. A standing worsted-weight lamb can measure about 26.5 cm, while another detailed design reaches 34 cm with a 3 mm hook. The dimensions in this pattern are based on the photographed proportions and a super-bulky chenille gauge. Reference: Ravelry Lamb Amigurumi. Reference: Ravelry Amigurumi Lamb-Sheep.
Materials and Tools
Yarn
- Cream white — super-bulky chenille — approximately 120 g — Premier Parfait Chunky, Himalaya Dolphin Baby or a comparable plush yarn
- Warm taupe — super-bulky chenille — approximately 35 g — used for inner ears, arms and hooves
- Pale pink — DK cotton or thin velvet yarn — approximately 5 g — used for cheeks and nose embroidery
- Dark brown — embroidery thread — less than 2 g — used for the mouth line
Tools
- 4 mm crochet hook
- 12 mm black safety eyes
- Polyester fiberfill
- Yarn needle
- Locking stitch markers
- Long sewing pins
- Scissors
- Row counter
Lamb patterns made in finer yarn commonly use 6–13 mm eyes, while larger cuddle-size versions may specify 15 mm. Twelve-millimeter eyes match this lamb’s broad chenille face without covering the cheek area. Reference: Crochet Lamb/Sheep. Reference: Cuddle-Sized Lamb Pattern.
Plastic safety eyes are unsuitable for children younger than three years. Replace them with firmly embroidered eyes when the finished lamb is intended for that age group.
Abbreviations
- MR — magic ring
- sc — single crochet
- inc — two single crochets in one stitch
- dec — single crochet decrease
- sl st — slip stitch
- ch — chain
- BLO — back loop only
- FLO — front loop only
- bo — bobble stitch
- FO — fasten off
For an invisible decrease, insert the hook through the front loops of the next two stitches, yarn over and complete one single crochet through both loops.
Bobble Stitch
Work five unfinished double crochets into the same stitch, leaving the final loop of each double crochet on the hook. Yarn over and pull through all six loops. Push the cluster toward the outside of the fabric before working the next single crochet.
Pattern — Step by Step
Work in a continuous spiral unless a section states otherwise. Place a marker in the first stitch of each round. Every round begins with a six-stitch magic ring, and each standard increase round adds six stitches.
Head
Yarn: cream white. Use standard amigurumi shaping with a 42-stitch medium-to-large plateau.
- R1: 6 sc in MR (6)
- R2: inc ×6 (12)
- R3: (sc, inc) ×6 (18)
- R4: (2 sc, inc) ×6 (24)
- R5: (3 sc, inc) ×6 (30)
- R6: (4 sc, inc) ×6 (36)
- R7: (5 sc, inc) ×6 (42)
- R8–R16: sc around (42)
- R17: (5 sc, dec) ×6 (36)
- R18: (4 sc, dec) ×6 (30)
- R19: (3 sc, dec) ×6 (24)
- R20: (2 sc, dec) ×6 (18)
- R21: (sc, dec) ×6 (12)
- R22: dec ×6 (6)
Insert the 12 mm eyes between R12 and R13 with nine visible stitches between the posts. Stuff firmly after R18, adding small pieces around the eye backs to keep the face rounded.
Fasten off. Close the final six stitches and weave the tail into the head.
Fleece Cap
Yarn: cream white. Work bobble rounds as a separate shallow cap fitted over the top and back of the head.
- R1: 6 sc in MR (6)
- R2: inc ×6 (12)
- R3: (sc, inc) ×6 (18)
- R4: (2 sc, inc) ×6 (24)
- R5: (bo, sc) ×12 (24)
- R6: (3 sc, inc) ×6 (30)
- R7: (sc, bo) ×15 (30)
- R8: (4 sc, inc) ×6 (36)
- R9: (bo, sc) ×18 (36)
- R10: (5 sc, inc) ×6 (42)
- R11–R12: (sc, bo) ×21 (42)
Do not stuff. Pin the cap so its front edge sits about three rounds above the eyes and its back edge reaches the neck.
Fasten off. Leave a 45 cm tail for sewing.
Body
Yarn: cream white.
- R1: 6 sc in MR (6)
- R2: inc ×6 (12)
- R3: (sc, inc) ×6 (18)
- R4: (2 sc, inc) ×6 (24)
- R5: (3 sc, inc) ×6 (30)
- R6: (4 sc, inc) ×6 (36)
- R7–R12: sc around (36)
- R13: (4 sc, dec) ×6 (30)
- R14–R16: sc around (30)
- R17: (3 sc, dec) ×6 (24)
- R18–R20: sc around (24)
Stuff the lower body firmly. Keep the upper two rounds slightly softer so the head sits close to the torso without a visible gap.
Fasten off. Leave a 35 cm tail for attaching the head.
Chest Fleece Panel
Yarn: cream white. Work in turned rows.
- Row 1: ch 13, sc in the second chain from the hook and across (12)
- Row 2: ch 1, turn, (bo, sc) ×6 (12)
- Row 3: ch 1, turn, sc across (12)
- Row 4: ch 1, turn, (sc, bo) ×6 (12)
- Row 5: ch 1, turn, sc across (12)
- Row 6: ch 1, turn, (bo, sc) ×6 (12)
- Row 7: ch 1, turn, sc across (12)
- Row 8: ch 1, turn, (sc, bo) ×6 (12)
The panel should lie flat against the upper torso. Add one plain row when a longer chest patch is needed.
Fasten off. Leave a 30 cm sewing tail.
Arms — Make Two
Yarn: warm taupe.
- R1: 6 sc in MR (6)
- R2: inc ×6 (12)
- R3–R5: sc around (12)
- R6: (2 sc, dec) ×3 (9)
- R7–R10: sc around (9)
Stuff the lower half lightly. Leave the upper half unstuffed so the arm can be flattened against the body.
Fasten off. Leave a 25 cm sewing tail.
Legs — Make Two
Begin with warm taupe and change to cream white.
- R1: 6 sc in MR (6)
- R2: inc ×6 (12)
- R3: (sc, inc) ×6 (18)
- R4–R6: sc around (18)
- R7: (sc, dec) ×6 (12)
- R8: change to cream white, BLO sc around (12)
- R9–R12: sc around (12)
Stuff the taupe hoof firmly and the cream section moderately. Roll each leg on a flat surface to check that both pieces have the same length.
Fasten off. Leave a 30 cm sewing tail.
Outer Ears — Make Two
Yarn: cream white. Work in rounds to form a shallow cup.
- R1: 6 sc in MR (6)
- R2: inc ×6 (12)
- R3: (sc, inc) ×6 (18)
- R4–R5: sc around (18)
- R6: (sc, dec) ×6 (12)
Do not stuff. Flatten the opening while keeping the center slightly cupped.
Fasten off. Leave a 25 cm sewing tail.
Inner Ears — Make Two
Yarn: warm taupe. Work as flat circles.
- R1: 6 sc in MR (6)
- R2: inc ×6 (12)
- R3: (sc, inc) ×6 (18)
Fasten off. Leave a 20 cm tail. Sew one taupe circle inside each cream ear, allowing the cream edge to remain visible.
Cheek Patches — Make Two
Yarn: pale pink.
- R1: 6 sc in MR (6)
- R2: inc ×6 (12)
Fasten off. Leave a 15 cm tail. Flatten the circles before positioning them below the eyes.
Tail
Yarn: cream white.
- R1: 6 sc in MR (6)
- R2: inc ×6 (12)
- R3: (sc, inc) ×6 (18)
- R4: (bo, sc) ×9 (18)
- R5: (sc, dec) ×6 (12)
- R6: dec ×6 (6)
Stuff lightly before closing. Keep the base flat for attachment.
Fasten off. Leave a 20 cm sewing tail.
Nose and Mouth
Use pale pink yarn for the nose and dark brown embroidery thread for the mouth.
Make four horizontal pink stitches between R14 and R15, gradually shortening the upper and lower stitches to form a small oval triangle. Bring the brown thread down from the center of the nose and work one vertical stitch approximately 1.2 cm long. The photographed lamb has no wide smile, so finish the mouth with a single straight line.
Assembly
- Pin the head to the body with the embroidered face aligned above the body’s front midpoint. Sew through every body stitch and the corresponding head fabric.
- Attach the legs beneath the body with approximately 1 cm between their inner edges. Check the standing position before tightening the final stitches.
- Pin the fleece cap over the upper head. Sew around its complete edge, then add several hidden stitches through the center to prevent lifting.
- Sew each ear below the fleece cap between R8 and R11 of the head. Angle the openings slightly forward so the taupe centers remain visible.
- Position the cheek patches one round below and two stitches outside the eyes. Sew through the outer loops without stretching the circles.
- Embroider the pink nose on the facial center line. Add the dark vertical mouth stitch directly below it.
- Pin the chest fleece panel between the neck and the widest body round. Sew around all four edges while leaving the bobbles raised.
- Attach the arms between R16 and R18 of the body. Angle each arm outward by about 25 degrees rather than pressing it flat against the torso.
- Sew the tail to the lower back between R7 and R10. Add two anchoring stitches above the base to hold it upright.
- Weave each remaining tail through at least 4 cm of stuffed fabric. Reshape the head, hooves and fleece clusters with your fingers.
The finished lamb should stand on both hooves with the head centered over the body and both inner ears visible from the front.
7 Technical Tips
- Marker drift: Move the locking marker after every completed round. A shift of two stitches can move one eye closer to an ear and rotate the nose away from the body center.
- Soft lower body: Pack fiberfill until the widest body area compresses by no more than 1 cm under finger pressure. A loosely stuffed torso folds above the legs and makes the lamb lean forward.
- Visible decrease holes: Work every decrease through front loops only. Standard decreases can expose white stuffing between the chenille fibers, particularly around the head closure.
- Late eye installation: Fit the safety-eye washers before R18 of the head. Once the opening drops below 24 stitches, the posts become difficult to reach without stretching the fabric.
- Collapsed bobbles: Push every completed bobble toward the outside before making the following single crochet. A cluster left on the wrong side creates a flat gap in the fleece cap.
- Uneven ear angle: Use three pins in each ear and measure the lower attachment points from the eye posts. A vertical difference of one round is visible because the ears extend horizontally.
- Loose woven tails: Pass each sewing tail through the stuffed piece in three different directions before trimming. A single straight pass can slide free when the arms or ears are handled.
Controlling the Fleece Texture
The bobbles should form a compact cap rather than a full sphere around the face. Keep one single crochet between neighboring clusters so the fabric can curve without becoming rigid. When the bobble rounds are packed too closely, the cap expands faster than the smooth head and develops a ruffled edge.
Work the fleece cap with slightly looser tension than the face. The cap must stretch across the 42-stitch head without flattening the underlying stuffing. Test its width after R10. When the edge does not reach both ear positions, repeat one 42-stitch round before fastening off.
Published sheep patterns use several methods for representing wool, including bouclé yarn, loop stitches and bobble stitches. This removable-cap method separates the textured area from the face, which makes eye spacing and stuffing easier to control. Reference: Bouclé Sheep Pattern. Reference: Bobble-Stitch Lamb.
Adjusting the Lamb’s Size
Yarn thickness and hook diameter alter the finished dimensions even when the stitch counts remain unchanged. Medium cotton with a 2 mm hook can produce a lamb near 12 cm, while larger worsted patterns may reach 26–34 cm. Reference: 12 cm Lamb.
For a smaller version of this pattern, stop the head after the 36-stitch increase round and stop the body at 30 stitches. Remove one plain round from each leg and arm. The fleece cap must also stop at 36 stitches or it will overhang the reduced head.
For a larger lamb, changing to thicker yarn is safer than adding isolated increase rounds. Adding six stitches only to the head can produce a heavy top that the existing legs cannot support. When increasing the head to 48 stitches, raise the body plateau to 42 stitches and widen each hoof to 24 stitches.
Working with Chenille Yarn
Chenille fibers conceal the top loops after each stitch. Count the round before moving the marker, then record the total with a row counter. Feeling the stitch opening with the hook tip is often more accurate than trying to separate the fibers visually.
Do not pull a chenille magic ring closed in one hard motion. Tighten it halfway, complete the second round and then close the remaining center. Excess force can strip the plush coating from the internal thread.
Replace any length of yarn that shows an exposed core after unraveling. Damaged chenille produces a narrow section that stuffing can widen further. Joins should be placed on the back of the head or body rather than within the fleece cap’s front edge.
A 4 mm hook is smaller than the hook commonly recommended for many super-bulky plush yarns. That smaller diameter creates the dense fabric needed for stuffed crochet while keeping the photographed lamb near the intended size.
Conclusion
Inspect the lamb from the front before trimming the final yarn tails. Both ears should begin on the same head round, the fleece cap should stop above the eyes, and the chest panel should follow the body’s center line. Photograph the finished plush lamb amigurumi crochet pattern against a plain background so the cream fleece and taupe limbs remain distinct. Save the project to Pinterest and share it on Instagram with #BobbleFleeceLamb. Record the finished height, eye spacing and yarn brand before starting another version. Would you keep the ears horizontal or lower their tips for a more pronounced droop?









