Introduction
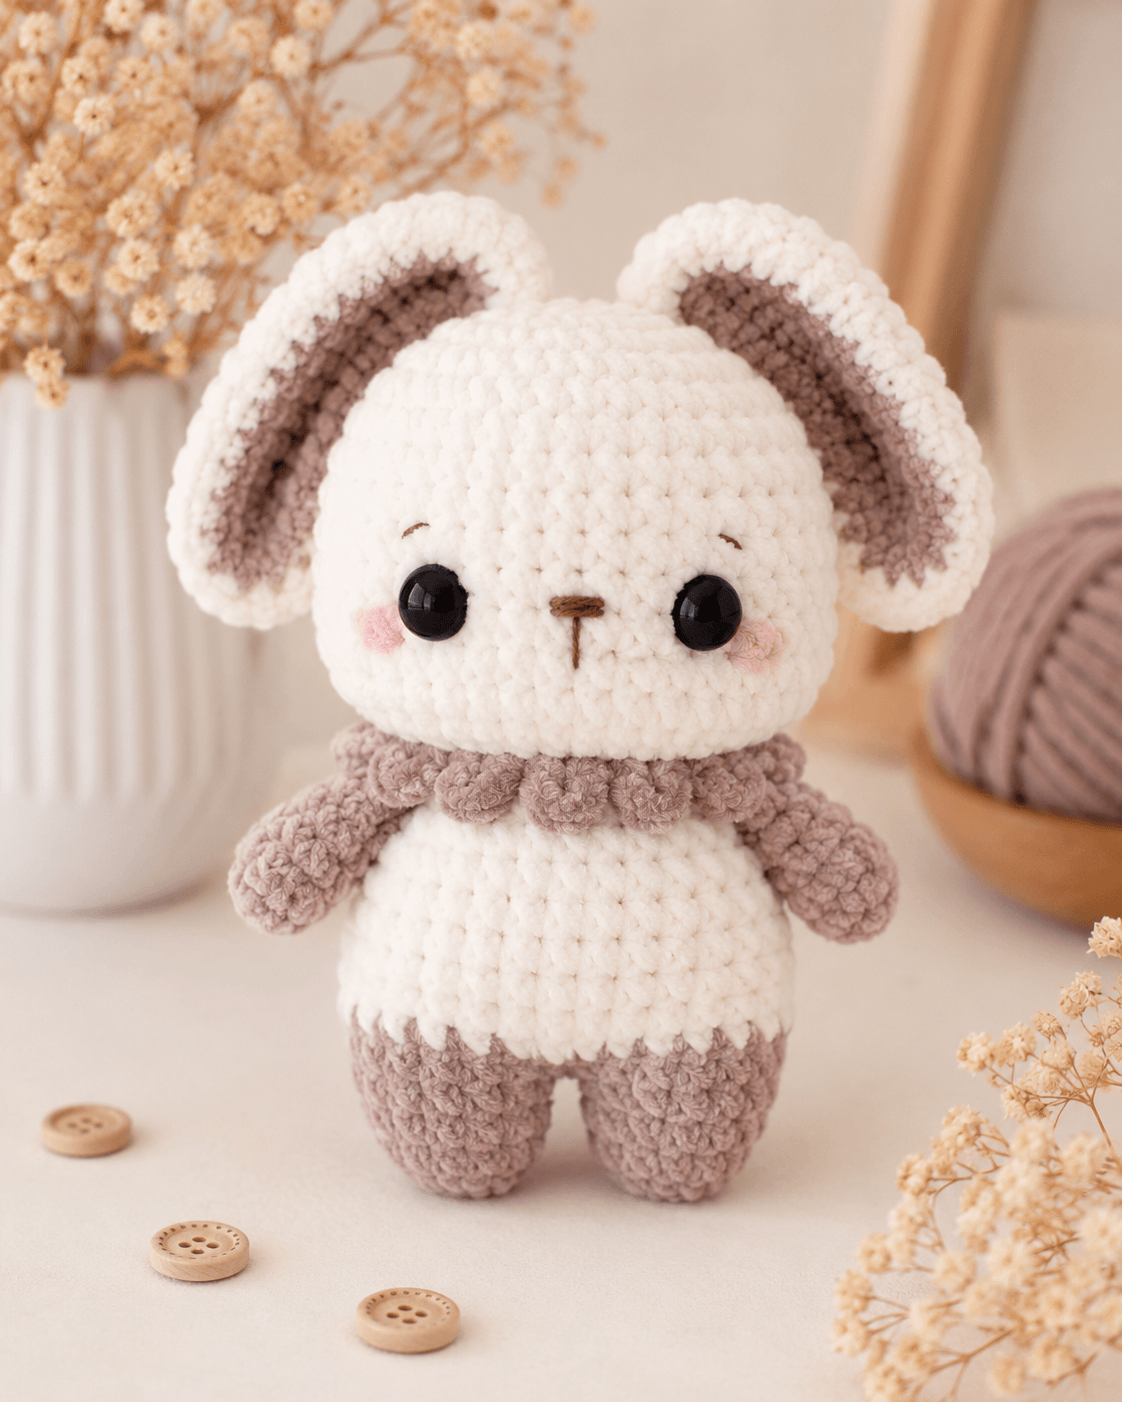
A mouse’s ears can exceed the width of its skull, and that proportion controls this entire mouse amigurumi crochet pattern. You will use super-bulky chenille, a 5 mm hook and layered ear panels to make a 25–28 cm standing figure at an intermediate skill level. The broad feet and compact body create a stable display toy that does not require internal wire.
The Design: What Makes Mallow the Mouse Different
Mallow uses a 42-stitch head plateau so the face remains wide enough to support oversized ears without looking compressed. Each ear has separate ivory and taupe layers; joining them around the edge adds stiffness and keeps the inner panel from curling forward. The body reaches only 36 stitches, which leaves the head visibly dominant while retaining enough width for stable leg placement. This plush mouse crochet pattern also uses flat-bottomed back legs rather than simple tubes. That decision reduces forward tipping after the head is attached. A frequent error in a chenille mouse amigurumi is sewing the ears too low. The maker then loses the high, open silhouette seen in the reference image. Pin both ears above the eye line and check the figure from the front before making permanent stitches.
Project Info at a Glance
| Skill Level | Time | Finished Size | Hook | Best For |
|---|---|---|---|---|
| Intermediate | 6–8 hours | 25–28 cm | 5 mm | Nursery display, shelf decor and supervised play |
Materials and Tools
Yarn
- Warm ivory — super-bulky chenille — 100–120 g — Himalaya Dolphin Baby, Premier Parfait Chunky or an equivalent yarn.
- Taupe — super-bulky chenille — 40–50 g — use the same yarn line to keep the gauge consistent.
- Dusty pink — DK cotton or smooth acrylic — less than 5 g — used for the cheek patches.
- Dark brown — embroidery cotton — approximately 1 m — used for the nose, mouth and eyebrows.
Tools
- 5 mm crochet hook
- 14 mm black safety eyes
- Polyester stuffing, approximately 90–120 g
- Yarn needle with an eye large enough for chenille
- Locking stitch markers
- Dressmaking pins
- Scissors
Safety eyes are not suitable for children younger than three years. Replace them with tightly embroidered eyes when the finished mouse is intended for a young child.
Abbreviations
- MR — magic ring
- sc — single crochet
- inc — work 2 sc in one stitch
- dec — single crochet decrease
- sl st — slip stitch
- ch — chain
- BLO — back loop only
- FLO — front loop only
- hdc — half double crochet
- dc — double crochet
For an invisible decrease, insert the hook through the front loops of the next two stitches, yarn over, pull through both front loops, then complete one single crochet.
Pattern — Step by Step
Work in a continuous spiral unless a section states otherwise. Place a marker in the first stitch of every round.
Head
Yarn: warm ivory — standard six-stitch amigurumi geometry.
R1: 6 sc in MR (6)
R2: inc ×6 (12)
R3: (1 sc, inc) ×6 (18)
R4: (2 sc, inc) ×6 (24)
R5: (3 sc, inc) ×6 (30)
R6: (4 sc, inc) ×6 (36)
R7: (5 sc, inc) ×6 (42)
R8–R13: 42 sc (42)
R14: (5 sc, dec) ×6 (36)
R15: (4 sc, dec) ×6 (30)
R16: (3 sc, dec) ×6 (24)
R17: (2 sc, dec) ×6 (18)
R18: (1 sc, dec) ×6 (12)
R19: dec ×6 (6)
Install the 14 mm eyes between R10 and R11 with 8 visible stitches between the posts. Begin stuffing after R15. Add small pieces around the eye backs before closing so the face remains rounded.
Fasten off. Leave a 20 cm tail and close the final six front loops.
Body
Yarn: warm ivory — standard six-stitch amigurumi geometry.
R1: 6 sc in MR (6)
R2: inc ×6 (12)
R3: (1 sc, inc) ×6 (18)
R4: (2 sc, inc) ×6 (24)
R5: (3 sc, inc) ×6 (30)
R6: (4 sc, inc) ×6 (36)
R7–R12: 36 sc (36)
R13: (4 sc, dec) ×6 (30)
R14–R15: 30 sc (30)
R16: (3 sc, dec) ×6 (24)
R17–R18: 24 sc (24)
R19: (2 sc, dec) ×6 (18)
R20: (1 sc, dec) ×6 (12)
R21: dec ×6 (6)
Stuff the lower body firmly enough to resist compression. Use less stuffing in the final three rounds so the neck seam can sit flat against the head.
Fasten off. Leave a 30 cm tail for attaching the head.
Arms — Make 2
Yarn: taupe — standard amigurumi math.
R1: 6 sc in MR (6)
R2: inc ×6 (12)
R3–R6: 12 sc (12)
R7: (2 sc, dec) ×3 (9)
R8–R10: 9 sc (9)
Stuff only the lower half. Flatten the top opening and work 4 sc through both layers.
Fasten off. Leave a 20 cm sewing tail.
Back Legs — Make 2
Yarn: taupe — flat-foot shaping adapted from standard amigurumi geometry.
R1: 6 sc in MR (6)
R2: inc ×6 (12)
R3: (1 sc, inc) ×6 (18)
R4: BLO 18 sc (18)
R5–R7: 18 sc (18)
R8: (1 sc, dec) ×6 (12)
R9–R10: 12 sc (12)
Fill the foot and lower leg firmly. Leave the top edge slightly flexible, then flatten the opening and crochet 6 sc through both layers.
Fasten off. Leave a 25 cm sewing tail.
Outer Ears — Make 2
Yarn: warm ivory — standard flat-circle math.
R1: 6 sc in MR (6)
R2: inc ×6 (12)
R3: (1 sc, inc) ×6 (18)
R4: (2 sc, inc) ×6 (24)
R5: (3 sc, inc) ×6 (30)
Fasten off. Leave a 30 cm tail on each outer ear.
Inner Ears — Make 2
Yarn: taupe — standard flat-circle math.
R1: 6 sc in MR (6)
R2: inc ×6 (12)
R3: (1 sc, inc) ×6 (18)
R4: (2 sc, inc) ×6 (24)
Fasten off and weave in the short tails. Center one taupe circle over each ivory circle. Sew around the taupe edge, then pinch approximately 2 cm of the lower ivory edge together and secure it with three stitches.
Cheek Patches — Make 2
Yarn: dusty pink DK yarn — standard flat-circle math.
R1: 6 sc in MR (6)
R2: inc ×6 (12)
Join with a sl st. Fasten off and leave a 15 cm sewing tail. The finished patch should measure approximately 18–20 mm across.
Tail
Yarn: taupe — narrow spiral tube.
R1: 6 sc in MR (6)
R2–R18: 6 sc (6)
Do not stuff. Roll the tube between the fingers after every four rounds to keep the stitches from twisting inward.
Fasten off. Leave a 20 cm sewing tail.
Ruffled Collar
Yarn: taupe — joined rounds.
Ch 25. Check the chain around the narrowest part of the neck without stretching it. Add or remove chains in multiples of one as required.
R1: Join to the first ch without twisting. Ch 1, sc in each ch around, sl st to first sc (25).
R2: Ch 2, work 3 hdc in each stitch around, sl st to the first hdc (75).
The dense three-stitch increase forms the compact scalloped collar shown in the photograph.
Fasten off. Leave a 15 cm tail for closing or anchoring the collar.
Embroidered Nose, Mouth and Eyebrows
Use dark brown embroidery cotton. Make a horizontal nose approximately 7 mm wide between R11 and R12. Bring a vertical stitch down by 8–10 mm, then secure it inside the head. Add one short eyebrow above each eye, spanning no more than two crochet stitches.
Assembly
- Pin the head to the body with the eye line facing directly forward. Sew twice around the 12-stitch neck opening.
- Compress the seam lightly with the fingers and add stuffing through any remaining gap before closing it.
- Position the cheek patches one round below the eyes and approximately one stitch outside each eye post. Sew through the outer loops only.
- Embroider the nose, mouth line and brows after the cheeks are fixed so the face remains symmetrical.
- Pin the arms to the body between R15 and R17. Angle each arm downward by approximately 20 degrees.
- Attach the back legs across R5–R9 of the body. Leave 3–4 stitches between their inner edges.
- Pin the ears across R4–R9 of the head, keeping their upper edges above the crown. Sew the pinched bases first, then anchor the rear edges.
- Attach the tail at the center back between R6 and R7. Curve it toward one side and tack the final 2 cm to the body when a fixed pose is preferred.
- Place the collar around the neck and close the foundation edge. Add two small anchoring stitches at the back.
- Weave each chenille tail through at least three directional changes, trim it inside the fabric and brush displaced fibers over the entry point.
The completed mouse should stand level with both feet, the lower body and the tail touching the supporting surface.
7 Technical Tips
- Marker drift: Moving the marker several stitches forward changes the ear and limb alignment. Count all 42 head stitches at the end of every plateau round.
- Underfilled feet: Soft feet collapse once the 25–28 cm figure is assembled. Pack the first seven leg rounds until each foot resists a 5 mm fingertip indentation.
- Visible decrease gaps: A standard two-stitch decrease can expose stuffing in chenille. Work every head and body decrease through the front loops only.
- Late eye placement: Safety-eye washers cannot be fitted after R18 closes the head. Install both 14 mm eyes immediately after completing R13.
- Velvet tension changes: Pulling chenille too tightly strips the pile and narrows the round. Keep each loop tall enough to slide freely over the 5 mm hook shaft.
- Unbalanced ear pinning: A 5 mm difference in ear height is visible from the front. Measure from each eye post to the lowest point of the corresponding ear before sewing.
- Escaping yarn tails: A tail woven in one direction can pull back through plush stitches. Change direction three times and carry at least 5 cm of yarn through the stuffed piece.
Conclusion
Check the finished figure on a level surface before trimming the final sewing tails. Both feet should carry equal weight, the collar should cover the neck seam, and the inner ear panels should face forward without folding across the eyes. Your next step is to record the yarn brand, hook size and finished height on the pattern copy; chenille thickness varies enough to change all three measurements. Share the completed mouse on Pinterest and post a front and side view on Instagram with #MallowMousePattern. This mouse amigurumi crochet pattern can also be tested in smooth worsted yarn for a smaller sample. Did you keep the tail free-moving or tack its tip beside one foot?









