Introduction
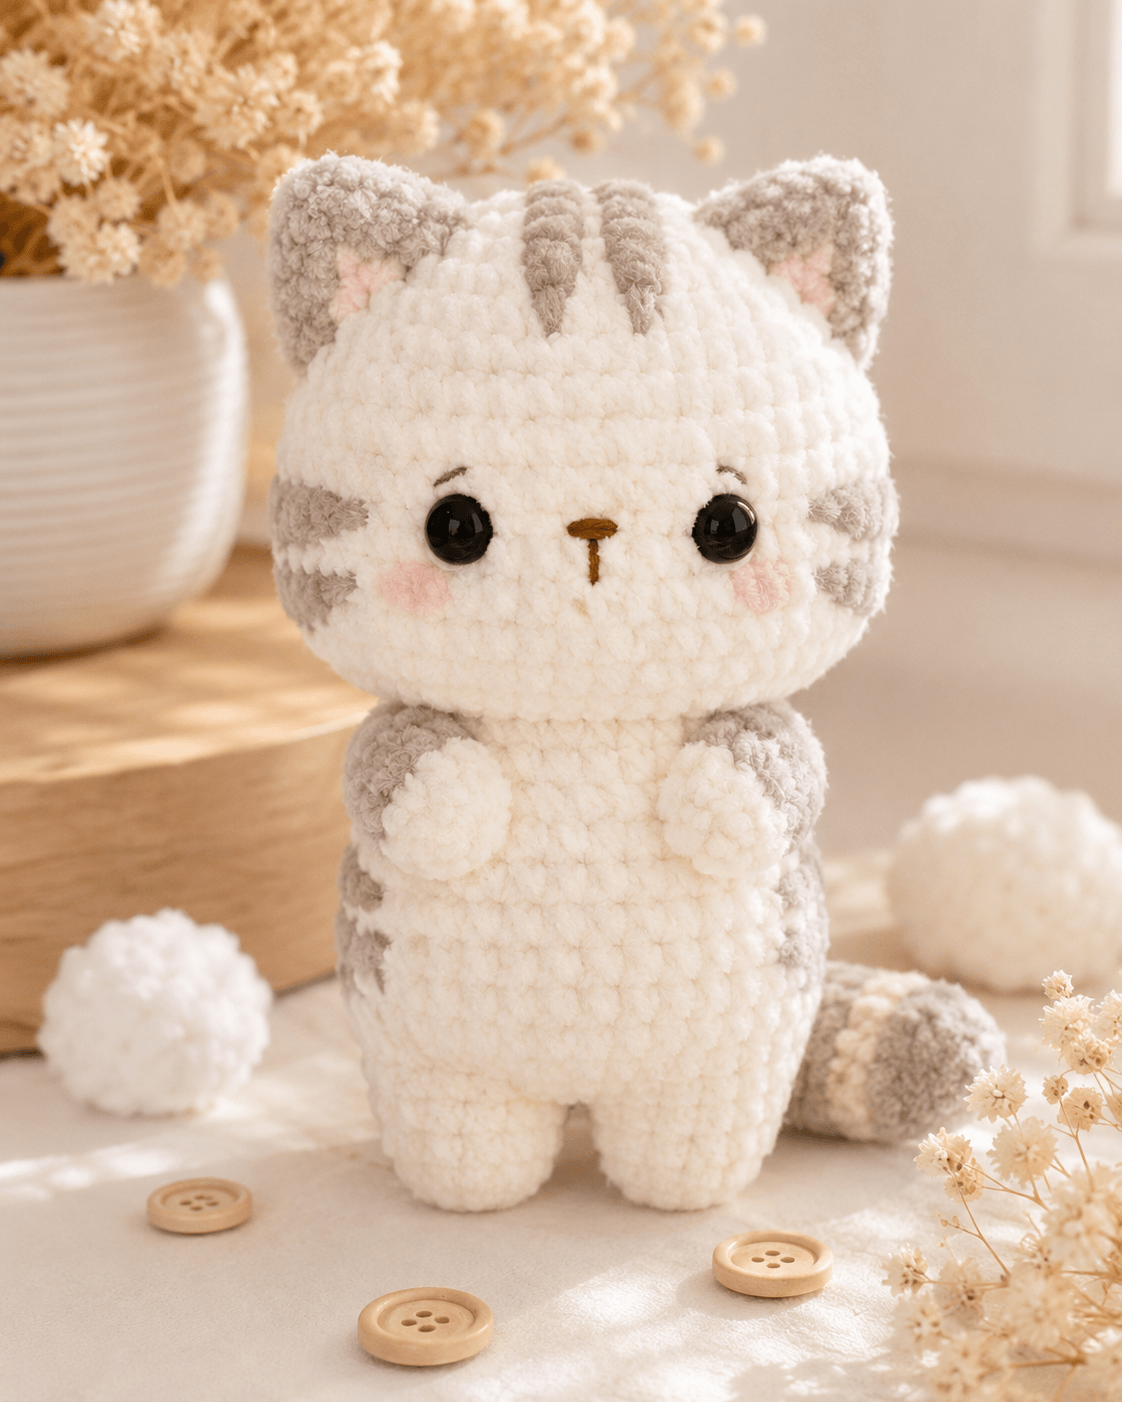
A tabby kitten needs forehead stripes that follow the curve of its skull rather than sitting like flat bars. This tabby cat amigurumi crochet pattern uses super-bulky chenille yarn, a 4 mm hook and shaped components to produce a standing kitten measuring about 25 cm. The project suits intermediate crocheters and creates a stable display toy with clearly positioned facial markings.
The Design: What Makes This Tabby Cat Different
The head is wider than the body because the photographed kitten depends on an oversized feline face rather than a realistic cat proportion. A 42-stitch head plateau provides enough surface for the safety eyes, cheek patches and six side stripes without crowding the muzzle. The body reaches 36 stitches, creating a narrower torso that still supports the head.
Short front paws are sewn against the chest instead of hanging beside the body. This placement reproduces the kitten’s upright pose and keeps the arms visible from the front. The standing legs are built separately, then attached beneath the body for a small gap between the feet. A common mistake in a striped cat crochet pattern is placing the forehead markings too low. The lowest end of each stripe should stop above the eye line so the face remains open.
Project Info at a Glance
| Skill Level | Working Time | Finished Size | Hook | Best For |
|---|---|---|---|---|
| Intermediate | 7–9 hours | Approximately 25 cm | 4 mm | Nursery display, gifts and plush collections |
Published chenille cat patterns commonly pair super-bulky yarn with a 4 mm hook. Plush cat patterns of similar construction often finish within a 25–30 cm range.
Materials and Tools
Yarn
- Cream white — super-bulky chenille — approximately 100 g — Himalaya Dolphin Baby, Premier Parfait Chunky or a comparable plush yarn
- Light gray — super-bulky chenille — approximately 35 g — used for ears, arms, tail and body markings
- Pale pink — DK or thin velvet yarn — approximately 5 g — used for inner ears and cheek patches
- Dark brown — embroidery thread — less than 2 g — used for the nose and mouth
Tools
- 4 mm crochet hook
- 12 mm safety eyes
- Polyester fiberfill
- Yarn needle
- Locking stitch markers
- Long sewing pins
- Scissors
Safety eyes are not suitable for toys intended for children younger than three years. Embroider the eyes when making the kitten for that age group.
Abbreviations
- MR — magic ring
- sc — single crochet
- inc — two single crochets in one stitch
- dec — single crochet decrease
- sl st — slip stitch
- ch — chain
- BLO — back loop only
- FO — fasten off
Work an invisible decrease through the front loops of the next two stitches to reduce gaps in the stuffed fabric.
Pattern — Step by Step
Work in a continuous spiral unless a section states otherwise. Place a marker in the first stitch of every round. The head uses a 42-stitch plateau because the photographed kitten has a large face and medium-to-large finished size.
Head
Yarn: cream white. Stitch shaping follows standard six-stitch amigurumi expansion.
- R1: 6 sc in MR (6)
- R2: inc ×6 (12)
- R3: (sc, inc) ×6 (18)
- R4: (2 sc, inc) ×6 (24)
- R5: (3 sc, inc) ×6 (30)
- R6: (4 sc, inc) ×6 (36)
- R7: (5 sc, inc) ×6 (42)
- R8–R16: sc around (42)
- R17: (5 sc, dec) ×6 (36)
- R18: (4 sc, dec) ×6 (30)
- R19: (3 sc, dec) ×6 (24)
- R20: (2 sc, dec) ×6 (18)
- R21: (sc, dec) ×6 (12)
- R22: dec ×6 (6)
Insert the 12 mm safety eyes between R12 and R13, leaving nine visible stitches between the posts. Begin stuffing after R18. Add small pieces of fiberfill around the eye backs before closing.
Fasten off. Close the remaining opening and weave the tail through the center.
Body
Yarn: cream white. Use light gray for the side stripes added after assembly.
- R1: 6 sc in MR (6)
- R2: inc ×6 (12)
- R3: (sc, inc) ×6 (18)
- R4: (2 sc, inc) ×6 (24)
- R5: (3 sc, inc) ×6 (30)
- R6: (4 sc, inc) ×6 (36)
- R7–R12: sc around (36)
- R13: (4 sc, dec) ×6 (30)
- R14–R16: sc around (30)
- R17: (3 sc, dec) ×6 (24)
- R18–R20: sc around (24)
Stuff the lower half firmly enough to resist compression. Keep the top two rounds slightly softer so the head can settle against the neck.
Fasten off. Leave a 35 cm tail for sewing.
Front Paws — Make Two
Begin with cream white and change to light gray for the upper arm.
- R1: 6 sc in MR (6)
- R2: inc ×6 (12)
- R3–R4: sc around (12)
- R5: (2 sc, dec) ×3 (9)
- R6: change to light gray, sc around (9)
- R7–R10: sc around (9)
Stuff the paw section only. Leave the upper arm flat so it lies against the chest.
Fasten off. Leave a 25 cm sewing tail.
Back Legs — Make Two
Yarn: cream white.
- R1: 6 sc in MR (6)
- R2: inc ×6 (12)
- R3: (sc, inc) ×6 (18)
- R4–R7: sc around (18)
- R8: (sc, dec) ×6 (12)
- R9–R11: sc around (12)
Stuff the foot firmly and the upper section moderately. Check that both legs have the same length before fastening off.
Fasten off. Leave a 30 cm sewing tail.
Outer Ears — Make Two
Yarn: light gray. Work in rows and turn after each row.
- Row 1: ch 2, 2 sc in the second chain from the hook (2)
- Row 2: ch 1, turn, inc ×2 (4)
- Row 3: ch 1, turn, sc across (4)
- Row 4: ch 1, turn, inc, 2 sc, inc (6)
- Row 5: ch 1, turn, sc across (6)
- Row 6: ch 1, turn, inc, 4 sc, inc (8)
- Row 7: ch 1, turn, sc across (8)
Fasten off. Leave a 25 cm tail for sewing the lower edge to the head.
Inner Ears — Make Two
Yarn: pale pink. Work in rows.
- Row 1: ch 2, 2 sc in the second chain from the hook (2)
- Row 2: ch 1, turn, inc ×2 (4)
- Row 3: ch 1, turn, sc across (4)
- Row 4: ch 1, turn, inc, 2 sc, inc (6)
Fasten off. Leave a 15 cm tail. Sew one pink triangle to the front of each gray ear, keeping a narrow gray border visible.
Tail
Begin with cream white and change to light gray near the tip.
- R1: 6 sc in MR (6)
- R2: inc ×6 (12)
- R3–R8: sc around (12)
- R9: change to light gray, sc around (12)
- R10–R15: sc around (12)
- R16: (2 sc, dec) ×3 (9)
- R17–R19: sc around (9)
Stuff lightly as the rounds progress. Leave the final 2 cm unstuffed so the base can be flattened against the body.
Fasten off. Leave a 30 cm sewing tail.
Cheek Patches — Make Two
Yarn: pale pink. Work each patch as a flat circle.
- R1: 6 sc in MR (6)
- R2: inc ×6 (12)
Fasten off. Leave a 15 cm tail. Flatten each patch before sewing.
Forehead Stripes — Make Three
Yarn: light gray. These pieces are crocheted as narrow cords.
- Ch 8.
- Beginning in the second chain from the hook, sl st across (7).
Fasten off. Leave a 15 cm tail at both ends. Make the center stripe one chain longer when a slightly lower central marking is preferred.
Side Face Stripes — Make Four
Yarn: light gray.
- Ch 6.
- Beginning in the second chain from the hook, sl st across (5).
Fasten off. Leave tails at both ends. Two stripes are positioned on each side of the face.
Body Side Stripes — Make Four
Yarn: light gray.
- Ch 7.
- Beginning in the second chain from the hook, sl st across (6).
Fasten off. Leave sewing tails. These stripes may be shortened by one chain near the upper body.
Nose and Mouth
Use dark brown embroidery thread.
Make three horizontal stitches between R14 and R15 to form a small triangular nose. Bring the needle down through the center of the triangle, then work one vertical stitch over approximately 1 cm. Add two short diagonal stitches from the base of the vertical line to form the mouth.
Assembly
- Pin the head to the open edge of the body, centering the face above the front midpoint. Sew through every body stitch and the corresponding head fabric.
- Attach the back legs beneath the body with a gap of approximately 1 cm between them. Test the standing position before tightening the final stitches.
- Sew the outer ears between R3 and R8 of the head. Angle each ear outward by approximately 20 degrees.
- Place the pink cheek patches below and slightly outside the eyes. Sew around the outer loops without pulling the circles into an oval.
- Embroider the nose and mouth at the center of the face. The nose should sit one round below the lower edge of the eyes.
- Pin the front paws against the chest with the cream paw sections facing inward. Sew the gray upper sections to the body while leaving the paws raised.
- Attach the three forehead stripes between the ears. Keep at least one full round of cream fabric between the stripe ends and the eye line.
- Sew two gray stripes to each side of the face. Position the upper stripe near eye level and the lower stripe beside the cheek patch.
- Add two body stripes to each side of the torso. Hide their yarn tails inside the stuffed body.
- Sew the tail to the lower back, curving it toward one side. Add several anchoring stitches 3 cm above the base to hold the curve.
The completed kitten should stand on both feet with the tail acting as a light rear support.
7 Technical Tips
- Prevent a shifted spiral: Move the stitch marker after every completed round. Missing the first stitch by one position can rotate the eyes and forehead stripes away from the body center.
- Control stuffing firmness: Compress the fiberfill in the lower body until the circumference gives less than 1 cm under finger pressure. A loosely stuffed base allows the head to pull the kitten forward.
- Reduce decrease gaps: Insert the hook through the front loops only when making each invisible decrease. Standard two-loop decreases can leave holes large enough for white stuffing to show through gray chenille.
- Set the eyes before closing: Install the safety eyes between R12 and R13 while the back of the head remains accessible. A spacing under seven stitches makes the muzzle look narrow, while more than eleven stitches pushes the eyes toward the side stripes.
- Manage velvet tension: Keep each single crochet tight enough that the 4 mm hook meets light resistance. Loose loops can hide skipped stitches because chenille fibers cover the top V of the stitch.
- Pin symmetrical parts: Use at least three pins in each ear and two pins in each cheek before sewing. A difference of one head round between the ears remains visible from the front.
- Secure yarn tails: Weave every tail through at least 4 cm of stuffed fabric before trimming. Short tails can pull free when the paws or tail are repositioned.
Adjusting the Finished Size
The completed dimensions depend on yarn thickness, hook size and individual tension. Using a thinner worsted yarn with a 3 mm hook will reduce the kitten while retaining the same stitch counts. Super-bulky chenille with a 4.5 mm hook produces a softer and slightly larger fabric, but visible gaps may appear around the decreases.
Do not alter only the head plateau when resizing the full design. A 36-stitch head paired with the original 36-stitch body removes the oversized kitten proportion. For a smaller version, reduce both components by one increase round: stop the head at 36 stitches and the body at 30 stitches. Remove one plain round from each limb and shorten every stripe by one chain.
Stripe Placement and Facial Proportion
The tabby markings should frame the face rather than divide it. Place the central forehead stripe on the vertical line formed by the nose and mouth. The remaining two forehead stripes sit approximately 1.5 cm to either side, with their upper ends closer together than their lower ends.
Side stripes need a slight upward angle toward the back of the head. Horizontal placement can make the face appear wider than the 42-stitch structure already creates. Pin both sides before sewing the first piece. The maker then views the head from the front, top and side, checking that the stripe angles match.
Keep the cheek patches separate from the lower gray stripes. A visible cream gap of two to three stitches preserves the photographed blush effect. When the patches touch the stripes, both details merge into one block of color.
Working with Chenille Yarn
Chenille fibers make the stitches difficult to count after several rounds. Count each round before moving the marker, then record the number on paper or in a row counter. Feeling for the top loops with a fingertip is often more reliable than identifying them by sight.
A magic ring made from plush yarn can snap when pulled tightly. Close the ring in two stages: pull until the center reaches approximately 5 mm, work the second round, then tighten the remaining opening. Another option is to form the ring with a matching strand of smooth worsted yarn and crochet the chenille stitches around it.
Frequent unraveling strips the fiber coating from the yarn core. When a section must be remade, replace any strand showing exposed thread. Damaged chenille creates thin areas that remain visible after stuffing.
Conclusion
Check the finished kitten from the front before cutting the final sewing tails. Both ears should begin on the same head round, the eyes should remain level, and the three forehead stripes should point toward the nose without reaching the eye line. Photograph the completed tabby cat amigurumi crochet pattern against a plain background so the cream and gray markings remain visible. Save the finished image to Pinterest and share it on Instagram with #ChenilleTabbyCat. Before starting another version, record the actual height, eye spacing and yarn used. Which stripe placement would you change to match your own tabby cat?









