Introduction
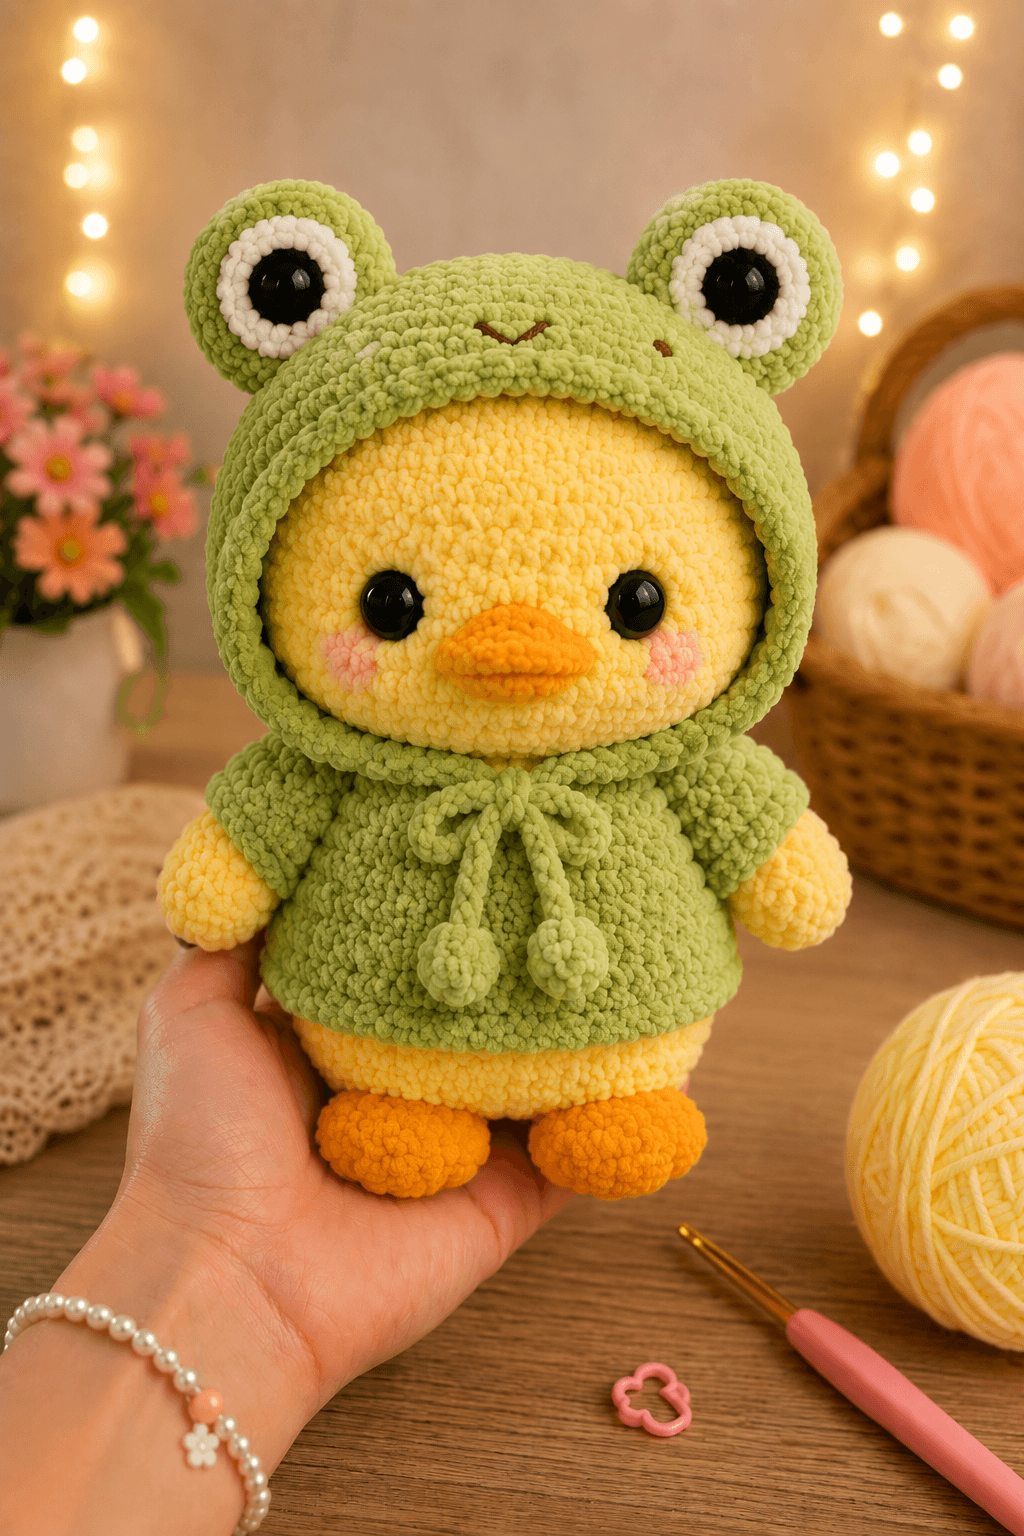
A duck’s bill must project beyond a frog hood without forcing the opening into an oval. This frog hood duck amigurumi pattern uses chunky chenille yarn, a 4.5 mm hook, and separate costume pieces to create a figure approximately 24 cm tall. The intermediate construction includes a yellow duck, orange feet, a fitted hood, raised frog eyes, and a removable green cape that stabilizes the neckline.
The Design: What Makes This Frog Hood Duck Different
The duck and costume are constructed separately so the yellow face remains round inside the green hood. A 36-stitch head plateau provides enough width for two 14 mm eyes, flat cheek patches, and a raised orange bill without crowding the features. The hood reaches 42 stitches because it must fit over the stuffed head rather than match its exact circumference. Two frog-eye discs sit above the hood opening, while a short embroidered mouth identifies the costume without adding another stuffed facial piece. The body also reaches 36 stitches, but its longer plateau produces an upright oval instead of a ball. Broad orange feet shift the center of gravity forward and help the figure stand beneath the weight of the hood. A common failure occurs when the hood is attached too low. Covering the lower cheeks reduces the visible face and makes the bill appear oversized.
Project Information at a Glance
| Skill Level | Estimated Time | Finished Size | Hook | Construction |
|---|---|---|---|---|
| Intermediate | 7–9 hours | Approximately 24 cm tall | 4.5 mm | Spiral pieces with a removable cape |
The finished measurement is an estimate for weight-6 chenille yarn. Tension, stuffing density, yarn thickness, and the height of the frog eyes can change the final measurement.
Materials and Tools
Yarn
- Pale-yellow weight-6 chenille yarn — approximately 150 g for the head, body, and arms.
- Sage-green weight-6 chenille yarn — approximately 120 g for the hood, cape, frog eyes, ties, and cord ends.
- Orange weight-6 chenille yarn — approximately 35 g for the bill and feet.
- White weight-6 chenille yarn — approximately 12 g for the frog-eye rings.
- Black smooth worsted yarn — less than 3 g for the frog pupils.
- Blush-pink worsted yarn — less than 2 g for the cheek patches.
- Dark-brown embroidery thread — approximately 25 cm for the frog mouth and optional bill line.
Use yellow and green chenille yarns with similar thickness. A denser green yarn can make the hood too small even when the stitch count is correct.
Tools
- 4.5 mm crochet hook
- Two 14 mm safety eyes for the duck
- Polyester fiberfill, approximately 100–120 g
- Large-eye yarn needle
- Locking stitch markers
- Long positioning pins
- Scissors
- Optional 4 mm hook for loose chenille tension
Use embroidered eyes instead of plastic safety eyes when the finished item is intended for a child under three years old.
Abbreviations
- MR — magic ring
- sc — single crochet
- inc — two single crochets in one stitch
- dec — decrease
- sl st — slip stitch
- ch — chain
- BLO — back loop only
- FLO — front loop only
- hdc — half double crochet
- dc — double crochet
- st — stitch
For an invisible decrease, insert the hook through the front loops of the next two stitches, yarn over, pull through both front loops, then complete one single crochet.
Frog Hood Duck Amigurumi Pattern
Work three-dimensional parts in continuous spiral rounds unless a section states otherwise. Mark the first stitch of every round and recount each shaping round before moving the marker.
Duck Head
Use pale-yellow chenille yarn.
R1: 6 sc in MR (6)
R2: inc ×6 (12)
R3: (sc, inc) ×6 (18)
R4: (2 sc, inc) ×6 (24)
R5: (3 sc, inc) ×6 (30)
R6: (4 sc, inc) ×6 (36)
R7–R14: sc around (36)
R15: (4 sc, dec) ×6 (30)
R16: (3 sc, dec) ×6 (24)
R17: (2 sc, dec) ×6 (18)
R18: (sc, dec) ×6 (12)
R19: dec ×6 (6)
Insert the 14 mm safety eyes between R11 and R12. Leave seven visible stitches between the posts. Add firm stuffing after R16 and place smaller pieces around the eye backs to prevent dents.
Fasten off and leave a 35 cm tail for attaching the head to the body.
Duck Body
Use pale-yellow chenille yarn.
R1: 6 sc in MR (6)
R2: inc ×6 (12)
R3: (sc, inc) ×6 (18)
R4: (2 sc, inc) ×6 (24)
R5: (3 sc, inc) ×6 (30)
R6: (4 sc, inc) ×6 (36)
R7–R12: sc around (36)
R13: (4 sc, dec) ×6 (30)
R14–R16: sc around (30)
R17: (3 sc, dec) ×6 (24)
R18–R19: sc around (24)
R20: (2 sc, dec) ×6 (18)
R21: sc around (18)
Stuff the lower body firmly. Use slightly less filling near the neck so the head can sit against a flat upper edge.
Fasten off and leave a 40 cm sewing tail.
Duck Arms — Make 2
Use pale-yellow chenille yarn.
R1: 6 sc in MR (6)
R2: inc ×6 (12)
R3–R5: sc around (12)
R6: (sc, dec) ×4 (8)
R7–R10: sc around (8)
Stuff the rounded hand and the first two narrow rounds. Leave the upper section empty so the arms hang beneath the cape.
Flatten the opening and work 4 sc through both layers. Fasten off and leave a 25 cm tail.
Orange Feet — Make 2
Use orange chenille yarn.
R1: 6 sc in MR (6)
R2: inc ×6 (12)
R3: (sc, inc) ×6 (18)
R4–R6: sc around (18)
R7: (sc, dec) ×6 (12)
R8: sc around (12)
Stuff the front of each foot firmly and the back lightly. Press the base against a flat surface to create a stable oval.
Flatten the opening and crochet 6 sc through both layers. Fasten off and leave a 30 cm tail.
Upper Bill
Use orange chenille yarn.
R1: 6 sc in MR (6)
R2: inc ×6 (12)
R3: (sc, inc) ×6 (18)
R4: sc around (18)
R5: (sc, dec) ×6 (12)
Add a thin layer of stuffing. Flatten the piece horizontally so it measures approximately 45 mm wide and 20 mm high.
Fasten off and leave a 30 cm tail.
Lower Bill
Use orange chenille yarn.
R1: 6 sc in MR (6)
R2: inc ×6 (12)
R3: sc around (12)
Do not stuff. Flatten the circle into a narrow oval before positioning it beneath the upper bill.
Fasten off and leave a 25 cm sewing tail.
Cheek Patches — Make 2
Use blush-pink worsted yarn.
R1: 6 sc in MR (6)
R2: inc ×6 (12)
Fasten off and leave a 15 cm tail. Flatten each patch and stretch it gently into a horizontal oval.
Frog Hood
Use sage-green chenille yarn.
R1: 6 sc in MR (6)
R2: inc ×6 (12)
R3: (sc, inc) ×6 (18)
R4: (2 sc, inc) ×6 (24)
R5: (3 sc, inc) ×6 (30)
R6: (4 sc, inc) ×6 (36)
R7: (5 sc, inc) ×6 (42)
R8–R12: sc around (42)
Begin the face opening:
Row 13: sc 27, ch 1, turn (27)
Row 14: sc across, ch 1, turn (27)
Row 15: dec, 23 sc, dec, ch 1, turn (25)
Row 16: sc across, ch 1, turn (25)
Row 17: dec, 21 sc, dec (23)
Opening border: Join yarn at the lower-right corner. Work sc evenly around the entire face opening, placing 2 sc in each upper corner. Join with a sl st.
Test the hood over the stuffed head before fastening off. The border should frame the face without covering the cheeks or pressing against the bill.
Fasten off and leave a 45 cm tail for securing the lower back edge to the cape.
Outer Frog Eyes — Make 2
Use sage-green chenille yarn.
R1: 6 sc in MR (6)
R2: inc ×6 (12)
R3: (sc, inc) ×6 (18)
R4: sc around (18)
Add a thin layer of stuffing. The pieces should remain broad discs rather than spherical eyes.
Fasten off and leave a 30 cm tail.
White Frog-Eye Rings — Make 2
Use white chenille yarn.
R1: 6 sc in MR (6)
R2: inc ×6 (12)
Fasten off and leave a 20 cm tail. Sew one white circle to the center of each green eye disc.
Black Frog Pupils — Make 2
Use black smooth worsted yarn.
R1: 6 sc in MR (6)
R2: inc ×6 (12)
Fasten off and leave a 20 cm tail. Attach one pupil to each white ring, keeping the black circle centered.
Frog Mouth
Thread approximately 25 cm of dark-brown embroidery yarn. Mark a shallow downward point measuring 20–24 mm across near the center front of the hood. Work one diagonal stitch from the left corner to the center and a second diagonal stitch from the center to the right corner. Secure both ends inside the hood.
Green Cape
Use sage-green chenille yarn. Work in turned rows.
Row 1: ch 25, beginning in the second ch from the hook, sc across (24)
Row 2: ch 1, turn, (3 sc, inc) ×6 (30)
Row 3: ch 1, turn, sc across (30)
Row 4: ch 1, turn, (4 sc, inc) ×6 (36)
Row 5: ch 1, turn, sc across (36)
Row 6: ch 1, turn, (5 sc, inc) ×6 (42)
Row 7–R11: ch 1, turn, sc across (42)
Wrap the cape around the body after Row 6. The front edges should remain separated by approximately 25–30 mm.
Work one row of sc down the first front edge, around the lower edge, and up the second front edge. Place 2 sc in each lower corner. Fasten off and weave in the tail.
Cape Collar
Use sage-green chenille yarn.
Row 1: Join yarn to the first neckline stitch and sc across (24)
Row 2: ch 1, turn, sc across (24)
Row 3: ch 1, turn, sc across (24)
Fasten off. Fold the collar outward and tack it at the center back with two small stitches.
Cape Ties — Make 2
Use sage-green chenille yarn.
Row 1: ch 23
Row 2: Starting in the second ch from the hook, sl st across (22)
Fasten off and leave a 20 cm tail. Attach one tie to each upper front corner of the cape.
Rounded Cord Ends — Make 2
Use sage-green chenille yarn.
R1: 6 sc in MR (6)
R2: inc ×6 (12)
R3: sc around (12)
R4: dec ×6 (6)
Add a small pinch of stuffing before closing.
Fasten off and leave a 15 cm tail. Sew one cord end to each cape tie.
Assembly
- Center the duck head above the body opening. Pin it at four points, then sew through the lower head rounds and the final body round.
- Position the upper bill between the eyes with its upper edge approximately two rounds below them. Sew around the flattened edge and add one anchoring stitch through the center underside.
- Place the lower bill beneath the upper bill. Sew its back edge to the face while leaving the front edge slightly visible.
- Attach one cheek patch beside each bill corner. Keep the inner edge of each patch approximately 8 mm from the nearest eye.
- Sew the arms to the upper sides of the body. Attach both feet beneath the body with approximately 20 mm between their inner edges.
- Pull the frog hood over the duck head and center the opening around the face. Tack the hood to the head at the top center, both lower corners, and the center back.
- Sew the completed frog eyes to the top of the hood. Keep their inner edges approximately 18 mm apart and angle both discs slightly forward.
- Embroider the frog mouth between the raised eyes and the upper edge of the face opening.
- Wrap the cape around the body and place its neckline beneath the hood edge. Tack the hood to the cape at the center back, then tie the cords in a balanced bow.
- Set the duck on a level surface. Adjust the feet and cape before securing the final knots and weaving each yarn tail through three stitch columns.
The completed duck should stand with both orange feet flat while the hood opening remains centered around the yellow face.
7 Technical Tips
- Hood compression: A hood with the same 36-stitch plateau as the head will press into the face. Increase the hood to 42 stitches and test the fit after R12.
- Covered cheeks: A low face opening hides the pink patches and changes the head proportions. Keep the lower hood border at least 10 mm below each cheek patch.
- Drooping frog eyes: Heavy stuffing can pull the eye discs backward. Use only a 10–12 mm layer of filling and sew across at least six stitches at each base.
- Rotating bill: A bill secured only around its outer edge can twist after handling. Add one hidden anchoring stitch from the center underside of the bill into the face.
- Visible decrease gaps: Standard decreases can expose stuffing through chenille yarn. Work decreases through the front loops and change to a 4 mm hook when gaps exceed 2 mm.
- Uneven cape flare: Random increase placement creates folds on one side of the body. Divide every increase row into six equal sections and place one increase in each section.
- Backward tipping: A firmly stuffed hood adds weight behind the head. Keep the hood unstuffed, place the feet 20 mm apart, and angle their front edges slightly outward.
Conclusion
Check the hood opening before permanently attaching the frog eyes. Its upper border should sit above the duck’s eyes, while the lower corners must remain outside the pink cheek patches. Next, place the finished figure on a flat surface and adjust both feet until the hood’s weight stays centered over the body. Pin the cape at the center back when the neckline rotates beneath the bow. Save this frog hood duck amigurumi pattern to Pinterest and share the finished project on Instagram with #FrogHoodDuck. For the next duck, should the frog costume keep its sage coloring or use a darker pond-green shade?









