Introduction
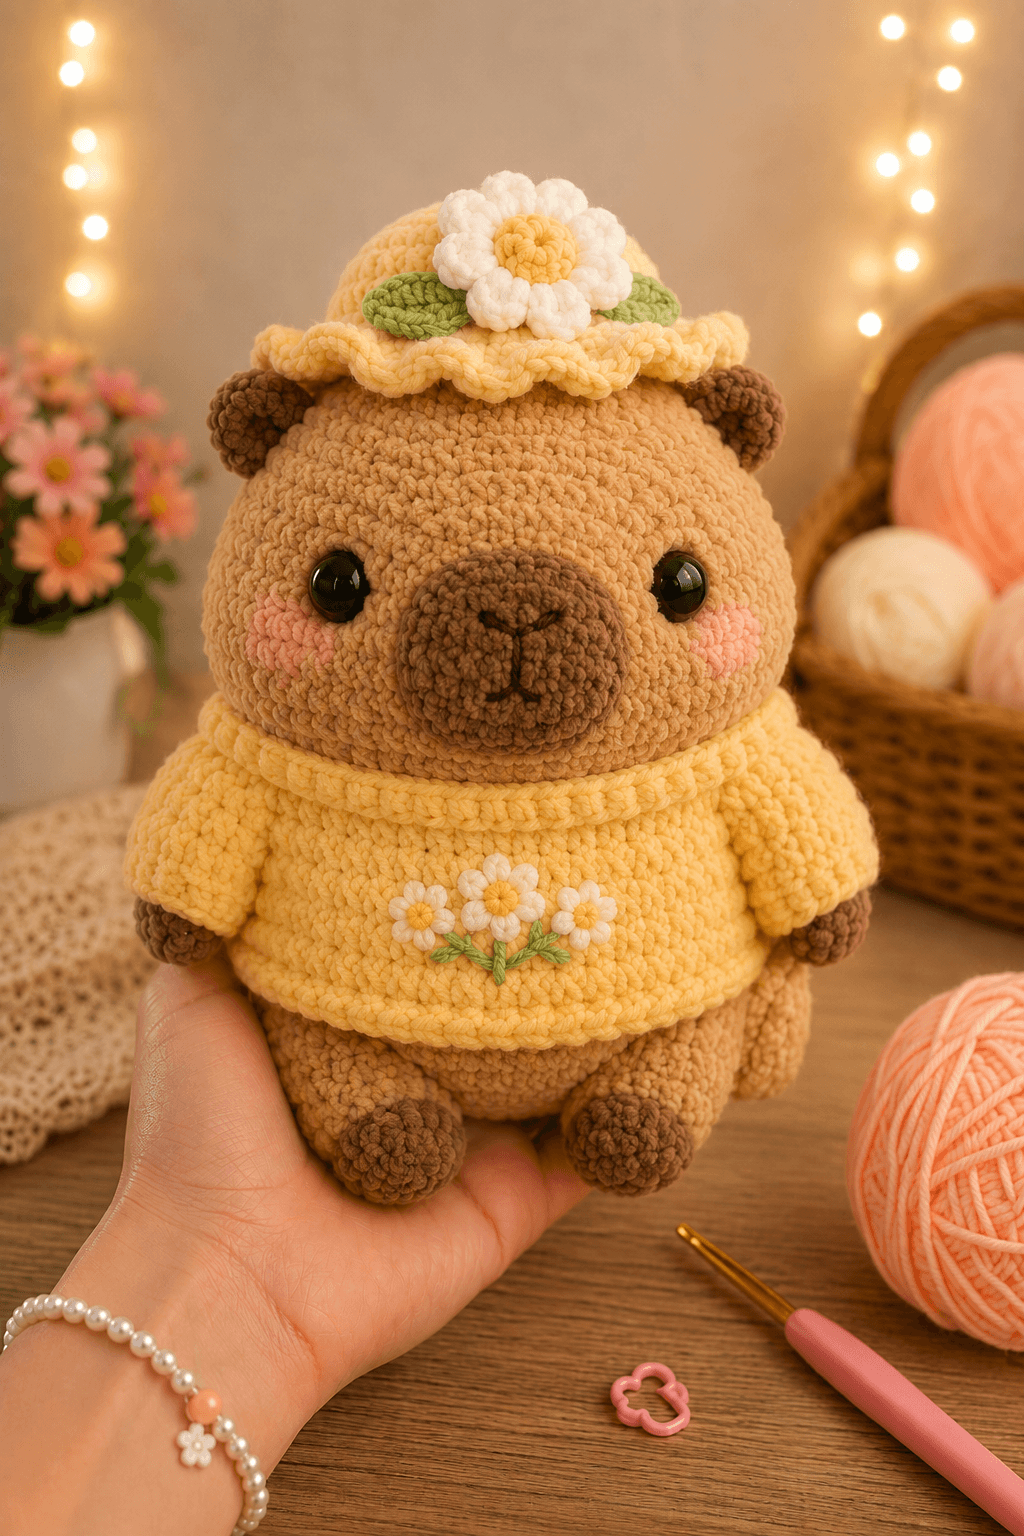
A capybara’s muzzle projects forward while its eyes remain widely spaced near the sides of the head. This capybara amigurumi crochet pattern recreates that structure with a separate oval muzzle, low ears and a 36-stitch head. Bulky chenille yarn and a 4.5 mm hook produce a seated toy measuring approximately 25 cm. The intermediate project includes a removable yellow sweater and a scalloped flower hat for practicing fitted accessories.
The Design: What Makes This Capybara Different
The head is wider than the body and keeps its full 36-stitch circumference through six rounds. That long plateau forms the capybara’s broad forehead without creating a spherical teddy-bear head. A separate dark brown muzzle supplies forward projection, while the embroidered nostrils and mouth divide its surface without flattening it.
Low-set circular ears support the species-specific silhouette. Placing them near the widest head round also leaves enough space for the flower hat to rest above them. The sweater uses a short yoke, two arm openings and a lightly flared lower edge so it covers the upper body without compressing the stuffing. A common mistake in a plush capybara amigurumi is placing the ears on top of the head. That adjustment makes the finished figure resemble a bear. The flower hat capybara crochet pattern keeps the ears near eye level and uses the hat crown as a separate upper shape.
Project Info at a Glance
| Skill Level | Time | Finished Size | Hook | Best For |
|---|---|---|---|---|
| Intermediate | 11–15 hours | Approximately 25 cm seated | 4.5 mm | Accessory fitting, chenille shaping and embroidered details |
The final measurement depends on stitch tension and chenille thickness. Keep the same hook and yarn line across all stuffed pieces so the muzzle, limbs and head remain proportional.
Materials and Tools
Yarn
- Caramel brown — bulky chenille, weight 5 — 130–150 g — Premier Parfait Chunky, Himalaya Dolphin Baby or a comparable plush yarn
- Dark brown — bulky chenille, weight 5 — 30–40 g — for muzzle, ears, hands and feet
- Butter yellow — bulky chenille, weight 5 — 100–120 g — for the sweater and hat
- White — bulky chenille or smooth worsted yarn — 15–20 g — for the large hat flower
- Leaf green — smooth worsted yarn — 10–15 g — for hat leaves, stems and embroidery
- White and yellow embroidery yarn — small quantities — for the sweater daisies
- Blush pink — smooth worsted yarn — small quantity — for cheek patches
- Black embroidery yarn — small quantity — for nostrils and mouth
Tools
- 4.5 mm crochet hook
- Two 14 mm safety eyes
- Polyester stuffing
- Yarn needle
- Embroidery needle
- Locking stitch markers
- Long sewing pins
- Scissors
- Optional 3.5 mm hook for the smooth-yarn flower embroidery
Replace the plastic eyes with embroidered eyes when the finished capybara is intended for a child under three.
Abbreviations
- MR — magic ring
- sc — single crochet
- inc — two single crochets in one stitch
- dec — single crochet decrease
- sl st — slip stitch
- ch — chain
- hdc — half double crochet
- dc — double crochet
- BLO — back loop only
- FLO — front loop only
For an invisible decrease, insert the hook through the front loops of the next two stitches, pull up one loop through both front loops, then complete a single crochet.
Pattern — Step by Step
Work stuffed pieces in continuous spiral rounds unless the instructions specify joined rounds or turning rows. Mark the first stitch after every completed round.
Head
Yarn: caramel brown. Original shaping follows standard six-stitch amigurumi expansion.
R1: 6 sc in MR (6)
R2: inc ×6 (12)
R3: (sc, inc) ×6 (18)
R4: (2 sc, inc) ×6 (24)
R5: (3 sc, inc) ×6 (30)
R6: (4 sc, inc) ×6 (36)
R7–R12: 36 sc (36)
R13: (4 sc, dec) ×6 (30)
R14: (3 sc, dec) ×6 (24)
R15: (2 sc, dec) ×6 (18)
Insert the eyes between R9 and R10 with approximately 12 stitches between their inner edges. Pin the muzzle temporarily before closing the washers. Stuff the sides and forehead firmly.
R16: (sc, dec) ×6 (12)
R17: dec ×6 (6)
R18: close the opening (6)
Fasten off. Draw the yarn through the front loops of the last six stitches and pull the hole closed.
Body
Yarn: caramel brown.
R1: 6 sc in MR (6)
R2: inc ×6 (12)
R3: (sc, inc) ×6 (18)
R4: (2 sc, inc) ×6 (24)
R5: (3 sc, inc) ×6 (30)
R6: (4 sc, inc) ×6 (36)
R7–R11: 36 sc (36)
R12: (4 sc, dec) ×6 (30)
R13–R15: 30 sc (30)
R16: (3 sc, dec) ×6 (24)
R17: 24 sc (24)
R18: (2 sc, dec) ×6 (18)
Stuff the base firmly and shape it into a flattened oval. Add less stuffing near the upper edge so the neck seam does not form a ridge.
R19: (sc, dec) ×6 (12)
R20: dec ×6 (6)
Fasten off and leave a 35 cm tail for assembly.
Arms — Make 2
Yarn: begin with dark brown and change to caramel brown.
R1: 6 sc in MR (6)
R2: inc ×6 (12)
R3–R4: 12 sc (12)
R5: (sc, dec) ×4 (8)
Stuff the dark brown hand. Change to caramel brown.
R6–R10: 8 sc (8)
Flatten the opening and work 4 sc through both layers. Fasten off with a 25 cm tail.
Back Legs — Make 2
Yarn: begin with dark brown and change to caramel brown.
R1: 6 sc in MR (6)
R2: inc ×6 (12)
R3: (sc, inc) ×6 (18)
R4–R5: 18 sc (18)
Change to caramel brown.
R6: (sc, dec) ×6 (12)
R7–R9: 12 sc (12)
R10: dec ×6 (6)
Stuff firmly through R7. Keep the upper round flexible for sewing.
Fasten off and leave a 30 cm tail.
Ears — Make 2
Yarn: dark brown.
R1: 6 sc in MR (6)
R2: inc ×6 (12)
R3: (sc, inc) ×6 (18)
R4: 18 sc (18)
R5: (sc, dec) ×6 (12)
Do not stuff. Flatten the circle and work 6 sc through both layers. Fasten off with a 25 cm tail.
Muzzle
Yarn: dark brown.
R1: 6 sc in MR (6)
R2: inc ×6 (12)
R3: (sc, inc) ×6 (18)
R4: (2 sc, inc) ×6 (24)
R5–R7: 24 sc (24)
R8: (2 sc, dec) ×6 (18)
R9: (sc, dec) ×6 (12)
Stuff the center firmly while keeping the outer edge flat enough to sit against the head. The completed muzzle should project approximately 3 cm.
Fasten off with a 40 cm sewing tail.
Cheek Patches — Make 2
Yarn: blush pink. Work as flat circles.
R1: 6 sc in MR (6)
R2: inc ×6 (12)
Fasten off with a 20 cm tail. Stretch each patch slightly sideways before sewing.
Tail
Yarn: caramel brown.
R1: 6 sc in MR (6)
R2: inc ×6 (12)
R3–R4: 12 sc (12)
R5: dec ×6 (6)
Add a small amount of stuffing. The finished tail should remain rounded rather than pointed.
Fasten off with a 20 cm tail.
Sweater
Yarn: butter yellow. Work in turning rows. Check the neck opening against the stuffed body before joining.
Ch 25.
Row 1: Starting in the second ch from the hook, 24 sc (24)
Row 2: ch 1, turn, (3 sc, inc) ×6 (30)
Row 3: ch 1, turn, 30 sc (30)
Row 4: ch 1, turn, 5 sc, ch 5, skip 5 stitches, 10 sc, ch 5, skip 5 stitches, 5 sc (30 positions)
Row 5: ch 1, turn, 5 sc, 5 sc around the first chain space, 10 sc, 5 sc around the second chain space, 5 sc (30)
Row 6: ch 1, turn, (4 sc, inc) ×6 (36)
Rows 7–12: ch 1, turn, 36 sc (36)
Row 13: ch 1, turn, BLO 36 sc (36)
Row 14: ch 1, turn, 36 sc (36)
Fasten off with a 35 cm tail. Wrap the sweater around the body and sew the back seam from Row 14 to Row 1. Leave the neck edge loose enough to pass over the body before the head is attached.
Sweater Neckband
Yarn: butter yellow.
Join yarn at the back neck edge. Work 24 sc evenly around the opening, then sl st to the first stitch. Work one additional round of 24 sc.
Fasten off and weave in the end.
Small Sweater Daisies — Make 3
Use smooth white and yellow yarn with the smaller hook.
With yellow, make 6 sc in MR and join with a sl st. Change to white. Work five petals around the center as follows: (ch 3, dc in the same stitch, ch 3, sl st in the same stitch), spacing the petals around the ring.
Fasten off with a 20 cm tail. Make the center flower slightly larger by adding a sixth petal.
Embroidered Stems and Leaves
Yarn: leaf green.
After sewing the three daisies to the center front of the sweater, embroider one vertical stem beneath each flower. Add two angled stitches on opposite sides of each stem to form narrow leaves.
Hat Crown
Yarn: butter yellow. Work in a continuous spiral.
R1: 6 sc in MR (6)
R2: inc ×6 (12)
R3: (sc, inc) ×6 (18)
R4: (2 sc, inc) ×6 (24)
R5: (3 sc, inc) ×6 (30)
R6: (4 sc, inc) ×6 (36)
R7–R10: 36 sc (36)
Do not fasten off. Continue directly to the brim.
Scalloped Hat Brim
Continue with butter yellow.
R11: FLO (5 sc, inc) ×6 (42)
R12: (6 sc, inc) ×6 (48)
R13: repeat around: sl st, skip 1 stitch, 5 dc in the next stitch, skip 1 stitch
Fasten off and weave in the yarn tail. The unused back loops of R11 create a firm bend between the crown and brim.
Large Hat Flower
Yarn: yellow center and white petals.
Center R1: With yellow, 6 sc in MR (6)
Center R2: inc ×6 (12)
Change to white. Work eight petals around the center. For each petal, ch 4, work 2 dc in the same stitch, ch 4 and sl st into the next stitch. Repeat until eight rounded petals surround the center.
Fasten off with a 30 cm tail.
Hat Leaves — Make 2
Yarn: leaf green.
Ch 8. Starting in the second chain from the hook, work sl st, sc, hdc, 2 dc, hdc and 3 sc in the final chain. Continue along the opposite side of the foundation chain with hdc, 2 dc, hdc, sc and sl st.
Fasten off with a 20 cm tail. Pin one leaf on each side of the large flower.
Assembly
- Pull the unfinished sweater over the body and place each arm through an opening. Close the sweater’s back seam before attaching the head.
- Sew the head to the body through Body R18 and the lower head rounds. Add stuffing beneath the seam until the head remains level.
- Center the muzzle between the eyes with its upper edge between Head R9 and R10. Sew around the edge, adding a final small amount of stuffing before closing.
- Embroider two short black nostrils across the upper half of the muzzle. Add a central vertical stitch and two shallow mouth curves below them.
- Attach the cheek patches below and slightly outside the eyes. Keep at least one clear stitch between each patch and the muzzle seam.
- Pin the ears at the sides of the head across Head R6–R9. Their lower edges should sit close to eye height rather than on the crown.
- Sew the arms to the body beneath the sweater openings. Angle the hands inward so they rest against the front panel.
- Attach the back legs to the lower front of the body, keeping the dark feet level. Sew the small tail to the lower back between the legs.
- Sew the three small daisies and green stems to the sweater. Position the center flower about 1 cm higher than the two side flowers.
- Attach the large flower and leaves to the front of the hat crown. Place the hat between the ears and add two hidden anchoring stitches when a removable hat is not required.
The finished capybara should sit on both back legs while the lower body and tail provide additional support.
7 Technical Tips
- Round-start displacement: Spiral crochet can move the marker several stitches toward the side as the head grows. Record the visual front after R6 and use that reference for both eye placement and the muzzle center.
- Weak muzzle projection: Loose stuffing causes the muzzle to collapse against the head. Pack the center until it projects approximately 3 cm, but leave the final stitch round flexible enough to sew flat.
- Visible decrease holes: Chenille exposes stuffing when both loops are used for decreases. Work every head and body decrease through the two front loops and keep the yarn loop close to the 4.5 mm hook shaft.
- High ear placement: Ears attached above Head R5 create a bear-like outline. Pin each ear across R6–R9 and compare its lower edge with the center line of the nearest eye.
- Twisted sweater: An unmarked back seam can rotate beneath the head during assembly. Align the seam with the body’s rear center and pin it at three points before sewing the neck.
- Uneven flower spacing: Daisies sewn by eye can drift toward one arm opening. Mark the sweater’s front center, then place the side flowers approximately 2 cm from the center flower.
- Flattened hat brim: Sewing through every brim layer removes the scalloped movement. Anchor the hat through the crown only, using two stitches placed about 4 cm apart behind the flower.
Conclusion
Fit the sweater before attaching the head, then test the hat only after the ears have been sewn at their final height. Those two checks prevent the accessories from distorting the body or covering the eyes. Record the completed height, head circumference and sweater opening before making another version because chenille thickness varies between brands. Save this capybara amigurumi crochet pattern to Pinterest, and share a front and side photograph on Instagram using #FlowerHatCapybara. The next practical step is to crochet one test flower in smooth yarn and compare it with the chenille hat crown. Would you keep three daisies on the sweater, or replace the center flower with a sunflower?









