Introduction
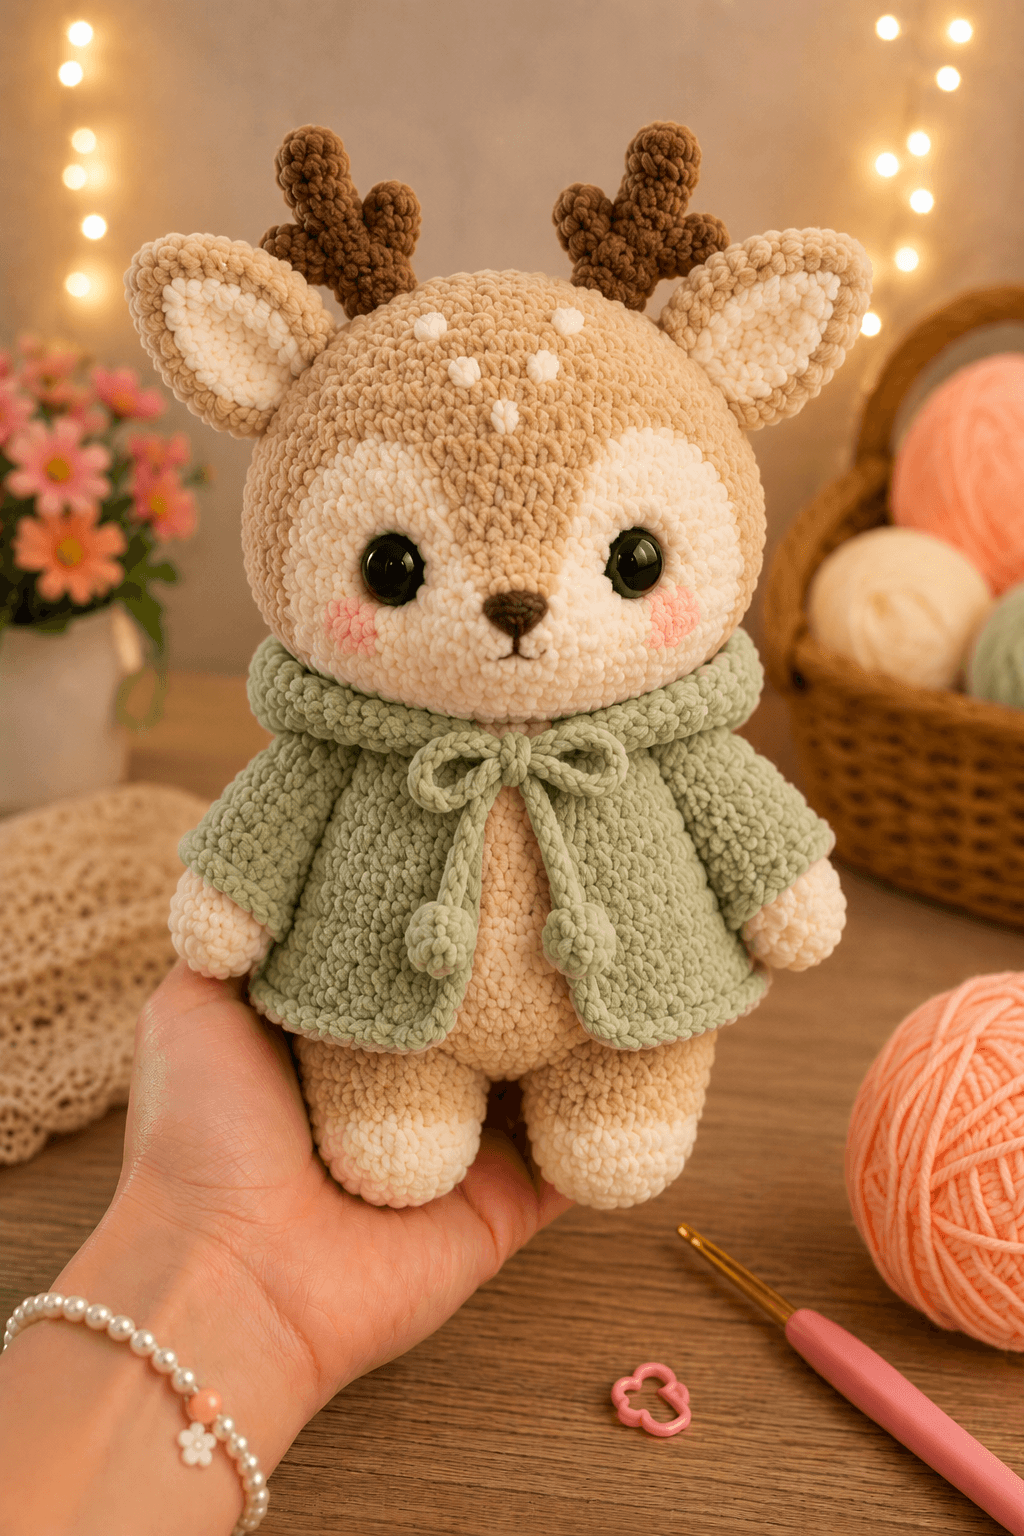
A reindeer’s antlers must rise above its ears without pulling the head backward. This winter reindeer amigurumi pattern uses weight-6 chenille yarn, a 4.5 mm hook, and a removable sage cape to create a figure approximately 25 cm tall. The pattern is written for intermediate makers. Its broad body, flattened feet, and reinforced antler bases help the finished reindeer remain upright on a shelf.
The Design: What Makes This Reindeer Different
The head uses a 36-stitch plateau to support the wide cream face patches, raised muzzle, ears, and two branched antlers. Each antler is built from one central stem with two short branches, reducing the number of loose seams at the top of the head. The body reaches the same 36-stitch plateau but remains narrower through the upper rounds, which prevents the sage cape from lifting away from the shoulders. Cream lower legs form clear hoof markings without adding separate foot pieces. The cape is worked as a flat garment with an expanded lower edge, then finished with a crocheted tie and two rounded cord ends. One frequent mistake is sewing both ears directly beneath the antlers. That compressed placement hides the ear shape and makes the head look top-heavy. Leave a visible gap of approximately 12 mm between each ear base and the nearest antler stem.
Project Information at a Glance
| Skill Level | Estimated Time | Finished Size | Hook | Construction |
|---|---|---|---|---|
| Intermediate | 7–9 hours | Approximately 25 cm tall | 4.5 mm | Continuous spiral with sewn parts |
The finished measurement is an estimate for weight-6 chenille yarn. A published sport-weight reindeer made with a 2.5 mm hook measures approximately 21 cm, while changing to thicker yarn increases the final scale. See the reindeer size reference.
Materials and Tools
Yarn
- Light tan weight-6 chenille yarn — approximately 110 g for the head, body, ears, upper arms, and upper legs.
- Cream weight-6 chenille yarn — approximately 55 g for the muzzle, face patches, hands, feet, and ear centers.
- Dark-brown weight-6 chenille yarn — approximately 25 g for the antlers.
- Sage-green weight-6 chenille yarn — approximately 80 g for the cape, collar, tie, and cord ends.
- White or cream worsted yarn — less than 2 g for the forehead spots.
- Blush-pink worsted yarn — less than 2 g for the cheek patches.
- Dark-brown embroidery thread — approximately 50 cm for the nose and mouth.
Select chenille yarns with similar thickness and pile height. A thinner cream yarn can pull the muzzle inward, while an unusually dense cape yarn can obscure the arms and body shaping.
Tools
- 4.5 mm crochet hook
- Two 14 mm safety eyes
- Polyester fiberfill, approximately 100–120 g
- Large-eye yarn needle
- Locking stitch markers
- Long positioning pins
- Scissors
- Optional wooden dowel for placing stuffing inside narrow antlers
Comparable reindeer patterns use safety eyes ranging from 8 mm to 14 mm, depending on yarn weight and finished scale. Fourteen-millimeter eyes match the oversized chenille face shown here. Replace plastic eyes with embroidered features when making the reindeer for a child under three.
Abbreviations
- MR — magic ring
- sc — single crochet
- inc — two single crochets in one stitch
- dec — decrease
- sl st — slip stitch
- ch — chain
- BLO — back loop only
- FLO — front loop only
- hdc — half double crochet
- dc — double crochet
- st — stitch
For an invisible decrease, insert the hook through the front loops of the next two stitches, yarn over, pull through both loops, then complete one single crochet.
Winter Reindeer Amigurumi Pattern
Work all three-dimensional pieces in continuous spiral rounds unless a section states otherwise. Mark the first stitch of every round and recount the completed round before moving the marker.
Head
Use light tan chenille yarn.
R1: 6 sc in MR (6)
R2: inc ×6 (12)
R3: (sc, inc) ×6 (18)
R4: (2 sc, inc) ×6 (24)
R5: (3 sc, inc) ×6 (30)
R6: (4 sc, inc) ×6 (36)
R7–R14: sc around (36)
R15: (4 sc, dec) ×6 (30)
R16: (3 sc, dec) ×6 (24)
R17: (2 sc, dec) ×6 (18)
R18: (sc, dec) ×6 (12)
R19: dec ×6 (6)
Place the safety eyes between R11 and R12 with eight visible stitches between the posts. Add firm stuffing after R16, filling the sides before packing the center.
Fasten off and leave a 35 cm sewing tail. Close the opening after checking that both eyes remain level.
Cream Face Patches — Make 2
Use cream chenille yarn. Work in joined rounds.
R1: 6 sc in MR, sl st to first sc (6)
R2: inc ×6, sl st to first sc (12)
R3: (sc, inc) ×6, sl st to first sc (18)
Fasten off and leave a 25 cm tail. Stretch each circle into a soft oval before pinning it below and beside the corresponding eye.
Muzzle
Use cream chenille yarn.
R1: 6 sc in MR (6)
R2: inc ×6 (12)
R3: (sc, inc) ×6 (18)
R4–R5: sc around (18)
R6: (sc, dec) ×6 (12)
Add a small amount of stuffing. The muzzle should project approximately 25 mm from the face without becoming spherical.
Fasten off and leave a 30 cm sewing tail.
Body
Use light tan chenille yarn.
R1: 6 sc in MR (6)
R2: inc ×6 (12)
R3: (sc, inc) ×6 (18)
R4: (2 sc, inc) ×6 (24)
R5: (3 sc, inc) ×6 (30)
R6: (4 sc, inc) ×6 (36)
R7–R11: sc around (36)
R12: (4 sc, dec) ×6 (30)
R13–R15: sc around (30)
R16: (3 sc, dec) ×6 (24)
R17–R18: sc around (24)
R19: (2 sc, dec) ×6 (18)
R20: sc around (18)
Stuff the lower body firmly and the upper body slightly less firmly. Keep the final opening accessible for attaching the head.
Fasten off and leave a 40 cm sewing tail.
Arms — Make 2
Begin with cream yarn and change to light tan.
R1: With cream, 6 sc in MR (6)
R2: inc ×6 (12)
R3–R4: sc around (12)
R5: Change to light tan, sc around (12)
R6: (sc, dec) ×4 (8)
R7–R12: sc around (8)
Stuff the cream hand and the first two tan rounds. Leave the upper half unstuffed so the arm hangs beneath the cape.
Flatten the opening and crochet 4 sc through both layers. Fasten off and leave a 25 cm tail.
Legs — Make 2
Begin with cream yarn and change to light tan.
R1: With cream, 6 sc in MR (6)
R2: inc ×6 (12)
R3: (sc, inc) ×6 (18)
R4–R6: sc around (18)
R7: BLO, (sc, dec) ×6 (12)
R8: Change to light tan, sc around (12)
R9–R12: sc around (12)
Stuff the foot firmly. Add lighter stuffing to the upper leg so the body can settle slightly between both legs.
Fasten off and leave a 30 cm sewing tail.
Outer Ears — Make 2
Use light tan chenille yarn. Work in rows.
Row 1: ch 2, 2 sc in second ch from hook (2)
Row 2: ch 1, turn, inc ×2 (4)
Row 3: ch 1, turn, sc, inc ×2, sc (6)
Row 4: ch 1, turn, sc across (6)
Row 5: ch 1, turn, dec, 2 sc, dec (4)
Row 6: ch 1, turn, dec ×2 (2)
Border: Work sc evenly around the ear, placing 3 sc in the upper tip.
Fasten off and leave a 25 cm tail. Fold the lower edge slightly before attaching it to the head.
Inner Ears — Make 2
Use cream chenille yarn. Work in rows.
Row 1: ch 2, 2 sc in second ch from hook (2)
Row 2: ch 1, turn, inc ×2 (4)
Row 3: ch 1, turn, sc across (4)
Row 4: ch 1, turn, dec ×2 (2)
Fasten off and leave a 20 cm tail. Sew one cream piece to the center of each tan ear, leaving a tan border approximately one stitch wide.
Main Antler Stems — Make 2
Use dark-brown chenille yarn.
R1: 6 sc in MR (6)
R2–R10: sc around (6)
Add a narrow roll of stuffing as the stem grows. Do not pack the final round because the base must flatten against the head.
Fasten off and leave a 30 cm sewing tail.
Long Antler Branches — Make 2
Use dark-brown chenille yarn.
R1: 6 sc in MR (6)
R2–R6: sc around (6)
Stuff lightly. Fasten off and leave a 20 cm tail.
Short Antler Branches — Make 2
Use dark-brown chenille yarn.
R1: 6 sc in MR (6)
R2–R4: sc around (6)
Stuff lightly. Fasten off and leave a 20 cm tail.
Forehead Spots — Make 5
Use cream or white worsted yarn.
R1: 6 sc in MR (6)
Fasten off and leave a 12 cm tail. Pull some rings tighter than others to create spots ranging from approximately 7 mm to 12 mm across.
Cheek Patches — Make 2
Use blush-pink worsted yarn.
R1: 6 sc in MR (6)
R2: inc ×6 (12)
Fasten off and leave a 15 cm sewing tail. Flatten the circles and place them partly over the lower edges of the cream face patches.
Sage Cape
Use sage-green chenille yarn. Work in turned rows.
Row 1: ch 25, starting in second ch from hook, sc across (24)
Row 2: ch 1, turn, (3 sc, inc) ×6 (30)
Row 3: ch 1, turn, sc across (30)
Row 4: ch 1, turn, (4 sc, inc) ×6 (36)
Row 5: ch 1, turn, sc across (36)
Row 6: ch 1, turn, (5 sc, inc) ×6 (42)
Row 7–Row 12: ch 1, turn, sc across (42)
Test the cape around the neck after Row 4. Add or remove two stitches at each front edge when the chenille thickness changes the fit.
Work one round of sc along both front edges and the lower edge. Place 2 sc in each lower corner. Fasten off and weave in the tail.
Cape Collar
Use sage-green chenille yarn.
Row 1: Join yarn to the first stitch of the cape neckline and sc across all 24 neckline stitches (24)
Row 2: ch 1, turn, sc across (24)
Row 3: ch 1, turn, sc across (24)
Fasten off. Fold the collar outward and tack it to the cape at the center back with two small stitches.
Cape Ties — Make 2
Use sage-green chenille yarn.
Row 1: ch 22
Row 2: Starting in second ch from hook, sl st in each ch (21)
Fasten off and leave a 20 cm tail. Sew one tie to each upper front corner of the cape.
Rounded Cord Ends — Make 2
Use sage-green chenille yarn.
R1: 6 sc in MR (6)
R2: inc ×6 (12)
R3: sc around (12)
R4: dec ×6 (6)
Add a small pinch of stuffing before closing.
Fasten off and leave a 15 cm tail. Sew one rounded end to the free end of each cape tie.
Embroidered Nose and Mouth
Mark a triangle approximately 14 mm wide at the center of the muzzle. Fill the shape with horizontal dark-brown stitches, covering each previous strand by about one-third. Bring a separate strand out beneath the nose, work one vertical stitch measuring approximately 7 mm, then add two shallow curves to form the mouth.
Assembly
- Center the head over the body opening and pin it at four points. Sew through the final head rounds and the upper body edge, adding extra stitches at the front and back of the neck.
- Pin the two cream face patches around the eyes. Their inner edges should approach the center line without overlapping beneath the forehead.
- Place the muzzle over the lower edges of both face patches. Sew around its base, adding the final stuffing before closing the last 2 cm.
- Embroider the nose and mouth, then attach the two cheek patches with their upper edges level with the bottom of the eyes.
- Sew the five forehead spots in an irregular vertical group. Keep the lowest spot at least 12 mm above the muzzle seam.
- Attach each inner ear to an outer ear, fold the ear base slightly, and sew the ears to the sides of the head between R5 and R9.
- Sew one long and one short branch to each main antler stem. Position the branches on different sides of the stem so the finished antlers do not look flat.
- Attach the antlers between the ears. Stitch each base across a circle approximately 18 mm wide and pass the yarn through the head several times to resist backward movement.
- Sew the legs beneath the body with approximately 20 mm between their inner edges. Attach the arms below the neck seam, then place the cape around the shoulders and tie a centered bow.
- Set the reindeer upright and adjust the legs before securing the final knots. Weave each chenille tail through three stitch columns and reverse direction once before cutting.
The completed reindeer should stand with both feet flat while the antlers remain centered over the body.
7 Technical Tips
- Antler lean: Overfilled branches place weight outside the head’s center line. Fill each branch to no more than medium firmness and keep the final 10 mm at every seam unstuffed.
- Hidden ears: Antlers sewn too far outward can cover the upper ear edges. Maintain a gap of approximately 12 mm between each ear base and the nearest antler stem.
- Uneven eye placement: Chenille makes stitch columns difficult to identify after stuffing. Install both eyes between R11 and R12 before the head opening decreases below 24 stitches.
- Protruding stuffing: Loose decreases create visible white fibers around the back of the head. Work all decreases through the front loops and change to a 4.0 mm hook when gaps exceed 2 mm.
- Rotating muzzle: A muzzle held with only two pins can shift while half of the seam is completed. Use at least six pins placed evenly around its 18-stitch edge.
- Cape flare: Too many increases near the neckline create folds beneath the chin. Keep the first expansion to six increases across Row 2 and place later increases directly above the previous increase points.
- Unstable feet: Rounded feet make the body rock backward. Press the cream foot section flat after stuffing and keep the lower leg seam parallel to the table during attachment.
Conclusion
Check the antlers before fastening the cape. Both stems should rise at matching angles, while the branches should remain visible between the ears rather than directly behind them. Next, place the reindeer on a level surface and adjust the feet until the body stands without support. Pin the cape at the center back when its weight causes the collar to rotate. Save this winter reindeer amigurumi pattern to Pinterest and share the completed figure on Instagram with #SageCapeReindeer. For a second version, test one controlled change: should the forehead spots remain cream, or should they match the pale sage cape?









