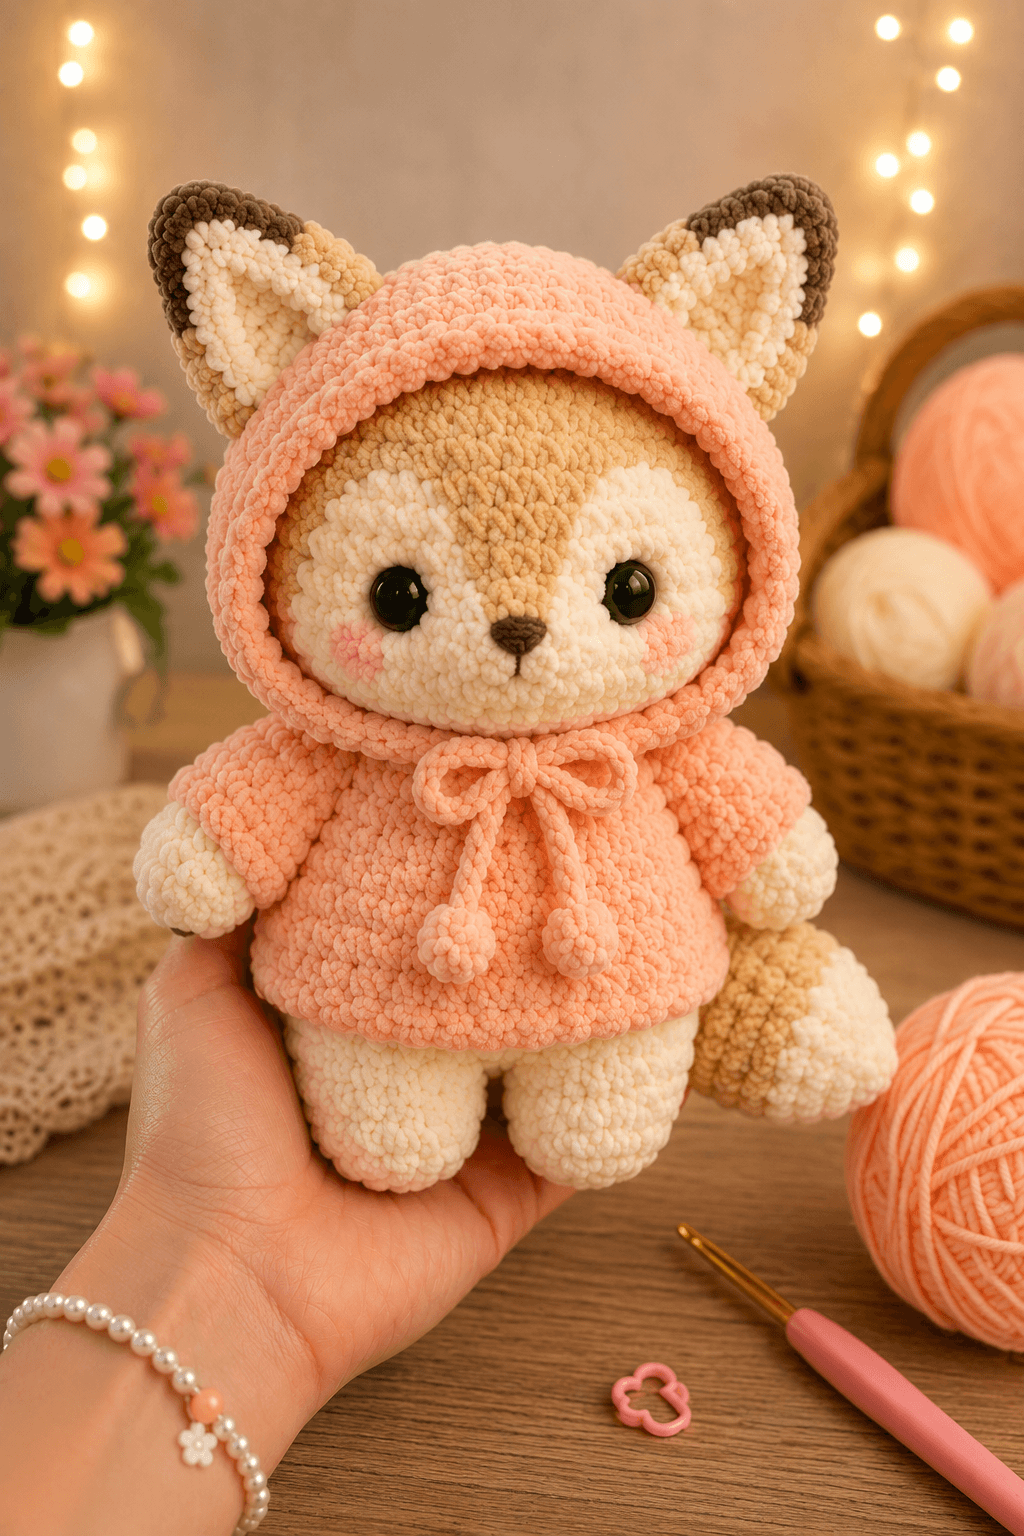
Introduction
A fox’s cream facial mask must rise between the eyes without turning the muzzle into a flat oval. This fox amigurumi crochet pattern builds that marking with separate cheek patches, a rounded snout and a broad chenille head. Using bulky velvet yarn and a 4.5 mm hook, the intermediate project finishes at approximately 25 cm. The removable cape also gives you access to the neck seams when the toy needs cleaning or repair.
The Design: What Makes This Hooded Fox Different
The head reaches a 36-stitch plateau, producing the broad shape visible beneath the hood without making the body equally wide. Two flat cream patches form the fox mask. Their upper edges angle toward the forehead, while the separate muzzle adds projection around the nose. This structure works more accurately than carrying cream stitches across the head because plush-yarn color changes can create a stepped line.
The ears are sewn directly to the head and pass through openings in the hood. That decision keeps the hood removable and prevents its weight from pulling the ears sideways. A weighted, oversized tail supports the seated body from behind. One common error in a hooded fox crochet pattern is attaching the cape before testing the head opening; the edge then compresses the cheek patches and changes the expression. This plush fox amigurumi leaves the garment separate until final fitting.
Project Info at a Glance
| Skill Level | Time | Finished Size | Hook | Best For |
|---|---|---|---|---|
| Intermediate | 10–14 hours | Approximately 25 cm seated | 4.5 mm | Woodland displays, nursery shelves and removable-garment practice |
The selected height follows a published bulky-yarn fox measurement of approximately 10 inches. Actual size changes with yarn thickness, hook size and individual tension.
Materials and Tools
Yarn
- Warm tan — bulky chenille, weight 5 — 100–120 g — Himalaya Dolphin Baby, Premier Parfait Chunky or a comparable yarn
- Cream — bulky chenille, weight 5 — 80–100 g — for the mask, muzzle, paws, inner ears and tail tip
- Peach pink — bulky chenille, weight 5 — 130–160 g — for the hood, cape, ties and pom-poms
- Dark brown — bulky chenille, weight 5 — 15–20 g — for ear tips and tail shading
- Blush pink — small quantity of smooth worsted yarn — for cheek embroidery
- Dark brown smooth yarn — small quantity — for the embroidered nose and mouth
Tools
- 4.5 mm crochet hook
- Two 14 mm safety eyes
- Polyester stuffing
- Yarn needle
- Locking stitch markers
- Long pins
- Scissors
- Optional nylon stocking scrap for containing stuffing inside loosely structured chenille stitches
Plastic safety eyes are not suitable for a toy intended for a child under three. Substitute securely embroidered eyes for that use.
Abbreviations
- MR — magic ring
- sc — single crochet
- inc — two single crochet stitches in one stitch
- dec — single crochet decrease
- sl st — slip stitch
- ch — chain
- BLO — back loop only
- FO — fasten off
For an invisible decrease, insert the hook through the front loops of the next two stitches, yarn over, pull through both front loops, then complete one single crochet.
Pattern — Step by Step
Work body parts in a continuous spiral unless a section states otherwise. Place a marker in the first stitch of every round.
Head
Yarn: warm tan. Original shaping uses standard six-stitch amigurumi expansion.
R1: 6 sc in MR (6)
R2: inc ×6 (12)
R3: (sc, inc) ×6 (18)
R4: (2 sc, inc) ×6 (24)
R5: (3 sc, inc) ×6 (30)
R6: (4 sc, inc) ×6 (36)
R7–R12: 36 sc (36)
R13: (4 sc, dec) ×6 (30)
R14: (3 sc, dec) ×6 (24)
R15: (2 sc, dec) ×6 (18)
Place the safety eyes between R9 and R10, approximately 8 stitches apart. Check the position with the cream patches pinned in place before fitting the washers. Stuff the forehead and sides firmly, but leave the lower center slightly softer for muzzle sculpting.
R16: (sc, dec) ×6 (12)
R17: dec ×6 (6)
R18: close the remaining opening (6)
Fasten off. Weave the yarn through the front loops of the final six stitches and pull closed.
Body
Yarn: warm tan. Original shaping uses standard six-stitch amigurumi expansion.
R1: 6 sc in MR (6)
R2: inc ×6 (12)
R3: (sc, inc) ×6 (18)
R4: (2 sc, inc) ×6 (24)
R5: (3 sc, inc) ×6 (30)
R6: (4 sc, inc) ×6 (36)
R7–R10: 36 sc (36)
R11: (4 sc, dec) ×6 (30)
R12–R13: 30 sc (30)
R14: (3 sc, dec) ×6 (24)
R15–R16: 24 sc (24)
R17: (2 sc, dec) ×6 (18)
Stuff the lower body firmly enough to resist flattening. Keep the final two rounds lightly stuffed so the neck can sit flush against the head.
R18: (sc, dec) ×6 (12)
R19: dec ×6 (6)
Fasten off. Leave a 35 cm tail for sewing.
Front Legs and Arms — Make 2
Yarn: begin with cream, then change to peach for the sleeve.
R1: 6 sc in MR (6)
R2: inc ×6 (12)
R3–R4: 12 sc (12)
R5: (sc, dec) ×4 (8)
Stuff only the cream paw. Change to peach at the end of R5.
R6–R10: 8 sc (8)
Flatten the opening and work 4 sc through both layers. Fasten off and leave a 25 cm sewing tail.
Back Legs — Make 2
Yarn: cream.
R1: 6 sc in MR (6)
R2: inc ×6 (12)
R3: (sc, inc) ×6 (18)
R4–R6: 18 sc (18)
R7: (sc, dec) ×6 (12)
R8–R10: 12 sc (12)
R11: dec ×6 (6)
Stuff firmly through R8. Add only a small amount near the top so the legs remain easy to sew against the body.
Fasten off. Leave a 30 cm tail.
Outer Ears — Make 2
Yarn: begin with dark brown, then change to warm tan.
R1: 6 sc in MR (6)
R2: inc ×6 (12)
Change to warm tan.
R3: (sc, inc) ×6 (18)
R4–R6: 18 sc (18)
R7: (sc, dec) ×6 (12)
Do not stuff. Flatten the ear and work 6 sc through both layers. Fasten off with a 30 cm tail.
Inner Ears — Make 2
Yarn: cream. These are flat circles folded into tapered inserts.
R1: 6 sc in MR (6)
R2: inc ×6 (12)
R3: (sc, inc) ×6 (18)
Fasten off with a 20 cm tail. Fold the lower third inward before sewing each circle to an outer ear. Keep a narrow border of tan and dark brown visible.
Cheek Patches — Make 2
Yarn: cream. Work as flat circles.
R1: 6 sc in MR (6)
R2: inc ×6 (12)
R3: (sc, inc) ×6 (18)
R4: (2 sc, inc) ×6 (24)
Fasten off with a 35 cm tail. Stretch each patch into a soft oval during pinning. The inside edge should angle upward toward the forehead, while the lower edge sits behind the muzzle.
Muzzle
Yarn: cream.
R1: 6 sc in MR (6)
R2: inc ×6 (12)
R3: (sc, inc) ×6 (18)
R4–R5: 18 sc (18)
R6: (sc, dec) ×6 (12)
Add a small amount of stuffing. The muzzle should project approximately 2.5 cm from the face without becoming spherical.
Fasten off with a 35 cm tail.
Tail
Yarn: begin with cream, change to dark brown, then warm tan.
R1: 6 sc in MR (6)
R2: inc ×6 (12)
R3: (sc, inc) ×6 (18)
R4: (2 sc, inc) ×6 (24)
R5–R6: 24 sc (24)
Change to dark brown.
R7–R8: 24 sc (24)
Change to warm tan.
R9–R12: 24 sc (24)
R13: (2 sc, dec) ×6 (18)
R14–R15: 18 sc (18)
R16: (sc, dec) ×6 (12)
R17: 12 sc (12)
Stuff the tip and middle firmly. Use less stuffing near the open edge so the tail curves around the body rather than extending rigidly backward.
Flatten the opening and work 6 sc through both layers. Fasten off with a 40 cm tail.
Hood
Yarn: peach. Work in joined rows rather than a spiral.
Ch 25.
Row 1: Starting in the second ch from the hook, 24 sc (24)
Rows 2–5: ch 1, turn, 24 sc (24)
Row 6: ch 1, turn, 4 sc, ch 5, skip 5 stitches, 6 sc, ch 5, skip 5 stitches, 4 sc (24 positions)
Row 7: ch 1, turn, 4 sc, 5 sc around the first chain space, 6 sc, 5 sc around the second chain space, 4 sc (24)
Rows 8–15: ch 1, turn, 24 sc (24)
Row 16: ch 1, turn, (2 sc, dec) ×6 (18)
Row 17: ch 1, turn, 18 sc (18)
Row 18: ch 1, turn, (sc, dec) ×6 (12)
Fasten off with a 40 cm tail. Fold the rectangle so the two short top sections meet. Sew the back seam from Row 18 downward for approximately 8 cm, leaving the lower section open. Pull the fox ears through the two chain openings.
Hood Face Edging
Yarn: peach.
Join yarn at the lower right corner of the hood opening. Work evenly around the face edge at an approximate rate of one sc per row end. Place 2 sc in each lower corner to prevent curling. Slip stitch to the first sc.
Fasten off and weave in the tail.
Cape
Yarn: peach. Work in turning rows.
Ch 25.
Row 1: Starting in the second ch from the hook, 24 sc (24)
Row 2: ch 1, turn, (3 sc, inc) ×6 (30)
Row 3: ch 1, turn, 30 sc (30)
Row 4: ch 1, turn, (4 sc, inc) ×6 (36)
Rows 5–10: ch 1, turn, 36 sc (36)
Row 11: ch 1, turn, 6 sc, ch 5, skip 5 stitches, 14 sc, ch 5, skip 5 stitches, 6 sc (36 positions)
Row 12: ch 1, turn, 6 sc, 5 sc around the chain space, 14 sc, 5 sc around the second chain space, 6 sc (36)
Row 13: ch 1, turn, 36 sc (36)
Fasten off. Place one front arm through each opening. Sew the top edge of the cape to the lower edge of the hood only across the back 14 stitches, leaving the front edges free.
Neck Ties — Make 2
Yarn: peach.
Ch 31. Starting in the second chain from the hook, sl st in each chain across (30).
Fasten off with a 20 cm tail. Sew one tie to each front corner where the hood and cape meet.
Pom-Poms — Make 2
Yarn: peach.
R1: 6 sc in MR (6)
R2: inc ×6 (12)
R3: 12 sc (12)
R4: dec ×6 (6)
Add a pea-sized amount of stuffing.
Fasten off with a 20 cm tail. Close the opening and sew one pom-pom to each tie.
Assembly
- Sew the head to the body through R17 of the body and the lower head rounds. Add a small amount of stuffing beneath the neck seam before closing the final gap.
- Pin the cream cheek patches around the eyes. Keep approximately two stitches between the upper inner corners, then sew around each patch.
- Center the muzzle over the lower edges of both patches. Its upper edge should sit roughly two rounds below the eyes. Sew three-quarters of the circumference, adjust the stuffing and close the seam.
- Embroider a dark brown triangular nose across the center stitches of the muzzle. Add one short vertical stitch and two shallow mouth stitches beneath it.
- Add blush-pink cheek marks below the outer half of each eye. Limit each mark to three or four horizontal stitches so it does not cover the cream mask.
- Sew each cream inner-ear piece to an outer ear. Attach the finished ears across Head R2–R7 with approximately six visible head stitches between their inner edges.
- Position the back legs at the lower front of the body. Sew around the upper three rounds of each leg so both feet remain parallel.
- Attach the front arms to the body between Body R14 and R17. Angle them slightly forward before fitting them through the cape openings.
- Sew the tail to the lower back across Body R6–R10. Add a second anchor stitch several centimeters along the tail so it rests beside the body.
- Fit the cape, pass the ears and arms through their openings, then tie the cords loosely beneath the muzzle. The completed fox should sit on both back legs with the tail acting as a third support point.
7 Technical Tips
- Stitch-marker drift: Chenille can hide the first stitch and move the apparent round start by one position. Place a locking marker through both loops of the first stitch rather than clipping it around the post.
- Under-stuffed head: A head that compresses more than 1 cm when pressed will allow the safety-eye washers to tilt. Pack small pieces of stuffing behind and above each eye before closing the head.
- Visible decrease ridges: Standard decreases create dark gaps in pale velvet yarn. Work every decrease through the front loops only and rotate the joined loops toward the inside of the piece.
- Incorrect eye placement: Eyes fitted before testing the cheek patches may sit too low. Pin both 24-stitch patches first, then place the eyes between Head R9 and R10 with an eight-stitch gap.
- Uneven velvet tension: Pulling chenille tightly can strip fibers from the core and produce narrow rounds. The loop on the hook should remain approximately the same width as the hook shaft throughout each stitch.
- Rotated limb seams: Arms pinned without a center reference can end up at different heights. Mark the body’s front center, then measure six stitches left and right before placing the upper arm edges.
- Loose tail weaving: A single woven pass can work free from slippery plush yarn. Weave each tail in three directions through at least 4 cm of fabric, then trim it only after gently stretching the section.
Conclusion
Check the hood opening before securing its back seam, then compare the two ear openings while the garment is on the fox. That fitting step controls the face framing more than the final edging round. Photograph the finished toy from the front and side so the cheek-patch placement, tail curve and cape length remain documented for a second version. Save the hooded fox amigurumi crochet pattern to Pinterest and share the completed project on Instagram with #HoodedFoxAmigurumi. For the next sample, record the exact yarn lot and finished height. Would you keep the photographed peach cape, or change this fox to a rust, sage or winter-blue hood?









