Introduction
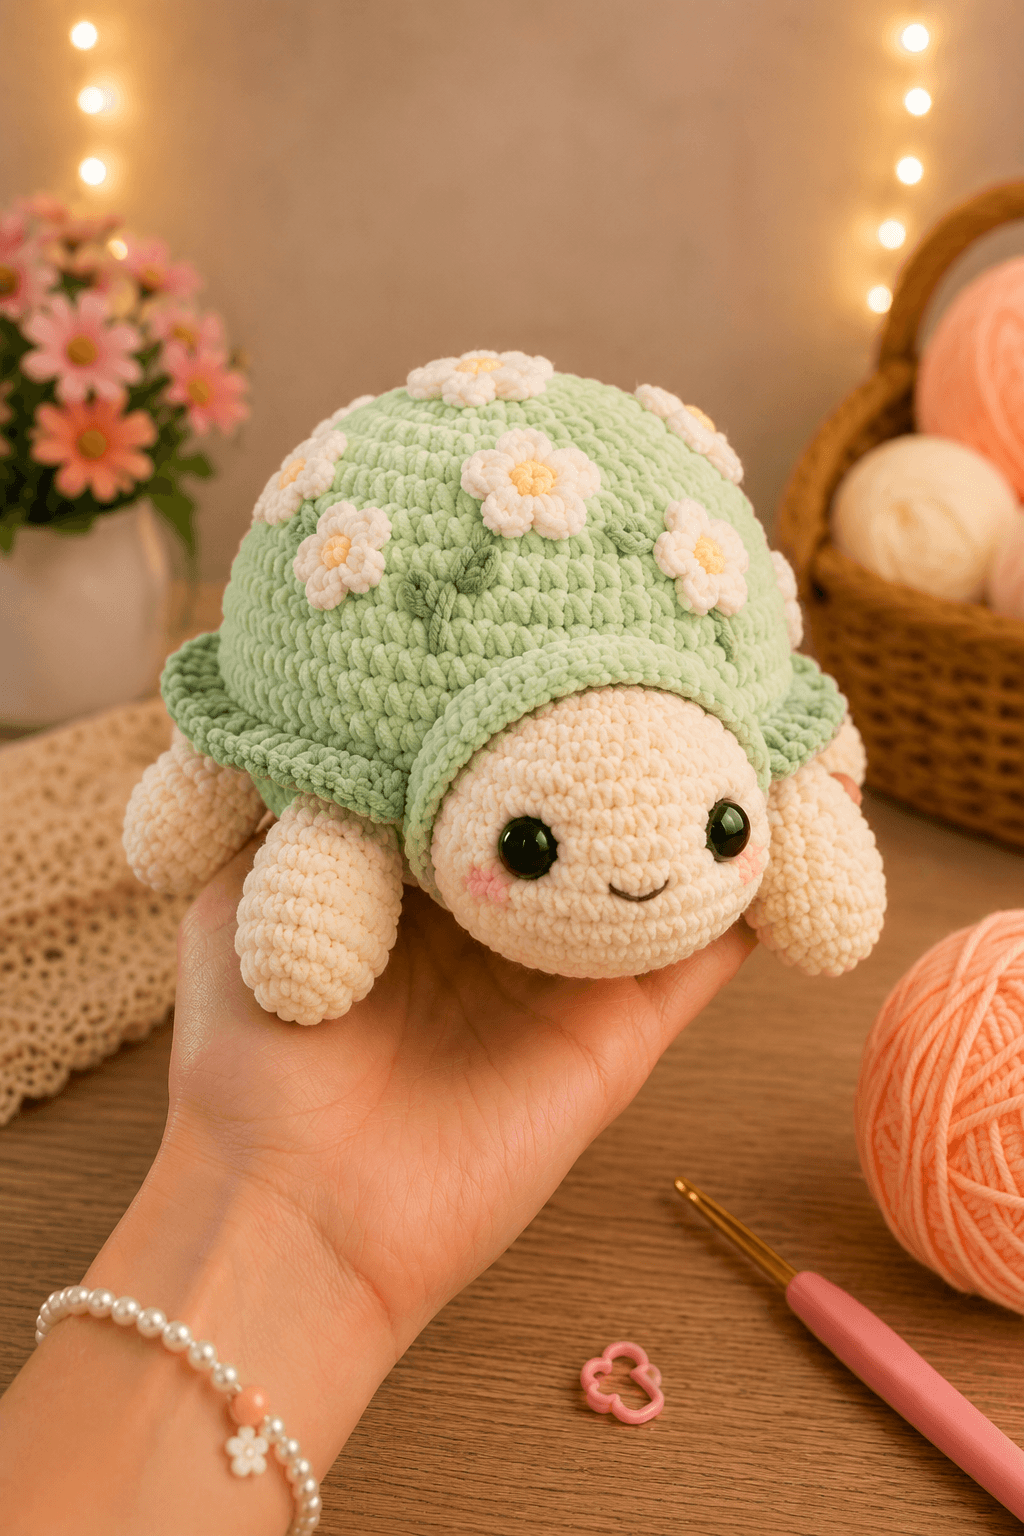
A turtle’s shell cannot sag behind its head; the crochet version fails when that dome is too shallow. This flower turtle amigurumi pattern uses weight-6 chenille yarn, a 4.5 mm hook, and layered daisies to produce a plush approximately 17 cm long. The project is suited to intermediate makers. Its flattened belly keeps the turtle stable, while the separate shell allows accurate flower placement.
The Design: What Makes This Flower Turtle Different
The shell is constructed as a separate dome rather than as part of the body. This creates enough depth for the raised flower arrangement without turning the belly into a sphere. A 36-stitch plateau gives the crochet turtle plush pattern a low, stable footprint, while the head reaches the same stitch count to retain the oversized proportions shown in the reference image. Short front legs sit beside the neck. Slightly smaller rear legs are positioned farther beneath the shell so the figure does not tip forward. The floral turtle amigurumi also has an expanded shell rim that conceals the body seam and forms the thick green border visible around the turtle. A common error is attaching the head too low. When the neck seam falls beneath the body midpoint, the face points toward the table instead of forward.
Project Information at a Glance
| Skill Level | Estimated Time | Finished Size | Hook | Best For |
|---|---|---|---|---|
| Intermediate | 5–7 hours | Approximately 17 cm long | 4.5 mm | Nursery display, shelf décor, and supervised gifting |
The finished measurement is based on comparable chenille turtle patterns. Yarn brand, tension, stuffing density, and hook size can change the final length by several centimeters.
Materials and Tools
Yarn
- Cream weight-6 chenille yarn — 145–155 g for the head, body, legs, tail, and underside.
- Pale sage-green weight-6 chenille yarn — 40–50 g for the shell.
- White weight-6 chenille yarn — approximately 15 g for seven flowers.
- Pale-yellow chenille yarn — approximately 5 g for the flower centers.
- Olive-green chenille yarn — approximately 5 g for the leaves.
- Blush-pink DK or worsted yarn — less than 2 g for the cheeks.
- Black embroidery thread or smooth yarn — approximately 30 cm for the mouth.
Use yarns from the same product line for the head and shell whenever possible. Different chenille brands can vary sharply in thickness even when both are labeled as weight 6.
Tools
- 4.5 mm crochet hook
- Two 14 mm safety eyes
- 70–90 g polyester fiberfill
- Large-eye yarn needle
- Locking stitch markers
- Long pins
- Scissors
Replace plastic safety eyes with embroidered eyes when the finished turtle is intended for a child under three years old.
Abbreviations
- MR — magic ring
- sc — single crochet
- inc — two single crochets in one stitch
- dec — decrease
- sl st — slip stitch
- ch — chain
- BLO — back loop only
- FLO — front loop only
- hdc — half double crochet
- dc — double crochet
- st — stitch
For an invisible decrease, insert the hook through the front loops of the next two stitches, yarn over, pull through both front loops, then complete one single crochet.
Flower Turtle Amigurumi Pattern
Work all amigurumi pieces in a continuous spiral unless a section states otherwise. Place a stitch marker in the first stitch of each round and move it after every completed round.
Head
Use cream chenille yarn.
R1: 6 sc in MR (6)
R2: inc ×6 (12)
R3: (sc, inc) ×6 (18)
R4: (2 sc, inc) ×6 (24)
R5: (3 sc, inc) ×6 (30)
R6: (4 sc, inc) ×6 (36)
R7–R11: sc around (36)
R12: (4 sc, dec) ×6 (30)
R13: (3 sc, dec) ×6 (24)
R14: (2 sc, dec) ×6 (18)
R15: (sc, dec) ×6 (12)
R16: dec ×6 (6)
Insert the 14 mm safety eyes between R8 and R9. Leave seven visible stitches between the eye posts. Add most of the stuffing after R13, then place smaller pieces around the eye backs to prevent dents.
Fasten off and leave a 35 cm tail for sewing. Close the final opening only after checking the eye alignment.
Body
Use cream chenille yarn.
R1: 6 sc in MR (6)
R2: inc ×6 (12)
R3: (sc, inc) ×6 (18)
R4: (2 sc, inc) ×6 (24)
R5: (3 sc, inc) ×6 (30)
R6: (4 sc, inc) ×6 (36)
R7–R9: sc around (36)
R10: (4 sc, dec) ×6 (30)
R11: (3 sc, dec) ×6 (24)
R12: (2 sc, dec) ×6 (18)
R13: (sc, dec) ×6 (12)
R14: dec ×6 (6)
Stuff the body to medium firmness. Press the finished piece between both palms to form a low oval instead of a ball.
Fasten off, close the opening, and weave the tail through several stitch columns.
Shell Dome
Use pale sage-green chenille yarn.
R1: 6 sc in MR (6)
R2: inc ×6 (12)
R3: (sc, inc) ×6 (18)
R4: (2 sc, inc) ×6 (24)
R5: (3 sc, inc) ×6 (30)
R6: (4 sc, inc) ×6 (36)
R7–R10: sc around (36)
R11: FLO, (5 sc, inc) ×6 (42)
R12: sc around (42)
Do not fill the shell as a separate closed piece. The 42-stitch round forms an expanded border. The main dome remains at the medium-size 36-stitch plateau.
Fasten off and leave a 50 cm tail for attaching the shell to the body.
Front Legs — Make 2
Use cream chenille yarn.
R1: 6 sc in MR (6)
R2: inc ×6 (12)
R3: (sc, inc) ×6 (18)
R4–R6: sc around (18)
R7: (sc, dec) ×6 (12)
R8–R9: sc around (12)
Stuff the rounded end only. Keep the upper section flexible so it can lie beneath the shell rim.
Flatten the opening and crochet 6 sc through both layers. Fasten off and leave a 25 cm sewing tail.
Back Legs — Make 2
Use cream chenille yarn.
R1: 6 sc in MR (6)
R2: inc ×6 (12)
R3: (sc, inc) ×6 (18)
R4–R5: sc around (18)
R6: (sc, dec) ×6 (12)
R7–R8: sc around (12)
Add a small amount of stuffing to the first four rounds. The back legs should remain slightly flatter than the front legs.
Flatten the opening and crochet 6 sc through both layers. Fasten off and leave a 25 cm tail.
Tail
Use cream chenille yarn.
R1: 6 sc in MR (6)
R2: inc ×6 (12)
R3: sc around (12)
R4: (sc, dec) ×4 (8)
R5: sc around (8)
Leave the tail unstuffed. Flatten the final opening before sewing.
Fasten off and leave a 20 cm tail.
Cheek Patches — Make 2
Use blush-pink DK or worsted yarn.
R1: 6 sc in MR (6)
R2: inc ×6 (12)
Fasten off and leave a 15 cm sewing tail. Flatten each circle before positioning it on the face.
Daisy Flowers — Make 7
Use pale-yellow yarn for each center and white yarn for the petals.
Center R1: With yellow, work 6 sc in MR (6).
Petal round: Change to white. In each stitch work: sl st, ch 2, 2 dc, ch 2, sl st. Repeat six times.
For two smaller side flowers, replace the two double crochets in each petal with two half double crochets.
Fasten off and leave a 20 cm tail on each flower. Use the tail to secure the center and the inner edge of each petal to the shell.
Leaves — Make 3
Use olive-green yarn.
Row 1: ch 6
Row 2: Starting in the second ch from the hook, sl st, sc, hdc, sc, sl st (5)
Row 3: Work along the unused side of the foundation chain: sl st, sc, hdc, sc, sl st (5)
Fasten off and leave an 18 cm sewing tail. Pull the starting tail gently to sharpen the tip of the leaf.
Embroidered Mouth
Thread approximately 30 cm of black embroidery cotton or smooth black yarn. Insert the needle beneath the head and bring it out one round below the midpoint between the eyes. Form a shallow curve measuring 18–22 mm from corner to corner. Anchor each side with one short vertical stitch, then return the thread through the neck area and secure it beneath the body seam.
Assembly
- Pin the head against the front of the body. Its lower edge should touch approximately R8–R10 of the body. Sew across a six-stitch-wide neck area and add two side stitches to prevent rotation.
- Center the shell over the body. The front rim should overlap the neck seam by approximately 8 mm.
- Sew the shell rim to the body with small whipstitches placed about one body stitch apart. Before closing the final 4 cm, add a thin layer of stuffing beneath the center of the dome.
- Check that the safety eyes are level when the turtle is placed on a table. Add the embroidered mouth one round below the midpoint between them.
- Sew one cheek patch on each side of the mouth. Keep the inner edge of each patch approximately 8 mm from the nearest eye post.
- Attach the front legs beside the head at the ten-o’clock and two-o’clock positions when the turtle is viewed from above.
- Place the back legs beneath the shell at the eight-o’clock and four-o’clock positions. Stitch through both the flattened leg edge and the body fabric.
- Center the tail between the back legs. Push its base approximately 5 mm beneath the shell rim before sewing.
- Pin the largest daisy near the upper front-right section of the shell. Distribute the remaining flowers around the dome, leaving at least 25 mm between their centers.
- Arrange the three leaves as a small cluster between the front flowers. Weave every loose tail through at least three stitch columns before trimming.
The finished turtle should rest on all four legs without its head or shell rim touching the work surface.
7 Technical Tips
- Control marker drift. Chenille can hide the first stitch and shift every shaping point by one position. Place a locking marker through both loops and recount each increase round before moving it.
- Prevent a collapsed shell. A hollow center allows the seven flowers to pull the dome inward. Add a stuffing layer no thicker than 20 mm beneath the center before closing the shell seam.
- Remove decrease bars. Standard decreases can create horizontal gaps on chenille surfaces. Work every head and body decrease through the front loops only.
- Install the eyes on time. The washers become difficult to attach after R13 of the head. Fit both eyes between R8 and R9 before adding most of the stuffing.
- Correct loose chenille tension. Gaps larger than 2 mm can expose the filling around the head and legs. Change to a 4.0 mm hook when the 4.5 mm stitches open under light pressure.
- Pin the shell before sewing. Stitching from one side without reference points can rotate the rim and pull the head off center. Use at least eight pins spaced around the shell edge.
- Secure short yarn tails. Chenille ends can work loose when they are cut beside the final knot. Weave each tail through three separate stitch columns and reverse direction once before trimming.
Conclusion
Measure the shell against the body before attaching any flowers. The green rim should extend evenly around both sides, cover the upper leg seams, and overlap the neck seam by about 8 mm. Once that fit is correct, pin all seven daisies before sewing the first one; this prevents an empty section from forming at the back of the dome. Save the finished flower turtle amigurumi pattern to Pinterest and share the completed turtle on Instagram with #FlowerShellTurtle. For the next version, test one controlled variation: should the central daisy remain white, or should its petals match the blush cheek patches?









