Introduction
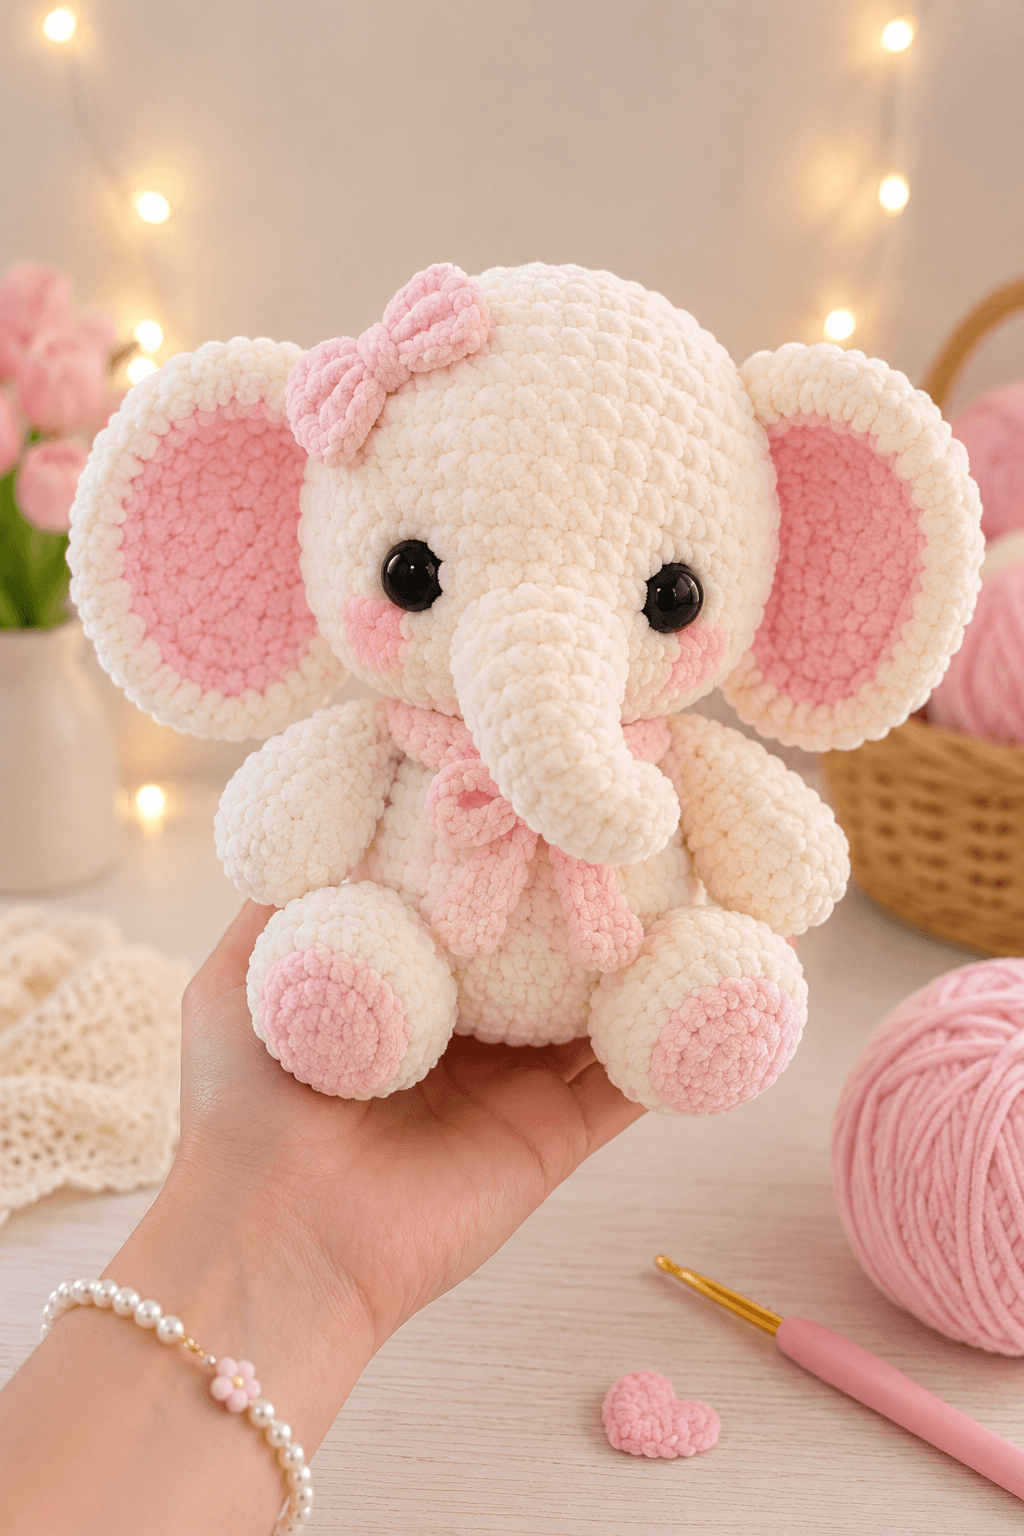
An elephant’s trunk begins between the eyes but must project below them without pulling the face out of alignment. This elephant amigurumi crochet pattern uses super-bulky chenille, a 5 mm hook and 18 mm eyes to make a sitting elephant approximately 23 cm tall. The project is rated intermediate and provides a stable nursery display piece with broad ears, pink foot pads and two removable bow details.
The Design: What Makes the Pink Bow Elephant Different
The head and body both reach a 36-stitch plateau, but their proportions are controlled by different numbers of straight rounds. Six plateau rounds make the head wide enough to support oversized ears, while four body rounds create a shorter seated torso. The trunk begins at six stitches, stays narrow at the tip and expands toward its attachment point. That direction matters. A trunk worked from the face outward tends to produce a blunt end and visible closing seam. Each ear combines a pink inner circle with a larger cream outer panel, giving the edge enough thickness to hold a shallow cupped shape. The plush elephant crochet pattern also uses separate back legs with flat pink pads. A common mistake is attaching the ears too far behind the head. Large elephant ears need visible front edges beside the eyes; otherwise, the chenille elephant pattern reads as a mouse rather than an elephant.
Project Info at a Glance
| Skill Level | Time | Finished Size | Hook | Best For |
|---|---|---|---|---|
| Intermediate | 8–11 hours | Approximately 23 cm sitting | 5 mm | Nursery display, shelf décor and supervised play |
Materials and Tools
Yarn
- Cream — super-bulky chenille — approximately 140–170 g — Premier Parfait Chunky, Himalaya Dolphin Baby or an equivalent plush yarn.
- Blush pink — super-bulky chenille — approximately 35–45 g — used for the inner ears, cheeks, foot pads, neck bow and head bow.
- Black — smooth embroidery yarn — less than 1 g — optional for eyelash or eyebrow details.
Tools
- 5 mm crochet hook
- Two 18 mm black safety eyes
- Polyester stuffing, approximately 140–180 g
- Large-eye yarn needle
- Locking stitch markers
- Rust-resistant pins
- Scissors
- Flexible measuring tape
Safety eyes are not suitable for children under three. Replace them with tightly embroidered eyes when the elephant will be handled by an infant or toddler.
Abbreviations
- MR — magic ring
- sc — single crochet
- inc — two single crochets in one stitch
- dec — single-crochet decrease
- sl st — slip stitch
- ch — chain
- BLO — back loop only
- FLO — front loop only
- hdc — half double crochet
Work an invisible decrease through the front loops of the next two stitches to reduce the opening that can expose stuffing.
Pattern — Step by Step
Work in a continuous spiral unless the instructions identify a row. Place a stitch marker in the first stitch of every round.
Head
Yarn: cream — original shaping based on standard six-stitch amigurumi math.
R1: 6 sc in MR (6)
R2: inc ×6 (12)
R3: (1 sc, inc) ×6 (18)
R4: (2 sc, inc) ×6 (24)
R5: (3 sc, inc) ×6 (30)
R6: (4 sc, inc) ×6 (36)
R7–R12: sc around (36)
Insert the eyes between R9 and R10 with approximately seven visible stitches between their inner edges. Hold the trunk base against the face before fitting the washers.
R13: (4 sc, dec) ×6 (30)
R14: (3 sc, dec) ×6 (24)
R15: (2 sc, dec) ×6 (18)
Stuff firmly around both eye posts. Keep the center-front area moderately packed so the trunk base does not bulge outward.
R16: (1 sc, dec) ×6 (12)
R17: dec ×6 (6)
Fasten off. Leave a 15 cm tail, pass it through the remaining front loops and close the opening.
Body
Yarn: cream — original shaping based on standard six-stitch amigurumi math.
R1: 6 sc in MR (6)
R2: inc ×6 (12)
R3: (1 sc, inc) ×6 (18)
R4: (2 sc, inc) ×6 (24)
R5: (3 sc, inc) ×6 (30)
R6: (4 sc, inc) ×6 (36)
R7–R10: sc around (36)
R11: (4 sc, dec) ×6 (30)
R12–R13: sc around (30)
R14: (3 sc, dec) ×6 (24)
R15: sc around (24)
R16: (2 sc, dec) ×6 (18)
Fill the lower body firmly. Add small pieces of stuffing around the side walls rather than forcing one large piece through the opening.
R17: (1 sc, dec) ×6 (12)
Fasten off. Leave a 35 cm tail for attaching the body to the head.
Trunk
Yarn: cream — the widening sequence follows published elephant-trunk construction using a narrow tip and broader base.
R1: 6 sc in MR (6)
R2–R5: sc around (6)
R6: 1 sc, inc, 2 sc, inc, 1 sc (8)
R7: (3 sc, inc) ×2 (10)
R8: 2 sc, inc, 4 sc, inc, 2 sc (12)
R9–R11: sc around (12)
R12: (1 sc, inc) ×6 (18)
R13: sc around (18)
Stuff the upper two-thirds lightly. Leave the narrow tip unstuffed so it can curve downward without forming a hard angle.
Fasten off. Leave a 35 cm sewing tail.
Outer Ears — Make Two
Yarn: cream — worked as flat circles with a partial shaping round.
R1: 6 sc in MR (6)
R2: inc ×6 (12)
R3: (1 sc, inc) ×6 (18)
R4: (2 sc, inc) ×6 (24)
R5: (3 sc, inc) ×6 (30)
R6: (4 sc, inc) ×6 (36)
R7: 15 sc, 3 hdc in next stitch, 20 sc (38)
Fasten off. Leave a 35 cm sewing tail. The hdc group marks the lower outer curve of the ear.
Inner Ears — Make Two
Yarn: blush pink.
R1: 6 sc in MR (6)
R2: inc ×6 (12)
R3: (1 sc, inc) ×6 (18)
R4: (2 sc, inc) ×6 (24)
R5: (3 sc, inc) ×6 (30)
Fasten off. Leave a 30 cm tail. Center each pink circle on a cream ear while leaving a cream border approximately one stitch wide.
Arms — Make Two
Yarn: cream.
R1: 6 sc in MR (6)
R2: inc ×6 (12)
R3: (1 sc, inc) ×6 (18)
R4–R6: sc around (18)
R7: (1 sc, dec) ×6 (12)
R8–R11: sc around (12)
Stuff the hand firmly and the upper arm lightly.
R12: (2 sc, dec) ×3 (9)
Flatten the opening and crochet 4 sc through both layers.
Fasten off. Leave a 25 cm sewing tail.
Back Legs — Make Two
Yarn: cream.
R1: 6 sc in MR (6)
R2: inc ×6 (12)
R3: (1 sc, inc) ×6 (18)
R4: (2 sc, inc) ×6 (24)
R5–R7: sc around (24)
R8: (2 sc, dec) ×6 (18)
R9–R11: sc around (18)
R12: (1 sc, dec) ×6 (12)
R13–R14: sc around (12)
Pack the foot firmly and add moderate stuffing to the upper section. The rear edge should stay flexible enough to sit against the body.
Flatten the opening and crochet 6 sc through both layers.
Fasten off. Leave a 30 cm sewing tail.
Foot Pads — Make Two
Yarn: blush pink.
R1: 6 sc in MR (6)
R2: inc ×6 (12)
R3: (1 sc, inc) ×6 (18)
Fasten off. Leave a 20 cm tail. Flatten each circle and sew it to the center of a back foot.
Cheek Patches — Make Two
Yarn: blush pink.
R1: 6 sc in MR (6)
R2: inc ×6 (12)
Fasten off. Leave a 15 cm tail. Keep the circles flat and do not stuff them.
Head Bow
Yarn: blush pink — worked in rows.
Ch 17.
Row 1: sc in second ch from hook and across (16)
Rows 2–6: ch 1, turn, sc across (16)
Fasten off. Leave a 25 cm tail. Fold the rectangle so the short ends meet and sew them together. Pinch the center and wrap yarn around it six to eight times.
Head-Bow Center
Yarn: blush pink.
Ch 7.
Row 1: sc in second ch from hook and across (6)
Rows 2–3: ch 1, turn, sc across (6)
Fasten off. Wrap the strip around the pinched bow center and sew the short edges together at the back.
Neck Bow
Yarn: blush pink.
Ch 61, beginning with a 20 cm tail.
Row 1: sl st in second ch from hook and in each remaining ch (60)
Fasten off with a second 20 cm tail. Knot a compact yarn ball at each end or weave the tails back through the cord.
Tail
Yarn: cream with a blush-pink tip.
Ch 10.
Row 1: sl st in second ch from hook and across (9)
Fasten off. Attach three 8 cm strands of pink yarn to the end, knot them together and trim the tassel to approximately 2 cm.
Assembly
- Center the head over the body and pin the neck seam at the front, back and both sides.
- Sew the head to the body with two passes around the opening, adding stuffing beneath the seam before closing the final section.
- Position the trunk between the eyes with its upper edge level with the lower third of each eye, then sew around the 18-stitch base.
- Attach the cheek patches beside the trunk, keeping their upper edges approximately one round below the eyes.
- Sew each pink inner ear to a cream outer ear, keeping the outer border consistent around the visible edge.
- Pin the ears to the sides of the head so their front edges remain visible beside the eyes, then sew along the upper and rear edges.
- Attach the back legs to the lower sides of the body and compare both foot-pad angles before completing the seams.
- Sew the arms to the upper body with their lower ends pointing slightly toward the center of the abdomen.
- Attach the tail to the lower back, sew the head bow above one eye and tie the neck cord into a compact front bow.
- Weave every structural tail through three stitch directions and check that the elephant remains seated without hand support.
The completed elephant should display equal eye height, a centered trunk and symmetrical contact points beneath both back feet.
7 Technical Tips
- Stitch-marker drift: Losing the start of a round can rotate the decrease line toward the face. Count all 36 stitches after each head plateau round and move the marker only after completing the final stitch.
- Overstuffed trunk: Dense filling turns the trunk into a rigid cylinder. Leave the lowest 2–3 cm unstuffed and use small filling pieces only in the wider upper section.
- Visible decrease holes: Standard decreases can expose white stuffing through cream chenille. Insert the hook through the next two front loops and complete them as one single crochet.
- Locked eye placement: A one-stitch difference becomes obvious beside a centered trunk. Position the eyes seven visible stitches apart and test the trunk between them before attaching either washer.
- Collapsed ear edges: Sewing only the inner ear allows the cream border to fold backward. Add a second line of attachment stitches around the upper third of the outer panel.
- Uneven seated balance: A leg placed one round higher makes the body tilt. Pin both upper leg seams to the same body round and measure from each inner foot edge to the centerline.
- Chenille tail slippage: A tail shorter than 15 cm can pull back through the plush fabric. Weave it vertically, horizontally and diagonally before drawing the cut end into the stuffing.
Conclusion
Inspect the elephant from the front before trimming the final yarn tails. Both ear borders should remain visible, the trunk should divide the face evenly, and the pink foot pads should point forward at matching angles. For the next version, change the inner-ear color while retaining the same head, trunk and ear counts. Save this elephant amigurumi crochet pattern to a Pinterest project board, then share the finished plush on Instagram with #PinkBowElephant. Record the yarn brand, hook size and final sitting height so a second elephant can be matched accurately. Would you keep the trunk pointing down or curve its unstuffed tip slightly upward?
Technical Sources
- Jess Huff, Esther the Elephant: https://jesshuff.com/esther-elephant-free-amigurumi-pattern/
- Supergurumi, Amigurumi Crochet Elephant Pattern: https://www.supergurumi.com/amigurumi-crochet-elephant-pattern
- Loops and Love Crochet, Elephant Amigurumi: https://www.loopsandlovecrochet.com/2021/02/15/elephant-amigurumi-free-crochet-pattern/
- Ravelry, Elwis Elephant Amigurumi: https://www.ravelry.com/patterns/library/elwis-elephant-amigurumi
- Little Crochet Farm, Little Elephant Amigurumi: https://littlecrochetfarm.com/little-elephant-free-amigurumi-pattern/









