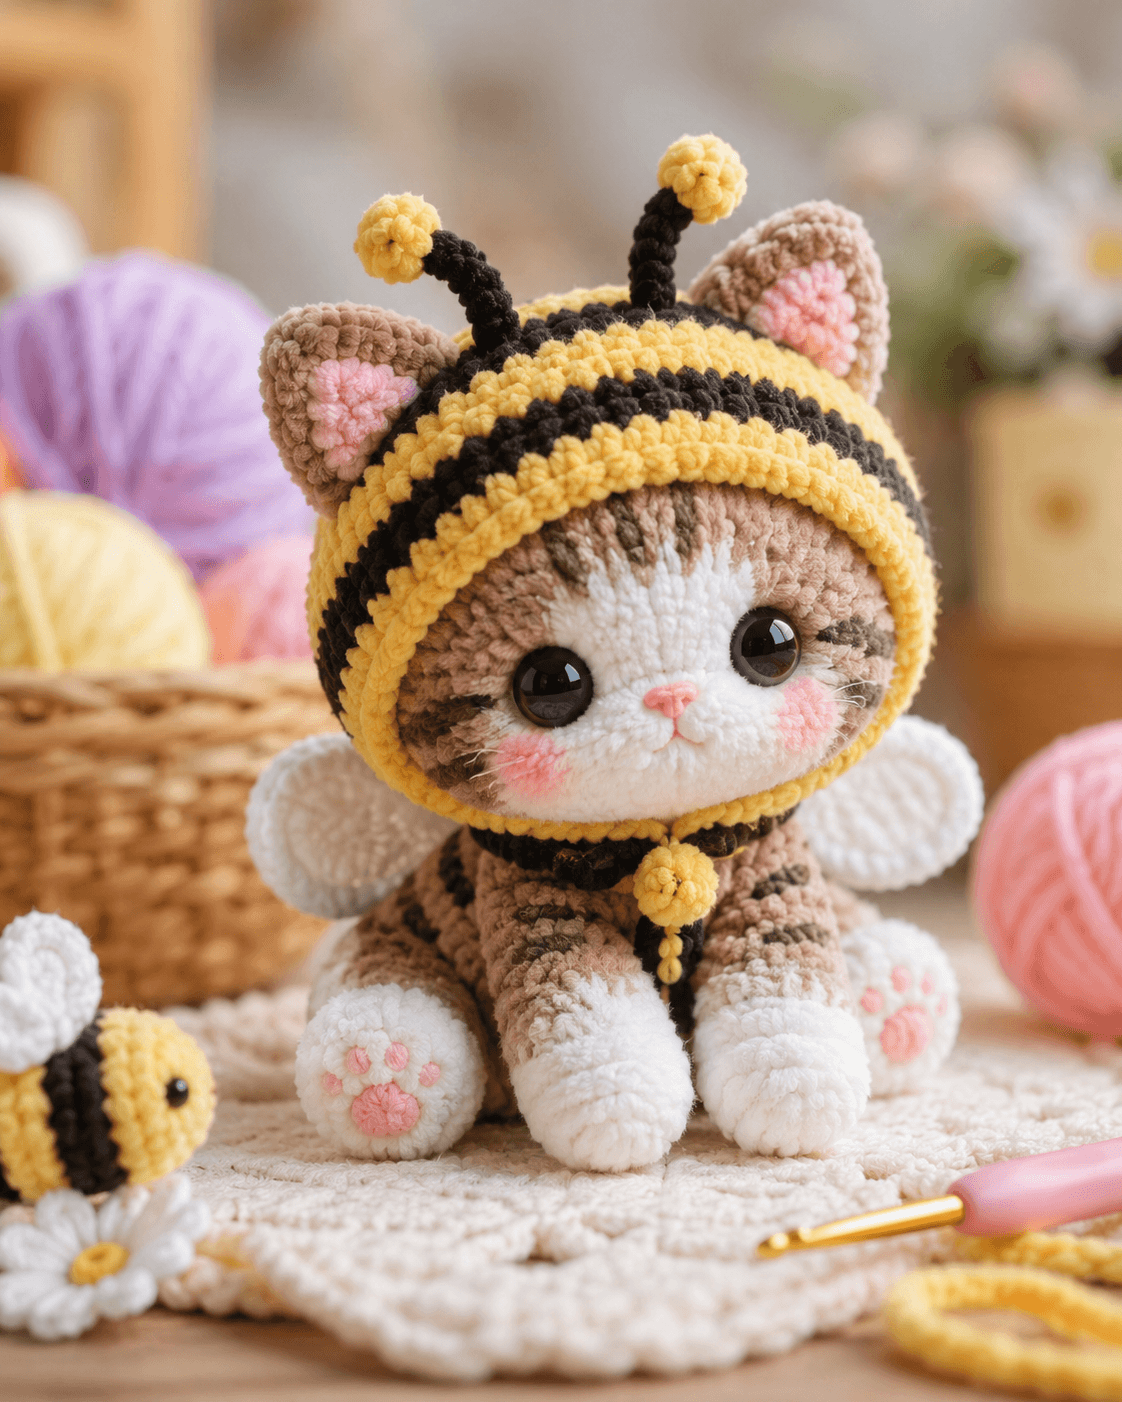
A bee hood changes ear placement before the first stripe is even worked. This cat bee amigurumi crochet pattern is built around a round tabby face, oversized eyes, a striped hood with ear openings, small white wings, and a seated body with visible paw pads. Use DK to light-worsted yarn with a 3.0 mm hook for a compact result around 20 to 22 cm tall, which fits the scale suggested by comparable cat-bee patterns. It suits an intermediate maker because placement controls the finish more than stitch variety. :contentReference[oaicite:19]{index=19}
The Design: What Makes This Cat Different
This build is not a standard cat with stripes sewn onto the body. The cat stays separate from the costume. That choice matters because the photo shows a clear hood edge framing the face rather than color changes worked directly into the head. A second decision is the ear opening placement. The ears sit through the hood, not under it, so the costume reads as wearable instead of fused. The third choice is the wing scale. These wings stay small and rounded so the face stays dominant in front view. One common mistake in a bee costume cat crochet design is widening the hood too much. Then the face sinks backward, the stripes flatten, and the antennae start looking like afterthoughts. This version keeps the hood close to the cheeks and lets the tie close the lower edge cleanly.
Project Info at a Glance
| Skill Level | Time | Finished Size | Hook | Best For |
|---|---|---|---|---|
| Intermediate | 8–10 hours | About 20–22 cm seated | 3.0 mm | Shelf display, themed gift, nursery decor |
Materials and Tools
Yarn
- Taupe tabby — DK or light worsted — about 60 g — for head, body, outer ears, tail
- White — same weight — about 35 g — for muzzle, chest, paws, wings
- Yellow — same weight — about 20 g — for hood and antenna tips
- Black — same weight — about 12 g — for hood stripes, antennae, tie
- Pink — scrap amount — for nose, cheek patches, paw pads
- Dark brown — scrap amount — for face striping and whisker accents
Tools
- Hook 3.0 mm
- 12 mm safety eyes
- Polyester stuffing
- Tapestry needle
- Stitch markers
- Straight pins
- Scissors
Abbreviations
MR = magic ring, sc = single crochet, inc = increase, dec = decrease, sl st = slip stitch, ch = chain, BLO = back loop only, FO = fasten off. Use invisible decrease on visible shaping rounds so the cat face stays rounded and the hood edge stays even.
Pattern — Step by Step
Continuous spiral unless noted.
Head (Make 1)
Yarn: taupe tabby — Standard amigurumi math adapted to photo proportions
R1: 6 sc in MR (6)
R2: inc x6 (12)
R3: [sc, inc] x6 (18)
R4: [2 sc, inc] x6 (24)
R5: [3 sc, inc] x6 (30)
R6: [4 sc, inc] x6 (36)
R7–13: sc around (36)
R14: [4 sc, dec] x6 (30)
R15: sc around (30)
R16: [3 sc, dec] x6 (24)
R17: sc around (24)
Insert eyes between R10 and R11, about 8 stitches apart. Stuff firmly before closing.
R18: [2 sc, dec] x6 (18)
R19: [sc, dec] x6 (12)
R20: dec x6 (6)
FO. Leave a 25 cm tail.
Muzzle (Make 1)
Yarn: white — Short cat muzzle
R1: 6 sc in MR (6)
R2: inc x6 (12)
R3: sc around (12)
R4: [sc, dec] x4 (8)
Stuff lightly. Embroider the pink nose before sewing if preferred.
FO. Leave a 20 cm tail.
Ears (Make 2)
Yarn: outer taupe, inner pink
Outer ear:
R1: 6 sc in MR (6)
R2: inc x6 (12)
R3: [sc, inc] x6 (18)
R4: sc around (18)
R5: [sc, dec] x6 (12)
Inner ear patch:
R1: 6 sc in MR (6)
R2: inc x6 (12)
Sew inner patch in place. Fold the base of each ear slightly before attachment.
FO. Leave 18 cm tails on outer ears.
Body (Make 1)
Yarn: taupe tabby — Standard amigurumi math adapted to seated silhouette
R1: 6 sc in MR (6)
R2: inc x6 (12)
R3: [sc, inc] x6 (18)
R4: [2 sc, inc] x6 (24)
R5: [3 sc, inc] x6 (30)
R6: [4 sc, inc] x6 (36)
R7–10: sc around (36)
R11: [4 sc, dec] x6 (30)
R12–13: sc around (30)
R14: [3 sc, dec] x6 (24)
R15: sc around (24)
Stuff the lower body firmly so the cat sits level. Keep the neck area slightly softer.
R16: [2 sc, dec] x6 (18)
R17: sc around (18)
FO. Leave a 30 cm tail.
Chest Patch (Make 1)
Yarn: white — Oval front patch
Ch 8.
Round 1: starting in 2nd ch from hook, sc 6, 3 sc in last ch, rotate, sc 5, inc in last st (16)
Round 2: inc, sc 5, inc x3, sc 5, inc x2 (22)
FO. Leave a 20 cm tail.
Arms / Front Legs (Make 2)
Yarn: start white, switch to taupe
R1: 6 sc in MR (6)
R2: inc x6 (12)
R3: sc around (12)
Change to taupe.
R4: [sc, dec] x4 (8)
R5–9: sc around (8)
Stuff the paw and lower half only. Flatten the top edge.
FO. Leave 20 cm tails.
Back Legs (Make 2)
Yarn: start white, switch to taupe
R1: 6 sc in MR (6)
R2: inc x6 (12)
R3: [sc, inc] x6 (18)
R4: sc around (18)
Change to taupe.
R5: [sc, dec] x6 (12)
R6–8: sc around (12)
Stuff moderately. Flatten the top edge so the legs angle outward in a seated pose.
FO. Leave 25 cm tails.
Tail (Make 1)
Yarn: taupe tabby
R1: 6 sc in MR (6)
R2: [sc, inc] x3 (9)
R3–12: sc around (9)
Stuff lightly or leave mostly unstuffed for a softer curve.
FO. Leave a 25 cm tail.
Cheek Patches (Make 2)
Yarn: pink — Flat circles
R1: 6 sc in MR (6)
R2: inc x6 (12)
FO. Leave 12 cm tails.
Wings (Make 2)
Yarn: white — Small bee wings inspired by common separate wing construction
Ch 6.
Round 1: starting in 2nd ch from hook, sc 4, 3 sc in last ch, rotate, sc 3, inc in last st (12)
Round 2: inc, sc 3, inc x3, sc 3, inc x2 (18)
Do not stuff. Shape into a soft oval before sewing.
FO. Leave 18 cm tails.
Bee Hood (Make 1)
Yarn: yellow and black — Costume piece from the photo
Start in yellow.
R1: 6 sc in MR (6)
R2: inc x6 (12)
R3: [sc, inc] x6 (18)
R4: [2 sc, inc] x6 (24)
R5: [3 sc, inc] x6 (30)
R6: [4 sc, inc] x6 (36)
R7: yellow sc around (36)
R8: black sc around (36)
R9: yellow sc around (36)
R10: black sc around (36)
R11: yellow sc around (36)
R12: black sc around (36)
R13: yellow sc around (36)
R14: [5 sc, inc] x6 (42)
R15–16: yellow sc around (42)
Test fit over the head before fastening off. The opening should frame the cheeks closely.
FO. Leave a 35 cm tail.
Ear Opening Trim (Make 2)
Yarn: yellow
Ch 12.
Row 1: starting in 2nd ch from hook, sc 11
Sew each strip into a small oval and attach around the ear openings after cutting and reinforcing the hood opening.
FO. Leave 15 cm tails.
Antennae Stems (Make 2)
Yarn: black
Ch 8.
Row 1: starting in 2nd ch from hook, sl st 7
FO. Leave 15 cm tails.
Antennae Tips (Make 2)
Yarn: yellow
R1: 6 sc in MR (6)
R2: sc around (6)
Stuff very lightly. Sew one tip to each black stem.
FO. Leave 12 cm tails.
Neck Tie (Make 1)
Yarn: black
Ch 26.
Row 1: starting in 2nd ch from hook, sl st 25
FO. Tie under the chin.
Tie Pom-Pom (Make 1)
Yarn: yellow
R1: 6 sc in MR (6)
R2: [sc, inc] x3 (9)
FO. Sew at the center of the neck tie knot.
Paw Pad Embroidery
Use pink yarn to add one large center pad and three small toe pads on each visible white foot.
Face Stripe Embroidery
Use dark brown yarn to add short tabby lines above the eyes and along the cheek sides.
Assembly
- Sew the chest patch to the front center of the body before attaching the limbs.
- Sew the head to the body with the face angled slightly downward.
- Pin the muzzle centered low on the face, then sew it in place and embroider the nose and mouth.
- Attach the ears high on the head with a slight outward tilt.
- Sew the front legs long and close to the body center so they drop straight in front.
- Attach the back legs low and slightly forward so the cat sits without rocking.
- Sew the tail at the back base and curve it around one side if desired.
- Attach the cheek patches and embroider the tabby facial stripes.
- Sew the wings to the upper back, one on each side, keeping them lower than the hood edge.
- Fit the hood over the head, attach the antennae, add the neck tie and pom-pom, then secure the hood at a few hidden points.
The finished cat should sit on both back legs, with the hood framing the face evenly and both wings visible from a front angle.
7 Technical Tips
- Pin the hood on the head before cutting ear openings. A placement error of even 5 mm makes one ear sit higher and breaks the costume symmetry.
- Do not overstuff the muzzle. On a 36-stitch head, too much fill pushes the pink nose upward and shortens the visible cheek area.
- Keep the eye line level before adding face stripes. Large eyes exaggerate any offset, especially on a cat face framed by a tight hood.
- Sew the wings after the hood is test-fitted. If the wings sit too high, the hood edge hides them from the front view.
- Stuff the back legs more firmly than the front legs. Soft hind legs flatten and make the cat lean backward once the hood is attached.
- Anchor each antenna through the hood and into the head, not only into the costume layer. Single-layer attachment lets the stems twist over time.
- Embroider paw pads after the legs are attached. That keeps the pads centered on the visible front of each foot instead of rotating sideways during assembly.
Conclusion
This cat bee amigurumi crochet pattern works because the cat and costume stay structurally separate. The round head carries the expression, the hood supplies the species cue, the antennae add height, and the wings finish the theme without taking over the silhouette. Make the cat first, test the hood fit second, and cut the ear openings only after the hood sits correctly on the face. That order keeps the proportions controlled. Share the finished piece on Pinterest and Instagram with #CatBeeAmigurumi. One practical question remains: did your hood opening stop high enough to leave the full pink cheeks visible from the front?









