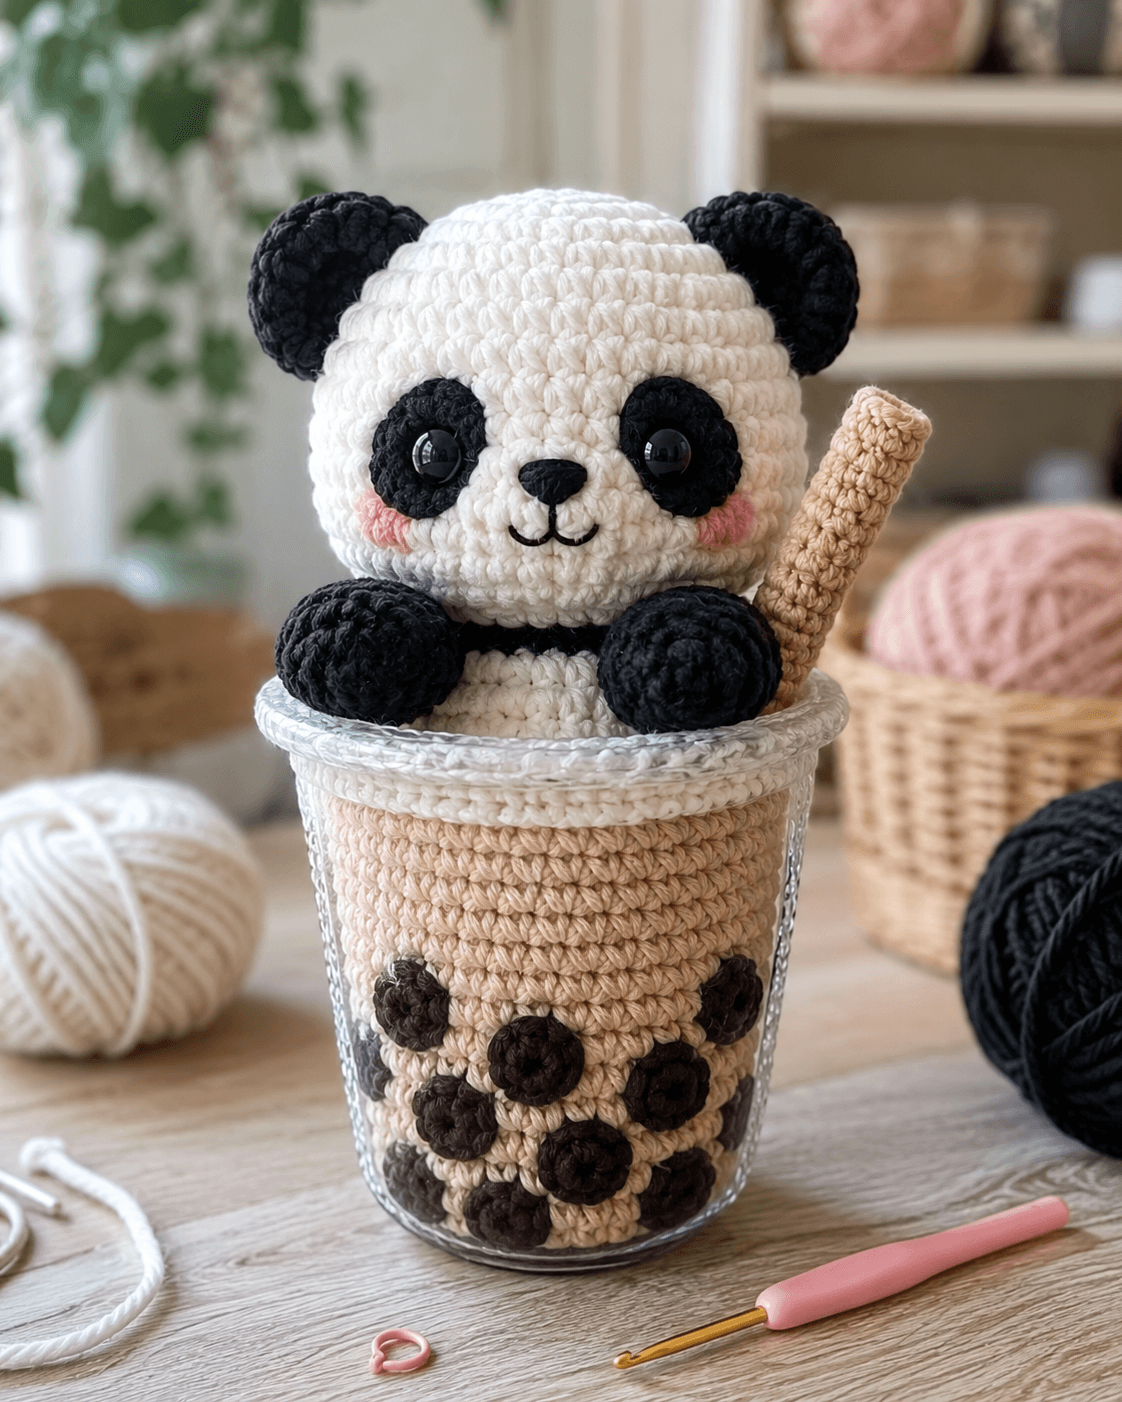
Panda markings fail fast when the eye patches sit even slightly off line. This panda amigurumi crochet pattern is built around a round white head, separate black patches, compact limbs, a beige bubble tea cup, and oversized boba pearls at the base. Use DK to light-worsted yarn with a 3.0 mm hook for a firm finish. The project suits an intermediate maker because symmetry matters more than stitch variety.
The Design: What Makes This Panda Different
This panda is not a standard standing bear with color swaps worked directly into the head. The face stays white, while the black eye patches are made separately and placed after the eyes go in. That keeps the expression cleaner and matches the photo better. A second structural choice is the cup build. The panda is designed to sit inside the top opening instead of standing beside the drink, so the lower body can stay compact while the arms rest on the rim. The straw also changes the silhouette. It adds vertical balance at the back and gives the piece an instant bubble tea read. One common mistake in a panda crochet pattern is making the head too small for the patches. Then the features crowd together and the cheeks have nowhere to sit.
Project Info at a Glance
| Skill Level | Time | Finished Size | Hook | Best For |
|---|---|---|---|---|
| Intermediate | 7–9 hours | About 18–20 cm tall | 3.0 mm | Desk display, gift make, café-themed decor |
Materials and Tools
Yarn
- White — DK or light worsted — about 45 g — for head, body, and cup rim
- Black — same weight — about 35 g — for ears, arms, eye patches, belt, and boba pearls
- Light beige — same weight — about 40 g — for the milk tea cup and straw
- Pink — scrap amount — for cheek patches
- Dark brown — scrap amount — for mouth detail if preferred
Tools
- Hook 3.0 mm
- 9 mm safety eyes
- Polyester stuffing
- Tapestry needle
- Stitch markers
- Scissors
Abbreviations
MR = magic ring, sc = single crochet, inc = increase, dec = decrease, sl st = slip stitch, ch = chain, BLO = back loop only, FO = fasten off. Use invisible decrease on visible shaping rounds so the panda head stays round and the cup edge stays clean.
Pattern — Step by Step
Continuous spiral unless noted.
Head (Make 1)
Yarn: white — Standard amigurumi math adapted to photo proportions
R1: 6 sc in MR (6)
R2: inc x6 (12)
R3: [sc, inc] x6 (18)
R4: [2 sc, inc] x6 (24)
R5: [3 sc, inc] x6 (30)
R6: [4 sc, inc] x6 (36)
R7–13: sc around (36)
R14: [4 sc, dec] x6 (30)
R15: sc around (30)
R16: [3 sc, dec] x6 (24)
R17: sc around (24)
Insert eyes between R10 and R11, about 8 stitches apart. Stuff firmly before closing.
R18: [2 sc, dec] x6 (18)
R19: [sc, dec] x6 (12)
R20: dec x6 (6)
FO. Leave a 25 cm tail.
Body (Make 1)
Yarn: white — Compact lower body for cup placement
R1: 6 sc in MR (6)
R2: inc x6 (12)
R3: [sc, inc] x6 (18)
R4: [2 sc, inc] x6 (24)
R5: [3 sc, inc] x6 (30)
R6–9: sc around (30)
R10: [3 sc, dec] x6 (24)
R11: sc around (24)
R12: [2 sc, dec] x6 (18)
Stuff firmly, especially at the base, so the panda stays seated above the cup opening.
FO. Leave a 30 cm tail.
Ears (Make 2)
Yarn: black
R1: 6 sc in MR (6)
R2: inc x6 (12)
R3: sc around (12)
R4: [sc, dec] x4 (8)
Stuff lightly or leave unstuffed for flatter ears. Flatten before sewing.
FO. Leave a 15 cm tail.
Arms (Make 2)
Yarn: black
R1: 6 sc in MR (6)
R2: [sc, inc] x3 (9)
R3–5: sc around (9)
R6: [sc, dec] x3 (6)
R7–8: sc around (6)
Stuff only the lower half. Flatten the top edge so the arms sit against the rim.
FO. Leave a 20 cm tail.
Legs (Make 2)
Yarn: black
R1: 6 sc in MR (6)
R2: inc x6 (12)
R3–4: sc around (12)
R5: [sc, dec] x4 (8)
Stuff moderately. Flatten top edge.
FO. Leave a 20 cm tail.
Eye Patches (Make 2)
Yarn: black — Flat appliqué pieces
R1: 6 sc in MR (6)
R2: inc x6 (12)
R3: [sc, inc] x6 (18)
Flatten each patch slightly into an oval while sewing. Place eyes through or just inside the patch area.
FO. Leave 15 cm tails.
Snout Patch (Make 1)
Yarn: white — Small raised muzzle
R1: 6 sc in MR (6)
R2: inc x6 (12)
R3: sc around (12)
Stuff very lightly. Embroider the nose before attaching if preferred.
FO. Leave a 20 cm tail.
Cheek Patches (Make 2)
Yarn: pink — Flat circles
R1: 6 sc in MR (6)
R2: inc x6 (12)
FO. Leave 12 cm tails.
Neck Band (Make 1)
Yarn: black — Small band between head and body
Ch 18.
Row 1: starting in 2nd ch from hook, sc 17
FO. Wrap around the neck join and tack in place.
Bubble Tea Cup (Make 1)
Yarn: light beige — Tapered cup shape
R1: 6 sc in MR (6)
R2: inc x6 (12)
R3: [sc, inc] x6 (18)
R4: [2 sc, inc] x6 (24)
R5: [3 sc, inc] x6 (30)
R6: [4 sc, inc] x6 (36)
R7: BLO sc around (36)
R8–13: sc around (36)
R14: [5 sc, inc] x6 (42)
R15–20: sc around (42)
Stuff the bottom lightly only if you want a freestanding soft cup. For a display version, place it over a small cup insert or stiff inner form.
FO. Leave a 35 cm tail.
Cup Rim / Foam Top (Make 1)
Yarn: white — Rolled top edge
R1: 6 sc in MR (6)
R2: inc x6 (12)
R3: [sc, inc] x6 (18)
R4: [2 sc, inc] x6 (24)
R5: [3 sc, inc] x6 (30)
R6: [4 sc, inc] x6 (36)
R7: [5 sc, inc] x6 (42)
R8: BLO sc around (42)
R9: sc around (42)
Sew to the top of the cup so the front edge reads like a foam or sealed lid line.
FO. Leave a 30 cm tail.
Boba Pearls (Make 12)
Yarn: black or very dark brown
R1: 6 sc in MR (6)
R2: sc around (6)
Stuff minimally or leave unstuffed for flatter appliqué pearls.
FO. Leave 10 cm tails.
Straw (Make 1)
Yarn: light beige
Ch 16.
Round 1: starting in 2nd ch from hook, sc 15 along chain, rotate, sc 15 on opposite side (30)
Round 2–5: sc around (30)
Insert a thin craft wire or rolled felt strip if a firmer straw is needed. Keep the lower end flat for sewing behind the panda.
FO. Leave a 20 cm tail.
Assembly
- Sew the head to the body with the face centered and only slightly tilted forward.
- Attach the eye patches first, keeping both patches level before locking the stitches.
- Place the safety eyes through the patch area if not already inserted, then secure them from inside the head.
- Sew the snout patch centered below the eyes and embroider the nose and mouth.
- Attach the ears high on the head, spaced evenly from the crown centerline.
- Sew the cheek patches below the eye patches and outside the snout edges.
- Attach the legs low on the body and the arms high enough to rest on the cup rim.
- Sew the neck band around the join between head and body.
- Attach the boba pearls around the lower half of the cup, then sew the rim to the cup top.
- Place the panda into the cup opening, sew it in place, and attach the straw at the back right angle shown in the photo.
The finished panda should sit securely above the rim, with both arms visible from the front and the straw rising behind one shoulder.
7 Technical Tips
- Pin both eye patches before sewing either one down. A shift of even half a stitch width is obvious on a panda face because the black patches frame the eyes so tightly.
- Keep the head firmly stuffed through round 17. A soft head collapses inward and makes the eye patches wrinkle at the edges.
- Do not oversize the snout patch. On a 36-stitch head, a muzzle wider than 12 stitches starts covering the lower edge of the patches.
- Sew the arms only after the panda is test-fitted inside the cup. If the arm angle is wrong, the paws float above the rim instead of resting on it.
- Space the boba pearls before stitching. Gaps larger than about 1.5 cm make the lower cup look empty and weaken the bubble tea effect.
- Use BLO on the cup transition round. That small corner gives the cup a clearer base and stops the sides from reading as a plain cylinder.
- Anchor the straw through the cup rim and the panda back, not only into the cup wall. One-point attachment lets the straw twist outward over time.
Conclusion
This panda amigurumi crochet pattern works because each section does a specific job. The white head keeps the expression open, the black patches define the species, the compact limbs hold the pose, and the cup turns the plush into a bubble tea display instead of a standard bear. Make the head first, test the patch placement before locking the eyes, and fit the body into the cup before sewing the arms. Share the finished piece on Pinterest and Instagram with #PandaBobaAmigurumi. One practical question remains: did your straw sit far enough behind the ear to stay visible from the front view?









