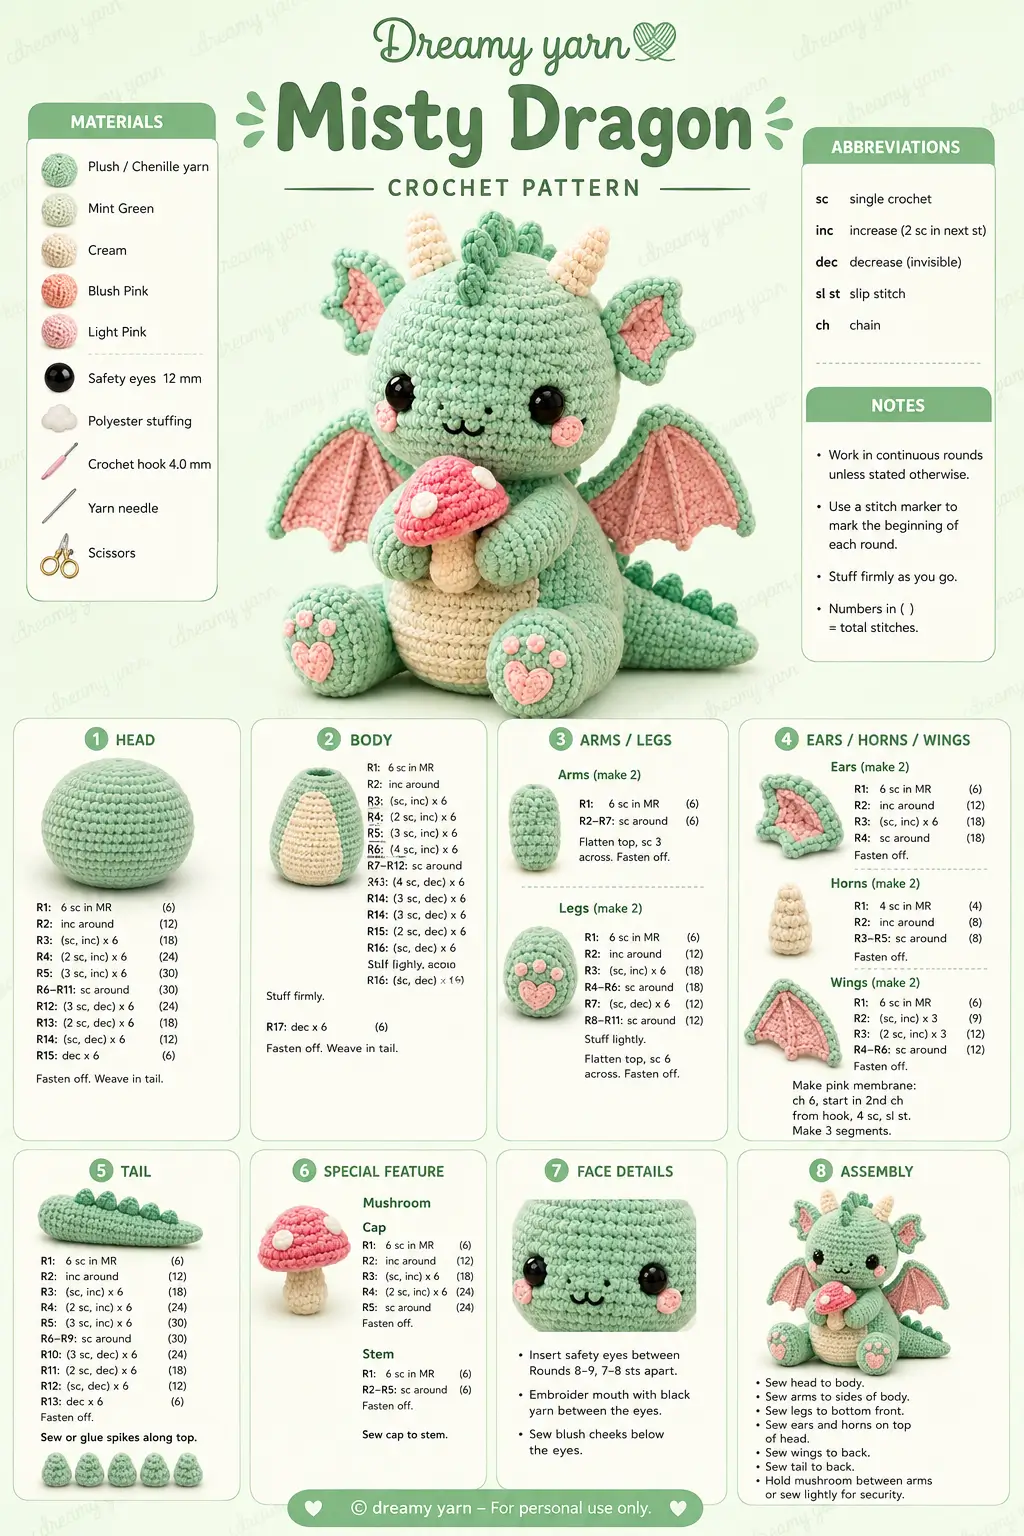
A dragon that has to sit upright while holding a mug needs a low center of gravity and a short neck. This dragon amigurumi crochet pattern is built for plush yarn, a 5 mm hook, and an intermediate maker who wants a photo-led result around 24 to 26 cm tall. The shape works well for desk decor, market stock, or a themed gift that reads clearly from the front.
The Design: What Makes This Dragon Different
This version uses three structural decisions that matter. First, the head stays large but stops at a medium 36-stitch plateau instead of pushing wider, because chenille yarn adds bulk fast and can make a baby dragon look top-heavy. Second, the body is pear-shaped with a flat seated base, which keeps the dragon upright once the tail is sewn behind the legs. Third, the wings stay shallow and wide instead of tall and narrow. That keeps them visible in a front-facing pose without pulling the toy backward.
The ears also need a defined inner panel. Without that contrast, the silhouette reads more like a dinosaur than a crochet dragon plush. One common mistake with a baby dragon amigurumi is placing the horns too far apart. The head then looks broad and blunt, and the forehead ridge disappears.
Project Info at a Glance
| Skill Level | Time | Finished Size | Hook | Best For |
|---|---|---|---|---|
| Intermediate | 8 to 12 hours | 24 to 26 cm sitting | 5.0 mm | Plush decor, gift makes, market display |
Materials and Tools
Yarn
- Mint green — super bulky weight 6 chenille — about 120 to 140 g — Hobbii Honey Bunny or similar plush yarn
- Cream — super bulky weight 6 chenille — about 25 to 35 g — matching plush yarn for belly and horns
- Blush pink — super bulky weight 6 chenille or lighter cotton for fine details — small amount
- Dark mint — super bulky weight 6 chenille — small amount for head spikes
- Black embroidery thread — for nose and mouth
Tools
- Hook 5.0 mm
- 12 to 14 mm safety eyes
- Polyester stuffing
- Yarn needle
- Stitch markers
- Pins
Abbreviations
MR = magic ring, sc = single crochet, inc = increase, dec = invisible decrease, sl st = slip stitch, ch = chain, BLO = back loop only, FLO = front loop only.
Use invisible decrease on all shaping rounds so the chenille surface stays compact and the stuffing does not flash through the fabric.
Pattern — Step by Step
Work in a continuous spiral unless noted.
Head (Make 1)
Yarn: mint green — built with standard amigurumi six-stitch math and a medium 36-stitch plateau.
R1: 6 sc in MR (6)
R2: inc x6 (12)
R3: (sc 1, inc) x6 (18)
R4: (sc 2, inc) x6 (24)
R5: (sc 3, inc) x6 (30)
R6: (sc 4, inc) x6 (36)
R7-R12: sc around (36)
R13: (sc 4, dec) x6 (30)
R14: sc around (30)
R15: (sc 3, dec) x6 (24)
R16: sc around (24)
R17: (sc 2, dec) x6 (18)
R18: sc around (18)
Insert safety eyes between R10 and R11, spaced 8 stitches apart. Embroider the nose between the eyes one round lower. Stuff firmly before the final neck round.
Fasten off. Leave a 25 cm tail.
Body (Make 1)
Yarn: mint green with cream belly panel added later.
R1: 6 sc in MR (6)
R2: inc x6 (12)
R3: (sc 1, inc) x6 (18)
R4: (sc 2, inc) x6 (24)
R5: (sc 3, inc) x6 (30)
R6: (sc 4, inc) x6 (36)
R7-R11: sc around (36)
R12: (sc 4, dec) x6 (30)
R13-R14: sc around (30)
R15: (sc 3, dec) x6 (24)
R16-R17: sc around (24)
R18: (sc 2, dec) x6 (18)
R19: sc around (18)
Stuff the lower half firmly and keep the upper chest slightly softer so the arms can fold inward around the mug.
Fasten off. Leave a 25 cm tail.
Belly Patch (Make 1)
Yarn: cream.
Ch 7.
Row 1: starting in second ch from hook, sc 6, ch 1, turn (6)
Row 2-8: sc across, ch 1, turn (6)
Row 9: dec, sc 2, dec (4)
Lightly stretch the panel before sewing so it curves over the front of the body.
Fasten off. Leave a 20 cm tail.
Arms / Front Legs (Make 2)
Yarn: mint green.
R1: 6 sc in MR (6)
R2: inc x6 (12)
R3-R5: sc around (12)
R6: (sc 4, dec) x2 (10)
R7-R9: sc around (10)
Stuff the paw section only. Keep the upper arm soft so it can wrap around the mug.
Fasten off. Leave a 20 cm tail.
Back Legs (Make 2)
Yarn: mint green.
R1: 6 sc in MR (6)
R2: inc x6 (12)
R3: (sc 1, inc) x6 (18)
R4-R6: sc around (18)
R7: (sc 1, dec) x6 (12)
R8-R10: sc around (12)
Stuff firmly at the foot and lightly in the top section. Flatten the opening before sewing.
Fasten off. Leave a 24 cm tail.
Horns (Make 2)
Yarn: cream.
R1: 6 sc in MR (6)
R2: sc around (6)
R3: (sc 1, inc) x3 (9)
R4-R5: sc around (9)
Add a touch of stuffing only at the base.
Fasten off. Leave a 15 cm tail.
Ears (Outer, Make 2)
Yarn: mint green.
R1: 6 sc in MR (6)
R2: inc x6 (12)
R3: (sc 1, inc) x6 (18)
R4: sc around (18)
Flatten into a rounded triangle. Fasten off. Leave a 20 cm tail.
Ears (Inner, Make 2)
Yarn: blush pink.
R1: 6 sc in MR (6)
R2: inc x6 (12)
R3: (sc 1, inc) x6 (18)
Flatten and stitch onto outer ears. Fasten off.
Head Spikes (Make 3)
Yarn: dark mint.
R1: 6 sc in MR (6)
R2: sc around (6)
R3: (sc 1, inc) x3 (9)
R4: sc around (9)
Do not stuff. Flatten slightly before sewing down the back of the head.
Fasten off. Leave a 15 cm tail.
Wings (Make 2)
Yarn: mint green border with blush pink inner panel. Worked in rows.
With blush pink, ch 7.
Row 1: starting in second ch from hook, sc 6, ch 1, turn (6)
Row 2: inc, sc 4, inc, ch 1, turn (8)
Row 3: inc, sc 6, inc, ch 1, turn (10)
Row 4: inc, sc 8, inc, ch 1, turn (12)
Row 5: inc, sc 10, inc, ch 1, turn (14)
Row 6: sc across (14)
Change to mint green.
Border round: sc evenly around the wing, working 3 sc in each corner. Add 3 surface lines from top edge to lower edge for the wing bones.
Fasten off. Leave a 25 cm tail.
Tail (Make 1)
Yarn: mint green.
R1: 6 sc in MR (6)
R2: (sc 1, inc) x3 (9)
R3: sc around (9)
R4: (sc 2, inc) x3 (12)
R5-R7: sc around (12)
R8: (sc 1, dec) x4 (8)
R9-R12: sc around (8)
Stuff lightly near the base and leave the tip softer so it can rest on the table behind the body.
Fasten off. Leave a 25 cm tail.
Cheek Patches (Make 2)
Yarn: blush pink.
R1: 6 sc in MR (6)
R2: inc x6 (12)
Fasten off. Leave a 10 cm tail.
Paw Pads (Make 4 large, 12 small dots)
Yarn: blush pink.
Large pad: ch 2, 4 sc in second ch from hook, sl st to first sc.
Small toe dots: ch 2, 2 sc in second ch from hook.
Fasten off. Leave short tails for stitching.
Mug Accessory (Make 1)
Yarn: cream or use a miniature ceramic prop. This crochet version is soft and lighter for display.
R1: 6 sc in MR (6)
R2: inc x6 (12)
R3: BLO sc around (12)
R4-R6: sc around (12)
R7: sl st around (12)
Handle: ch 6, sl st to side of mug, leave a tail, and tack the top edge in place.
Do not overstuff. A lightly padded mug sits better between the arms.
Fasten off. Leave a 15 cm tail.
Assembly
- Sew the head to the body with the neck opening centered over the upper chest.
- Attach the belly patch to the front of the body before adding the arms.
- Sew the cheek patches one stitch below each eye and one stitch outward from the smile line.
- Attach the horns on the crown, spaced about 4 stitches apart.
- Sew the ears just outside the horns, angled slightly outward.
- Place the three head spikes in a straight line from forehead to back of head.
- Attach the back legs low on the body so the feet project forward and form the seated base.
- Sew the arms high on the chest and angle them inward around the mug.
- Attach the wings between head and body level, slightly behind the arms, then sew the tail centered at the back base.
- Stitch on the paw pads, secure the mug between both hands, and weave all tails inside the body.
The finished toy should sit without rolling, with the tail acting as a rear stabilizer.
7 Technical Tips
- Use a stitch marker at the first stitch of every round. Plush yarn hides the round break, and a one-stitch drift will throw off eye spacing by the time the head reaches R10.
- Pack the lower body harder than the upper chest. A soft base makes the dragon slump backward once the wings and head are attached.
- Work every decrease as an invisible decrease through the front loops. Standard decreases leave wider holes that show stuffing on chenille fabric.
- Install the safety eyes before the head closes past 24 stitches. After that point, the pile of the yarn and the reduced opening make washer placement much harder.
- Keep the wings shallow. If the wing height exceeds roughly half the head height, the piece starts to read like a bat and the side profile looks heavy.
- Pin the mug and both arms before sewing either arm permanently. Even a 5 mm difference in hand height will make the mug look tilted.
- Weave tails back through stuffed areas, not across empty seams. Short chenille fibers release easily, and tails anchored only at the seam can creep out with handling.
Conclusion
This seated plush build turns a standard fantasy shape into a display-ready dragon with a clear front view, visible wings, and a stable base. Follow the parts in order, keep the 36-stitch head and body plateaus intact, and pin the mug before final sewing so the pose stays balanced. After assembly, photograph the piece from the front, side, and three-quarter angle for Pinterest and Instagram, then label the post with #MintMugDragon. The next practical step is to test one second colorway before writing your final product listing or printable PDF. For this dragon amigurumi crochet pattern, would you keep the mug neutral cream or switch it to a contrasting pastel glaze?









