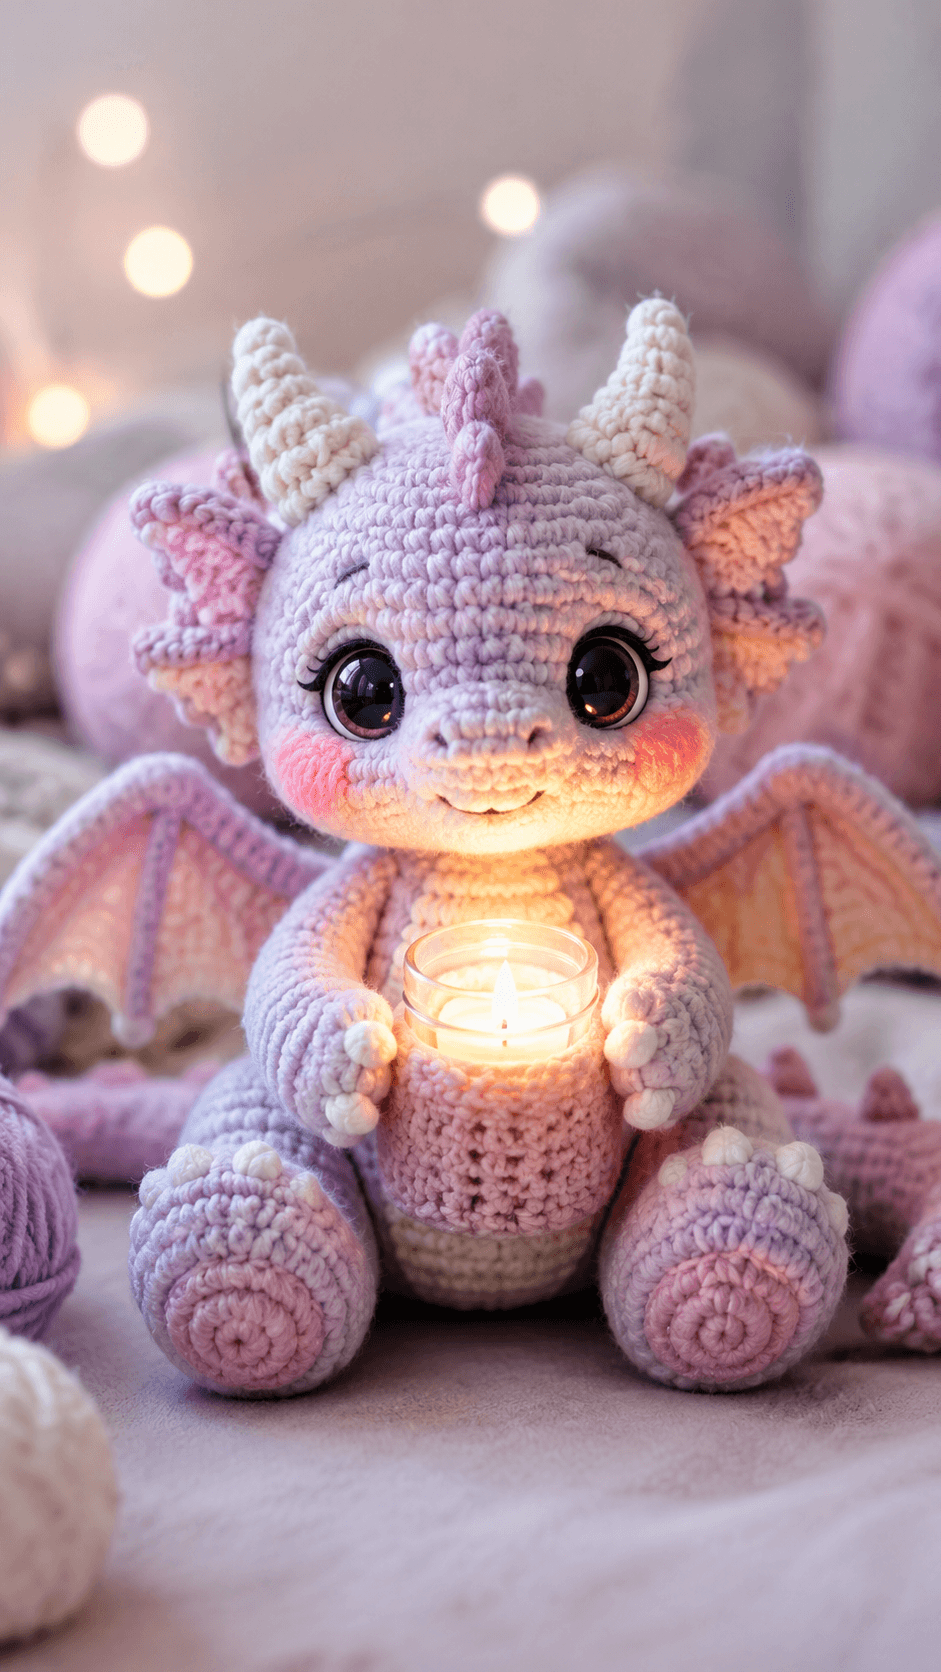
Dragon wings fail first at the fold line, not at the edge. This lavender dragon crochet pattern is built around that problem, with a wide head, short muzzle, seated body, curved horns, frilled side fins, and open wings that frame a small candle cup at the center. The photographed version reads as a display amigurumi rather than a toy. It uses pastel yarn, large safety eyes, contrast paw pads, and a front-facing pose that keeps the candle holder visible.
The Design: What Makes This Dragon Different
This dragon depends on balance more than scale. The head is oversized, but the neck is kept short so the face stays low and forward instead of floating above the body. That matters here because the hands need to meet at the centerline and hold a crocheted cup without leaving a gap. The wings are also built as shaped panels rather than simple triangles. A triangle reads as bat wing only at a distance. A dragon wing needs inner structure, a longer outer edge, and a lower attachment point on the back.
The horns and frill do separate jobs. Horns establish the silhouette from the front. The small ridge spikes carry the shape over the crown and down the back so the top of the head does not look plain beside the large eyes. The feet are oversized on purpose. You need that extra base width to keep the body seated when the front arms are angled inward.
The common mistake with a cute dragon is reducing too many features at once. Small horns, tiny wings, and narrow feet turn it into a generic fantasy dinosaur. This version avoids that by keeping every key feature readable from the front view.
Project Info at a Glance
| Skill Level | Time | Finished Size | Hook | Best For |
|---|---|---|---|---|
| Intermediate | 7–9 hours | About 24 cm seated | 3.0 mm | Shelf decor, nursery display, LED candle holder |
Materials and Tools
Yarn
- Lavender — DK cotton or soft acrylic — about 90 g — for head, body, limbs, tail, wings, and spikes
- Blush pink — DK cotton or soft acrylic — about 25 g — for inner wings, cheek patches, and foot pads
- Cream — DK cotton or soft acrylic — about 20 g — for belly, horns, claws, and hand accents
- Black embroidery thread — small amount — for mouth details
Tools
- 3.0 mm hook
- 18 mm safety eyes
- Polyester stuffing
- Tapestry needle
- Stitch markers
- Fine floral wire or pipe cleaner — optional for wing shaping
- LED tealight or small glass votive — do not use an open flame near yarn
Abbreviations
MR = magic ring, sc = single crochet, inc = increase, dec = invisible decrease, sl st = slip stitch, ch = chain, BLO = back loop only, FLO = front loop only, st = stitch.
Use invisible decrease on all shaping rounds. It keeps the face and limbs smoother, especially around the muzzle and paw curves.
Pattern Notes
Work in continuous rounds unless noted. Stuff the head firmly, the body moderately, the limbs lightly, and the tail with decreasing density toward the tip. This draft is written from the photo and structured with standard amigurumi math rather than copied from any existing pattern.
The candle cup in the photo should be treated as a sleeve for a glass holder or LED tealight base. Yarn should not be placed in direct contact with an exposed flame.
Pattern — Step by Step
Head (Make 1)
Yarn: lavender
- R1: 6 sc in MR (6)
- R2: inc x6 (12)
- R3: (sc, inc) x6 (18)
- R4: (2 sc, inc) x6 (24)
- R5: (3 sc, inc) x6 (30)
- R6: (4 sc, inc) x6 (36)
- R7: (5 sc, inc) x6 (42)
- R8-14: sc around (42)
- R15: (5 sc, dec) x6 (36)
- R16: (4 sc, dec) x6 (30)
- R17: (3 sc, dec) x6 (24)
- R18: (2 sc, dec) x6 (18)
Place the 18 mm eyes between R10 and R11 with 8 stitches between them. Add stuffing before the opening narrows. Embroider curved brows above the eyes after assembly.
Fasten off. Leave a 25 cm tail.
Muzzle (Make 1)
Yarn: lavender
- R1: ch 6, 2 sc in 2nd ch from hook, 3 sc, 4 sc in last ch, working on opposite side 3 sc, 2 sc in last ch (14)
- R2: inc, sc, inc, 3 sc, inc x4, 3 sc, inc, sc, inc (22)
- R3: sc around (22)
- R4: sc around (22)
Lightly stuff or leave nearly flat. Embroider two nostrils after sewing in place.
Fasten off. Leave a 20 cm tail.
Body (Make 1)
Yarn: lavender
- R1: 6 sc in MR (6)
- R2: inc x6 (12)
- R3: (sc, inc) x6 (18)
- R4: (2 sc, inc) x6 (24)
- R5: (3 sc, inc) x6 (30)
- R6: (4 sc, inc) x6 (36)
- R7-11: sc around (36)
- R12: BLO sc around (36)
- R13-15: sc around (36)
- R16: (4 sc, dec) x6 (30)
- R17: sc around (30)
- R18: (3 sc, dec) x6 (24)
Stuff firmly at the base and moderately near the neck opening so the seated body stays stable.
Fasten off. Leave a 25 cm tail.
Belly Panel (Make 1)
Yarn: cream
- R1: ch 7, 2 sc in 2nd ch from hook, 4 sc, 4 sc in last ch, working on opposite side 4 sc, 2 sc in last ch (16)
- R2: inc, sc, inc, 4 sc, inc x4, 4 sc, inc, sc, inc (24)
- R3: sc around (24)
- R4: sc around (24)
Sew this panel to the lower front body after stuffing.
Fasten off. Leave a 20 cm tail.
Arms (Make 2)
Yarn: lavender with cream claws
- R1: With cream, 6 sc in MR (6)
- R2: Switch to lavender, inc x6 (12)
- R3-7: sc around (12)
- R8: (sc, dec) x4 (8)
- R9-11: sc around (8)
Add a little stuffing in the hand only. Flatten the upper arm slightly so it can angle inward around the candle cup.
Fasten off. Leave a 20 cm tail.
Legs (Make 2)
Yarn: lavender with pink foot pad
- R1: With pink, 6 sc in MR (6)
- R2: inc x6 (12)
- R3: Switch to lavender in BLO, (sc, inc) x6 (18)
- R4-6: sc around (18)
- R7: (sc, dec) x6 (12)
- R8-10: sc around (12)
Stuff firmly in the foot, lightly in the upper leg. Add cream claw nubs during assembly or embroider them afterward.
Fasten off. Leave a 25 cm tail.
Tail (Make 1)
Yarn: lavender
- R1: 6 sc in MR (6)
- R2: inc x6 (12)
- R3: (sc, inc) x6 (18)
- R4-8: sc around (18)
- R9: (sc, dec) x6 (12)
- R10-14: sc around (12)
- R15: (dec) x6 (6)
- R16-18: sc around (6)
Stuff the first half firmly and taper off. Curve the tail before final attachment.
Fasten off. Leave a 25 cm tail.
Horns (Make 2)
Yarn: cream
- R1: 6 sc in MR (6)
- R2: sc around (6)
- R3: (sc, inc) x3 (9)
- R4-6: sc around (9)
Stuff lightly so the horns keep a gentle curve.
Fasten off. Leave a 15 cm tail.
Head Spikes (Make 3)
Yarn: pink-lilac
- R1: 4 sc in MR (4)
- R2: inc x4 (8)
- R3-4: sc around (8)
Do not overstuff. These should sit upright as small rounded ridges.
Fasten off. Leave a 12 cm tail.
Back Spikes (Make 4)
Yarn: pink-lilac
- R1: 4 sc in MR (4)
- R2: sc around (4)
- R3: (sc, inc) x2 (6)
- R4: sc around (6)
Fasten off. Leave a 12 cm tail.
Cheek Patches (Make 2)
Yarn: blush pink
- R1: 6 sc in MR (6)
- R2: inc x6 (12)
- R3: sc around (12)
Fasten off. Leave a 12 cm tail.
Wings Outer Panels (Make 2)
Yarn: lavender
Work in rows.
- Row 1: ch 13, sc in 2nd ch from hook and across (12)
- Row 2: ch 1, turn, dec, 8 sc, dec (10)
- Row 3: ch 1, turn, sc across (10)
- Row 4: ch 1, turn, dec, 6 sc, dec (8)
- Row 5: ch 1, turn, sc across (8)
- Row 6: ch 1, turn, dec, 4 sc, dec (6)
- Row 7: ch 1, turn, sc across (6)
Do not fasten off if you want to crochet the border directly around the wing.
Wings Inner Panels (Make 2)
Yarn: blush pink
Work in rows.
- Row 1: ch 11, sc in 2nd ch from hook and across (10)
- Row 2: ch 1, turn, dec, 6 sc, dec (8)
- Row 3: ch 1, turn, sc across (8)
- Row 4: ch 1, turn, dec, 4 sc, dec (6)
- Row 5: ch 1, turn, sc across (6)
Sew each pink panel onto a lavender outer panel, leaving a lavender edge visible. Add stitched vein lines with lavender yarn if desired.
Fasten off. Leave a 15 cm tail.
Candle Cup Sleeve (Make 1)
Yarn: blush pink
- R1: 6 sc in MR (6)
- R2: inc x6 (12)
- R3: (sc, inc) x6 (18)
- R4: (2 sc, inc) x6 (24)
- R5-9: sc around (24)
Test the fit around a glass votive or LED tealight holder. Adjust by one increase round if needed. This sleeve should sit around a container, not hold a bare flame.
Fasten off. Leave a 20 cm tail.
Assembly
- Sew the muzzle to the lower center of the head and embroider the nostrils.
- Attach the cheek patches beneath the eyes, slightly outward from the muzzle edge.
- Sew the horns to the top sides of the head, angling them slightly outward.
- Attach the three head spikes along the crown from the forehead toward the back.
- Sew the head to the body with the face angled slightly downward so the dragon looks toward the candle cup.
- Attach the legs wide apart at the lower front of the body so the seated base stays stable.
- Sew the arms at the upper front body and pin them inward before securing, leaving enough space to hold the cup sleeve.
- Attach the tail at the back center and curve it around one side if desired.
- Sew the wing panels to the upper back, low enough that they frame the body rather than rising behind the horns.
- Add the back spikes from neck to tail base, then place the cup sleeve between the hands and stitch the hands lightly against it or against the glass holder position.
The completed dragon should sit balanced on both feet and tail base, with the wings spread, the hands meeting at center, and the cup held securely without forcing the arms out of shape.
7 Technical Tips
- Install the eyes before the head drops below 30 stitches. Large safety eyes are harder to seat cleanly once the head opening narrows.
- Keep the feet firmly stuffed. Soft feet collapse forward and tip the whole dragon toward the candle cup.
- Do not overstuff the arms. Overfilled arms cannot bend inward enough to hold the center sleeve.
- Pin the wings from the front view first. If both wings match from the back but not the front, the dragon will look asymmetrical in photos.
- Place the horns outside the eye line. Horns set too close together crowd the crown and make the forehead look narrow.
- Keep the muzzle low on the face. A higher muzzle removes the short cute-dragon proportion and makes the eyes look misplaced.
- Use only a glass holder or LED insert in the crocheted cup. Direct flame near yarn is a material hazard, especially with acrylic fibers.
Conclusion
This lavender dragon crochet pattern works because the silhouette stays readable from the front: broad head, short muzzle, curved horns, layered spikes, shaped wings, and oversized feet. Build the head first, then test the eye spacing and muzzle width before moving on to the body. After assembly, fit the cup sleeve around a glass votive or LED base and adjust the arm angle only after the holder is in place. Share one front-view photo on Pinterest and one close-up on Instagram with #LavenderDragonPattern. The useful final question is specific to this design: should the wings stay open and level, or angle slightly forward to frame the candle more tightly?









