Introduction
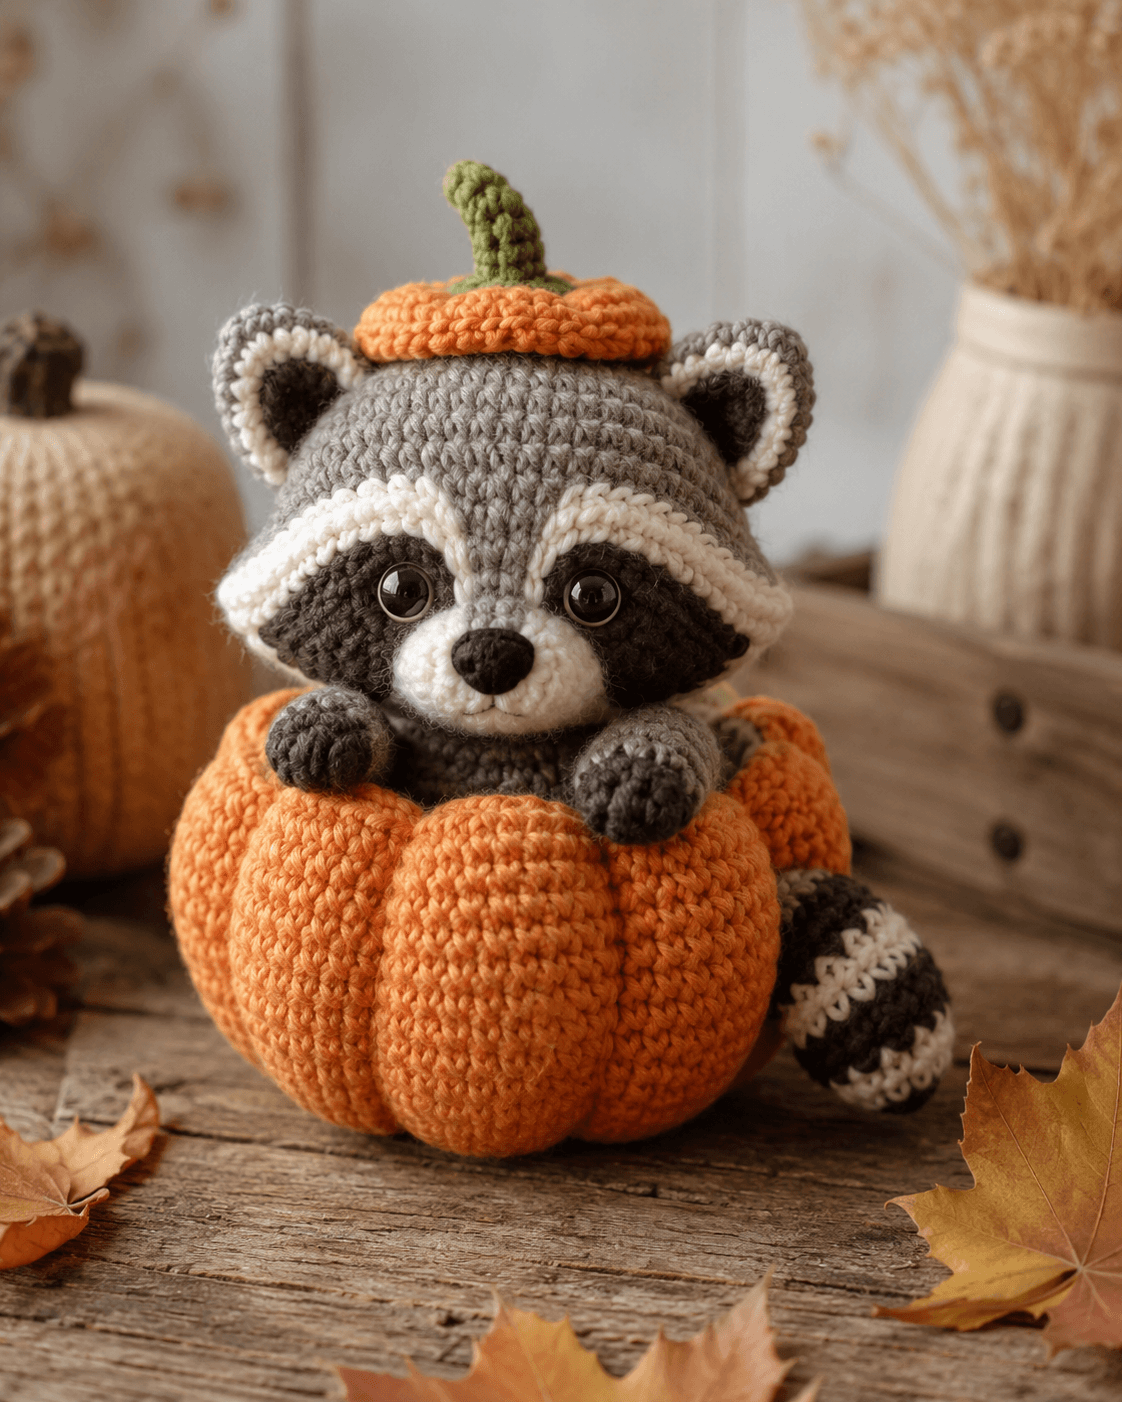
A raccoon face fails fast when the mask line drifts even one stitch off center. This raccoon amigurumi crochet pattern solves that with a compact 14 cm build, DK-weight proportions, a 3.5 mm hook benchmark, and a separate pumpkin shell that hides the lower body. The result suits an intermediate maker who needs a seasonal display piece that stores the figure upright on a shelf.
The Design: What Makes This Raccoon Different
A raccoon needs three things to read correctly at a glance: a peaked center forehead, a mask that widens past the eyes, and a ringed tail that does not overpower the head. That balance drives the whole build. The head here stays at a medium 36-stitch plateau for stability, then uses surface color placement and sewn brow strips to fake the broader facial pattern seen in a larger crochet raccoon pattern. The pumpkin changes the silhouette again. Lower-body bulk can stay small because the shell provides width and visual weight. That keeps the raccoon from looking top-heavy. Many makers miss the eye-mask spacing on a woodland raccoon amigurumi and place the eyes too close together. The species stops reading as raccoon almost immediately. Verified examples place the eyes with a moderate gap and use 8 to 10 mm eyes depending on yarn scale.
Project Info at a Glance
| Skill Level | Time | Finished Size | Hook | Best For |
|---|---|---|---|---|
| Intermediate | 6–8 hours | 14 cm raccoon, larger with pumpkin | 3.5 mm | fall décor, shelf plush, gift display |
Size and hook are based on verified raccoon pattern references; the pumpkin shell is photo-adapted.
Materials and Tools
Yarn
- Gray — DK — 33 g benchmark — Stylecraft Special DK or similar
- White — DK — 8 g benchmark — same yarn line
- Black/charcoal — DK — 21 g benchmark — same yarn line
- Orange — DK or light worsted — about 40–60 g for pumpkin and lid — photo-based estimate
- Olive green — DK — small amount — photo-based estimate
Tools
- Hook 3.5 mm
- Safety eyes 10 mm
- Stuffing
- Tapestry needle
- Stitch markers
- Pins
- Black embroidery thread for nose shaping
Abbreviations
- MR = magic ring
- sc = single crochet
- inc = increase
- dec = invisible decrease
- sl st = slip stitch
- ch = chain
- BLO = back loop only
- FO = fasten off
Invisible decrease keeps the muzzle, head, and pumpkin ribs cleaner because the front loop line stays flatter than a standard decrease.
Pattern — Step by Step
Continuous spiral unless noted.
Head
Yarn: gray then white — Source: Standard amigurumi math adapted from verified raccoon sizing and photo proportions
R1: 6 sc in MR (6)
R2: inc x6 (12)
R3: [sc, inc] x6 (18)
R4: [2 sc, inc] x6 (24)
R5: [3 sc, inc] x6 (30)
R6: [4 sc, inc] x6 (36)
R7–10: sc around (36)
R11: [4 sc, dec] x6 (30)
R12: [3 sc, dec] x6 (24)
Insert safety eyes between R7 and R8, about 8 sts apart.
R13: [2 sc, dec] x6 (18)
Stuff firmly.
R14: [sc, dec] x6 (12)
R15: dec x6 (6)
Fasten off. Leave 20 cm tail.
Snout
Yarn: white with embroidered black nose — Source: Standard amigurumi math
R1: 6 sc in MR (6)
R2: inc x6 (12)
R3: [sc, inc] x6 (18)
R4: sc around (18)
R5: [sc, dec] x6 (12)
Light stuffing only. Embroider nose before sewing.
Fasten off. Leave 18 cm tail.
Eye Masks (Make 2)
Yarn: charcoal — Source: Standard amigurumi math inspired by common raccoon mask placement
R1: 6 sc in MR (6)
R2: inc x6 (12)
R3: [sc, inc] x6 (18)
R4: sc around, then flatten slightly into an oval by hand while sewing
Fasten off. Leave 20 cm tail.
Brow Stripes (Make 2)
Yarn: white — Source: Standard amigurumi math based on photo
Row 1: ch 8
Row 2: starting in 2nd ch from hook, 7 sc (7)
Fasten off. Leave 15 cm tail.
Cheek Patches (Make 2)
Yarn: white — Source: Standard amigurumi math
R1: 6 sc in MR (6)
R2: [sc, inc] x3 (9)
Fasten off. Leave 15 cm tail.
Ears (Make 2)
Yarn: gray outer, white inner optional overlay — Source: verified ear count logic
R1: 6 sc in MR (6)
R2: [sc, inc] x3 (9)
R3: sc around (9)
R4: [2 sc, inc] x3 (12)
R5: fold flat, sc through both sides 6 times (6)
Fasten off. Leave 18 cm tail.
Body
Yarn: gray — Source: Standard amigurumi math for medium seated body
R1: 6 sc in MR (6)
R2: inc x6 (12)
R3: [sc, inc] x6 (18)
R4: [2 sc, inc] x6 (24)
R5: [3 sc, inc] x6 (30)
R6–8: sc around (30)
R9: [3 sc, dec] x6 (24)
R10: [2 sc, dec] x6 (18)
R11: sc around (18)
Stuff firmly but keep bottom flat enough to sit inside pumpkin cavity.
Fasten off. Leave 25 cm tail.
Arms / Front Legs (Make 2)
Yarn: charcoal then gray — Source: Standard amigurumi math; compact paws based on photo
R1: 6 sc in MR (6)
R2: inc x6 (12)
R3–4: sc around (12)
R5: [4 sc, dec] x2 (10)
Change to gray
R6–7: sc around (10)
R8: [3 sc, dec] x2 (8)
Stuff lower half only.
Fasten off. Leave 18 cm tail.
Back Legs (Make 2)
Yarn: charcoal then gray — Source: Standard amigurumi math
R1: 6 sc in MR (6)
R2: [sc, inc] x3 (9)
R3: sc around (9)
Change to gray
R4: [2 sc, inc] x3 (12)
R5–6: sc around (12)
Light stuffing.
Fasten off. Leave 18 cm tail.
Tail
Yarn: alternate charcoal and white or gray/charcoal depending on palette — Source: verified raccoon tail trend and photo
R1: 6 sc in MR (6)
R2: [sc, inc] x3 (9)
R3: sc around (9)
R4: [2 sc, inc] x3 (12)
R5: sc around (12)
R6: [3 sc, inc] x3 (15)
R7–8: sc around (15)
R9: [3 sc, dec] x3 (12)
R10–11: sc around (12)
R12: [2 sc, dec] x3 (9)
Switch color every 2 rounds for clear rings. Stuff lightly.
Fasten off. Leave 22 cm tail.
Pumpkin Body
Yarn: orange — Source: Standard amigurumi math based on photo proportions
R1: 6 sc in MR (6)
R2: inc x6 (12)
R3: [sc, inc] x6 (18)
R4: [2 sc, inc] x6 (24)
R5: [3 sc, inc] x6 (30)
R6: [4 sc, inc] x6 (36)
R7: [5 sc, inc] x6 (42)
R8: [6 sc, inc] x6 (48)
R9–15: sc around (48)
R16: [6 sc, dec] x6 (42)
R17: [5 sc, dec] x6 (36)
R18: [4 sc, dec] x6 (30)
Stuff the lower half firmly. Keep top open. Use long orange yarn to wrap 6 vertical ribs from center base to upper edge.
Fasten off. Leave 30 cm tail.
Pumpkin Lid
Yarn: orange — Source: Standard amigurumi math
R1: 6 sc in MR (6)
R2: inc x6 (12)
R3: [sc, inc] x6 (18)
R4: [2 sc, inc] x6 (24)
R5: [3 sc, inc] x6 (30)
R6: [4 sc, inc] x6 (36)
R7: BLO sc around (36)
R8: [4 sc, dec] x6 (30)
R9: sc around (30)
Fasten off. Leave 20 cm tail.
Stem
Yarn: olive green — Source: Standard amigurumi math based on photo
R1: 6 sc in MR (6)
R2–5: sc around (6)
R6: [sc, inc] x3 (9)
R7: sc around (9)
Stuff lightly and bend before sewing.
Fasten off. Leave 18 cm tail.
Assembly
- Sew the snout to the lower center of the head.
- Attach the eye masks so they sit behind and around the eyes, not under the snout.
- Sew the white brow strips above the masks in a shallow upward curve.
- Add the cheek patches low on each side of the snout.
- Attach the ears between the upper side rounds of the head.
- Sew the head to the body with the face angled slightly forward.
- Fix the arms to the front upper body so they can drape over the pumpkin rim.
- Sew the back legs low on the body, keeping them mostly hidden inside the pumpkin shell.
- Attach the tail at the rear opening so one ringed section remains visible outside the pumpkin.
- Place the assembled raccoon into the pumpkin body, tack the lower body in place, then sew the stem to the pumpkin lid and rest the lid on the head.
The completed piece should sit upright with the pumpkin carrying most of the base width.
7 Technical Tips
- Mask drift: Pin both eye masks before sewing and count the same distance from the center snout seam on each side. One-stitch drift is visible immediately on raccoon faces.
- Eye placement timing: Insert 10 mm eyes before the head closes past 18 stitches. Waiting until the last two decrease rounds makes the washers hard to seat cleanly.
- Stuffing firmness: Pack the head firmer than the body. A soft head collapses under the pumpkin lid and flattens the brow line.
- Pumpkin rib depth: Wrap exactly 6 ribs with a separate strand after stuffing. Fewer ribs look like an orange bowl; more ribs crowd the front paw placement.
- Invisible decreases: Use invisible dec on the head, body, and lid edge only. Standard decreases leave tiny notches that show on light yarn.
- Pinning order: Pin head, then paws, then pumpkin placement. Sewing the pumpkin first often locks the paws too low on the front rim.
- Tail weaving: Leave at least 22 cm for the tail sewing strand. The striped tail needs extra passes to stop the join from rolling outward.
Conclusion
This raccoon amigurumi crochet pattern works because the species markers stay sharp: broad mask, small rounded muzzle, compact ears, and a tail with visible banding. The pumpkin shell does the rest by widening the base and turning a normal woodland plush into seasonal décor. Next step: swatch your gray and orange yarn together, then test the 10 mm eyes against the head after round 10 before committing to final assembly. Share the finished piece on Pinterest and Instagram with #RaccoonPumpkinPattern. One useful check remains: did you angle the white brow stripes high enough to keep the face reading as raccoon from three feet away?









