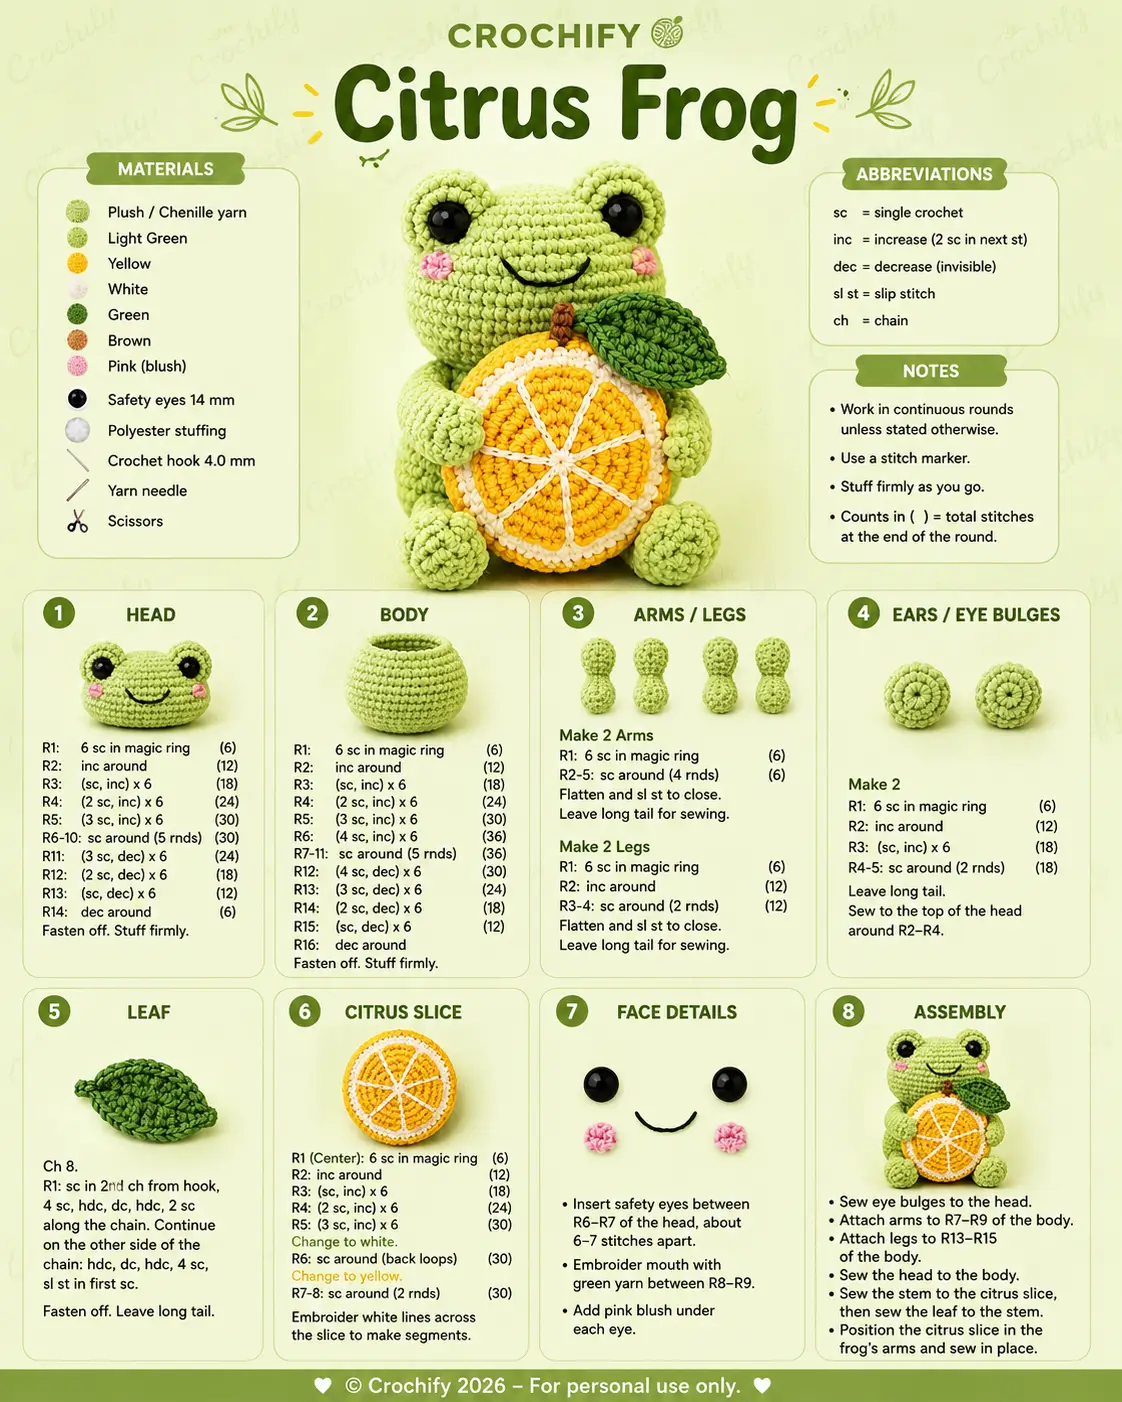
A frog holding a citrus slice cannot use the usual flat belly shaping. This citrus frog amigurumi crochet pattern solves that by pairing a wide 36-stitch body with a separate fruit disc that sits between the hands. Use plush yarn, a 4.0 mm hook, and 14 mm safety eyes for a compact intermediate project. The result works well as a shelf plush because the short legs and round base keep it seated.
The Design: What Makes Citrus Frog Different
The first structural difference is the eye bulge. Standard round frog heads often flatten the eyes into the head fabric, but this version uses two separate circular bulges sewn high on the face. That keeps the frog silhouette readable even after the citrus slice is attached. The second difference is the body depth. A frog with orange slice crochet detail needs extra front coverage, so the body expands to 36 stitches and stays there long enough to support the disc without caving inward.
Then the fruit piece changes the whole balance of the toy. Instead of crocheting the citrus into the body, the slice is made separately and stitched on after the limbs are placed. That keeps the segment embroidery clean and the front surface flatter. Many citrus frog crochet pattern results online stop at listing photos and sales pages. They do not explain how the body width, arm position, and slice diameter interact. That is where most distortion starts.
Project Info at a Glance
| Skill Level | Time | Finished Size | Hook | Best For |
|---|---|---|---|---|
| Intermediate | 4–6 hours | 12.7–16 cm | 4.0 mm | Desk plush, market table item, photo prop |
Materials and Tools
Yarn
- Light green — plush / chenille — main body color — blanket-style chenille or similar
- Yellow — plush / chenille — citrus flesh
- White — plush / chenille — citrus rind line
- Green — plush / chenille — leaf
- Brown — plush / chenille or smooth yarn — small stem
- Pink — small amount — blush circles
- Black — embroidery yarn — mouth detail
Tools
- Hook 4.0 mm
- Safety eyes 14 mm
- Polyester stuffing
- Yarn needle
- Scissors
- Stitch marker
Abbreviations
MR / sc / inc / dec / sl st / ch / hdc / dc / BLO
Invisible decrease joins two stitches through the front loops only, which reduces bulk on chenille shaping rounds.
Pattern — Step by Step
Work in continuous rounds unless noted. Counts in parentheses show total stitches at the end of each round. Pattern data below is reconstructed directly from the provided image.
Head
Yarn: light green
R1: 6 sc in MR (6)
R2: inc around (12)
R3: (sc, inc) x6 (18)
R4: (2 sc, inc) x6 (24)
R5: (3 sc, inc) x6 (30)
R6-R10: sc around (30)
R11: (3 sc, dec) x6 (24)
R12: (2 sc, dec) x6 (18)
R13: (sc, dec) x6 (12)
R14: dec around (6)
Insert stuffing before the final two rounds.
Fasten off. Close opening.
Body
Yarn: light green
R1: 6 sc in MR (6)
R2: inc around (12)
R3: (sc, inc) x6 (18)
R4: (2 sc, inc) x6 (24)
R5: (3 sc, inc) x6 (30)
R6: (4 sc, inc) x6 (36)
R7-R11: sc around (36)
R12: (4 sc, dec) x6 (30)
R13: (3 sc, dec) x6 (24)
R14: (2 sc, dec) x6 (18)
R15: (sc, dec) x6 (12)
R16: dec around (6)
Stuff firmly before closing. Keep more filling in the lower half than the neck.
Fasten off.
Arms (Make 2)
Yarn: light green
R1: 6 sc in MR (6)
R2-R5: sc around (6)
Flatten and sl st to close. Leave a long tail for sewing.
Legs (Make 2)
Yarn: light green
R1: 6 sc in MR (6)
R2: inc around (12)
R3-R4: sc around (12)
Flatten and sl st to close. Leave a long tail for sewing.
Eye Bulges (Make 2)
Yarn: light green
R1: 6 sc in MR (6)
R2: inc around (12)
R3: (sc, inc) x6 (18)
R4-R5: sc around (18)
Leave a long tail. Sew to the top of the head around R2-R4.
Leaf
Yarn: green
Ch 8.
R1: sc in 2nd ch from hook, 4 sc, hdc, dc, hdc, 2 sc along the chain. Continue on the other side of the chain: hdc, dc, hdc, 4 sc, sl st in first sc.
Fasten off. Leave a long tail.
Stem
Yarn: brown
R1: 4 sc in MR (4)
R2-R3: sc around (4)
Fasten off. Leave a tail for sewing to the citrus slice.
Citrus Slice
Yarn: yellow, then white, then yellow
R1: 6 sc in MR (6)
R2: inc around (12)
R3: (sc, inc) x6 (18)
R4: (2 sc, inc) x6 (24)
R5: (3 sc, inc) x6 (30)
Change to white.
R6: sc around in back loops only (30)
Change to yellow.
R7-R8: sc around (30)
Embroider white lines across the slice to form citrus segments.
Fasten off. Leave a long tail.
Blush Patches (Make 2)
Yarn: pink
R1: 6 sc in MR (6)
Fasten off. Leave a short tail.
Face Details
Yarn: black and pink
Insert safety eyes between R6-R7 of the head, about 6-7 stitches apart.
Embroider the mouth with black yarn between R8-R9.
Attach or embroider pink blush under each eye.
Assembly
- Sew the eye bulges to the top front of the head around R2-R4.
- Insert the 14 mm safety eyes through the bulges and head between R6-R7.
- Add the mouth between R8-R9 with a slight upward curve.
- Attach the pink blush circles under each eye.
- Sew the head to the top center of the body.
- Attach the arms around R7-R9 of the body.
- Attach the legs around R13-R15 of the body.
- Sew the brown stem to the top edge of the citrus slice.
- Sew the green leaf to the stem so it angles to one side.
- Position the citrus slice between the frog’s arms and sew it in place.
The finished plush should sit upright with the slice centered below the mouth.
7 Technical Tips
- Use a stitch marker from the first round of the head. Chenille stitches blur fast, and one lost round can shift eye placement by a full row.
- Stuff the head before the final decrease round, not after. A late fill stretches the neck opening and makes the face wider than the eye bulges.
- Keep the body base firmer than the top third. A soft lower half causes the plush to tip back once the citrus slice is attached.
- Place the safety eyes before sewing the bulges completely shut. On a small frog head, post clearance gets tight once the bulges are fully anchored.
- Embroider the citrus lines after R8 is finished and the disc is flattened. Segment lines stitched too early pull the circle into a shallow cone.
- Pin the slice between the arms before sewing either arm permanently. Even a 5 mm shift makes one hand look higher and breaks the centered fruit read.
- Weave chenille tails back through at least three stitch columns. Short tail paths slip loose more easily in plush yarn than in cotton.
Conclusion
This citrus frog amigurumi crochet pattern stands out because the accessory is structural, not decorative. The citrus disc affects arm spacing, body width, and sitting balance, so those sections have to be planned together. Follow the round counts, keep the eye bulges high, and attach the slice only after checking the arm angle from the front. That produces the cleanest frog silhouette. Save this citrus frog amigurumi crochet pattern to Pinterest, post your version on Instagram, and tag it with #CitrusFrogPattern. One comparison matters for this design: did your slice read more clearly as orange, lemon, or lime once the white segment lines were stitched?









