Introduction
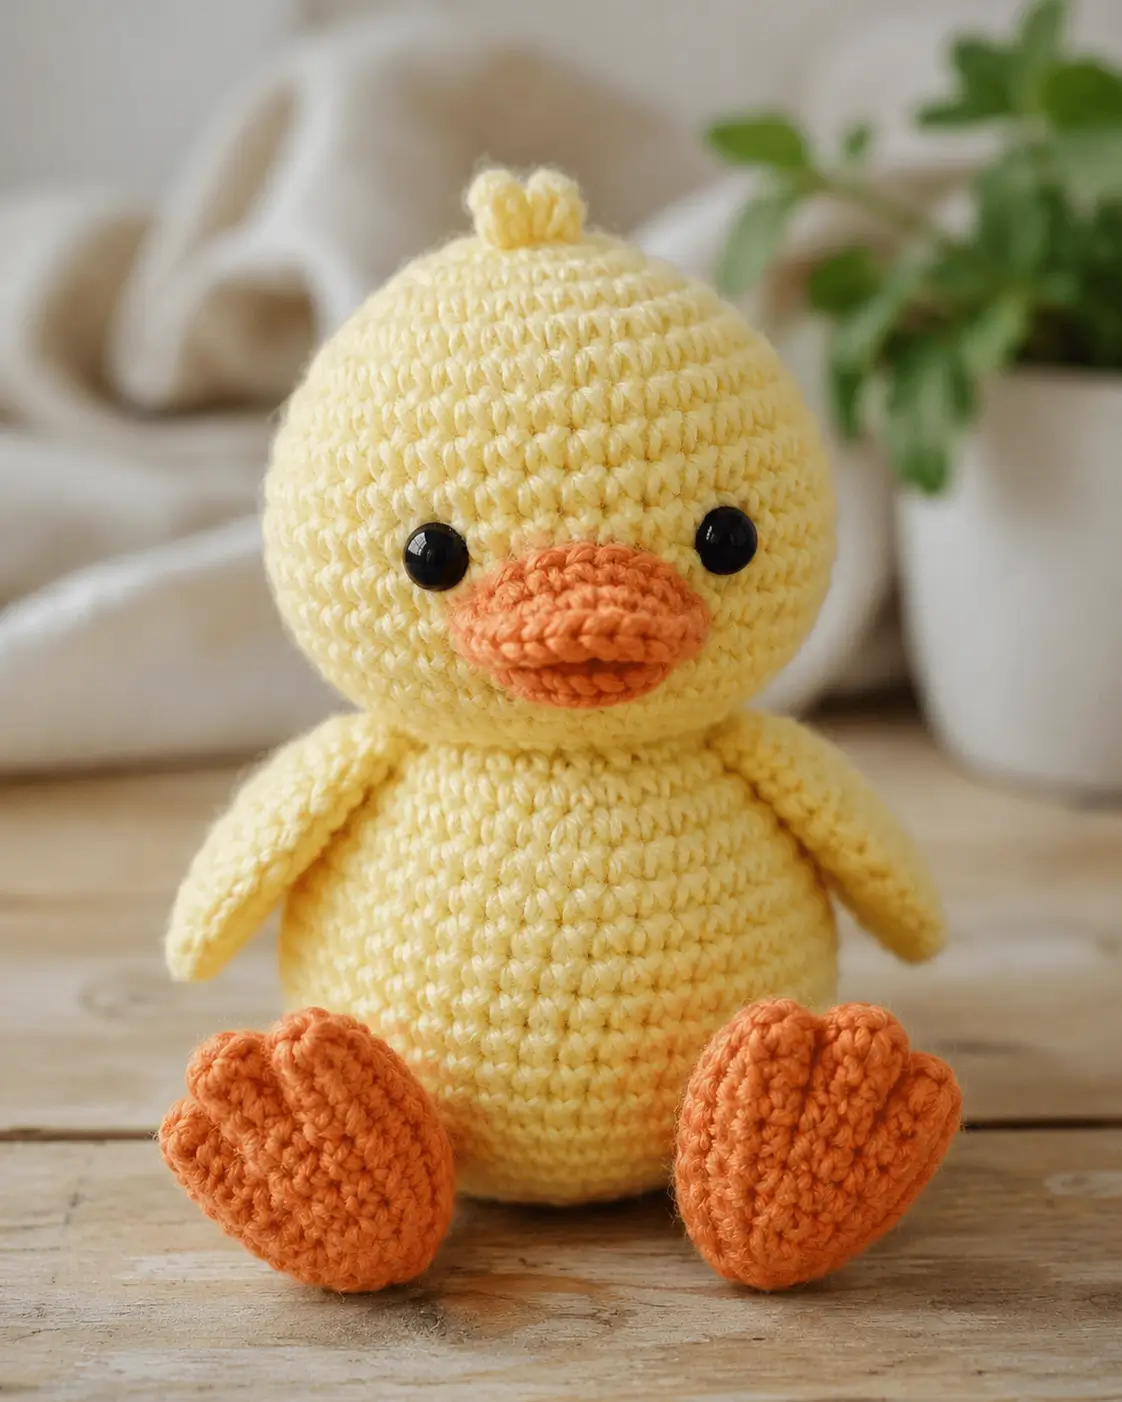
A duck’s bill is wider than its head can structurally justify, so this duck amigurumi crochet pattern solves the beak before it solves the body. You will make a pale yellow worsted-weight toy with orange feet, cheek patches, a head tuft, 12 mm safety eyes, and a finished height near 16.5 cm. The skill level is advanced beginner. The stable seated base makes it useful for shelf displays and non-infant gifts.
The Design: What Makes This Duck Different
This duck uses a large 42-stitch head and body system, not a narrow chick shape. That larger plateau gives the bill enough face width and keeps the eyes from crowding the center line. The orange feet are oversized because a duck crochet toy needs visual weight at the base; small round feet make the body look like a chick. The cheek patches are flat circles placed under the bill edge, adding the soft peach area seen in the photo without changing the head shaping. Many versions of a free duck crochet pattern skip this detail, and many amigurumi duck pattern posts use a rubber-duck silhouette with no separate legs. The common mistake is sewing the bill too low. The maker then loses the duckling face and gets a long-necked bird instead.
Project Info at a Glance
| Skill Level | Time | Finished Size | Hook | Best For |
|---|---|---|---|---|
| Advanced beginner | A few hours | 16.5 cm | 4.0 mm | Shelf toy, photo prop, spring display |
Finished size, hook, yarn weight, and 12 mm eye data are benchmarked from a worsted Pekin duck reference: Daphne the Duck by The Nicole Chase.
Materials and Tools
Yarn
- Pale yellow — medium #4 worsted — 45–50 g — WeCrochet/Knit Picks Brava Worsted, Paintbox Simply Aran, or similar.
- Orange — medium #4 worsted — 16 yd / about 18 g — for beak, feet, and toe ridges.
- Soft peach — medium #4 worsted or DK — 5–10 g — for cheek patches.
- Black embroidery thread — small amount — optional eye highlights only.
The yellow and orange yardage ranges match published worsted duck yardage and gram references: Daphne the Duck by The Nicole Chase.
Tools
- Hook 4.0 mm
- 12 mm safety eyes
- Polyester stuffing
- Tapestry needle
- Locking stitch markers
- Sewing pins
- Scissors
- Black sewing thread, optional for anchoring eye highlights
Safety eyes are not suitable for toys intended for babies or children who mouth toys; embroidered eyes are safer for that use.
Abbreviations
- MR = magic ring
- sc = single crochet
- inc = 2 sc in next stitch
- dec = invisible decrease
- sl st = slip stitch
- ch = chain
- BLO = back loop only
- FLO = front loop only
- FO = fasten off
Invisible decrease means working through the front loops of the next two stitches before finishing one single crochet, which reduces gaps at closed curves.
Pattern — Step by Step
Continuous spiral unless noted. Place a marker in the first stitch of every round. Counts are written at the end of every round.
Head Make 1
Yarn: pale yellow — Source: standard amigurumi math, sized from worsted duck measurements and 42-stitch body references.
R1: 6 sc in MR (6)
R2: inc ×6 (12)
R3: (sc, inc) ×6 (18)
R4: (2 sc, inc) ×6 (24)
R5: (3 sc, inc) ×6 (30)
R6: (4 sc, inc) ×6 (36)
R7: (5 sc, inc) ×6 (42)
R8: sc around (42)
R9: sc around (42)
R10: sc around (42)
R11: sc around (42)
R12: sc around (42)
R13: sc around (42)
R14: sc around (42)
R15: (5 sc, dec) ×6 (36)
R16: sc around (36)
Insert 12 mm safety eyes between R12 and R13, about 10 stitches apart. Center the gap over the front of the head.
R17: (4 sc, dec) ×6 (30)
R18: (3 sc, dec) ×6 (24)
R19: (2 sc, dec) ×6 (18)
Stuff firmly, especially under the eyes and crown.
R20: (sc, dec) ×6 (12)
R21: dec ×6 (6)
Fasten off. Leave a 20 cm tail and close the final hole through front loops.
Body Make 1
Yarn: pale yellow — Source: standard amigurumi math, aligned to 42-stitch duck body references.
R1: 6 sc in MR (6)
R2: inc ×6 (12)
R3: (sc, inc) ×6 (18)
R4: (2 sc, inc) ×6 (24)
R5: (3 sc, inc) ×6 (30)
R6: (4 sc, inc) ×6 (36)
R7: (5 sc, inc) ×6 (42)
R8: sc around (42)
R9: sc around (42)
R10: sc around (42)
R11: sc around (42)
R12: sc around (42)
R13: sc around (42)
R14: (5 sc, dec) ×6 (36)
R15: sc around (36)
R16: (4 sc, dec) ×6 (30)
R17: sc around (30)
R18: (3 sc, dec) ×6 (24)
R19: sc around (24)
Stuff the lower half firmly. Add less stuffing near the neck opening so the head sits flat.
R20: (2 sc, dec) ×6 (18)
R21: (sc, dec) ×6 (12)
R22: dec ×6 (6)
Fasten off. Leave a 35 cm tail for sewing the body to the head.
Wings / Front Limbs Make 2
Yarn: pale yellow — Source: standard amigurumi math; wing placement cross-checked against duck wing references.
R1: 6 sc in MR (6)
R2: inc ×6 (12)
R3: (sc, inc) ×6 (18)
R4: sc around (18)
R5: sc around (18)
R6: sc around (18)
R7: sc around (18)
R8: sc around (18)
R9: (sc, dec) ×6 (12)
R10: sc around (12)
R11: sc around (12)
R12: dec ×6 (6)
Do not stuff. Flatten the wing so the point angles down.
Fasten off. Leave a 25 cm tail on each wing.
Feet / Back Legs Make 2
Yarn: orange — Source: standard amigurumi math; orange feet are consistent with Pekin duck references.
R1: 6 sc in MR (6)
R2: inc ×6 (12)
R3: (sc, inc) ×6 (18)
R4: (2 sc, inc) ×6 (24)
R5: (3 sc, inc) ×6 (30)
R6: sc around (30)
R7: sc around (30)
R8: (3 sc, dec) ×6 (24)
R9: (2 sc, dec) ×6 (18)
Lightly stuff the heel only. Leave the toe end flatter than the back edge.
R10: (sc, dec) ×6 (12)
R11: dec ×6 (6)
Fasten off. Leave a 30 cm tail.
For toe ridges, thread orange yarn on a needle and work two raised vertical lines on each foot from R4 to R8. Each line should sit about 3 stitches away from the center line. Pull gently; tight ridges will curl the foot.
Beak / Bill Make 1
Yarn: orange — Source: standard amigurumi math; bill shape benchmarked against duck bill construction in published patterns.
R1: 6 sc in MR (6)
R2: inc ×6 (12)
R3: (sc, inc) ×6 (18)
R4: sc around (18)
R5: sc around (18)
R6: sc around (18)
R7: (sc, dec) ×6 (12)
Do not close into a ball. Flatten horizontally so the piece becomes a soft oval bill.
Fasten off. Leave a 30 cm tail.
Optional bill line: with orange yarn, sew one horizontal line across the front center of R5. The line should run about 12 mm wide.
Cheek Patches Make 2
Yarn: soft peach — Source: standard flat-circle amigurumi math.
R1: 6 sc in MR (6)
R2: inc ×6 (12)
Sl st into first stitch. Fasten off. Leave a 20 cm tail.
Block flat between fingers. These patches sit partly under the bill edges, not beside the eyes.
Top Tuft Make 1
Yarn: pale yellow — Source: standard amigurumi base with looped feather detail.
R1: 6 sc in MR (6)
R2: In first stitch, sl st, ch 5, sl st in second ch from hook, sl st in next 3 ch, sl st back into same base stitch. Repeat this loop in each of the next 2 stitches. Sl st in each of the last 3 base stitches (6 base stitches, 3 loops).
Fasten off. Leave a 25 cm tail.
The loops should stand upright. Pin before sewing so the tuft remains centered on the crown.
Assembly
- Pin the head to the body with the head opening centered over the body closure. Sew around the neck twice using the body tail.
- Check the head angle from the side. The bill area should face forward, not upward.
- Pin both cheek patches on the lower front of the head, with inner edges 2 stitches apart.
- Sew the beak over the inner edges of the cheek patches, centered between the eyes and spanning R13 to R16.
- Add one small stitch at each beak corner so the bill stays flattened.
- Pin the wings to the body at R9 to R13, with the tapered points angled down.
- Sew each wing along the top third only; leave the lower wing edge slightly loose.
- Pin the feet to the lower front of the body at R17 to R21, aligned under the eyes.
- Sew the top tuft to the crown center. No accessory is shown in the photo, so no accessory piece is added.
- Weave all tails through at least 3 nearby stitches before trimming.
The duck is complete when it sits without tipping backward.
7 Technical Tips
- Failure mode: diagonal rounds from a missing marker. Move the stitch marker into the first stitch of every round, not the last stitch of the previous round.
- Failure mode: a collapsing neck seam. Sew the head to the body twice around the neck and add one hidden anchor stitch at the front center.
- Failure mode: visible stuffing through decreases. Use invisible decreases on R17–R21 of the head and R18–R22 of the body.
- Exact measurement: eye placement. Place 12 mm eyes between R12 and R13 with about 10 stitches between the inner posts.
- Failure mode: duck feet curling into balls. Stuff only the heel section and keep the front half almost flat before closing R11.
- Exact measurement: wing position. Pin the wing top at body R9 and the lower point near R14 so each wing drops vertically.
- Failure mode: loose tail weaving after handling. Leave at least 20 cm of yarn tail and weave through 3 stitches, then reverse direction through 2 more stitches.
Conclusion
This duck build depends on proportion: a wide bill, rounded yellow head, low seated body, flat orange feet, and a small crown tuft. Make the head and body first, then test the beak position before sewing any facial pieces. That one check controls the finished expression more than any stitch count adjustment. Save the finished duck to Pinterest with a clear front-view photo, then post the side view on Instagram so the wing and foot shaping are visible. Use #DuckWithWebbedFeet when sharing. The next practical step is to crochet one test foot before making the full pair. For this duck amigurumi crochet pattern, would you make the bill flatter or more rounded?









