Introduction
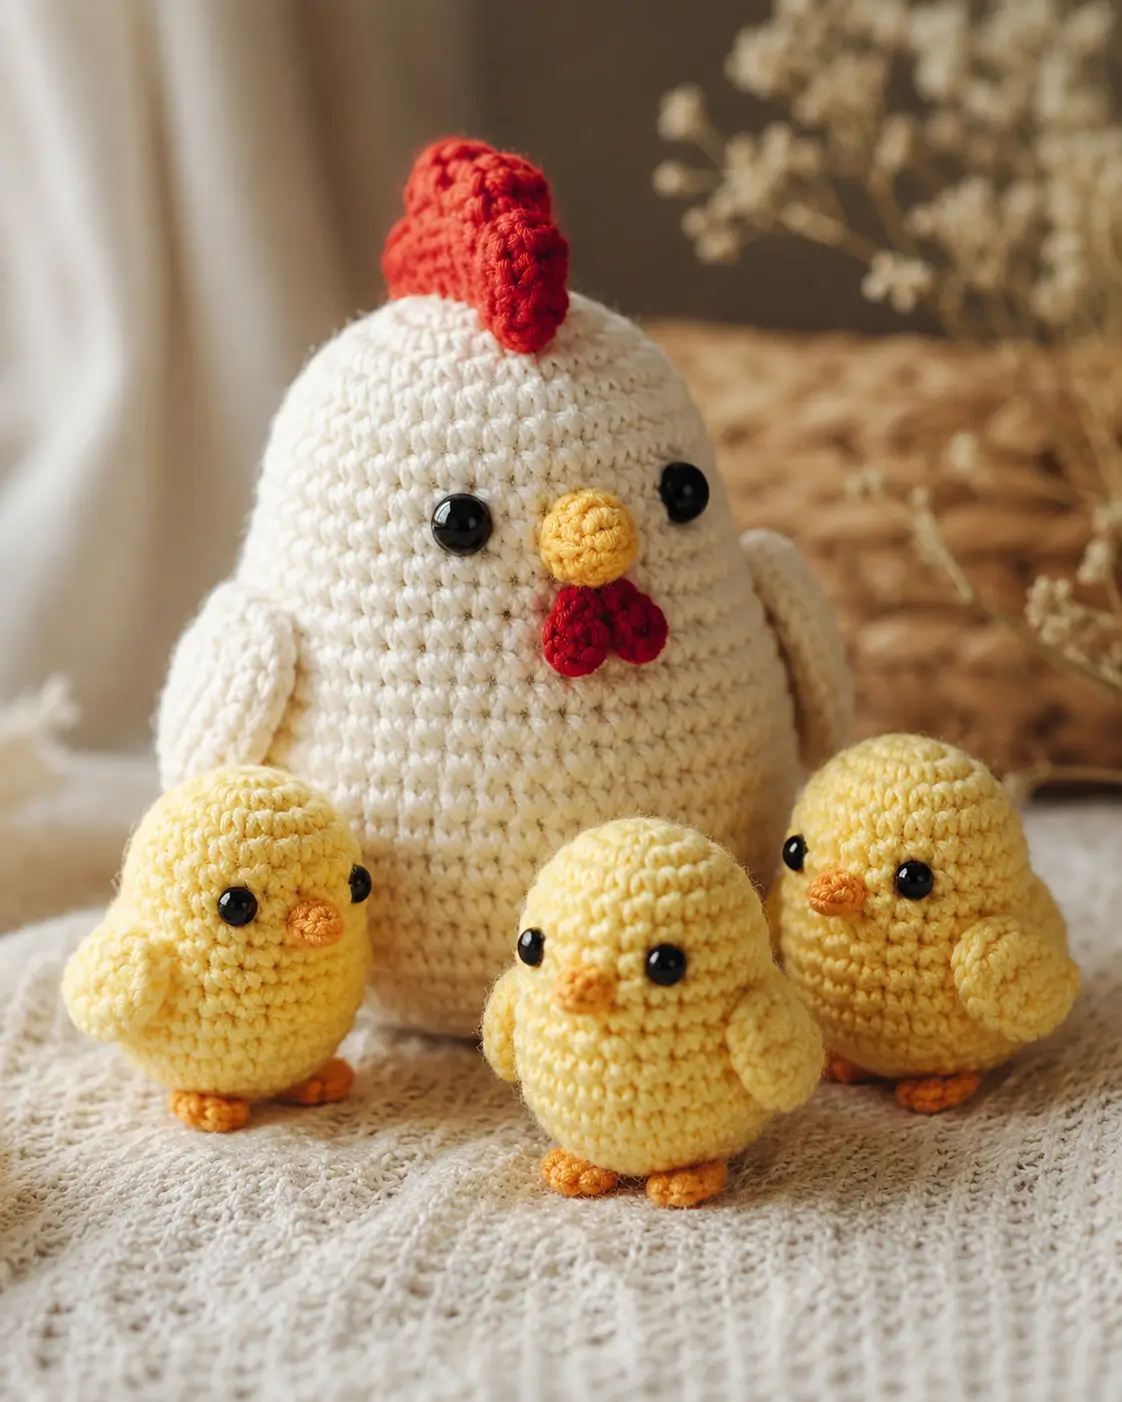
A hen’s comb has to stand upright while the head stays egg-shaped. This chicken amigurumi crochet pattern builds a white mother hen with three yellow chicks, using worsted yarn, a 3.5 mm hook, and an intermediate skill set. The finished mother sits about 18 cm tall. Make the set when you need a farm animal amigurumi display with clear face placement and repeatable chick sizing.
The Design: What Makes This Hen Different
Chicken shapes fail when the beak, comb, and wattle are treated as decoration instead of structure. Here, the head is a closed 42-stitch dome, so the comb can be sewn through several crown stitches without pulling the face upward. The body repeats the same 42-stitch ceiling, then runs longer before decreasing; that makes the hen read as a sitting bird rather than a snowman stack. For the chicks, a 30-stitch crochet chick pattern body keeps the head and belly in one oval, which reduces seams and prevents tipping. The wings stay flat and slightly under-stuffed because round wings look like arms on this species. A common mistake in a crochet hen pattern is placing the eyes too high; the bird then loses the squat, forward-looking profile shown in the photo.
Project Info at a Glance
| Skill Level | Time | Finished Size | Hook | Best For |
|---|---|---|---|---|
| Intermediate | 7–8 hours for full family | Hen approx. 18 cm; chicks approx. 7 cm | 3.5 mm | Shelf display, farm set, spring table scene |
Size and hook choices are built from the verified competitor range of 8–23 cm chickens and the 3.5 mm worsted-weight benchmark. Source: Yarnhild.
Materials and Tools
Yarn
- Cream white — #4 worsted — 55 g — Paintbox Simply Aran, Lion Brand Basic Stitch, or similar
- Pale yellow — #4 worsted — 36 g — for three chicks
- Red — #4 worsted — 8 g — comb and wattle
- Golden yellow — #4 worsted — 4 g — hen beak
- Orange — #4 worsted — 6 g — chick beaks and all feet
- Soft pink — #4 worsted — 2 g — cheek patches
These gram amounts scale from published chicken yarn data that lists 51 g cream, 7 g yellow, and 5 g red for a detailed worsted chicken. Source: Jess Huff.
Tools
- Hook 3.5 mm
- 10 mm black safety eyes for hen
- 6 mm black safety eyes for chicks
- Fiberfill stuffing
- Yarn needle
- Locking stitch markers
- Straight pins
- Scissors
Published chicken eye sizes vary, so this set uses 10 mm for the larger hen and 6 mm for the palm-size chicks. Source: Yarnhild.
Abbreviations
- MR = magic ring
- sc = single crochet
- inc = 2 sc in same stitch
- dec = invisible decrease
- sl st = slip stitch
- ch = chain
- BLO = back loop only
- st = stitch
Invisible decrease is worked through the front loops of the next two stitches before completing a single crochet, which removes the horizontal bar often visible in white yarn.
Pattern — Step by Step
Continuous spiral unless noted. Place a marker in the first stitch of each round.
Mother Hen Head
Yarn: cream white — Source: standard amigurumi math with verified 6-stitch chicken increase/decrease logic.
R1: 6 sc in MR (6)
R2: inc ×6 (12)
R3: (sc, inc) ×6 (18)
R4: (2 sc, inc) ×6 (24)
R5: (3 sc, inc) ×6 (30)
R6: (4 sc, inc) ×6 (36)
R7: (5 sc, inc) ×6 (42)
R8–R15: sc around (42)
R16: (5 sc, dec) ×6 (36)
R17: (4 sc, dec) ×6 (30)
R18: (3 sc, dec) ×6 (24)
R19: (2 sc, dec) ×6 (18)
R20: (sc, dec) ×6 (12)
R21: dec ×6 (6)
Insert 10 mm eyes between R11 and R12, 9 stitches apart, before closing. Stuff the dome firmly, especially below the comb line.
Fasten off. Leave a 35 cm tail and close the final hole.
Mother Hen Body
Yarn: cream white — Source: standard amigurumi math; large plateau kept at 42 stitches.
R1: 6 sc in MR (6)
R2: inc ×6 (12)
R3: (sc, inc) ×6 (18)
R4: (2 sc, inc) ×6 (24)
R5: (3 sc, inc) ×6 (30)
R6: (4 sc, inc) ×6 (36)
R7: (5 sc, inc) ×6 (42)
R8–R18: sc around (42)
R19: (5 sc, dec) ×6 (36)
R20: sc around (36)
R21: (4 sc, dec) ×6 (30)
R22: (3 sc, dec) ×6 (24)
R23: (2 sc, dec) ×6 (18)
R24: (sc, dec) ×6 (12)
R25: dec ×6 (6)
Stuff the bottom wider than the head. A flat sitting base is made by pressing the last three rounds into the table before the final close.
Fasten off. Leave a 30 cm tail and close.
Mother Hen Wings Make 2
Yarn: cream white — Source: standard amigurumi math.
R1: 6 sc in MR (6)
R2: inc ×6 (12)
R3: (sc, inc) ×6 (18)
R4: (2 sc, inc) ×6 (24)
R5–R7: sc around (24)
R8: (2 sc, dec) ×6 (18)
R9: (sc, dec) ×6 (12)
R10: flatten opening; sc through both layers across (6)
Do not stuff. Flatten the wing so the oval edge points downward.
Fasten off. Leave a 25 cm tail.
Mother Hen Beak
Yarn: golden yellow — Source: standard amigurumi math.
R1: 6 sc in MR (6)
R2: inc ×6 (12)
R3: sc around (12)
Add a pinch of stuffing only if the beak sinks inward.
Fasten off. Leave a 20 cm tail for sewing.
Mother Hen Wattle Lobes Make 2
Yarn: red — Source: standard amigurumi math.
R1: 6 sc in MR (6)
R2: inc ×6 (12)
R3: sc around (12)
R4: dec ×6 (6)
Stuff lightly. The lobes should hang under the beak, not push the beak upward.
Fasten off. Leave a 20 cm tail.
Mother Hen Comb Lobes Make 3
Yarn: red — Source: chicken comb competitor gap; built as sewn 3D lobes rather than surface chains.
R1: 6 sc in MR (6)
R2: inc ×6 (12)
R3–R4: sc around (12)
R5: dec ×6 (6)
Do not over-stuff. Make one center lobe and two side lobes, then sew them together at their bases before attaching to the crown.
Fasten off each lobe with a 25 cm tail.
Mother Hen Cheek Patches Make 2
Yarn: soft pink — Source: standard flat circle math.
R1: 6 sc in MR (6)
R2: inc ×6 (12)
Sl st to first stitch (12)
Keep patches flat. Sew one patch below each eye, offset slightly toward the beak.
Fasten off. Leave a 15 cm tail.
Mother Hen Feet Make 2
Yarn: orange — Source: visible chick-foot construction adapted for the hidden hen base.
R1: 6 sc in MR (6)
R2: inc ×6 (12)
R3: sc around (12)
R4: flatten opening; sc through both layers across (6)
Toe row: ch 3, sl st in second ch from hook, sl st in next ch, sl st into same base stitch; repeat twice across the front edge (3 toes)
Feet may be partly hidden by the chicks. Sew them under the body, 10 stitches apart, so only the toe tips show.
Fasten off. Leave a 20 cm tail.
Chick Head and Body Make 3
Yarn: pale yellow — Source: standard amigurumi math; small plateau kept at 30 stitches.
R1: 6 sc in MR (6)
R2: inc ×6 (12)
R3: (sc, inc) ×6 (18)
R4: (2 sc, inc) ×6 (24)
R5: (3 sc, inc) ×6 (30)
R6–R15: sc around (30)
R16: (3 sc, dec) ×6 (24)
R17: sc around (24)
R18: (2 sc, dec) ×6 (18)
R19: (sc, dec) ×6 (12)
R20: dec ×6 (6)
Insert 6 mm eyes between R8 and R9, 6 stitches apart. Stuff the bottom firmly so each chick can stand without leaning into the hen.
Fasten off. Close the final hole.
Chick Wings Make 6
Yarn: pale yellow — Source: standard amigurumi math.
R1: 6 sc in MR (6)
R2: inc ×6 (12)
R3–R4: sc around (12)
R5: dec ×6 (6)
Do not stuff. Flatten each wing and sew it between R10 and R14 on the side of each chick.
Fasten off. Leave a 15 cm tail.
Chick Beaks Make 3
Yarn: orange — Source: standard amigurumi math.
R1: 6 sc in MR (6)
R2: sc around (6)
Flatten the tiny tube before sewing. Place it centered between the eyes over R9 and R10.
Fasten off. Leave a 15 cm tail.
Chick Feet Make 6
Yarn: orange — Source: row construction for small visible toes.
Row 1: ch 4, sl st in second ch from hook, sl st in next 2 ch (3)
Toe branch: ch 3, sl st in second ch from hook, sl st in next ch, sl st back into the starting end (2)
Second toe branch: ch 3, sl st in second ch from hook, sl st in next ch, sl st back into the starting end (2)
Each chick gets two feet. Sew them under R18, spaced 4 stitches apart, with the toe branches facing forward.
Fasten off. Leave a 12 cm tail.
Assembly
- Sew the head to the body with the lower head centered over body R1–R4; pass the seam twice so the head does not wobble.
- Pin the beak between the hen eyes, centered across head R12–R13, then sew around the open edge.
- Attach the two red wattle lobes directly below the beak, touching at the center line.
- Sew the three comb lobes along the top of the head from front to back, with the tallest lobe in the middle.
- Attach cheek patches below the eyes, one stitch away from the beak edge.
- Pin the hen wings to body R9–R16, angled slightly backward, then sew only the top half of each wing.
- Sew the hen feet beneath the body so the toe tips sit just outside the front curve.
- Finish each chick face by sewing its orange beak between the eyes and burying the yarn tail through the lower body.
- Attach chick wings and feet, then press each chick against a flat surface to check balance.
- Arrange the chicks in front of the hen: one centered, one left, and one right, with all beaks facing forward.
The finished set contains one white mother hen and three matching yellow chicks.
7 Technical Tips
- Stitch marker drift: If the marker shifts more than 2 stitches from the back center, the comb line will twist. Reset the marker after R8 of the head and again before the first decrease round.
- Stuffing firmness: An under-filled 42-stitch body collapses behind the wings. Press the body with your thumb; it should compress about 5 mm, not fold inward.
- Invisible decrease ridges: White yarn shows standard decrease bars along the face and body base. Work every decrease through front loops only, then pull the working yarn tight before the next stitch.
- Eye placement timing: Install the hen eyes before R16 and chick eyes before R16 of the chick body. After those rounds, the opening is too small for flat washer placement.
- Worsted tension gap: If white stuffing shows between stitches on R8–R15, the hook is too large for your hand tension. Drop from 3.5 mm to 3.25 mm before starting the body.
- Wing pinning error: Wings sewn level with the eyes make the hen look like a round bear. Pin the wing top at body R9 and the lower tip near R16 before sewing.
- Tail weaving dots: Red wattle tails can leave red specks on the white face. Run each red tail inside the head for at least 4 cm before trimming.
Conclusion
Scale control matters more than decoration in this hen-and-chicks set. The mother uses the same 42-stitch ceiling in the head and body, so the red comb and wattle have enough surface to sit cleanly without distorting the face. The chicks use a 30-stitch ceiling, which keeps the trio visually related but clearly smaller. For the next step, crochet one chick first, measure its height, then adjust hook size before making the remaining two. Share the finished chicken amigurumi crochet pattern on Pinterest and Instagram with #MotherHenAmigurumi. Which detail should change first on your version: the comb height, the chick eye spacing, or the shape of the orange feet?









