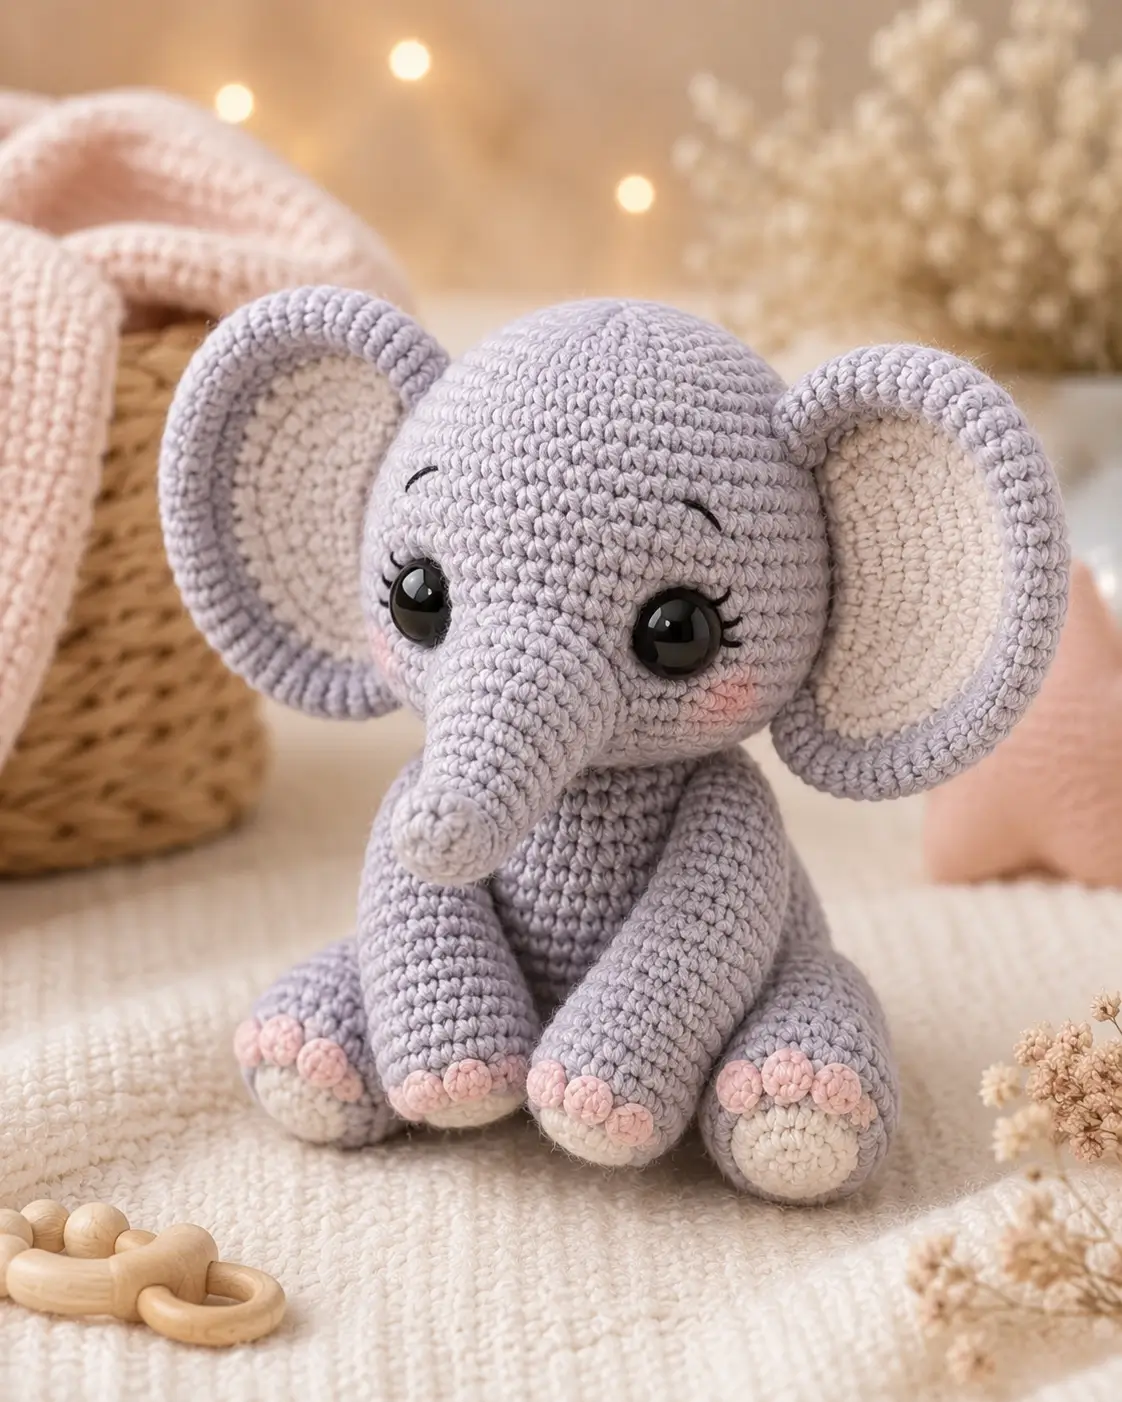
Introduction
An elephant’s trunk changes the whole build because it must project from a round face without dragging the head down. This elephant amigurumi crochet pattern uses worsted yarn, a 3.75 mm hook, and 15 mm safety eyes to make an 18 cm sitting toy. The skill level is intermediate because the ears, trunk, and toe bobbles need placement accuracy. Make it as a nursery shelf toy or photo prop.
The Design: What Makes This Baby Elephant Different
A baby elephant amigurumi needs width before height. The head uses a 42-stitch plateau so the face can hold 15 mm eyes, a broad trunk base, cheek patches, and embroidery without crowding. Those large ears are made as two-layer disks: cream inner panels sit inside a lavender-gray rim so the ear stays flat rather than cupping forward. A sitting elephant amigurumi also needs weight low in the body, so the back legs are wider than the front legs and the body closes firmly at the bottom. Another choice is the separate trunk. Many free elephant crochet pattern results start the head from the trunk, but this version keeps the trunk sewn on so you can correct angle and curve after stuffing. The common mistake: sewing ears too low, which makes the face look long instead of baby-like.
Project Info at a Glance
| Skill Level | Time | Finished Size | Hook | Best For |
|---|---|---|---|---|
| Intermediate | 5–6 hours | 18 cm benchmark | 3.75 mm | Nursery shelf, photo prop, toy display |
The 18 cm size, 3.75 mm hook, worsted yarn, and 15 mm safety-eye benchmark match a published cuddle-sized elephant pattern listing.
Materials and Tools
Yarn
- Pale lavender gray — worsted / medium weight — 100–121 g — Paintbox Simply Aran, Lion Brand Basic Stitch, or similar smooth acrylic.
- Warm cream — worsted / medium weight — 20–25 g — inner ears and foot pads.
- Blush pink — worsted / medium weight — 10–16 g — toe bobbles and cheek patches.
- Black embroidery thread — small amount — lashes and brows.
Tools
- Hook 3.75 mm
- 15 mm black safety eyes
- Polyester stuffing
- Yarn needle
- Stitch markers
- Pins
- Scissors
- Black embroidery needle
Safety eyes are hard to remove after the washers are attached, and they are not rated as safe for children under 3 years or pets; embroider eyes for those uses.
Abbreviations
- MR = magic ring
- sc = single crochet
- inc = 2 sc in one stitch
- dec = invisible decrease over next 2 stitches
- sl st = slip stitch
- ch = chain
- BLO = back loop only
- FLO = front loop only
Work invisible decreases through the front loops only on closing rounds so the final surface stays smooth and the stitch count still drops by 6.
Pattern — Step by Step
Continuous spiral unless noted. Place a stitch marker in the first stitch of every round.
Head
Yarn: pale lavender gray
R1: 6 sc in MR (6)
R2: inc ×6 (12)
R3: (sc, inc) ×6 (18)
R4: (2 sc, inc) ×6 (24)
R5: (3 sc, inc) ×6 (30)
R6: (4 sc, inc) ×6 (36)
R7: (5 sc, inc) ×6 (42)
R8: sc around (42)
R9: sc around (42)
R10: sc around (42)
R11: sc around (42)
R12: sc around (42)
R13: sc around (42)
R14: sc around (42)
R15: (5 sc, dec) ×6 (36)
R16: sc around (36)
Place safety eyes between R11 and R12, 8 stitches apart. Do not attach washers until the trunk and cheeks are pinned.
R17: (4 sc, dec) ×6 (30)
R18: (3 sc, dec) ×6 (24)
R19: (2 sc, dec) ×6 (18)
Stuff firmly. Add extra stuffing behind the eye line.
R20: (sc, dec) ×6 (12)
R21: dec ×6 (6)
Fasten off. Leave 15 cm tail and close through FLO.
Body
Yarn: pale lavender gray
R1: 6 sc in MR (6)
R2: inc ×6 (12)
R3: (sc, inc) ×6 (18)
R4: (2 sc, inc) ×6 (24)
R5: (3 sc, inc) ×6 (30)
R6: (4 sc, inc) ×6 (36)
R7: sc around (36)
R8: sc around (36)
R9: sc around (36)
R10: sc around (36)
R11: sc around (36)
R12: sc around (36)
R13: (4 sc, dec) ×6 (30)
R14: sc around (30)
R15: sc around (30)
R16: (3 sc, dec) ×6 (24)
R17: sc around (24)
R18: (2 sc, dec) ×6 (18)
R19: (sc, dec) ×6 (12)
Stuff the base more firmly than the neck so the toy sits without tipping forward.
R20: dec ×6 (6)
Fasten off. Leave 45 cm tail for sewing the body to the head.
Front Legs / Arms
Yarn: warm cream, then pale lavender gray
Make 2.
R1: with cream, 6 sc in MR (6)
R2: inc ×6 (12)
R3: in BLO with gray, sc around (12)
R4: sc around (12)
R5: sc around (12)
R6: sc around (12)
R7: sc around (12)
R8: sc around (12)
R9: sc around (12)
R10: sc around (12)
R11: (2 sc, dec) ×3 (9)
R12: sc around (9)
R13: sc around (9)
R14: sc around (9)
Stuff only the lower two-thirds so the top can flatten against the body.
Fasten off. Leave 30 cm tail.
Back Legs
Yarn: warm cream, then pale lavender gray
Make 2.
R1: with cream, 6 sc in MR (6)
R2: inc ×6 (12)
R3: (sc, inc) ×6 (18)
R4: in BLO with gray, sc around (18)
R5: sc around (18)
R6: sc around (18)
R7: sc around (18)
R8: (4 sc, dec) ×3 (15)
R9: sc around (15)
R10: (3 sc, dec) ×3 (12)
R11: sc around (12)
R12: sc around (12)
Stuff the foot firmly and leave the upper edge lightly filled.
Fasten off. Leave 35 cm tail.
Large Ears
Yarn: warm cream and pale lavender gray
Make 2 inner panels in cream.
R1: 6 sc in MR (6)
R2: inc ×6 (12)
R3: (sc, inc) ×6 (18)
R4: (2 sc, inc) ×6 (24)
R5: (3 sc, inc) ×6 (30)
Fasten off. Leave 25 cm tail for sewing.
Make 2 outer ears in gray.
R1: 6 sc in MR (6)
R2: inc ×6 (12)
R3: (sc, inc) ×6 (18)
R4: (2 sc, inc) ×6 (24)
R5: (3 sc, inc) ×6 (30)
R6: (4 sc, inc) ×6 (36)
R7: (5 sc, inc) ×6 (42)
R8: sc around (42)
Do not stuff. Sew one cream panel centered on each gray ear, leaving one gray round visible as the rim.
Fasten off. Leave 50 cm tail per ear.
Trunk
Yarn: pale lavender gray
R1: 6 sc in MR (6)
R2: sc around (6)
R3: sc around (6)
R4: (sc, inc) ×3 (9)
R5: sc around (9)
R6: sc around (9)
R7: (2 sc, inc) ×3 (12)
R8: sc around (12)
R9: sc around (12)
R10: (3 sc, inc) ×3 (15)
R11: sc around (15)
R12: sc around (15)
R13: (4 sc, inc) ×3 (18)
R14: sc around (18)
R15: (5 sc, inc) ×3 (21)
R16: sc around (21)
R17: (6 sc, inc) ×3 (24)
Stuff the tip lightly and the base medium-firm. Curve the trunk downward while sewing rather than overstuffing it.
Fasten off. Leave 40 cm tail.
Cheek Patches
Yarn: blush pink
Make 2.
R1: 6 sc in MR (6)
R2: inc ×6 (12)
Sl st to first stitch. Fasten off. Leave 20 cm tail per cheek.
Toe Bobbles
Yarn: blush pink
Make 12.
R1: 6 sc in MR (6)
R2: sc around (6)
R3: dec ×3 (3)
Do not stuff. Close tightly so each toe stays round.
Fasten off. Leave 12 cm tail per toe.
Tail
Yarn: pale lavender gray
R1: 6 sc in MR (6)
R2: sc around (6)
R3: sc around (6)
R4: sc around (6)
Fasten off. Leave 20 cm tail. Add three 5 cm yarn strands to the tip and knot them once for a small tassel.
Face Embroidery
Yarn/thread: black embroidery thread
Embroider one short brow above each eye, following the curve of R9. Add two small lashes at the outer edge of each safety eye. Use one hidden knot inside the head or bury the thread through the back of the head for 5 cm before trimming.
Attached Accessories
No attached accessory appears on the elephant in the reference photo. The wooden teether in the background is a prop, so it is not included in the crochet pattern.
Assembly
- Pin the head to the body with the trunk area centered over the front body line.
- Sew the head to the body using the 45 cm body tail and small mattress stitches.
- Pin the trunk between the eyes, with the base centered across head R12–R16.
- Sew the trunk in place, adding two extra stitches under the base to hold the downward curve.
- Attach cheek patches beside the trunk, one round lower than the safety eyes.
- Pin ears with the top edge near head R8 and the lower edge near head R15.
- Sew ears through the gray rim only so the cream inner panel stays flat.
- Attach front legs under the head, angled inward by about 1 cm at the lower tips.
- Sew back legs to the lower sides of the body, then attach three toe bobbles to each visible foot.
- Add the tail to the back body center at R10 and weave in every remaining yarn end.
The finished elephant measures about 18 cm when worked with worsted yarn and a 3.75 mm hook.
7 Technical Tips
- Stitch marker drift: A moved marker can shift the trunk line left by 2–3 stitches after R10. Move the marker every round and re-count each +6 increase sequence before starting the plateau.
- Stuffing firmness: A soft head lets 15 mm eyes tilt inward. Fill the head until it resists a 1 cm thumb press but still closes without gaps at R21.
- Invisible decrease ridges: Standard decreases can leave raised bars on R17–R21 of the head. Work through front loops only and tug each new loop to match the height of the surrounding sc.
- Eye placement timing: Eye washers attached after R17 are hard to reach and can distort the forehead. Test both eyes between R11 and R12, 8 stitches apart, before locking the washers.
- Velvet tension change: Switching to velvet can add about 2 cm of width and make toe bobbles look buried. Drop one hook size or remove one plain round from each leg if the fabric stretches.
- Ear pinning error: Ears sewn 1 cm too low make the trunk look too long. Pin the top of each ear at head R8 and check the front silhouette before sewing.
- Tail weaving failure: A tail trimmed at the surface can pop out after stuffing settles. Weave at least 5 cm through the body, reverse once, then trim close to the fabric.
Conclusion
Use the stitch counts above as the master copy before cutting yarn. Check the 42-stitch head, 36-stitch body, 42-stitch ears, and 24-stitch trunk base against your row counter, then sew only after every pin line matches the front view. The next step is to make one test ear in scrap yarn and confirm that the cream panel sits inside the gray rim without rippling. Share the finished elephant amigurumi crochet pattern project on Pinterest and Instagram with a flat front photo, a side photo showing trunk curve, and #BabyElephantAmigurumi. Which placement works better for your elephant: ears level with the eyes, or ears slightly higher to frame the forehead?









