Introduction
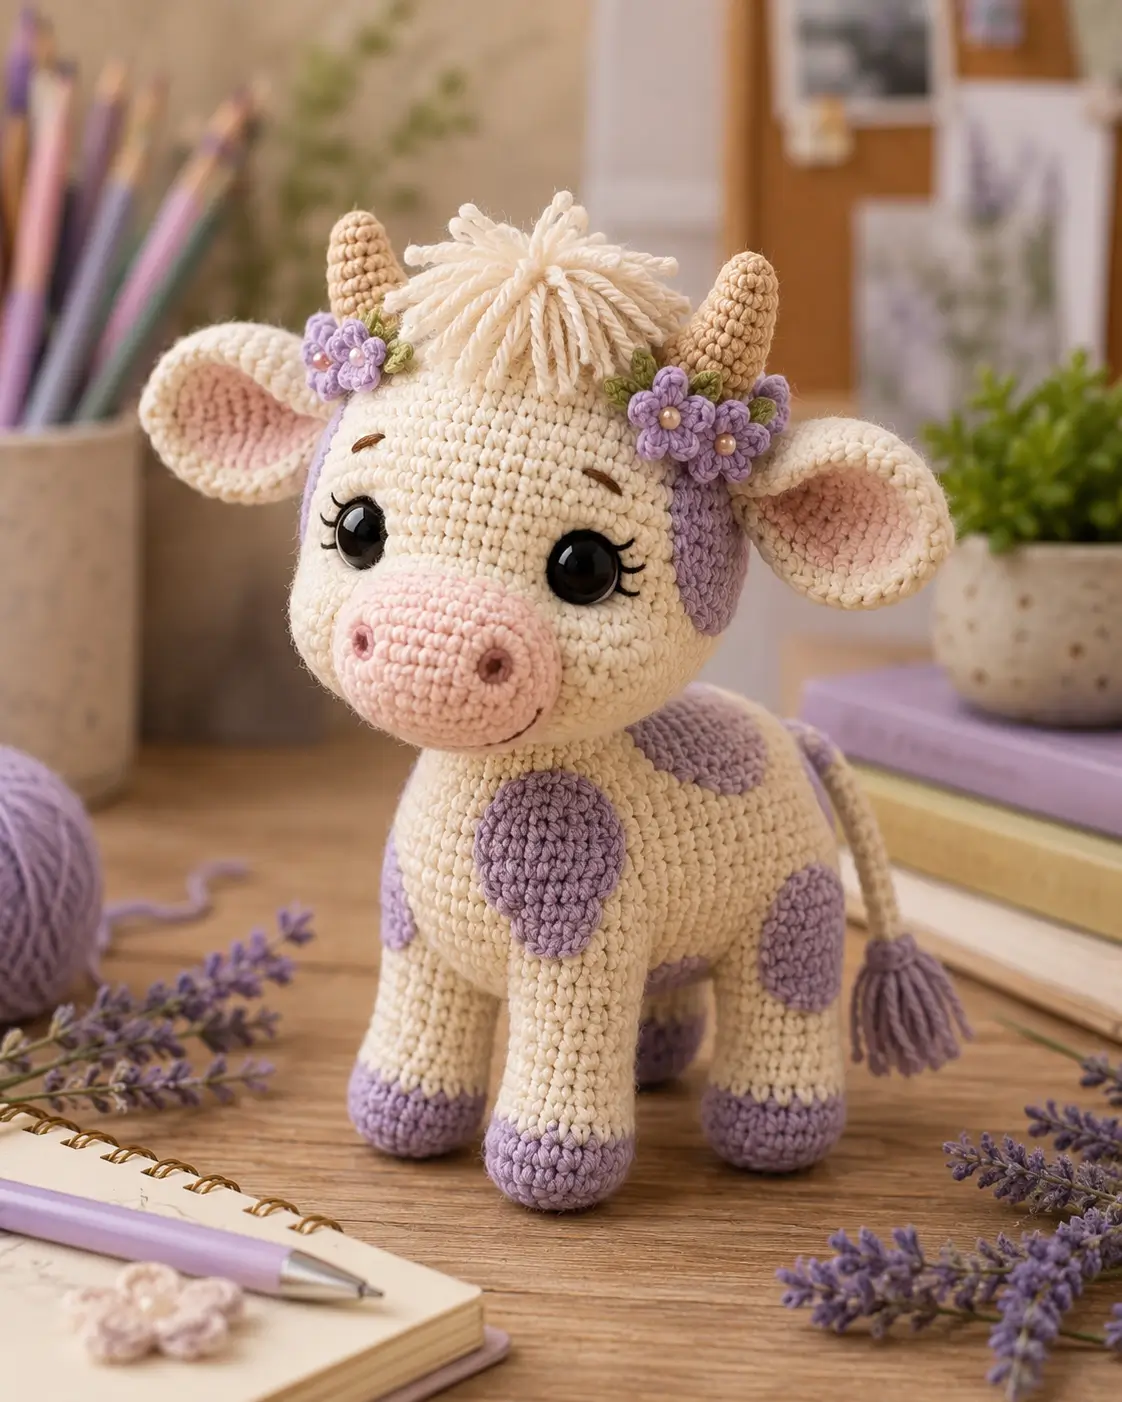
A cow with lavender spots still needs cloven hooves, two horns, and a long tail tuft before it reads as a cow. This cow amigurumi crochet pattern uses chunky yarn, a 4 mm hook, 16 mm safety eyes, and a medium 23 cm build. Work it at an advanced-beginner level for a stable desk-size farm animal with floral horn trim.
The Design: What Makes This Cow Different
You build the head wider than the neck because the snout and ears need visual weight. The body stays horizontal and slightly oval, so the four legs can support the toy without pulling the belly flat. Lavender spots are sewn on after stuffing, not carried through the rounds, because surface patches give cleaner edges on chunky yarn. The maker should also treat the horns as structure, not decoration; they sit forward of the ears and define the cow profile. A common mistake with a crochet cow plushie pattern is placing the ears too high, which turns the silhouette into a rabbit. In this lavender cow amigurumi, ears sit low and wide, flowers cover the horn base, and the mane fills the crown without hiding the safety-eye spacing.
Project Info at a Glance
| Skill Level | Time | Finished Size | Hook | Best For |
|---|---|---|---|---|
| Advanced beginner | Few hours | 23 cm | 4.0 mm | Display toy, shelf decor, farm animal set |
Materials and Tools
Yarn
- Cream ivory chunky yarn — bulky/chunky — 120–150 g — Himalaya Dolphin Baby, Bernat Velvet, or similar
- Lavender chunky yarn — bulky/chunky — 25–30 g — for hooves, spots, and flower accents
- Pale pink chunky yarn — bulky/chunky — 10–15 g — for snout, cheek patches, and inner ears
- Tan chunky yarn — bulky/chunky — 10–15 g — for horns and tail base
- Purple DK or worsted cotton — small amount — for flowers
- Green DK or worsted cotton — small amount — for leaves
- Black embroidery thread — small amount — for nostrils, mouth, and lashes
Tools
- Hook 4.0 mm
- 16 mm black safety eyes
- Polyester stuffing
- Yarn needle
- Stitch markers
- Pins
- Scissors
- Disappearing marker
Abbreviations
MR = magic ring; sc = single crochet; inc = 2 sc in one stitch; dec = invisible decrease over 2 stitches; sl st = slip stitch; ch = chain; BLO = back loop only; dc = double crochet; st = stitch.
For invisible decrease, work through the front loops of the next 2 stitches before finishing the single crochet so the decrease sits inside the fabric.
Pattern — Step by Step
Continuous spiral unless noted. This cow amigurumi crochet pattern uses standard 6-stitch amigurumi increases and decreases.
Head
Yarn: cream ivory
R1: 6 sc in MR (6)
R2: inc ×6 (12)
R3: (sc, inc) ×6 (18)
R4: (2 sc, inc) ×6 (24)
R5: (3 sc, inc) ×6 (30)
R6: (4 sc, inc) ×6 (36)
R7–R14: sc around (36)
Place safety eyes between R10 and R11, 8 stitches apart. Stuff firmly through the crown and cheeks.
R15: (4 sc, dec) ×6 (30)
R16: (3 sc, dec) ×6 (24)
R17: (2 sc, dec) ×6 (18)
R18: (sc, dec) ×6 (12)
R19: dec ×6 (6)
Fasten off. Leave 20 cm tail and close the opening.
Body
Yarn: cream ivory
R1: 6 sc in MR (6)
R2: inc ×6 (12)
R3: (sc, inc) ×6 (18)
R4: (2 sc, inc) ×6 (24)
R5: (3 sc, inc) ×6 (30)
R6: (4 sc, inc) ×6 (36)
R7–R15: sc around (36)
Stuff as you go. Keep the underside flat enough for four legs.
R16: (4 sc, dec) ×6 (30)
R17: sc around (30)
R18: (3 sc, dec) ×6 (24)
R19: sc around (24)
R20: (2 sc, dec) ×6 (18)
R21: sc around (18)
R22: (sc, dec) ×6 (12)
R23: dec ×6 (6)
Fasten off. Leave 35 cm tail for sewing to the head.
Front Legs / Arms
Yarn: lavender for hoof, cream for leg. Make 2.
R1: 6 sc in MR (6)
R2: inc ×6 (12)
R3: (sc, inc) ×6 (18)
R4: BLO sc around (18)
R5: sc around in lavender (18)
R6: change to cream, (sc, dec) ×6 (12)
R7–R15: sc around (12)
Stuff the hoof firmly and the upper leg lightly.
Fasten off. Leave 25 cm tail.
Back Legs
Yarn: lavender for hoof, cream for leg. Make 2.
R1: 6 sc in MR (6)
R2: inc ×6 (12)
R3: (sc, inc) ×6 (18)
R4: BLO sc around (18)
R5–R6: sc around in lavender (18)
R7: change to cream, (sc, dec) ×6 (12)
R8–R14: sc around (12)
Back legs sit slightly behind the body center line.
Fasten off. Leave 25 cm tail.
Snout
Yarn: pale pink
Ch 7.
R1: inc in 2nd ch from hook, sc 4, 4 sc in last ch, work opposite side, sc 4, inc in last base ch (16)
R2: inc ×2, sc 4, inc ×4, sc 4, inc ×2 (24)
R3: (sc, inc) ×2, sc 4, (sc, inc) ×4, sc 4, (sc, inc) ×2 (32)
R4–R5: sc around (32)
Stuff lightly. Embroider two nostrils between R2 and R3, 5 stitches apart.
Fasten off. Leave 35 cm tail.
Ears
Yarn: cream ivory. Make 2.
R1: 6 sc in MR (6)
R2: inc ×6 (12)
R3: (sc, inc) ×6 (18)
R4: (2 sc, inc) ×6 (24)
R5: sc around (24)
R6: (2 sc, dec) ×6 (18)
Flatten, pinch the base, and sew through both layers.
Fasten off. Leave 30 cm tail.
Inner Ear Patches
Yarn: pale pink. Make 2.
R1: 6 sc in MR (6)
R2: inc ×6 (12)
R3: (sc, inc) ×6 (18)
Sl st to finish.
Fasten off. Leave 20 cm tail and sew one patch inside each ear.
Horns
Yarn: tan. Make 2.
R1: 6 sc in MR (6)
R2–R3: sc around (6)
R4: inc ×6 (12)
R5–R8: sc around (12)
Stuff only the base. Leave the tip firm but not bulky.
Fasten off. Leave 25 cm tail.
Cheek Patches
Yarn: pale pink. Make 2.
R1: 6 sc in MR (6)
R2: inc ×6 (12)
R3: (sc, inc) ×6 (18)
Sl st to finish.
Fasten off. Leave 18 cm tail.
Lavender Spots
Yarn: lavender. Make 6 total: 2 large, 2 medium, 2 small.
Large Spot
R1: 6 sc in MR (6)
R2: inc ×6 (12)
R3: (sc, inc) ×6 (18)
R4: (2 sc, inc) ×6 (24)
Sl st to finish.
Fasten off. Leave 25 cm tail.
Medium Spot
R1: 6 sc in MR (6)
R2: inc ×6 (12)
R3: (sc, inc) ×6 (18)
Sl st to finish.
Fasten off. Leave 20 cm tail.
Small Spot
R1: 6 sc in MR (6)
R2: inc ×6 (12)
Sl st to finish.
Fasten off. Leave 18 cm tail.
Tail
Yarn: tan for cord, lavender for tassel
R1: 6 sc in MR (6)
R2–R16: sc around (6)
Do not overstuff. Insert a narrow line of stuffing or leave as a cord.
Fasten off. Leave 20 cm tail for sewing.
For tassel, cut 8 lavender strands, each 14 cm long. Tie through the tail tip, fold, wrap twice near the top, knot, and trim to 4 cm.
Mane Tuft
Yarn: cream ivory
Cut 18 strands, each 12 cm long. Attach strands between the horns across 6 stitches using lark’s-head knots. Trim the finished mane to 4–5 cm. Split chunky yarn plies only at the ends if the top looks too dense.
Flowers
Yarn: purple DK or worsted cotton. Make 5.
R1: 6 sc in MR (6)
R2: In each stitch work: sl st, ch 2, 2 dc, ch 2, sl st. Repeat around for 6 petal groups (6 groups)
Fasten off. Leave 15 cm tail. Add one small bead only for display pieces, never for toys intended for small children.
Leaves
Yarn: green DK or worsted cotton. Make 6.
Ch 6.
Row 1: sl st in 2nd ch from hook, sc, hdc, dc, 3 sc in last ch, work opposite side, dc, hdc, sc, sl st (10)
Fasten off. Leave 12 cm tail.
Assembly
- Sew the head to the body with the head angled slightly downward, adding stuffing at the neck before closing the seam.
- Pin the snout across the lower front of the head, centered below the eyes, then sew around the edge.
- Embroider the mouth as a shallow curve under the snout and add two short eyelashes at the outer edge of each eye.
- Sew the cheek patches to the left and right sides of the snout, keeping them below the eye line.
- Attach the horns on top of the head between R5 and R8, spaced 9–10 stitches apart.
- Sew the ears beside and slightly below the horns, then fold the ear bases forward by 1 cm.
- Attach the front legs under the chest and the back legs under the rear body, checking that all four hooves touch the table.
- Sew lavender spots to the head, body, and legs, placing the largest body spot on the visible side.
- Attach the tail at the center back between body R10 and R12, then trim the tassel level.
- Sew flowers and leaves around both horn bases, then add the mane tuft between the horns.
The finished cow stands on four hooves with a centered head, visible snout, paired horns, flower trim, and lavender spots.
7 Technical Tips
- Eye placement failure: eyes too low. Place the eyes between head R10 and R11 before closing the head; after R15 the opening becomes too small for safety-eye backs.
- Stuffing failure: collapsing neck. Add a firm 3 cm column of stuffing between the head and body seam before the final closing stitches.
- Invisible decrease failure: front-loop gaps. Use front loops only for dec rounds, then pull the working yarn tight after every third decrease.
- Velvet tension failure: uneven spots. Keep the spot stitches 10–15% looser than the body stitches so flat appliqués do not cup.
- Pinning failure: floating hooves. Pin all four legs before sewing any leg fully; the bottom of each hoof should touch the table at the same time.
- Horn failure: soft tips. Leave the top 2 rounds unstuffed and pack only the base, or the horn tips become round knobs.
- Tail weaving failure: tassel slips out. Wrap the tassel neck twice and bury the knot inside the tail tube with a yarn needle.
Conclusion
Block the spots before final sewing, then test the cow on a flat surface and adjust leg placement before weaving the last tails. The next concrete step is to crochet the head, snout, and horns first, because those parts set the animal identity before the body is attached. Save this cow amigurumi crochet pattern to Pinterest with a full-side photo, then share the finished lavender-spotted cow on Instagram from a low angle so the flowers and tassel tail show. Use hashtag #LavenderSpotCow. Which detail will you change first on this cow: the horn flowers, the lavender spot layout, or the length of the mane tuft?









