Introduction
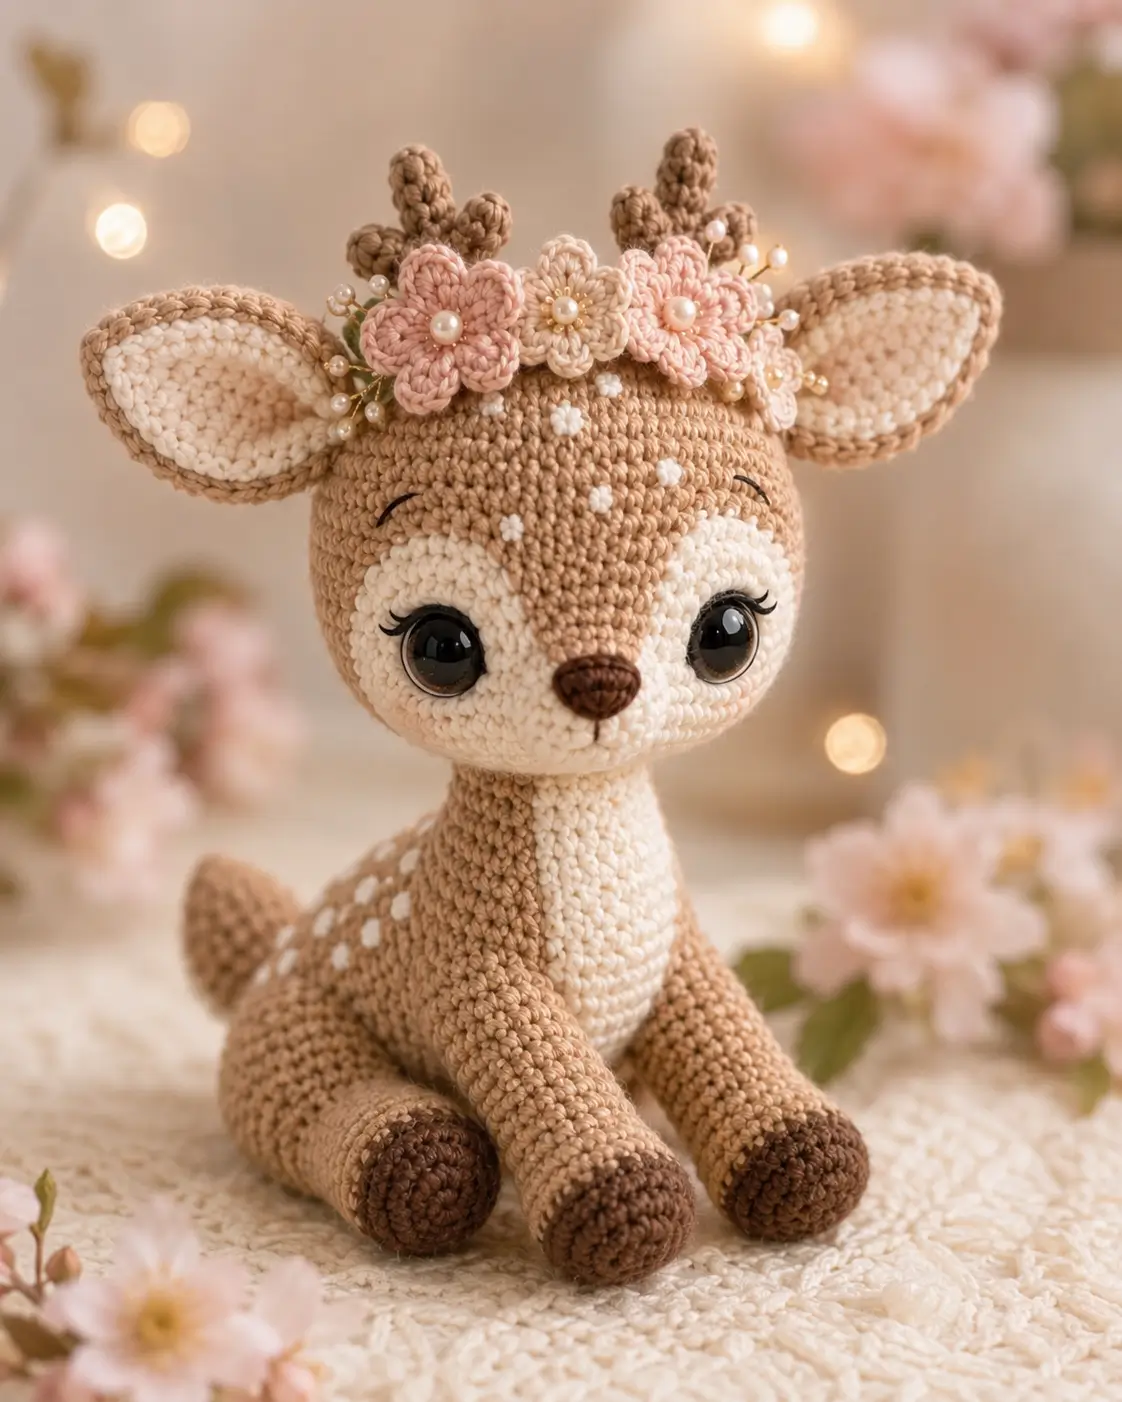
A fawn’s white throat climbs into the muzzle instead of stopping at the chest. This fawn amigurumi crochet pattern builds that blaze with separate cheek patches, a raised snout, and a cream belly panel. Use worsted yarn, a 3.5 mm hook, and 12 mm safety eyes for a 24 cm decorative woodland toy at easy-intermediate level. The seated shape makes it stable for shelf display.
The Design: What Makes This Fawn Different
A strong fawn amigurumi crochet pattern needs a large forehead, narrow muzzle, and low seated body. You shape the head first because the eye spacing controls the whole animal; too-close eyes make a baby deer read as a bear. The maker then adds cream cheek patches instead of relying only on color changes, which keeps the face cleaner for a crochet deer pattern worked in spiral rounds. Antlers must stay short. Long antlers shift the silhouette toward a stag, while this baby deer amigurumi needs rounded ears and small branching points. The body uses a large base and lighter stuffing in the limbs so the figure sits forward without falling. A common mistake is placing the ears high like rabbit ears. Deer ears sit wide and slightly low, framing the flower crown rather than competing with it.
Project Info at a Glance
| Skill Level | Time | Finished Size | Hook | Best For |
|---|---|---|---|---|
| Easy-intermediate | 6–8 hours | 24 cm | 3.5 mm | Decorative woodland display |
Materials and Tools
Yarn
- Tan — worsted / size 4 — 150 g — Paintbox Simply Aran, Stylecraft Special Aran, or similar
- Cream — worsted / size 4 — 25 g — for cheeks, muzzle, chest, inner ears
- Dark brown — worsted / size 4 — 10 g — for hooves, nose embroidery, antler shading if desired
- Soft brown — worsted / size 4 — 15 g — for antlers and tail
- Blush pink — DK or worsted scrap — 10 g — for flowers
- Ivory — DK or worsted scrap — 5 g — for center flower
- Green — DK scrap or embroidery floss — 2 g — for leaves
- White — small scrap — for spots
Tools
- Hook 3.5 mm
- 12 mm black safety eyes
- Polyester stuffing
- Tapestry needle
- Stitch markers
- Sewing pins
- Black embroidery thread
- Optional pearl beads or pearl pins
Pearl beads, buttons, and similar small add-ons are decorative only. Avoid small detachable parts on toys intended for children under 3.
Abbreviations
- MR = magic ring
- sc = single crochet
- inc = 2 sc in next stitch
- dec = invisible decrease
- sl st = slip stitch
- ch = chain
- BLO = back loop only
- FLO = front loop only
- FO = fasten off
- cc = color change
Invisible decrease works through the front loops of the next two stitches before completing one single crochet, reducing bulk on closed amigurumi rounds.
Pattern — Step by Step
Continuous spiral unless noted. The main head and body are original editor-drafted shapes based on the photo, verified size data, and standard six-stitch amigurumi growth.
Head
Yarn: tan
R1: 6 sc in MR (6)
R2: inc ×6 (12)
R3: (sc, inc) ×6 (18)
R4: (2 sc, inc) ×6 (24)
R5: (3 sc, inc) ×6 (30)
R6: (4 sc, inc) ×6 (36)
R7: (5 sc, inc) ×6 (42)
R8–R14: sc around (42)
R15: (5 sc, dec) ×6 (36)
R16: sc around (36)
R17: (4 sc, dec) ×6 (30)
R18: (3 sc, dec) ×6 (24)
Place eyes between R10 and R11, 9 stitches apart, after pinning the cheek patches.
R19: (2 sc, dec) ×6 (18)
R20: (sc, dec) ×6 (12)
Stuff firmly, with extra stuffing at the forehead and jawline.
R21: dec ×6 (6)
Fasten off. Leave 20 cm tail and close the opening.
Body
Yarn: tan
R1: 6 sc in MR (6)
R2: inc ×6 (12)
R3: (sc, inc) ×6 (18)
R4: (2 sc, inc) ×6 (24)
R5: (3 sc, inc) ×6 (30)
R6: (4 sc, inc) ×6 (36)
R7: (5 sc, inc) ×6 (42)
R8–R16: sc around (42)
R17: (5 sc, dec) ×6 (36)
R18–R19: sc around (36)
R20: (4 sc, dec) ×6 (30)
R21: sc around (30)
R22: (3 sc, dec) ×6 (24)
R23: (2 sc, dec) ×6 (18)
Stuff the base firmly and the neck area very firmly.
R24: (sc, dec) ×6 (12)
R25: dec ×6 (6)
Fasten off. Leave 30 cm tail for sewing to the head.
Front Legs
Make 2. Yarn: dark brown, then tan
R1: with dark brown, 6 sc in MR (6)
R2: inc ×6 (12)
R3: BLO sc around (12)
R4: sc around (12)
R5: cc to tan, sc around (12)
R6–R15: sc around (12)
R16: dec ×6 (6)
R17–R18: sc around (6)
Stuff the hoof firmly and the upper leg lightly.
Fasten off. Leave 25 cm tail.
Back Legs
Make 2. Yarn: dark brown, then tan
R1: with dark brown, 6 sc in MR (6)
R2: inc ×6 (12)
R3: (sc, inc) ×6 (18)
R4: BLO sc around (18)
R5: sc around (18)
R6: cc to tan, sc around (18)
R7–R11: sc around (18)
R12: (sc, dec) ×6 (12)
R13–R16: sc around (12)
Stuff hoof and lower leg; leave the top slightly flat for sewing.
Fasten off. Leave 30 cm tail.
Ears
Make 2 outer ears and 2 inner patches. Yarn: tan and cream
Outer ear, tan:
R1: 6 sc in MR (6)
R2: inc ×6 (12)
R3: (sc, inc) ×6 (18)
R4–R6: sc around (18)
R7: (sc, dec) ×6 (12)
R8: sc around (12)
Flatten. Fasten off with 30 cm tail.
Inner ear, cream:
R1: 6 sc in MR (6)
R2: inc ×6 (12)
Fasten off with 20 cm tail. Sew one cream circle slightly low inside each outer ear and pinch the base.
Antlers
Make 2. Yarn: soft brown
Main stem:
R1: 6 sc in MR (6)
R2–R6: sc around (6)
Fasten off. Leave 25 cm tail.
Small branch:
R1: 6 sc in MR (6)
R2–R3: sc around (6)
Fasten off. Sew branch to the side of the main stem between R3 and R4. Lightly stuff the stem only.
Snout
Yarn: cream
R1: 6 sc in MR (6)
R2: inc ×6 (12)
R3: (sc, inc) ×6 (18)
R4: sc around (18)
R5: (sc, dec) ×6 (12)
Stuff lightly; the snout should sit oval, not round.
Fasten off. Leave 30 cm tail. Embroider a dark brown triangular nose after sewing.
Cheek Patches
Make 2. Yarn: cream
R1: 6 sc in MR (6)
R2: inc ×6 (12)
R3: (sc, inc) ×6 (18)
Fasten off. Leave 25 cm tail. Keep flat; do not stuff.
Chest Patch
Yarn: cream
Ch 9.
R1: starting in 2nd ch from hook, sc 7, 3 sc in last ch, working other side, sc 6, inc in first stitch (18)
R2: inc, sc 6, inc ×3, sc 6, inc ×2 (24)
R3: (3 sc, inc) ×6 (30)
R4: sc around (30)
Fasten off. Leave 35 cm tail.
Tail
Yarn: tan, with cream embroidery
R1: 6 sc in MR (6)
R2: inc ×6 (12)
R3–R5: sc around (12)
R6: dec ×6 (6)
Stuff lightly. Add 3 cream stitches across the underside before sewing.
Fasten off. Leave 25 cm tail.
Body Spots and Forehead Dots
Make 12–16. Yarn: white
R1: 6 sc in MR (6)
Sl st to first sc.
Fasten off with two 10 cm tails. Make smaller dots by pulling the magic ring tight and sewing through the center once.
Flower Crown
Make 5 flowers and 6 leaves. Yarn: pink, ivory, green
Flower:
R1: 6 sc in MR (6)
R2: [sl st, ch 2, 2 sc, ch 2, sl st] in each stitch around (6 petals)
Fasten off. Leave 20 cm tail. Make 3 blush pink flowers and 2 ivory flowers.
Leaf:
Ch 6.
Row 1: sl st in 2nd ch, sc 2, sl st 2 (5)
Fasten off. Leave 12 cm tail. Make 6.
Crown band:
Ch 26.
Row 1: sc in 2nd ch from hook and across (25)
Fasten off. Leave 25 cm tail. Sew flowers and leaves across the band before attaching it between the antlers. Add pearl beads only for display pieces.
Face Embroidery
Yarn: black and dark brown
Use black thread for two lashes at the outside of each eye. Make each lash 2 rounds tall and no more than 2 stitches wide. Add one small brow stitch above each eye, angled upward toward the ear. Embroider the nose in dark brown on the snout after the snout is sewn down.
Assembly
- Sew the head to the body with the face centered over the cream chest area.
- Pin the chest patch to the front of the body, with the top edge touching the neck seam, then sew around the edge.
- Place cheek patches on the lower front of the head, overlapping slightly under the eye line, then sew them flat.
- Sew the snout over the inner edges of the cheek patches and embroider the nose.
- Attach the front legs to the front lower body, angled forward so the hooves sit on the table.
- Attach the back legs to the sides of the base, with dark hooves pointing forward.
- Sew ears between R7 and R11 of the head, set wide and slightly lower than the antlers.
- Sew antlers between the ears, with each branch pointing outward.
- Attach the tail to the back lower body and sew white spots across the forehead, sides, and haunches.
- Sew the flower crown across the forehead, then add eyelashes, brows, and final thread shaping under the eyes.
The finished fawn should sit without hand support on a flat surface.
7 Technical Tips
- Stitch marker drift causes a twisted face line when the spiral moves more than 1 stitch by R14. Reset the marker at the back of the head every 6 rounds.
- Under-stuffing leaves a dent between the safety eyes after R18. Add stuffing in 1 cm pieces behind each eye before the final decrease rounds.
- Visible decrease holes appear when both loops are caught during head closure. Work the invisible decrease through front loops only on R19–R21.
- Eye placement fails if washers are attached before the cheek patches are pinned. Test the 12 mm eyes between R10 and R11, 9 stitches apart, then lock the washers.
- Velvet substitution can make the 42-stitch head larger than 24 cm scale. Drop to a 3.25 mm hook or reduce the head plateau to 36 stitches.
- Unpinned ears pull the flower crown out of level. Pin each ear base 3 stitches behind the outer eye edge before sewing.
- Loose antler tails make the branches tilt after handling. Weave each tail 4 cm through the head, turn once, and weave back through a different path.
Conclusion
This project works because the fawn structure stays readable before the flowers are added: wide ears, short antlers, cream muzzle, white spots, and a low seated body. Finish one sample in the verified worsted-weight setup first, then change only one variable on the next version, such as hook size or flower color. Photograph the fawn from the front and from a slight side angle so the chest patch and tail are visible. Share the finished fawn on Pinterest and Instagram with #FawnFlowerCrown. For the next fawn amigurumi crochet pattern test, should the antlers stay short like a baby deer, or grow taller for a young stag version?









