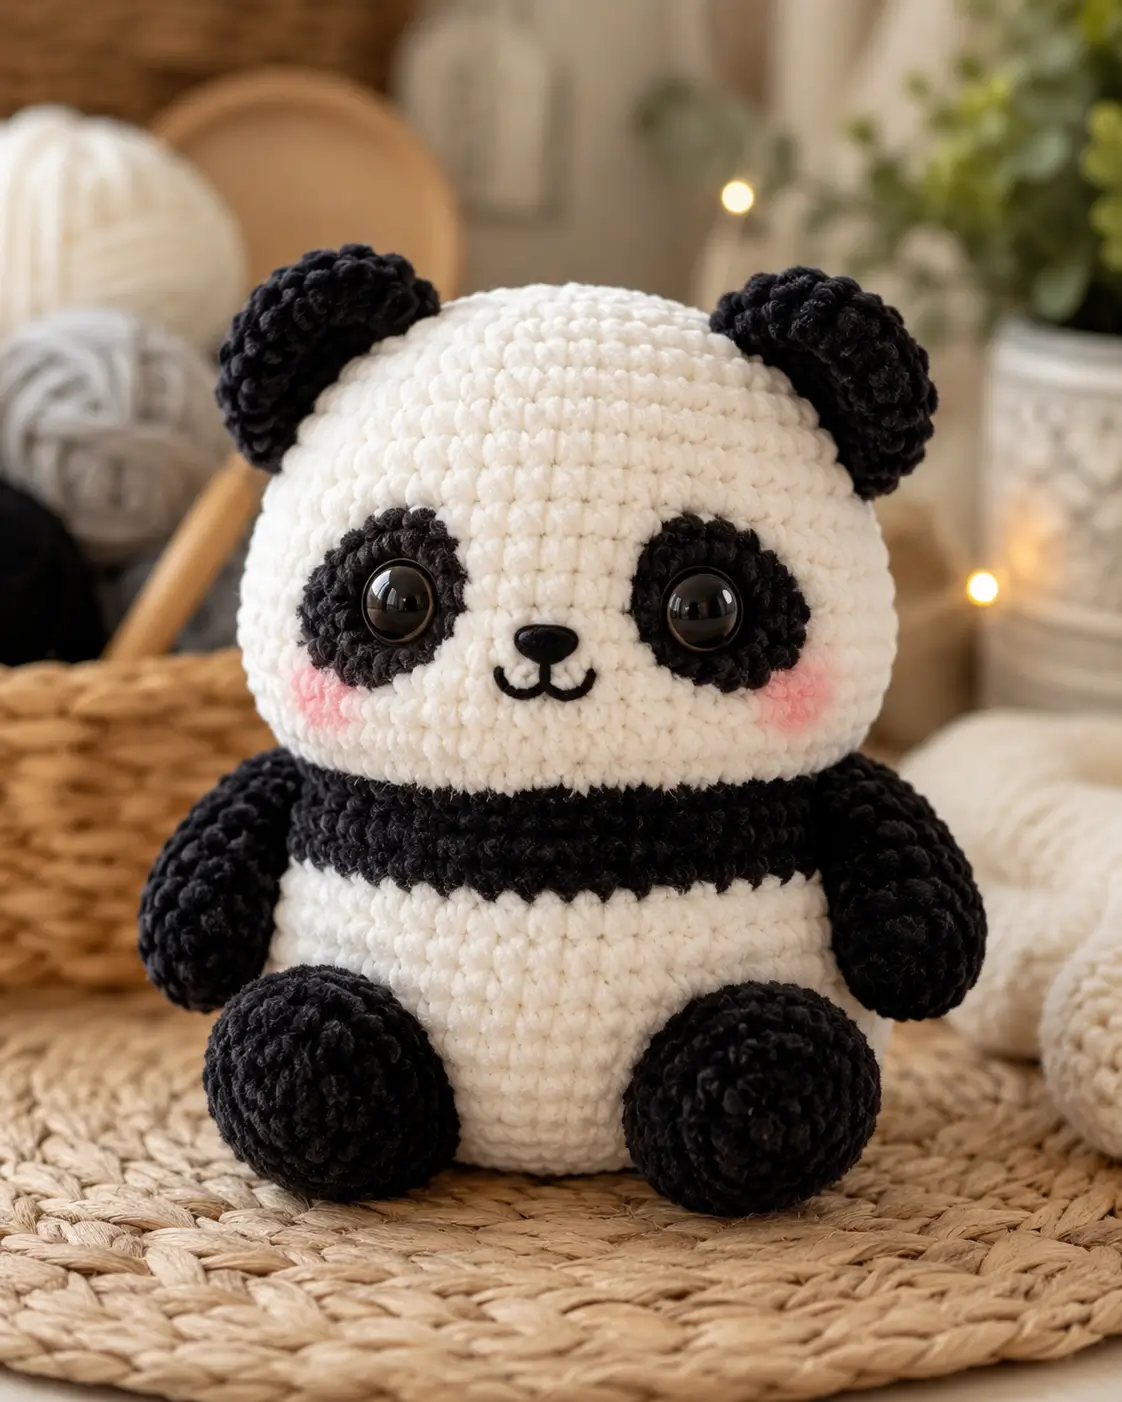
A panda is not built from black-and-white stripes; it is built from eye patches, black ears, and a white face that must stay wider than the body. This panda amigurumi crochet pattern uses velvet-style yarn, a 5 mm hook, 12–15 mm safety eyes, and a large 21 cm seated scale. Work it at intermediate level for a stable display toy with clear facial placement.
The Design: What Makes This Panda Different
This design starts with the face, not the body. The black eye patches are made as separate flat circles so the safety eyes can sit inside dark fields rather than floating on white yarn. That choice gives the panda its species-specific contrast and keeps the expression readable in plush yarn. The body is shorter than the head, with a black chest band worked as a stripe; the maker gets a seated amigurumi panda bear instead of a tall teddy shape. Pin the patches before locking the backs. The maker then checks symmetry from the front, because the most common panda mistake is setting the eyes too high and losing the low, rounded face. A crochet panda pattern also needs heavy black limbs. This panda plush crochet pattern keeps the arms and back legs thick so the toy sits without tipping.
Project Info at a Glance
| Skill Level | Time | Finished Size | Hook | Best For |
|---|---|---|---|---|
| Intermediate | A few hours | 21 cm seated | 5.0 mm | Seated display plush |
Size and hook data follow the chenille version documented by DIY Fluffies; the “few hours” time range is also reported for that small plush format. Source
Materials and Tools
Yarn
- White — chunky chenille or #5 velvet — about 140–150 g for a full plush scale — Bernat Velvet, Big Twist Baby Bear, or similar. Yarn + Chai lists 150 yd white for a bulky/velvet panda, and Bernat Velvet is listed as 300 g per 315 yd ball, so the gram figure is a practical conversion. Source
- Black — chunky chenille or #5 velvet — about 150–155 g for ears, patches, limbs, and stripe — Bernat Velvet Blackbird or similar. The source yardage is 160 yd black in a bulky panda sample, converted against the same 300 g / 315 yd ball data. Source
- Pink — DK, worsted, or embroidery-weight scrap — 2 g — any soft blush shade.
- Black embroidery yarn — 1 m — for the mouth line and nose shaping.
Tools
- Hook 5.0 mm for chunky chenille, or Hook 3.0 mm for DK scale. Cuddly Stitches lists 3.0 mm for DK and DIY Fluffies lists 5.0 mm for a chenille panda. Source
- 12–15 mm safety eyes; use embroidered eyes for toys intended for children under 3 or pets. The Woobles notes that safety eyes are measured in millimeters and are not safe for children younger than 3 or pets. Source
- Polyester stuffing, tapestry needle, locking stitch markers, pins, scissors, and black sewing thread for reinforcing facial parts.
Abbreviations
MR = magic ring; sc = single crochet; inc = 2 sc in next stitch; dec = invisible decrease over next 2 stitches; sl st = slip stitch; ch = chain; BLO = back loop only; FO = fasten off. Invisible decrease is made through the front loops of the next two stitches before the final yarn-over, which reduces holes on stuffed amigurumi fabric. Source
Pattern — Step by Step
Continuous spiral unless noted. The large parts use a 42-stitch plateau, which matches the uploaded chunky toy scale and the required large-size stitch rule.
Head
Yarn: white — Source: standard amigurumi math checked against 42-stitch gauge circle data.
R1: 6 sc in MR (6)
R2: inc ×6 (12)
R3: (sc, inc) ×6 (18)
R4: (2 sc, inc) ×6 (24)
R5: (3 sc, inc) ×6 (30)
R6: (4 sc, inc) ×6 (36)
R7: (5 sc, inc) ×6 (42)
R8–R15: sc around (42)
R16: (5 sc, dec) ×6 (36)
R17: (4 sc, dec) ×6 (30)
R18: (3 sc, dec) ×6 (24)
Place the safety eyes through the black eye patches before closing the head. For this scale, set the eyes between R10 and R11, about 9–10 stitches apart.
R19: (2 sc, dec) ×6 (18)
Stuff the head firmly, with extra stuffing at the lower cheeks.
R20: (sc, dec) ×6 (12)
R21: dec ×6 (6)
Fasten off. Weave through front loops and close.
Body
Yarn: white and black — Source: standard amigurumi math checked against published panda body construction using MR 6 and +6 growth.
R1: 6 sc in MR with white (6)
R2: inc ×6 (12)
R3: (sc, inc) ×6 (18)
R4: (2 sc, inc) ×6 (24)
R5: (3 sc, inc) ×6 (30)
R6: (4 sc, inc) ×6 (36)
R7: (5 sc, inc) ×6 (42)
R8–R10: sc around with white (42)
R11: change to black, sc around (42)
R12–R13: sc around with black (42)
R14: change to white, sc around (42)
R15–R16: sc around with white (42)
R17: (5 sc, dec) ×6 (36)
R18: (4 sc, dec) ×6 (30)
R19: (3 sc, dec) ×6 (24)
Stuff the base heavily so the panda sits flat.
R20: (2 sc, dec) ×6 (18)
R21: (sc, dec) ×6 (12)
R22: dec ×6 (6)
Fasten off. Close the top and leave a 30 cm tail for joining to the head.
Arms / Front Legs Make 2
Yarn: black — Source: standard amigurumi math; published panda patterns use black arms and separate limb construction.
R1: 6 sc in MR (6)
R2: inc ×6 (12)
R3: (sc, inc) ×6 (18)
R4–R6: sc around (18)
R7: (sc, dec) ×6 (12)
R8–R12: sc around (12)
Stuff only the lower half so the upper arm lies flat against the body.
R13: flatten opening, sc through both layers across (6)
Fasten off. Leave a 25 cm tail for sewing.
Back Legs Make 2
Yarn: black — Source: standard amigurumi math; panda leg references use a wider foot that narrows to a 12-stitch attachment.
R1: 6 sc in MR (6)
R2: inc ×6 (12)
R3: (sc, inc) ×6 (18)
R4: (2 sc, inc) ×6 (24)
R5–R7: sc around (24)
R8: (2 sc, dec) ×6 (18)
R9: (sc, dec) ×6 (12)
R10–R12: sc around (12)
Stuff the foot firmly and leave the top softer for a seated angle.
R13: dec ×6 (6)
Fasten off. Leave a 30 cm tail.
Ears Make 2
Yarn: black — Source: panda ear construction appears in published panda patterns with separate black ears.
R1: 6 sc in MR (6)
R2: inc ×6 (12)
R3: (sc, inc) ×6 (18)
R4–R5: sc around (18)
R6: (sc, dec) ×6 (12)
Do not overstuff. Flatten the base slightly to make a rounded cup.
Fasten off. Leave a 25 cm tail.
Black Eye Patches Make 2
Yarn: black — Source: standard flat-circle math plus verified 24-stitch eye-patch reference.
R1: 6 sc in MR (6)
R2: inc ×6 (12)
R3: (sc, inc) ×6 (18)
R4: (2 sc, inc) ×6 (24)
Sl st to first stitch. Fasten off with a 30 cm tail.
Block each circle into a slight oval with pins. Insert one safety eye through the upper center of each patch before final face sewing.
Pink Cheek Patches Make 2
Yarn: pink — Source: standard amigurumi flat-circle math.
R1: 6 sc in MR (6)
R2: inc ×6 (12)
Sl st to first stitch. Fasten off with a 20 cm tail.
These patches sit one round below the eye patches, toward the outer face.
Nose Oval and Mouth
Yarn: black — Source: standard small-circle amigurumi math.
R1: 6 sc in MR (6)
R2: inc ×6 (12)
Sl st to first stitch. Fasten off with a 20 cm tail.
Fold the circle into a shallow oval and stitch it between the eye patches. Embroider a short vertical line down from the nose, then two small curves for the mouth.
Mini Tail
Yarn: white — Source: panda tail inclusion verified in published low-sew panda pattern sections.
R1: 6 sc in MR (6)
R2: inc ×6 (12)
R3–R4: sc around (12)
R5: dec ×6 (6)
Fasten off. Leave a 20 cm tail.
The tail is hidden from the front view but gives the seated toy a finished back.
Assembly
- Pin the head to the closed top of the body with the face centered over the black chest band.
- Sew the head to the body using the 30 cm body tail, adding stuffing under the neck before the final stitches.
- Pin both black eye patches between R9 and R13 of the head, with 9–10 stitches between the eye stems.
- Attach the safety-eye washers only after both patches sit level from the front.
- Sew the nose oval between the patches, then embroider the mouth directly below it.
- Sew the pink cheek patches one round below the eye patches and slightly outward.
- Attach ears across R4–R7 of the head, curving each base toward the back.
- Sew arms to the side body at the black stripe, angled downward.
- Sew back legs to the lower front body so the feet face forward and touch the table.
- Attach the tail to the back center of the body, then weave all ends through stuffed sections.
The finished panda sits as a 21 cm chunky plush when worked in chenille at matching tension. Source
7 Technical Tips
- Stitch marker drift: A one-stitch drift by R10 moves the eye patches off center. Reset the marker at the back of the head after every increase round.
- Stuffing firmness: A soft body base causes the panda to roll backward. Pack the lower body until it resists finger pressure by about 50%.
- Invisible decrease holes: White stuffing can show through black limbs at R7 and R9. Work the dec through front loops only and pull the final yarn-over tight.
- Eye placement timing: Locked washers cannot be moved cleanly in chenille. Pin both eye patches first, insert both eyes, then attach washers only after the face is level.
- Velvet tension: A 5.0 mm hook can leave gaps if the yarn is loose. Drop to 4.5 mm when stuffing is visible between two adjacent sc stitches.
- Ear pinning: Ears sewn too far forward make the panda look like a mouse. Place the front edge no lower than R7 and angle the ear base backward.
- Tail weaving: Short tails can pull out of plush yarn. Leave at least 20 cm and weave through three separate stitch paths before trimming.
Conclusion
This chunky panda works because the face is planned before the limbs are attached. The eye patches set the species, the black stripe lowers the body visually, and the heavy back legs give the toy a seated base. Your next step is to crochet the two black eye patches first, pin them to the head, and confirm the 9–10 stitch spacing before locking the safety eyes. Save the finished panda amigurumi crochet pattern photo to Pinterest and post the front and side view on Instagram so the patch placement is visible. Hashtag: #ChunkyPandaPlush. Should the black chest band sit directly under the chin, or one round lower for a softer panda face?









