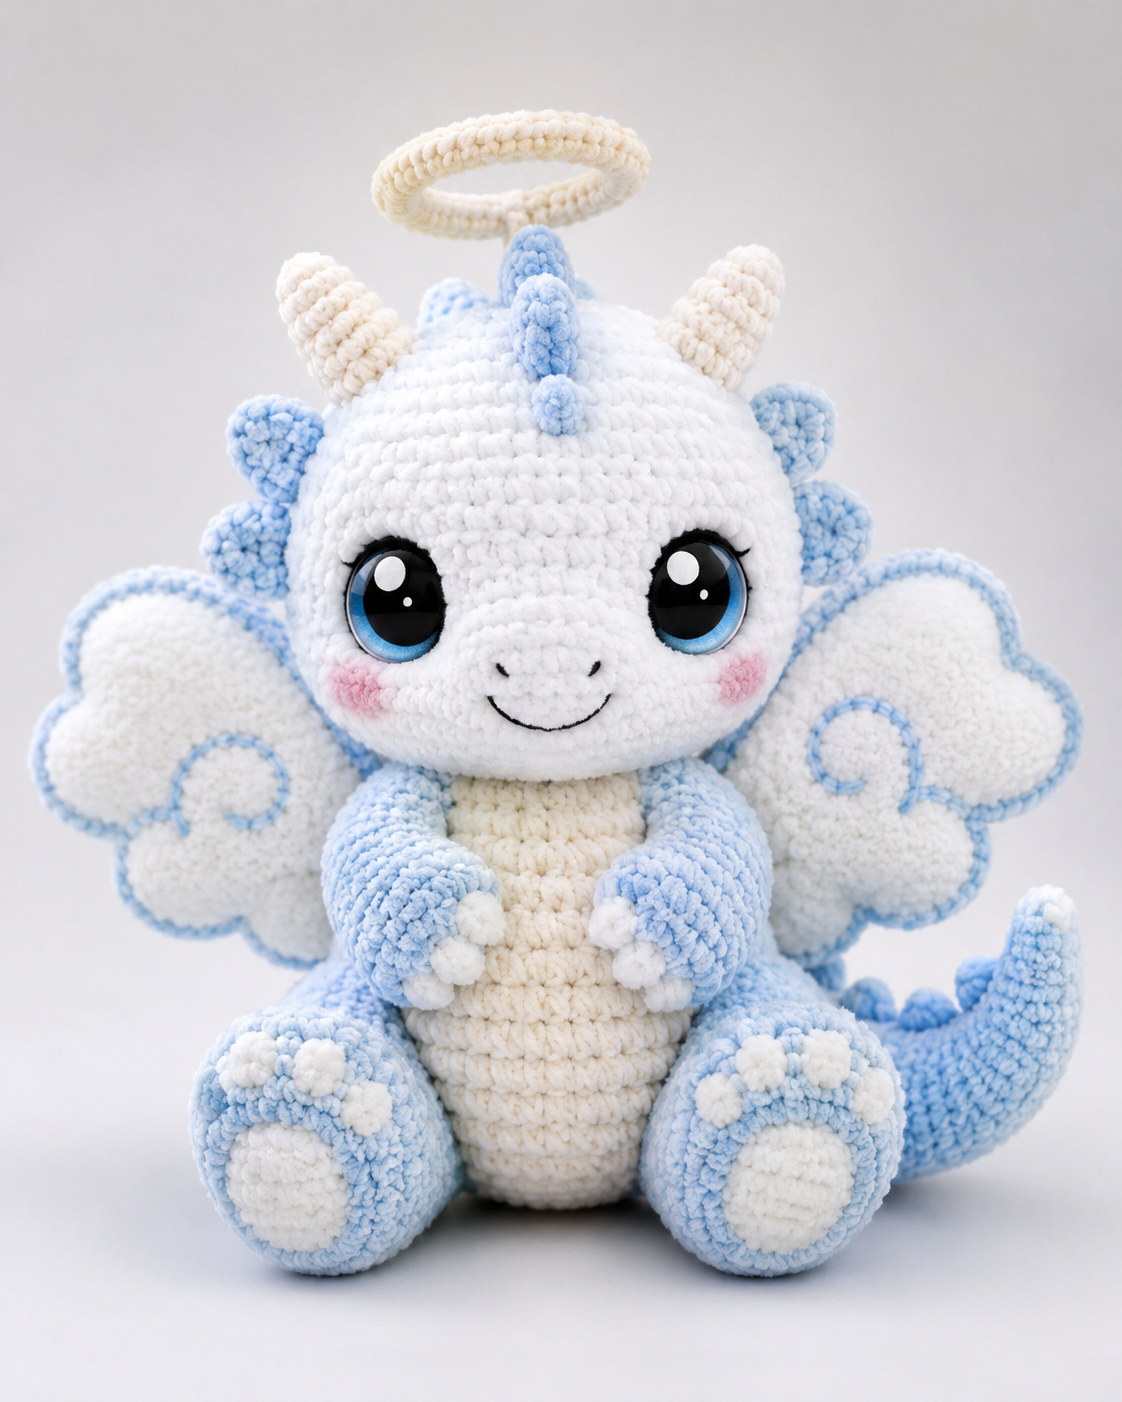
A dragon with a halo needs the ring to clear both horns, or the silhouette collapses into a plain plush dragon. This angel dragon amigurumi crochet pattern uses bulky velvet yarn, a 5 mm hook, 20 mm safety eyes, and a firm medium-large sitting form of about 20 cm. The skill level is intermediate because wings, halo, horns, and tail placement must be balanced for shelf display.
The Design: What Makes This Angel Dragon Different
This design starts with a wide white head and smaller blue body because the photo reads face-first. The head uses a 42-stitch plateau, while the body holds the same maximum briefly so the lower shape stays stable under the wings. A halo sits on a short post instead of being sewn flat; that gap keeps the horns visible and stops the ring from pulling the crown forward. The wings are not bat wings. They are cloud-lobed panels with blue edging and a stitched spiral, so this angel dragon amigurumi pattern needs flat-row shaping rather than only tubes. Many dragon crochet pattern errors happen at the face: makers place eyes after stuffing and then lose symmetry. Set eyes before closing the head, then embroider the nostrils and smile under the center line.
Project Info at a Glance
| Skill Level | Time | Finished Size | Hook | Best For |
|---|---|---|---|---|
| Intermediate | 8–10 hours | 20 cm sitting target | 5 mm | Display plush, fantasy décor, pattern testing |
Comparable sources show 20 cm dragon builds with sport cotton and 5 mm hooks for super bulky plush dragons, so this photo-matched version uses bulky velvet proportions rather than fine cotton proportions.
Materials and Tools
Yarn
- White — super bulky velvet/chenille — 65 g — Hobbii Honey Bunny, Himalaya Dolphin Baby, or similar
- Baby blue — super bulky velvet/chenille — 70 g — same yarn family
- Cream — super bulky velvet/chenille — 22 g — horns, belly, halo
- Pink — super bulky velvet/chenille or worsted doubled — 3 g — cheek patches
- Black embroidery thread — 50 cm — smile and nostrils
Comparable dragon patterns list 140 g as a main-color figure for a 20 cm sport-weight dragon and 137 g as a main-color figure for a worsted dragon, so the split white/blue photo version is planned with a similar total mass across its two dominant colors.
Tools
- Hook 5 mm
- 20 mm blue safety eyes, or embroidered eyes for a child under three
- Polyester stuffing
- Yarn needle
- Locking stitch markers
- Pins
- Scissors
- Black embroidery needle
Abbreviations
MR = magic ring; sc = single crochet; inc = increase; dec = decrease; sl st = slip stitch; ch = chain; BLO = back loop only; hdc = half double crochet; dc = double crochet.
Invisible decrease means inserting the hook through the front loops of the next two stitches before completing one sc, which reduces visible bars on velvet yarn.
Pattern — Step by Step
Continuous spiral unless noted. Counts appear in brackets.
Head
Yarn: white — Source: Standard amigurumi math.
R1: 6 sc in MR (6)
R2: inc ×6 (12)
R3: (sc, inc) ×6 (18)
R4: (2 sc, inc) ×6 (24)
R5: (3 sc, inc) ×6 (30)
R6: (4 sc, inc) ×6 (36)
R7: (5 sc, inc) ×6 (42)
R8–R15: sc around (42)
Insert 20 mm safety eyes between R10 and R11, 10 stitches apart. Place the face center between the eyes before locking washers.
R16: (5 sc, dec) ×6 (36)
R17: (4 sc, dec) ×6 (30)
R18: (3 sc, dec) ×6 (24)
Stuff firmly around the eye backs before the opening narrows.
R19: (2 sc, dec) ×6 (18)
R20: (sc, dec) ×6 (12)
R21: dec ×6 (6)
Fasten off. Leave 15 cm tail and close the final hole.
Body
Yarn: baby blue — Source: Standard amigurumi math.
R1: 6 sc in MR (6)
R2: inc ×6 (12)
R3: (sc, inc) ×6 (18)
R4: (2 sc, inc) ×6 (24)
R5: (3 sc, inc) ×6 (30)
R6: (4 sc, inc) ×6 (36)
R7: (5 sc, inc) ×6 (42)
R8–R10: sc around (42)
R11: (5 sc, dec) ×6 (36)
R12–R14: sc around (36)
R15: (4 sc, dec) ×6 (30)
R16–R17: sc around (30)
R18: (3 sc, dec) ×6 (24)
Stuff the lower body firmly so the dragon sits without leaning backward.
R19: (2 sc, dec) ×6 (18)
R20: (sc, dec) ×6 (12)
R21: dec ×6 (6)
Fasten off. Leave 25 cm tail for sewing to the head.
Belly Patch
Yarn: cream — Source: Standard amigurumi math.
R1: 6 sc in MR (6)
R2: inc ×6 (12)
R3: (sc, inc) ×6 (18)
R4: (2 sc, inc) ×6 (24)
R5: sc around (24)
Fasten off. Leave 30 cm tail. Flatten into a vertical oval before sewing to the body front.
Front Arms
Make 2. Yarn: baby blue — Source: Standard amigurumi math.
R1: 6 sc in MR (6)
R2: inc ×6 (12)
R3–R8: sc around (12)
R9: dec ×6 (6)
R10: sc around (6)
Do not overstuff. Fasten off and leave 20 cm tail for sewing.
Front Claw Dots
Make 6. Yarn: white — Source: Standard amigurumi math.
R1: 6 sc in MR (6)
Sl st to first sc (6)
Fasten off. Leave 10 cm tail. Sew three dots to the end of each front arm.
Back Legs
Make 2. Yarn: baby blue — Source: Standard amigurumi math.
R1: 6 sc in MR (6)
R2: inc ×6 (12)
R3: (sc, inc) ×6 (18)
R4–R6: sc around (18)
R7: (sc, dec) ×6 (12)
R8–R10: sc around (12)
R11: dec ×6 (6)
Stuff the foot end firmly and leave the upper end softer for sitting angle. Fasten off with 25 cm tail.
Foot Pads
Make 2. Yarn: cream — Source: Standard amigurumi math.
R1: 6 sc in MR (6)
R2: inc ×6 (12)
R3: (sc, inc) ×6 (18)
Fasten off. Leave 20 cm tail and sew one pad to the front face of each back foot.
Back Toe Dots
Make 6. Yarn: white — Source: Standard amigurumi math.
R1: 6 sc in MR (6)
Sl st to first sc (6)
Fasten off. Leave 10 cm tail. Sew three dots above each foot pad.
Wings
Make 2. Yarn: white panel with baby blue border — Source: Standard row shaping.
Ch 8. Work in rows.
Row 1: sc in 2nd ch from hook and across (7)
Row 2: ch 1, turn, inc, 5 sc, inc (9)
Row 3: ch 1, turn, sc across (9)
Row 4: ch 1, turn, inc, 7 sc, inc (11)
Row 5: ch 1, turn, sc across (11)
Row 6: ch 1, turn, inc, 9 sc, inc (13)
Row 7: ch 1, turn, sc across (13)
Change to baby blue.
Border: sc evenly around the full wing edge, placing 3 sc in each outer corner (42).
Surface detail: ch 14 (14), fasten off, then sew the chain as a loose spiral on the wing front.
Fasten off. Leave 35 cm tail for sewing.
Horns
Make 2. Yarn: cream — Source: Standard amigurumi math.
R1: 6 sc in MR (6)
R2–R5: sc around (6)
Stuff lightly with a yarn tail only. Fasten off with 20 cm tail.
Forehead Spikes
Make 3. Yarn: baby blue — Source: Standard amigurumi math.
R1: 6 sc in MR (6)
R2–R4: sc around (6)
Fasten off. Leave 15 cm tail. Make one taller center spike by adding R5: sc around (6).
Side Spikes
Make 2. Yarn: baby blue — Source: Standard amigurumi math.
R1: 6 sc in MR (6)
R2–R3: sc around (6)
Fasten off. Leave 15 cm tail. Flatten before sewing to the side of the head.
Tail
Yarn: white tip, then baby blue — Source: Standard amigurumi math.
R1: with white, 6 sc in MR (6)
R2: sc around (6)
R3: change to baby blue, sc around (6)
R4: inc ×6 (12)
R5–R7: sc around (12)
R8: (sc, inc) ×6 (18)
R9–R13: sc around (18)
R14: (sc, dec) ×6 (12)
R15–R16: sc around (12)
Stuff the base firmly and leave the tip soft enough to curve upward.
Fasten off with 30 cm tail.
Cheek Patches
Make 2. Yarn: pink — Source: Standard amigurumi math.
R1: 6 sc in MR (6)
R2: inc ×6 (12)
Fasten off. Leave 12 cm tail. Flatten hard before sewing under the eyes.
Muzzle Shape and Face Embroidery
Yarn: black embroidery thread — Source: photo-read placement.
Cut 35 cm black embroidery thread. Make two nostrils between R12 and R13, each one stitch wide. Make the smile as one shallow curve across R14, with the center point directly below the midpoint between the eyes. Anchor the thread inside the head and bury both ends.
Halo Ring
Yarn: cream — Source: Standard chain ring construction.
Ch 42. Join with sl st, taking care not to twist the chain (42).
R1: sc in each ch around (42)
R2: BLO sl st around (42)
Fasten off. Sew the two ends together with the tail for a rounded ring.
Halo Post
Yarn: baby blue — Source: Standard amigurumi math.
R1: 6 sc in MR (6)
R2–R8: sc around (6)
Insert a rolled yarn tail inside the tube. Fasten off with 25 cm tail. Sew the top to the halo ring and the base to the crown behind the center spike.
Assembly
- Sew the body to the underside of the head, centering the body under the eye midpoint.
- Sew the cream belly patch to the body front from R5 to R15 of the body.
- Attach the cheeks below the eyes, leaving one stitch between each patch and the smile.
- Sew the horns to the crown, one on each side of the halo post line.
- Sew the forehead spikes in a row between the horns, with the tallest spike at center.
- Attach the side spikes to the head sides, level with the lower edge of the eyes.
- Sew the front arms to the upper body, angled inward toward the belly patch.
- Sew the back legs to the lower body so the foot pads face forward and touch the table.
- Attach the wings to the back between body R8 and R15, then sew the tail below them at the center back.
- Sew the halo post to the crown and tack the halo ring once to the back of each horn if the ring tilts.
The finished dragon sits with the halo above the horns and the wings visible from the front.
7 Technical Tips
- Marker drift: If the marker leans more than 2 stitches after R8 of the head, the muzzle will skew. Move the marker to the visual back at the end of the round and write down the move.
- Stuffing firmness: Underfilled head fabric lets 20 mm eyes pucker inward after the washers lock. Add stuffing in small tufts until the head springs back but still compresses by about 5 mm.
- Invisible dec gaps: A normal decrease leaves visible bars on R16–R21 of the head. Work invisible dec through front loops only and pull the next sc tight.
- Eye placement timing: Late eye placement fails because the head opening is only 12 stitches at R20. Place and lock the eyes between R10 and R11 before the first decrease round.
- Velvet tension: Loose velvet tension creates holes beside the eye backs and around the belly patch seam. Keep the hook shaft close to the fabric and tighten every third stitch by 2–3 mm of yarn pull.
- Pinning wings: Unpinned wings often sit at different heights after sewing. Pin both wing tops to the same body round and check the front view before making the first seam.
- Tail weaving: A short tail end can work loose inside chenille after handling. Bury each sewing tail through at least 4 cm of stuffed fabric, reverse once, then trim the end close.
Conclusion
Block the wings flat before the final seam so the blue spiral stays visible from the front. The next practical step is to crochet the head and body first, weigh the remaining white and blue yarn, then make the halo only after both horns are pinned. That order keeps the top clearance measurable instead of guessed. Save this angel dragon amigurumi crochet pattern to Pinterest with a front-view photo and post the finished shelf pose on Instagram with #HaloAngelDragon. For pattern testing notes, record eye round, horn spacing, and halo post height. Which halo height gives your dragon the cleanest gap above the cream horns: 3 cm, 4 cm, or 5 cm?









