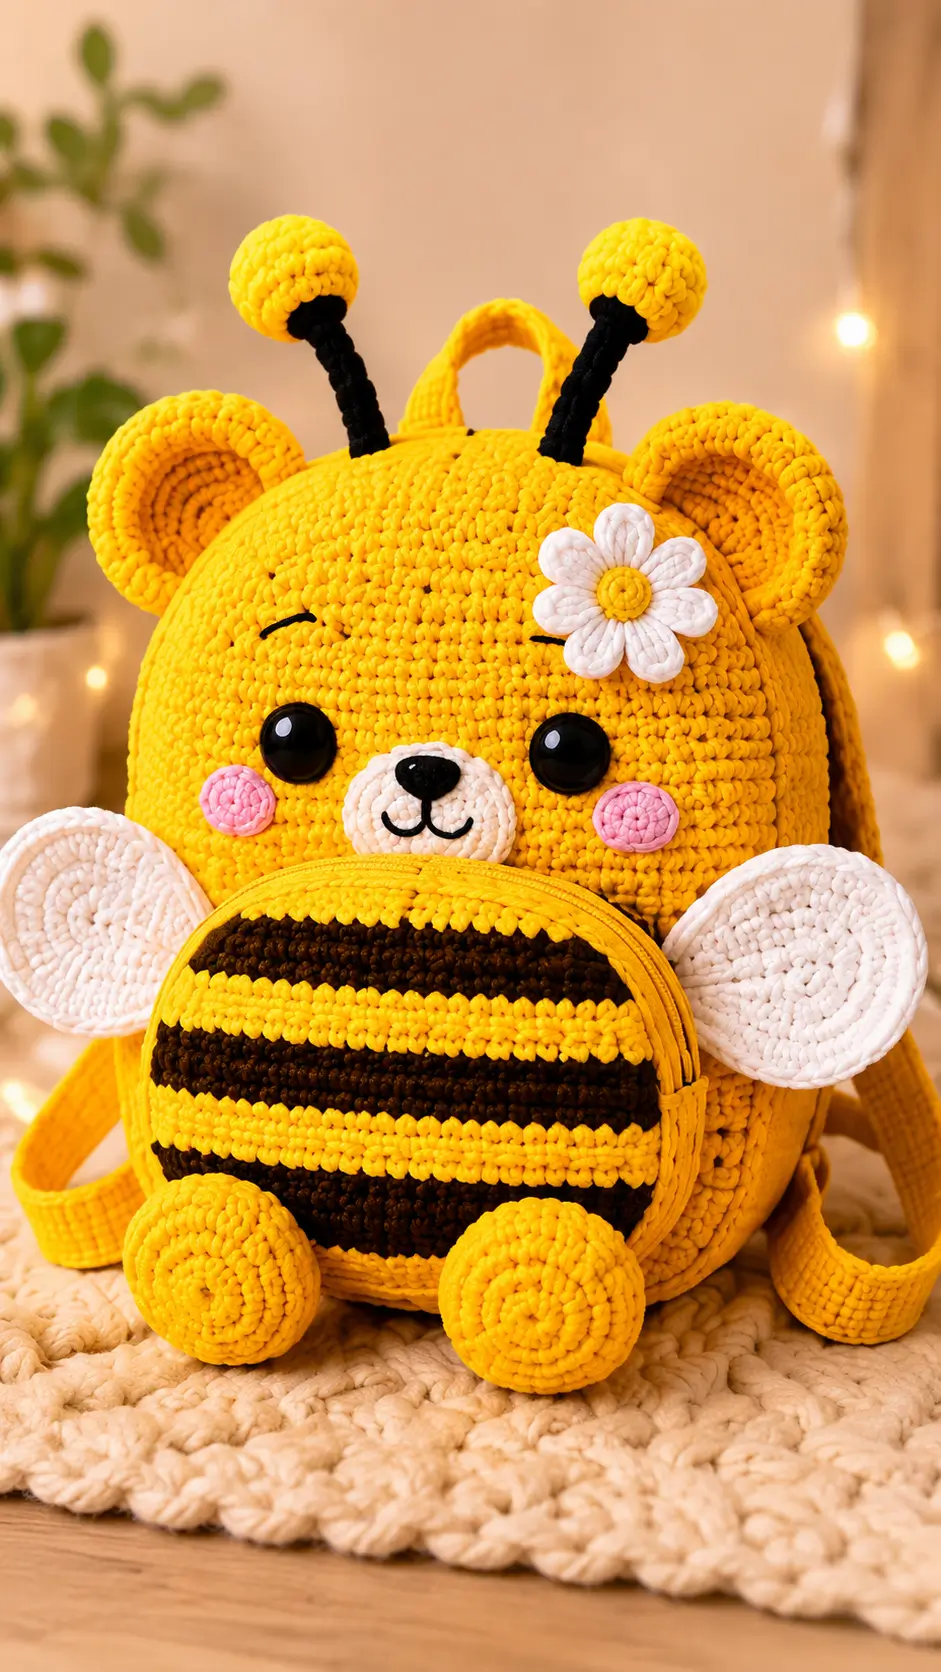
Bee bears need two silhouettes at once: round mammal ears above a striped insect abdomen. This bee bear amigurumi crochet pattern builds that split form with bulky yellow yarn, black bands, white wings, a muzzle, antennae, pink cheeks, and a daisy. Use a 5.5 mm hook for a 25 cm display backpack form at intermediate level. The pouch line gives the toy a practical bag reference without changing the face proportions.
The Design: What Makes Bee Bear Different
A crochet bee bear backpack fails when the bear head reads as a loose mask instead of the upper half of the toy. Set the ears wide and low, then keep the antennae higher than the ear rims so the bee identity stays clear. The striped body is treated as a rounded pouch because black bands across a sphere look wider at the center and narrower near the decreases. One common maker mistake is placing wings too high; they should sit behind the stripe transition, not behind the cheeks. This bee bear crochet pattern also uses flat cheek patches instead of embroidered blush because bulky yarn can swallow short pink stitches. The amigurumi bee backpack effect comes from the zipper band, handle, and straps after the main shapes are stable.
Project Info at a Glance
| Skill Level | Time | Finished Size | Hook | Best For |
|---|---|---|---|---|
| Intermediate | Not source-stated | 25 cm target | 5.5 mm | Display backpack styling, shelf toy, photo prop |
Materials and Tools
Yarn
- Yellow — weight 6 bulky / chenille-style plush — 200–213 g — Premier Parfait Chunky, Hobbii Honey Bunny, or similar.
- Black — weight 6 bulky / chenille-style plush — 60–71 g — use for stripes and antenna stems.
- White — weight 6 bulky or smooth #4 cotton — 45–71 g — use for wings, muzzle, and flower petals.
- Pink — #4 cotton or small plush scrap — 5 g — use for cheek patches.
- Flower center yellow — scrap — 2 g — use a smaller hook for the daisy if the petals look oversized.
Backpack-scale yarn quantity is based on a bee backpack source requiring three yellow skeins and one each in black and white; the listed Sugar’n Cream solid skeins are 71 g, but this article adapts the form for bulky plush yarn.
Tools
- Hook 5.5 mm
- 15 mm safety eyes, or 18 mm for a larger photo-style face
- Fiberfill stuffing
- Yarn needle
- Stitch markers
- Pins
- Scissors
- Optional yellow zipper, 18–22 cm, for a decorative front line
- Black embroidery floss for brow curves, nose, and mouth
Abbreviations
MR = magic ring; sc = single crochet; inc = increase; dec = decrease; sl st = slip stitch; ch = chain; BLO = back loop only; FLO = front loop only; hdc = half double crochet; bobble = 4 unfinished hdc worked into one stitch and closed together. For invisible decrease, insert the hook through the front loops of the next two stitches before completing one single crochet, so the decrease line stays flat.
Pattern — Step by Step
Continuous spiral unless noted.
Head Make 1
Yarn: yellow — Source: Standard amigurumi math; comparable bee bear head source uses 6 sc to 42 sts, then closes down to 6 sts.
R1: 6 sc in MR (6)
R2: inc ×6 (12)
R3: (sc, inc) ×6 (18)
R4: (2 sc, inc) ×6 (24)
R5: (3 sc, inc) ×6 (30)
R6: (4 sc, inc) ×6 (36)
R7: (5 sc, inc) ×6 (42)
R8–R18: sc around (42)
R19: (5 sc, dec) ×6 (36)
R20: (4 sc, dec) ×6 (30)
R21: (3 sc, dec) ×6 (24)
R22: (2 sc, dec) ×6 (18)
R23: (sc, dec) ×6 (12)
R24: dec ×6 (6)
Place eyes between R14 and R15, 9 stitches apart. Add stuffing firmly before R22.
Fasten off. Leave 35 cm tail.
Body / Striped Pouch Make 1
Yarn: yellow and black — Source: Standard 6-stitch sphere math; bee sources confirm striped color changes and 6-stitch starts.
R1: yellow, 6 sc in MR (6)
R2: inc ×6 (12)
R3: (sc, inc) ×6 (18)
R4: (2 sc, inc) ×6 (24)
R5: (3 sc, inc) ×6 (30)
R6: (4 sc, inc) ×6 (36)
R7: (5 sc, inc) ×6 (42)
R8–R9: black, sc around (42)
R10–R11: yellow, sc around (42)
R12–R13: black, sc around (42)
R14–R15: yellow, sc around (42)
R16–R17: black, sc around (42)
R18: yellow, sc around (42)
R19: yellow, (5 sc, dec) ×6 (36)
R20: yellow, (4 sc, dec) ×6 (30)
R21: yellow, (3 sc, dec) ×6 (24)
R22: yellow, (2 sc, dec) ×6 (18)
R23: yellow, (sc, dec) ×6 (12)
R24: yellow, dec ×6 (6)
Stuff firmly through R21. Keep the final black stripe centered on the front.
Fasten off. Leave 40 cm tail.
Front Legs / Round Feet Make 2
Yarn: yellow — Source: Standard amigurumi math.
R1: 6 sc in MR (6)
R2: inc ×6 (12)
R3: (sc, inc) ×6 (18)
R4–R5: sc around (18)
R6: (sc, dec) ×6 (12)
R7: dec ×6 (6)
Stuff lightly. Flatten the back edge before sewing.
Fasten off. Leave 25 cm tail.
Back Legs / Side Support Pads Make 2
Yarn: yellow — Source: Standard amigurumi math.
R1: 6 sc in MR (6)
R2: inc ×6 (12)
R3–R4: sc around (12)
R5: dec ×6 (6)
These sit partly behind the lower body and stop the pouch from rolling backward.
Fasten off. Leave 20 cm tail.
Ears Make 2
Yarn: yellow — Source: Standard amigurumi math; bear sources confirm separate round ears.
R1: 6 sc in MR (6)
R2: inc ×6 (12)
R3: (sc, inc) ×6 (18)
R4: (2 sc, inc) ×6 (24)
R5–R6: sc around (24)
Do not stuff. Fold the bottom edge into a shallow cup.
Fasten off. Leave 30 cm tail.
Inner Ear Circles Make 2
Yarn: yellow in a slightly darker shade, or the same yellow — Source: Standard flat-circle math.
R1: 6 sc in MR (6)
R2: inc ×6 (12)
R3: (sc, inc) ×6 (18)
Slip stitch to finish. Sew inside each ear before attaching the ear to the head.
Fasten off. Leave 18 cm tail.
Wings Make 2
Yarn: white — Source: Bee patterns commonly use separate white wings.
R1: 6 sc in MR (6)
R2: inc ×6 (12)
R3: (sc, inc) ×6 (18)
R4: (2 sc, inc) ×6 (24)
R5–R6: sc around (24)
R7: (2 sc, dec) ×6 (18)
R8: (sc, dec) ×6 (12)
Do not stuff. Flatten each wing into an oval and sew through both layers.
Fasten off. Leave 30 cm tail.
Antennae Make 2
Yarn: black for stem, yellow for bobble — Source: Bee and bee bear sources confirm antennae as separate parts.
Bobble:
R1: yellow, 6 sc in MR (6)
R2: inc ×6 (12)
R3–R4: sc around (12)
R5: dec ×6 (6)
Stuff the bobble with a pea-sized amount of fiberfill.
Stem:
Row 1: black, ch 8, sc in second ch from hook and across (7)
Row 2: ch 1, turn, BLO sc across (7)
Roll the stem into a narrow tube and whipstitch the long edge. Sew the bobble to one end.
Fasten off. Leave 25 cm tail.
Muzzle / Snout Make 1
Yarn: white — Source: Standard flat-circle math.
R1: 6 sc in MR (6)
R2: inc ×6 (12)
R3: (sc, inc) ×6 (18)
R4: sc around (18)
Flatten. Embroider a black oval nose across the top third, then stitch a short vertical line and two mouth curves.
Fasten off. Leave 25 cm tail.
Cheek Patches Make 2
Yarn: pink — Source: Standard flat-circle math.
R1: 6 sc in MR (6)
R2: inc ×6 (12)
R3: (sc, inc) ×6 (18)
Use thinner yarn if the patches touch the muzzle.
Fasten off. Leave 15 cm tail.
Daisy Flower Applique Make 1
Yarn: yellow center and white petals — Source: Standard applique construction.
Center:
R1: yellow, 6 sc in MR (6)
R2: inc ×6 (12)
Sl st to first stitch.
Petals:
Join white in any stitch. Repeat 6 times: ch 5, sc in second ch from hook, hdc in next 2 ch, sc in last ch, sl st in next center stitch.
Block the petals flat with pins before sewing to the head.
Fasten off. Leave 20 cm tail.
Zipper Band, Handle, and Straps
Yarn: yellow — Source: Backpack comparison confirms zipper and strap features in bee backpack patterns.
Zipper band:
Row 1: ch 50, sc in second ch from hook and across (49)
Row 2: ch 1, turn, sc across (49)
Row 3: ch 1, turn, sc across (49)
Handle:
Row 1: ch 26, sc in second ch from hook and across (25)
Row 2: ch 1, turn, sc across (25)
Straps Make 2:
Row 1: ch 54, sc in second ch from hook and across (53)
Row 2: ch 1, turn, sc across (53)
For a decorative zipper, sew the crochet band first, then stitch the zipper tape on top without cutting the body stitches.
Fasten off. Leave 25 cm tails on each strap.
Assembly
- Sew the head to the upper front of the striped body, matching the head centerline to the body stripe join.
- Attach the ears between head R5 and R10, with 7–8 visible stitches between the inner edges.
- Sew the muzzle between head R15 and R19, centered between the safety eyes.
- Add cheek patches beside the muzzle, one round lower than the eye line.
- Stitch the black brow curves above each eye using two short embroidery passes.
- Sew front feet to the lower front of the body at R19–R22, spaced 8 stitches apart.
- Attach back support pads behind the front feet at the lower side seams.
- Sew wings to the back of the striped body across R10–R15, angled slightly outward.
- Attach antennae at head R4–R6, then sew the daisy above the right eye area.
- Stitch the zipper band across the front curve, then sew the handle and straps to the back.
The finished piece is a 25 cm bee bear display backpack form with all visible photo parts represented.
7 Technical Tips
- Marker drift: If the color-change seam moves more than 4 stitches from the side, the black bands will slant across the pouch. Move the marker one stitch left or right at the end of a yellow round to keep the stripe join hidden.
- Stuffing firmness: Under-stuffing makes the muzzle cave inward after the eyes are locked. Pack the head until it resists light thumb pressure, then add a final ring of stuffing before R22.
- Invisible decrease ridge: Standard decreases on R19–R24 can leave six raised spokes across the head and body. Use front-loop invisible decreases on every closing round.
- Eye placement timing: Install the eyes between R14 and R15 before closing the head past 18 stitches. A 9-stitch gap gives the muzzle space without pushing the cheeks off-center.
- Velvet tension: A 5.5 mm hook works for many weight 6 plush yarns, but gaps appear fast near black stripes. Drop to 5.0 mm if stuffing shows between stitches.
- Pinning wings: Wings that differ by more than one round in height make the backpack look tilted. Pin both wing tops to the same body round before sewing the first stitch.
- Tail weaving: Strap joins fail when the yarn tail is buried once through plush fabric. Weave each 20–25 cm tail through five separate stitch paths, then knot under the strap base.
Conclusion
Block the daisy and wings before final photos, because bulky yarn twists small flat pieces after sewing. Save this bee bear amigurumi crochet pattern as the base pattern, then test the face with pins before committing the muzzle, cheeks, and flower. Share the finished bee bear backpack on Pinterest and Instagram with the front zipper band visible. Use hashtag #BeeBearBackpack so the stripe layout and antenna placement are easy to compare. Ask one project-specific question in the caption: should the next bee bear use round teddy ears, larger insect wings, or a real working zipper pocket?









