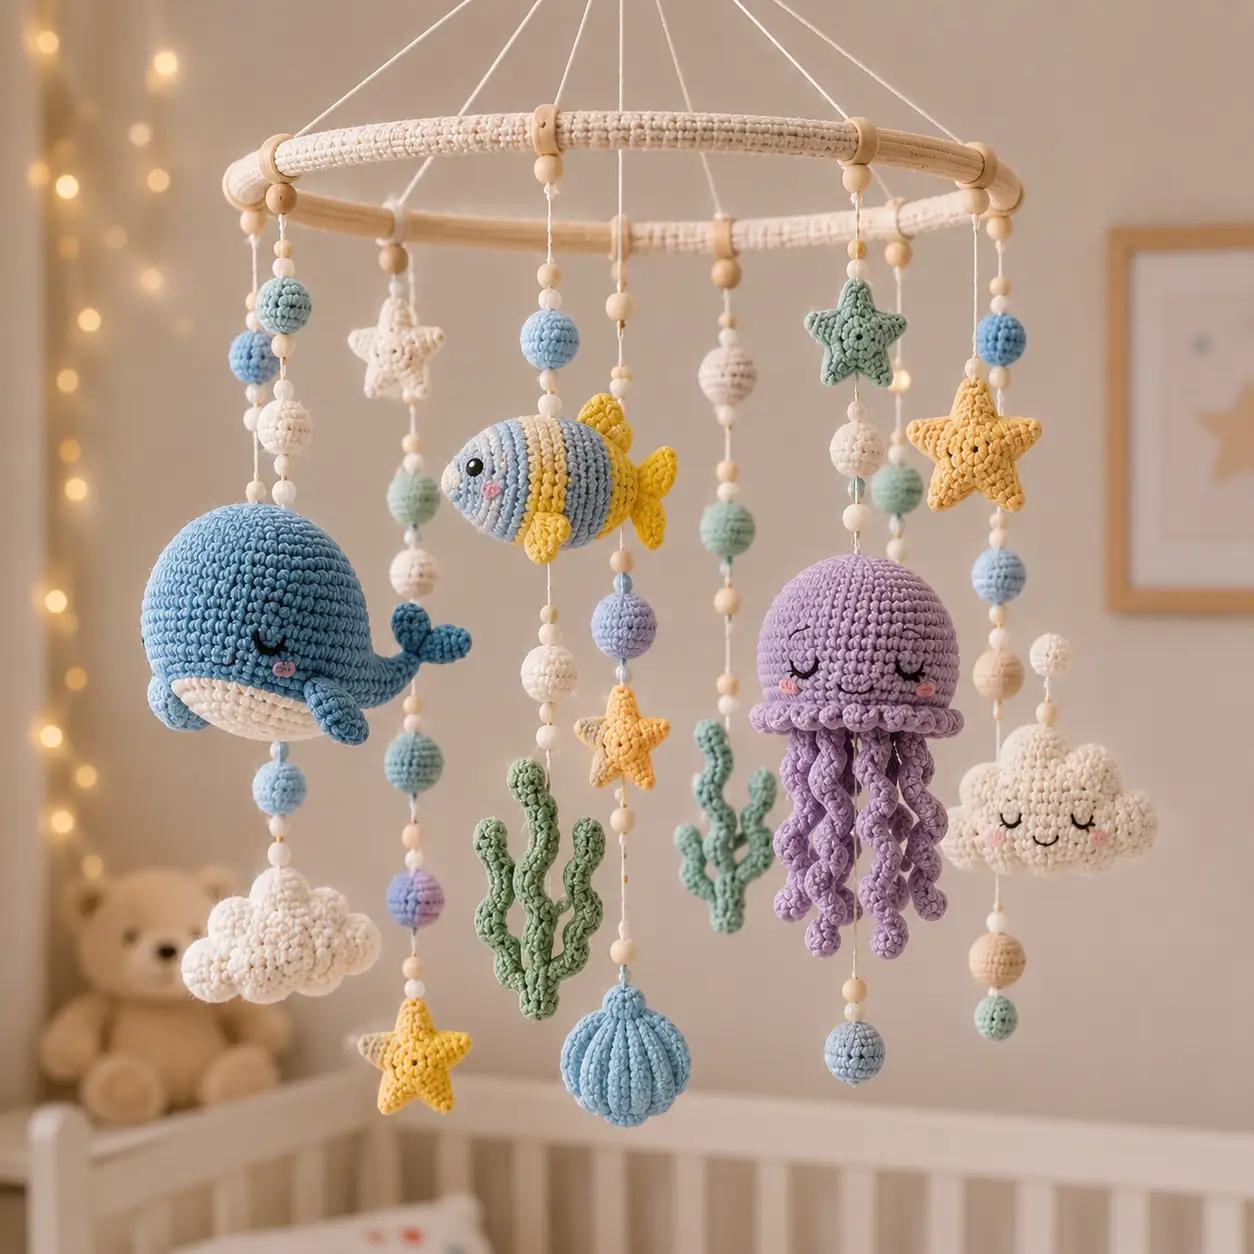
A whale needs its tail weight opposite the jellyfish dome, or the ring tilts. This ocean baby mobile amigurumi pattern uses DK cotton, a 2.5–3.0 mm hook, and 6–8 mm eyes to make a 40–45 cm hanging mobile. The skill level is intermediate because the project combines compact shaping, color changes, suspended balance, and several small ornaments for matched nursery décor.
The Design: What Makes This Ocean Mobile Different
The photo is not a single toy. It is a suspended sea creatures amigurumi mobile, so weight distribution matters as much as stitch count. You build the jellyfish as the visual center because its dome and tentacles create the lowest vertical line. The maker then places the whale and fish on outer cords to counter the center drop. A flat-belly whale keeps the silhouette readable from below, while the striped fish uses color bands instead of embroidery for scale. Clouds and stars add volume above the animals, giving the under the sea crochet mobile a softer nursery shape. The common mistake is making every ornament the same size. That causes crowding. The larger jellyfish, medium whale, and small stars need separate plateaus.
Project Info at a Glance
| Skill Level | Time | Finished Size | Hook | Best For |
|---|---|---|---|---|
| Intermediate | Piece-count project | 40–45 cm total height | 2.5–3.0 mm | Nursery hanging décor, baby shower display, ocean-themed room |
Materials and Tools
Yarn
- Pastel blue — DK cotton — 60 g — Paintbox Cotton DK or similar
- Soft blue — DK cotton — 30 g — for whale and beads
- Lavender — DK cotton — 25 g — for jellyfish
- Cream / white — DK cotton — 15 g — clouds, whale belly, fish stripes
- Yellow — DK cotton — 20 g — fish tail and stars
- Mint green — DK cotton — 12 g — coral and seaweed pieces
- Pink — DK cotton — small amount — cheek patches
- Black embroidery thread — small amount — sleepy eyes and smiles
Tools
- Hook 2.5–3.0 mm
- 6–8 mm safety eyes for whale and fish, or embroidered eyes for a baby mobile
- Fiberfill stuffing
- Tapestry needle
- Locking stitch markers
- Wooden or bamboo hoop, 25–28 cm
- Strong cotton cord or nylon hanging thread
- Straight pins for layout
- Ruler for cord spacing
Abbreviations
MR / magic ring, sc / single crochet, inc / 2 sc in one stitch, dec / invisible decrease, sl st / slip stitch, ch / chain, BLO / back loop only, hdc / half double crochet, FO / fasten off. Invisible decrease is worked through the front loops of the next two stitches so the closing rounds do not show gaps.
Pattern — Step by Step
Continuous spiral unless noted. Every closed amigurumi part starts with 6 sc in MR. Small ornaments plateau at 30 stitches; the jellyfish dome uses a medium 36-stitch plateau.
Jellyfish Head and Body Dome Make 1
Yarn: lavender
R1: 6 sc in MR (6)
R2: inc ×6 (12)
R3: (1 sc, inc) ×6 (18)
R4: (2 sc, inc) ×6 (24)
R5: (3 sc, inc) ×6 (30)
R6: (4 sc, inc) ×6 (36)
R7–R10: sc around (36)
R11: (4 sc, dec) ×6 (30)
R12: (3 sc, dec) ×6 (24)
R13: BLO (2 sc, dec) ×6 (18)
R14: (1 sc, dec) ×6 (12)
R15: dec ×6 (6)
Add embroidered sleepy eyes between R8 and R9, about 7 stitches apart. Stuff before R14.
Fasten off. Leave 20 cm tail and close the final hole.
Jellyfish Frill Make 1
Yarn: lavender
Attach yarn to the front loops left from R13.
R1: (sl st in next st, ch 2, 2 hdc in next st, sl st in next st) repeat around the 18 front loops (18 base loops used).
The frill should sit close to the lower edge, not flare wider than the dome.
Fasten off. Leave 10 cm tail and weave into the underside.
Jellyfish Tentacles Make 9
Yarn: lavender
Short tentacle, make 3: ch 17; starting in second ch from hook, 3 sc in each ch (48)
Medium tentacle, make 4: ch 21; starting in second ch from hook, 3 sc in each ch (60)
Long tentacle, make 2: ch 25; starting in second ch from hook, 3 sc in each ch (72)
Attach tentacles under R14 and R15. Vary the lengths so the lower edge does not form a hard line.
Fasten off each strand with a 12 cm sewing tail.
Whale Head and Body Oval Make 1
Yarn: soft blue and cream
R1: 6 sc in MR with soft blue (6)
R2: inc ×6 (12)
R3: (1 sc, inc) ×6 (18)
R4: (2 sc, inc) ×6 (24)
R5: (3 sc, inc) ×6 (30)
R6: sc 9 blue, sc 12 cream, sc 9 blue (30)
R7: sc 9 blue, sc 12 cream, sc 9 blue (30)
R8: sc 8 blue, sc 14 cream, sc 8 blue (30)
R9: sc 9 blue, sc 12 cream, sc 9 blue (30)
R10: (3 sc, dec) ×6, keeping the lower 10 stitches cream (24)
R11: (2 sc, dec) ×6 (18)
R12: (1 sc, dec) ×6 (12)
R13: dec ×6 (6)
Insert 6–8 mm eyes between R7 and R8, 8 stitches apart, or embroider them. Stuff firmly, with more stuffing toward the head end.
Fasten off. Leave 25 cm tail.
Whale Front Flippers Make 2
Yarn: soft blue
R1: 6 sc in MR (6)
R2: inc ×6 (12)
R3: sc around (12)
R4: dec ×6 (6)
Do not stuff. Flatten each flipper into a teardrop.
Fasten off. Leave 18 cm tail.
Whale Back Tail Flukes Make 2
Yarn: soft blue
R1: 6 sc in MR (6)
R2: inc ×6 (12)
R3: sc around (12)
R4: dec ×6 (6)
Flatten both flukes and sew them side by side at the narrow end of the whale body.
Fasten off. Leave 20 cm tail.
Striped Fish Body Make 1
Yarn: pastel blue, cream, yellow
R1: 6 sc in MR with pastel blue (6)
R2: inc ×6 (12)
R3: (1 sc, inc) ×6 (18)
R4: (2 sc, inc) ×6 (24)
R5: (3 sc, inc) ×6 (30)
R6: sc around in pastel blue (30)
R7: sc around in cream (30)
R8: sc around in pastel blue (30)
R9: sc around in yellow (30)
R10: sc around in pastel blue (30)
R11: (3 sc, dec) ×6 (24)
R12: (2 sc, dec) ×6 (18)
R13: (1 sc, dec) ×6 (12)
R14: dec ×6 (6)
Place eyes between R6 and R7 before closing. Stuff lightly so the fish stays oval, not round.
Fasten off. Leave 18 cm tail.
Fish Side Fins or Wings Make 2
Yarn: yellow
R1: 6 sc in MR (6)
R2: inc ×6 (12)
R3: sc around (12)
R4: dec ×6 (6)
Flatten and sew one fin on each side at R8–R10 of the fish body.
Fasten off. Leave 15 cm tail.
Fish Tail Flukes Make 2
Yarn: yellow
R1: 6 sc in MR (6)
R2: inc ×6 (12)
R3: sc around (12)
R4: dec ×6 (6)
Pin both flukes in a V shape before sewing to the final fish round.
Fasten off. Leave 18 cm tail.
Cheek Patches Make 6
Yarn: pink
R1: 6 sc in MR (6)
Sl st to first sc (6).
Use two patches for the whale, two for the fish, and two for one cloud. Sew with matching thread if the patch edge looks heavy.
Fasten off. Leave 10 cm tail on each patch.
Puffy Clouds Make 2
Yarn: cream
Large lobes, make 4 total:
R1: 6 sc in MR (6)
R2: inc ×6 (12)
R3: (1 sc, inc) ×6 (18)
R4: sc around (18)
R5: (1 sc, dec) ×6 (12)
R6: dec ×6 (6)
Small lobes, make 6 total:
R1: 6 sc in MR (6)
R2: inc ×6 (12)
R3: sc around (12)
R4: dec ×6 (6)
For each cloud, sew two large lobes and three small lobes into a scalloped horizontal cluster. Add sleepy embroidered eyes before final joining.
Fasten off. Leave 20 cm tail on the last lobe of each cloud.
Five-Point Stars Make 4
Yarn: yellow and mint
Make 2 panels per star.
R1: 6 sc in MR (6)
R2: inc ×6 (12)
R3: (1 sc, inc) ×6 (18)
R4: (2 sc, inc) ×6 (24)
R5: (3 sc, inc) ×6 (30)
Point 1: work 6 sc, turn (6); dec, 2 sc, dec (4); dec ×2 (2); dec (1)
Point 2: join yarn to next unused stitch group; repeat point rows (1)
Point 3: repeat across next 6-stitch group (1)
Point 4: repeat across next 6-stitch group (1)
Point 5: repeat across final 6-stitch group (1)
Hold two panels wrong sides together and sc around the edge. Add a pinch of stuffing before closing the fifth point.
Fasten off. Leave 18 cm tail for hanging.
Branch Coral Make 2
Yarn: mint green
Main stem:
R1: 6 sc in MR (6)
R2–R12: sc around (6)
Branch A: ch 10, sl st in second ch from hook and across, sl st back into stem (9 sl sts)
Branch B: ch 8, sl st in second ch from hook and across, sl st back into stem (7 sl sts)
Branch C: ch 6, sl st in second ch from hook and across, sl st back into stem (5 sl sts)
Curve the stem while sewing so the coral does not hang as a straight stick.
Fasten off. Leave 18 cm tail.
Ribbed Shell Make 1
Yarn: pastel blue
R1: 6 sc in MR (6)
R2: inc ×6 (12)
R3: (1 sc, inc) ×6 (18)
R4: (2 sc, inc) ×6 (24)
R5: (3 sc, inc) ×6 (30)
R6–R7: BLO sc around (30)
R8: (3 sc, dec) ×6 (24)
R9: (2 sc, dec) ×6 (18)
R10: (1 sc, dec) ×6 (12)
R11: dec ×6 (6)
Surface slip stitch from top to base along six vertical channels to form shell ribs. Stuff lightly before R10.
Fasten off. Leave 20 cm tail.
Hanging Balls Make 14
Yarn: pastel blue, cream, mint, lavender
R1: 6 sc in MR (6)
R2: inc ×6 (12)
R3: sc around (12)
R4: dec ×6 (6)
Stuff with a pea-sized amount of fiberfill. Close tightly so the cord hole does not widen.
Fasten off. Leave no sewing tail unless the ball will be tied directly to a strand.
Wrapped Hoop and Hanging Cords Make 1
Material: wooden or bamboo hoop, cotton cord, leftover yarn
Wrap the hoop with cream yarn until no wood shows.
Cut four top suspension cords at 55 cm each.
Cut eight ornament cords between 22 and 42 cm.
Tie the jellyfish to the center line.
Place whale, fish, clouds, stars, coral, shell, and balls on alternating outer strands.
Check balance before trimming knots. A mobile can look centered on the table and still tilt once lifted.
Fasten off by knotting each cord twice and burying the knot inside a crochet ball when possible.
Assembly
- Close the jellyfish head first, then attach the frill and tentacles underneath.
- Finish the whale body and fish body before sewing any fins so the oval shape can be judged flat on the table.
- Add eyes, cheeks, and embroidered mouths while the pieces can still be held without pulling on cords.
- Sew the whale flippers to the lower side curve and the tail flukes to the narrow end.
- Sew the fish fins at the yellow stripe line and place the tail flukes in a narrow V.
- Join cloud lobes into two uneven clusters, then add sleepy eyes and cheek patches.
- Join star panels, stuff each point lightly, and close all points with no gaps.
- Shape coral stems, rib the shell, and make the hanging balls in mixed colors.
- Wrap the hoop, tie the center jellyfish first, then balance the whale opposite the heavier cloud or shell strand.
- Add the remaining stars, balls, coral, and fish, then trim all cords after the mobile hangs level.
The completed mobile measures about 40–45 cm from top knot to lowest tentacle when matched to the verified size range.
7 Technical Tips
- Stitch marker drift: Move the marker every round on the jellyfish dome, not every few rounds. A one-stitch drift at R10 shifts the face off center by about 5 mm.
- Stuffing firmness: Fill the whale to about 80% firmness before closing R12. Overstuffing makes the cream belly bulge below the blue edge.
- Invisible decrease holes: Work decreases through front loops only on R11–R15 of the jellyfish. Standard decreases leave visible diagonal gaps on pale lavender yarn.
- Eye placement timing: Place safety eyes before R11 on the whale and before R12 on the fish. After the decrease rounds, the washer angle becomes difficult to set flat.
- Velvet tension risk: If substituting velvet yarn, drop one hook size and test a 30-stitch ball first. Loose velvet tension can add 1–2 cm per ornament and disturb the ring balance.
- Pinning measurement: Pin every hanging cord at four equal hoop points before knotting. A 1 cm difference between opposite cords can tilt the mobile toward the whale.
- Tail weaving length: Leave at least 15–20 cm tails on fins, flukes, stars, and clouds. Shorter tails can pull free when the ornament rotates on its cord.
Conclusion
Use the verified 40–45 cm hanging size as the layout target, then adjust cord length only after every ornament is tied on. The next step is a dry balance test: suspend the wrapped hoop from one hook, move the whale and shell strands in 1 cm increments, and mark the final knot positions with removable stitch markers. Save this ocean baby mobile amigurumi pattern to Pinterest, then post the finished ring layout on Instagram before trimming cords so the balance work is visible. Use #OceanBabyMobile. Which strand gives your whale the cleanest counterweight: the star strand or the ribbed shell strand?









