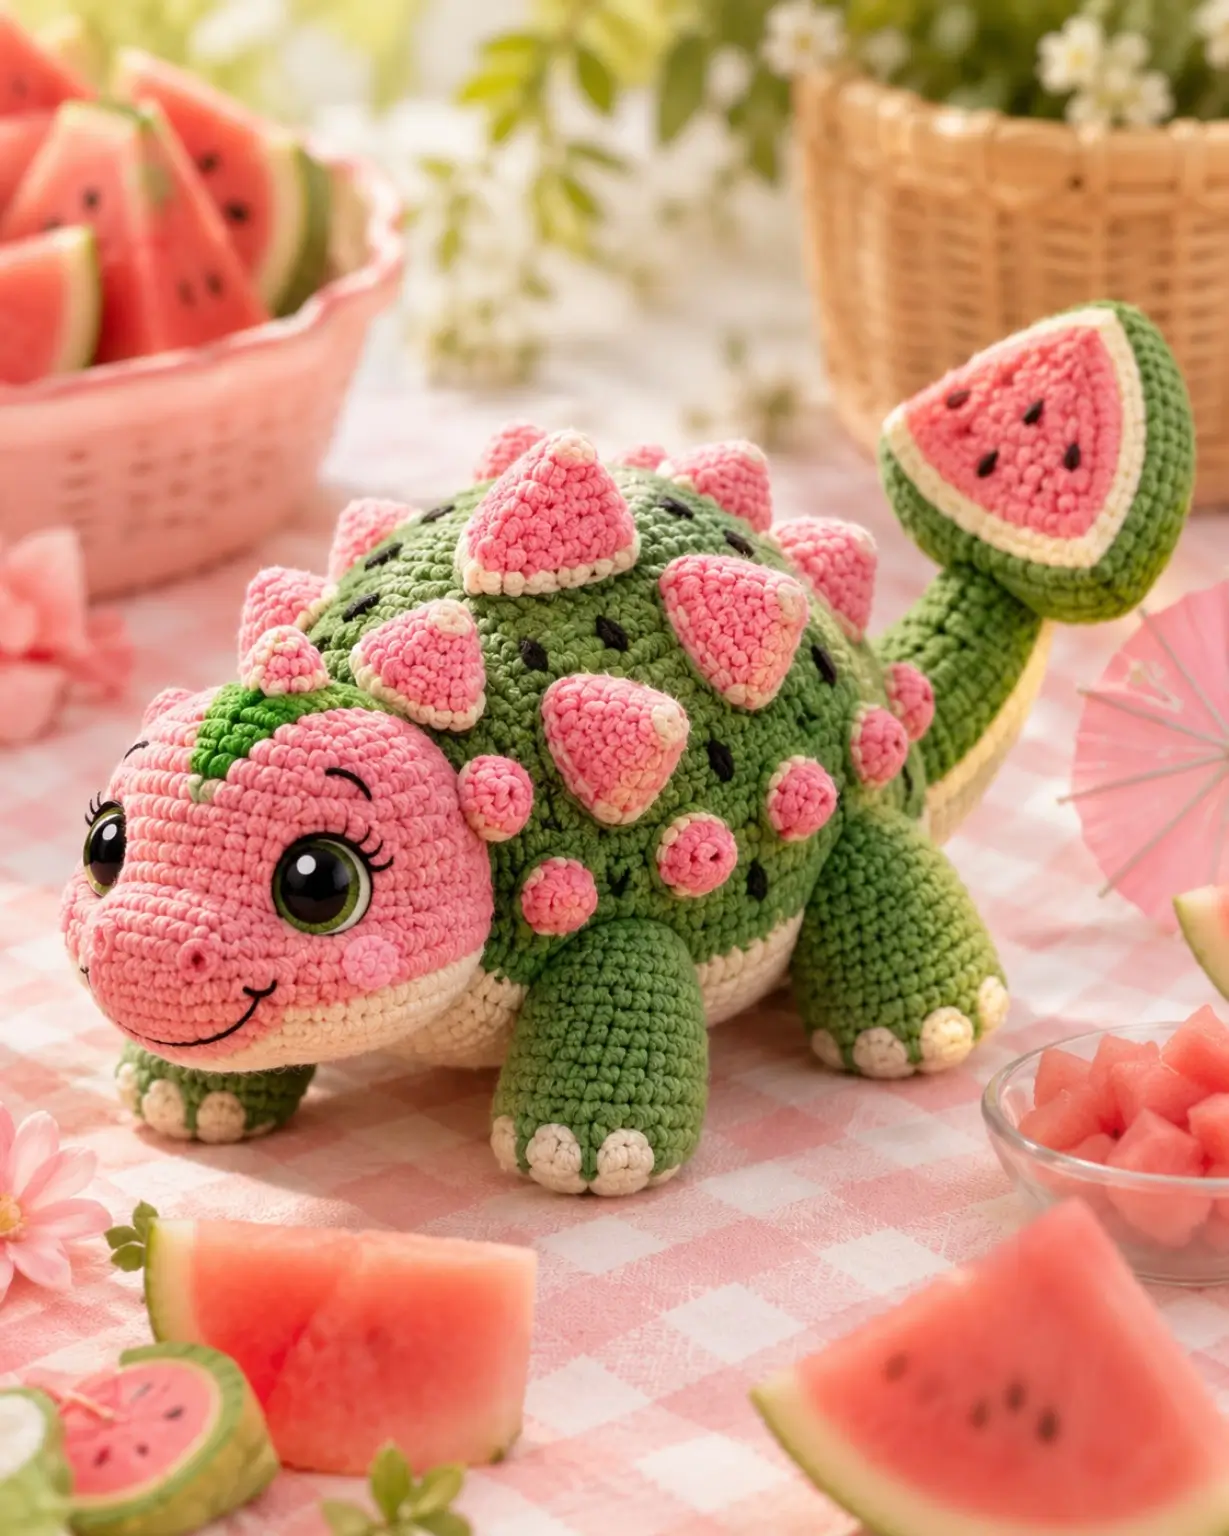
A stegosaurus plate should look like a rind-backed watermelon wedge, not a generic triangle. This watermelon stegosaurus amigurumi uses chunky velvet yarn, a 5 mm hook, safety eyes, and firm stuffing to make a medium fruit dinosaur about 22 cm long. The skill level is intermediate because the shape needs stable legs, aligned plates, and controlled surface details. Make it for a themed market table or summer display.
The Design: What Makes This Stegosaurus Different
The main design problem is weight distribution. A stegosaurus has a long body, low head, four short legs, and a tail, so this version keeps the body on a 36-stitch plateau instead of overexpanding into a ball. You place the back legs slightly wider than the front legs; the maker gets a stable base without adding wire. The watermelon dinosaur crochet pattern also needs readable rind anatomy: green body, cream underside, pink fruit plates, and black seeds. Use the stegosaurus crochet pattern structure first, then add fruit markings second. A common mistake is making every plate the same size. Real visual balance comes from larger middle plates and smaller tail plates, otherwise the back line looks flat rather than armored.
Project Info at a Glance
| Skill Level | Time | Finished Size | Hook | Best For |
|---|---|---|---|---|
| Intermediate | 5–7 hours | Approx. 22 cm long | 5.0 mm | Fruit dinosaur plush, display stock, themed gift table |
Source note: The 22 cm size and 5.0 mm chenille reference come from a comparable chenille stegosaurus pattern. A watermelon-themed finished-item reference lists 12 cm tall × 14 cm wide when made in acrylic.
Materials and Tools
Yarn
- Medium green — chunky velvet / chenille — approx. 80–120 g for this medium build — Big Twist Plush, Premier Parfait Chunky, or similar
- Coral pink — chunky velvet / chenille — approx. 35–55 g — fruit head, plates, tail slice, cheeks
- Cream — chunky velvet / chenille — approx. 15–25 g — rind edge, belly, toes, jaw patch
- Dark green — chunky velvet / chenille — approx. 8–12 g — forehead stripe and rind accents
- Black — DK cotton or embroidery yarn — under 5 g — seeds, nostrils, mouth
Comparable published yarn data for larger #6 stegosaurus projects lists about 75 yd main yarn, 5 yd spike yarn, and 2 yd white detail yarn. Big Twist Plush is listed as 300 g / 140 m, so actual grams vary by tension and brand.
Tools
- Hook 5.0 mm
- Safety eyes 18 mm for a photo-matched chunky look, or 10 mm for a smaller large-yarn build
- Polyester stuffing
- Yarn needle
- Stitch markers
- Pins
- Black embroidery needle
Melonosaurus uses 6 mm eyes with DK yarn, while larger stegosaurus references use 10 mm safety eyes. Scale the eye size to the yarn rather than copying one number across yarn weights.
Abbreviations
MR = magic ring; sc = single crochet; inc = 2 sc in one stitch; dec = invisible decrease over 2 stitches; sl st = slip stitch; ch = chain; BLO = back loop only; FO = fasten off.
Invisible decrease is worked through the front loops of the next two stitches before completing one sc, which reduces gaps on stuffed parts.
Pattern — Step by Step
Continuous spiral unless noted. This is an original photo-matched article pattern using standard amigurumi math. Every inc round adds 6 stitches. Every dec round removes 6 stitches.
Head
Make 1. Yarn: coral pink.
R1: 6 sc in MR (6)
R2: inc ×6 (12)
R3: (sc, inc) ×6 (18)
R4: (2 sc, inc) ×6 (24)
R5: sc around (24)
R6: (3 sc, inc) ×6 (30)
R7: sc around (30)
R8: (4 sc, inc) ×6 (36)
R9–R13: sc around (36)
R14: (4 sc, dec) ×6 (30)
R15: sc around (30)
R16: (3 sc, dec) ×6 (24)
R17: sc around (24)
R18: (2 sc, dec) ×6 (18)
R19: (sc, dec) ×6 (12)
R20: dec ×6 (6)
Insert safety eyes between R10 and R11, about 10–12 stitches apart. Stuff the snout first, then the back of the head.
Fasten off. Leave 35 cm tail and close the final hole.
Cream Jaw Patch
Make 1. Yarn: cream.
R1: 6 sc in MR (6)
R2: inc ×6 (12)
R3: (sc, inc) ×6 (18)
R4: (2 sc, inc) ×6 (24)
Flatten into a shallow oval with pins before sewing. Fasten off. Leave 45 cm tail.
Body
Make 1. Yarn: medium green.
R1: 6 sc in MR (6)
R2: inc ×6 (12)
R3: (sc, inc) ×6 (18)
R4: (2 sc, inc) ×6 (24)
R5: (3 sc, inc) ×6 (30)
R6: (4 sc, inc) ×6 (36)
R7–R16: sc around (36)
R17: (4 sc, dec) ×6 (30)
R18–R20: sc around (30)
R21: (3 sc, dec) ×6 (24)
R22: sc around (24)
R23: (2 sc, dec) ×6 (18)
R24: (sc, dec) ×6 (12)
R25: dec ×6 (6)
Stuff firmly through the center. Keep the underside slightly flat so the legs can hold the body.
Fasten off. Leave 30 cm tail and close.
Belly Panel
Make 1. Yarn: cream.
R1: 6 sc in MR (6)
R2: inc ×6 (12)
R3: (sc, inc) ×6 (18)
R4: (2 sc, inc) ×6 (24)
R5: (3 sc, inc) ×6 (30)
Fasten off. Leave 60 cm tail. Pin to the lower body before attaching the legs.
Front Legs
Make 2. Yarn: medium green.
R1: 6 sc in MR (6)
R2: inc ×6 (12)
R3: (sc, inc) ×6 (18)
R4: BLO sc around (18)
R5–R7: sc around (18)
R8: (sc, dec) ×6 (12)
R9–R10: sc around (12)
R11: dec ×6 (6)
Stuff lightly at the foot only. Fasten off. Leave 30 cm tail.
Back Legs
Make 2. Yarn: medium green.
R1: 6 sc in MR (6)
R2: inc ×6 (12)
R3: (sc, inc) ×6 (18)
R4: (2 sc, inc) ×6 (24)
R5: BLO sc around (24)
R6–R8: sc around (24)
R9: (2 sc, dec) ×6 (18)
R10–R11: sc around (18)
R12: (sc, dec) ×6 (12)
R13: dec ×6 (6)
Stuff to a firm oval. Fasten off. Leave 35 cm tail.
Toe Nubs
Make 12. Yarn: cream.
R1: 6 sc in MR (6)
Sl st to first stitch (6)
Fasten off. Leave 15 cm tail. Sew three toe nubs to each leg.
Dorsal Watermelon Plates
Make 5 large and 4 small. Yarn: coral pink with cream edging.
Large Plates
R1: 6 sc in MR (6)
R2: sc around (6)
R3: inc ×6 (12)
R4: sc around (12)
R5: (sc, inc) ×6 (18)
R6: sc around (18)
Fasten off. Leave 40 cm tail.
Small Plates
R1: 6 sc in MR (6)
R2: sc around (6)
R3: inc ×6 (12)
R4: sc around (12)
Fasten off. Leave 30 cm tail. Add cream stitches around each plate base before sewing.
Tail
Make 1. Yarn: medium green.
R1: 6 sc in MR (6)
R2: sc around (6)
R3: inc ×6 (12)
R4–R5: sc around (12)
R6: (sc, inc) ×6 (18)
R7–R8: sc around (18)
R9: (2 sc, inc) ×6 (24)
R10–R14: sc around (24)
Stuff the tail from tip to base. Fasten off. Leave 50 cm tail for sewing.
Tail Watermelon Slice
Make 1. Yarn: coral pink, cream, and medium green.
R1: pink, 6 sc in MR (6)
R2: inc ×6 (12)
R3: (sc, inc) ×6 (18)
R4: (2 sc, inc) ×6 (24)
R5: cream, (3 sc, inc) ×6 (30)
R6: green, (4 sc, inc) ×6 (36)
Fold the circle in half and stitch the straight edge closed to make a thick half-slice. Fasten off. Leave 45 cm tail.
Cheek Patches
Make 2. Yarn: pale pink.
R1: 6 sc in MR (6)
R2: inc ×6 (12)
Fasten off. Leave 20 cm tail.
Forehead Rind Stripe and Seed Stitches
Yarn: dark green and black.
Surface crochet or embroider one dark green stripe from the crown toward the snout, stopping above the eyes. Add black seed stitches on the green body, pink head sides, dorsal plates, and tail slice. Each seed should be 1 vertical stitch long on DK builds or 2 vertical stitches long on chunky builds.
Assembly
- Sew the head to the front of the body with the snout angled slightly downward.
- Attach the cream jaw patch under the face, centered below the eyes.
- Sew the cream belly panel to the lower body, leaving its edge just visible from the side.
- Add the cheek patches two rounds below the eyes and slightly behind the smile line.
- Embroider the mouth, nostrils, eyelashes, and seed marks on the head.
- Pin the front legs under the shoulder area and sew them flat against the body.
- Pin the back legs wider than the front legs and sew them so the body rests level.
- Attach the tail to the back body, then sew the folded watermelon slice to the tail tip.
- Place the large dorsal plates along the body center and the small plates near the head and tail.
- Weave all tails through stuffed areas, trim hidden ends, and check that the stegosaurus stands without tipping.
The finished toy is a medium watermelon stegosaurus with a green rind body, pink fruit details, black seed embroidery, and a visible tail slice.
7 Technical Tips
- Eye placement failure mode: crossed expression. Set the safety eyes between R10 and R11 with 10–12 stitches between posts before adding the washers.
- Stuffing failure mode: round body rolling sideways. Pack the lower body to medium firmness, then press the underside flat for 30 seconds before closing.
- Plate alignment failure mode: zigzag spine. Pin every dorsal plate first, leaving 1–2 stitches between plate bases along the body centerline.
- Velvet tension failure mode: hidden increases. Use a stitch marker on every round because chenille stitches blur after R6.
- Invisible decrease failure mode: stuffing holes. Work each decrease through front loops only and pull the working yarn tight before the next sc.
- Leg balance failure mode: front-heavy dinosaur. Place back legs 1 round farther toward the tail than looks natural while pinning; the head adds forward weight.
- Tail weaving failure mode: loose slice fin. Run the tail-slice sewing strand through the folded edge twice, then anchor it into R12 of the green tail.
Conclusion
This build works because the dinosaur structure is solved before the fruit styling is added. Keep the 36-stitch body plateau, sew the back legs wide, and grade the plates from small to large to small again. After assembly, photograph the toy from a low side angle so the tail slice, cheek patch, and rind plates are visible in one frame. Pin the finished watermelon stegosaurus amigurumi to Pinterest, then share the side-view photo on Instagram with #WatermelonStegosaurus. For the next revision, test one detail only: should the black seeds appear on the green rind body, or only on the pink fruit plates?









