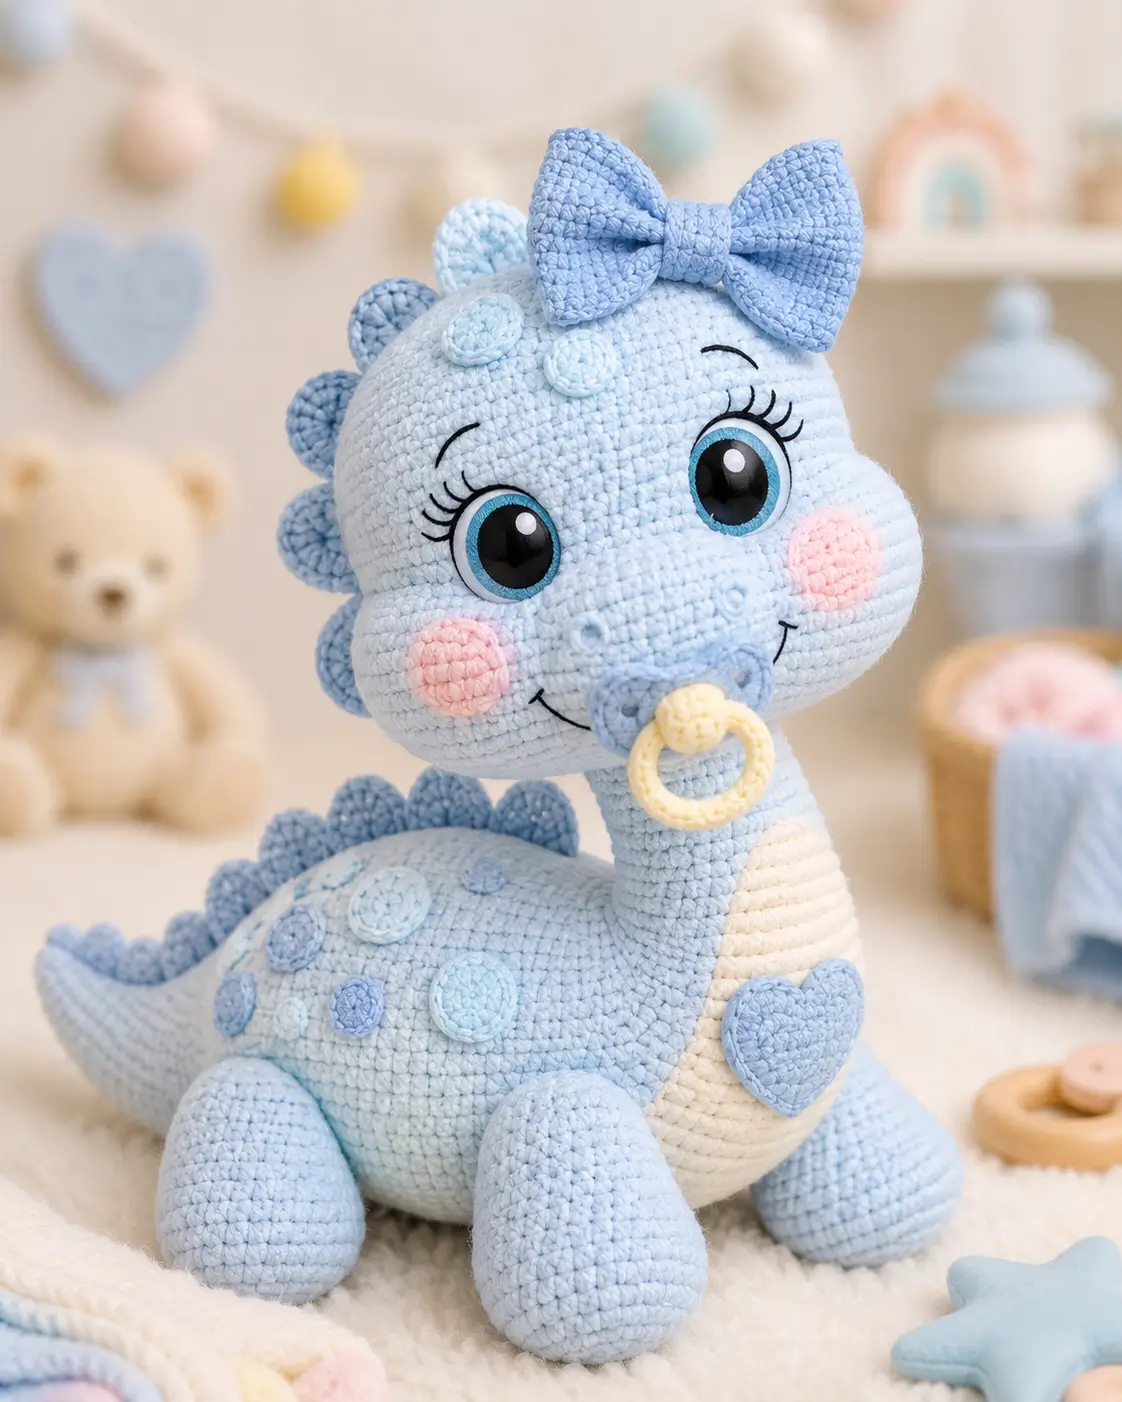
A brontosaurus has a tiny head balanced on a long neck; this baby version adds a pacifier at the exact point where the neck wants to tip forward. This baby brontosaurus amigurumi uses smooth cotton-style yarn, a 2.5 mm hook, safety or embroidered eyes, and intermediate shaping for a 20.5 cm sitting toy. Make it when a plain dinosaur needs nursery-level detail without losing structural balance.
The Design: What Makes Blue Bronto Baby Different
You build this brontosaurus crochet pattern around weight control first. The head is large, the snout is wide, and the neck must stay vertical under both pieces. For that reason, the head closes completely before sewing, while the neck is stuffed in small pinches rather than one hard plug. The maker then gets a stronger tilt test before attaching the pacifier.
The second decision is surface layering. Raised body spots, cheek patches, and dorsal spikes make the long silhouette read as a dinosaur amigurumi pattern even in pale blue yarn. A common maker mistake with a long neck dinosaur crochet pattern is placing the head too far forward. That shifts the center of gravity. Pin the head over the front third of the body, not beyond it.
Project Info at a Glance
| Skill Level | Time | Finished Size | Hook | Best For |
|---|---|---|---|---|
| Intermediate | 5–7 hours | 20.5 cm | 2.5 mm | Display toy or older-child toy with embroidered eyes |
Comparable published brontosaurus projects list 19 cm to 20.5 cm finished sizes, while hook recommendations vary by yarn from 2.0 mm cotton work to 5.0 mm bulky yarn work. Safety eyes are not recommended for toys made for young children or pets; embroider the eyes for that use case.
Materials and Tools
Yarn
- Pale baby blue — cotton-style DK/sport, 75 g — Círculo Amigurumi, YarnArt Jeans, or similar
- Darker blue — same weight, 10–15 g — bow, spikes, heart, small spots
- Cream — same weight, 12–15 g — belly patch
- Pink — same weight, 4 g — cheek patches
- Yellow — same weight, 5 g — pacifier
- Black embroidery thread — scrap — smile, brows, lashes, nostrils
Tools
- Hook 2.5 mm
- 18 mm blue iris safety eyes, or embroidered/felt eyes for child-safe gifting
- Polyester stuffing
- Yarn needle
- Stitch markers
- Pins
- Scissors
- Black embroidery needle
- Optional plastic pellets for the body base, kept inside a sewn fabric pouch
Abbreviations
MR = magic ring / sc = single crochet / inc = 2 sc in one stitch / dec = single crochet decrease / sl st = slip stitch / ch = chain / BLO = back loop only / FLO = front loop only / R = round
Work invisible decreases through the front loops only so the decrease line stays closed across the cheeks, belly, and tail.
Pattern — Step by Step
Continuous spiral unless noted.
Head – Make 1
Yarn: pale baby blue
R1: 6 sc in MR (6)
R2: inc ×6 (12)
R3: (sc, inc) ×6 (18)
R4: (2 sc, inc) ×6 (24)
R5: (3 sc, inc) ×6 (30)
R6: (4 sc, inc) ×6 (36)
R7: (5 sc, inc) ×6 (42)
R8–R15: sc around (42)
R16: (5 sc, dec) ×6 (36)
R17: sc around (36)
R18: (4 sc, dec) ×6 (30)
R19: sc around (30)
R20: (3 sc, dec) ×6 (24)
R21: (2 sc, dec) ×6 (18)
R22: (sc, dec) ×6 (12)
R23: dec ×6 (6)
R24: sc around (6)
Place eyes between R12 and R13, 13 stitches apart, before closing if safety eyes are used. Stuff firmly at the cheeks and lightly at the crown.
Fasten off. Leave 25 cm tail for head-to-neck sewing.
Snout – Make 1
Yarn: pale baby blue
R1: 6 sc in MR (6)
R2: inc ×6 (12)
R3: (sc, inc) ×6 (18)
R4: (2 sc, inc) ×6 (24)
R5–R7: sc around (24)
R8: (2 sc, dec) ×6 (18)
R9: sc around (18)
Stuff lightly. Flatten the upper edge so the snout sits across the lower half of the face, not under the chin.
Fasten off. Leave 30 cm tail.
Neck – Make 1
Yarn: pale baby blue
R1: 6 sc in MR (6)
R2: inc ×6 (12)
R3: (sc, inc) ×6 (18)
R4: (2 sc, inc) ×6 (24)
R5–R18: sc around (24)
R19: (2 sc, dec) ×6 (18)
R20: sc around (18)
Stuff every 3 rounds. Stop when the neck bends slightly but does not collapse.
Fasten off. Leave 35 cm tail.
Body – Make 1
Yarn: pale baby blue
R1: 6 sc in MR (6)
R2: inc ×6 (12)
R3: (sc, inc) ×6 (18)
R4: (2 sc, inc) ×6 (24)
R5: (3 sc, inc) ×6 (30)
R6: (4 sc, inc) ×6 (36)
R7: (5 sc, inc) ×6 (42)
R8–R16: sc around (42)
R17: (5 sc, dec) ×6 (36)
R18–R19: sc around (36)
R20: (4 sc, dec) ×6 (30)
R21–R22: sc around (30)
R23: (3 sc, dec) ×6 (24)
R24: (2 sc, dec) ×6 (18)
R25: (sc, dec) ×6 (12)
R26: dec ×6 (6)
Stuff the lower third firmly. Keep the top shoulder area medium-firm so the neck can be sewn into a shallow hollow.
Fasten off. Leave 20 cm tail and close.
Belly Patch – Make 1
Yarn: cream
R1: 6 sc in MR (6)
R2: inc ×6 (12)
R3: (sc, inc) ×6 (18)
R4: (2 sc, inc) ×6 (24)
R5: (3 sc, inc) ×6 (30)
R6: (4 sc, inc) ×6 (36)
R7–R9: sc around (36)
R10: (4 sc, dec) ×6 (30)
R11: sc around (30)
Do not stuff. Flatten into a soft oval before sewing from lower neck to belly front.
Fasten off. Leave 45 cm tail.
Front Legs / Arms – Make 2
Yarn: pale baby blue
R1: 6 sc in MR (6)
R2: inc ×6 (12)
R3: (sc, inc) ×6 (18)
R4–R8: sc around (18)
R9: (sc, dec) ×6 (12)
R10–R12: sc around (12)
Stuff only the lower half. Flatten the top edge.
Fasten off. Leave 25 cm tail on each leg.
Back Legs – Make 2
Yarn: pale baby blue
R1: 6 sc in MR (6)
R2: inc ×6 (12)
R3: (sc, inc) ×6 (18)
R4: (2 sc, inc) ×6 (24)
R5–R8: sc around (24)
R9: (2 sc, dec) ×6 (18)
R10–R12: sc around (18)
R13: (sc, dec) ×6 (12)
R14: sc around (12)
Stuff firmly at the toe and lightly at the top. The back legs should hold the body in a seated angle.
Fasten off. Leave 30 cm tail.
Tail – Make 1
Yarn: pale baby blue
R1: 6 sc in MR (6)
R2: inc ×6 (12)
R3–R4: sc around (12)
R5: (sc, inc) ×6 (18)
R6–R8: sc around (18)
R9: (2 sc, inc) ×6 (24)
R10–R14: sc around (24)
Stuff progressively, keeping the tip lighter than the base.
Fasten off. Leave 35 cm tail.
Rounded Head Bumps / Ear-Like Bumps – Make 2
Yarn: pale baby blue
R1: 6 sc in MR (6)
R2: inc ×6 (12)
R3–R4: sc around (12)
R5: dec ×6 (6)
Stuff with one pinch only.
Fasten off. Leave 20 cm tail.
Dorsal Spikes – Make 8
Yarn: darker blue
R1: 6 sc in MR (6)
R2: inc ×6 (12)
R3: sc around (12)
R4: (sc, inc) ×6 (18)
R5: sc around (18)
Do not overstuff. Flatten each spike into a rounded triangular plate.
Fasten off. Leave 18 cm tail on each spike.
Cheek Patches – Make 2
Yarn: pink
R1: 6 sc in MR (6)
R2: inc ×6 (12)
R3: (sc, inc) ×6 (18)
Sl st to next stitch (18)
Do not stuff. Sew flat under the eyes and outside the snout edge.
Fasten off. Leave 20 cm tail.
Raised Body Spots – Make 9
Yarn: pale blue and darker blue scraps
Small spots, make 5:
R1: 6 sc in MR (6)
R2: inc ×6 (12)
Sl st to next stitch (12)
Medium spots, make 4:
R1: 6 sc in MR (6)
R2: inc ×6 (12)
R3: (sc, inc) ×6 (18)
Sl st to next stitch (18)
Mix both blues. Place spots irregularly across the head side, back, and body, leaving the belly patch clear.
Fasten off. Leave 15 cm tail on each.
Heart Patch – Make 1
Yarn: darker blue
Heart lobes, make 2:
R1: 6 sc in MR (6)
R2: inc ×6 (12)
Sl st to next stitch (12)
Lower point, make 1:
R1: 6 sc in MR (6)
R2: inc ×6 (12)
R3–R4: sc around (12)
R5: dec ×6 (6)
Flatten the lower point and sew it under the two circles to form a small heart.
Fasten off. Leave tails for sewing.
Bow Loops – Make 2
Yarn: darker blue
R1: 6 sc in MR (6)
R2: inc ×6 (12)
R3: (sc, inc) ×6 (18)
R4: (2 sc, inc) ×6 (24)
R5–R8: sc around (24)
R9: (2 sc, dec) ×6 (18)
R10: (sc, dec) ×6 (12)
Stuff lightly. Flatten each loop with the tapered end toward the center.
Fasten off. Leave 25 cm tail.
Bow Center Band – Make 1
Yarn: darker blue — worked in rows, not spiral.
Ch 7.
Row 1: sc in second ch from hook and across (6)
Rows 2–6: ch 1, turn, sc across (6)
Wrap the band around the two bow loops. Sew the short ends together at the back.
Pacifier Shield and Button – Make 1 Set
Yarn: yellow
Shield:
R1: 6 sc in MR (6)
R2: inc ×6 (12)
R3: (sc, inc) ×6 (18)
Sl st to next stitch (18)
Button:
R1: 6 sc in MR (6)
R2: inc ×6 (12)
R3: sc around (12)
R4: dec ×6 (6)
Stuff the button lightly and sew it to the shield center.
Fasten off. Leave tails for sewing.
Pacifier Ring – Make 1
Yarn: yellow — worked as an open chain ring.
Ch 26. Join with sl st to first ch, checking that the chain is not twisted.
R1: sc around the chain ring (26)
R2: sc around (26)
Fasten off. Sew the ring behind the pacifier button so it hangs below the snout.
Face Embroidery
Thread: black embroidery thread
Stitch one curved smile from each lower cheek toward the snout. Add two nostril dots on the snout, one eyebrow curve above each eye, and three short lashes at the outside of each eye. Keep each lash under 1 cm so the face stays scaled to the 20.5 cm body.
Assembly
- Sew the neck to the top-front of the body, centered over R8–R14 of the body.
- Sew the head to the neck with the snout area facing slightly downward.
- Sew the snout across the lower face between the cheeks.
- Attach the belly patch from the lower neck down the front body panel.
- Sew the cheek patches under the eyes and outside the snout.
- Attach front legs at the upper body sides, angled toward the belly.
- Attach back legs to the lower body so the toy sits without rolling.
- Sew the tail to the rear body, aligned with the bottom third for balance.
- Sew head bumps, dorsal spikes, raised spots, and heart patch in place.
- Attach the bow at the crown and the pacifier at the lower snout.
The finished toy should sit with the head above the front legs and the tail touching the surface behind the body.
7 Technical Tips
- Mark R1 on every spiral part with a locking stitch marker. Losing the first stitch by one position shifts the snout and makes the smile look crooked.
- Stuff the neck to medium firmness only. A hard 24-stitch tube pushes the head backward, while an underfilled tube folds under the pacifier.
- Use invisible decreases on R20–R23 of the head and R23–R26 of the body. Standard decreases leave six visible gaps at the closing point.
- Place safety eyes before R23 of the head closes. For this face, keep the eyes 13 stitches apart or the snout will cover the inner eye edges.
- Keep the bow center band at 6 stitches wide. A wider band hides the bow pinch and turns the loops into one flat rectangle.
- Pin all eight dorsal spikes before sewing any of them. A spacing error of more than 1.5 cm near the neck makes the spike line look broken.
- Weave yarn tails through at least 3 cm of stuffed fabric. Shorter tails can work out through the pale blue stitches after the toy is handled.
Conclusion
Block the cream belly patch before final sewing, then test the toy on a flat surface from the side. The head should sit above the front legs, the tail should touch down behind the body, and the pacifier should hang without pulling the snout forward. For a child-safe version, replace the plastic eyes with embroidered eyes and stitch the pacifier as a fixed applique. Save the side-view photo to Pinterest and post the finished dinosaur on Instagram with #BlueBrontoBaby. This baby brontosaurus amigurumi is ready for its final check: should the next version keep the pacifier, or trade it for a tiny crochet teether?









