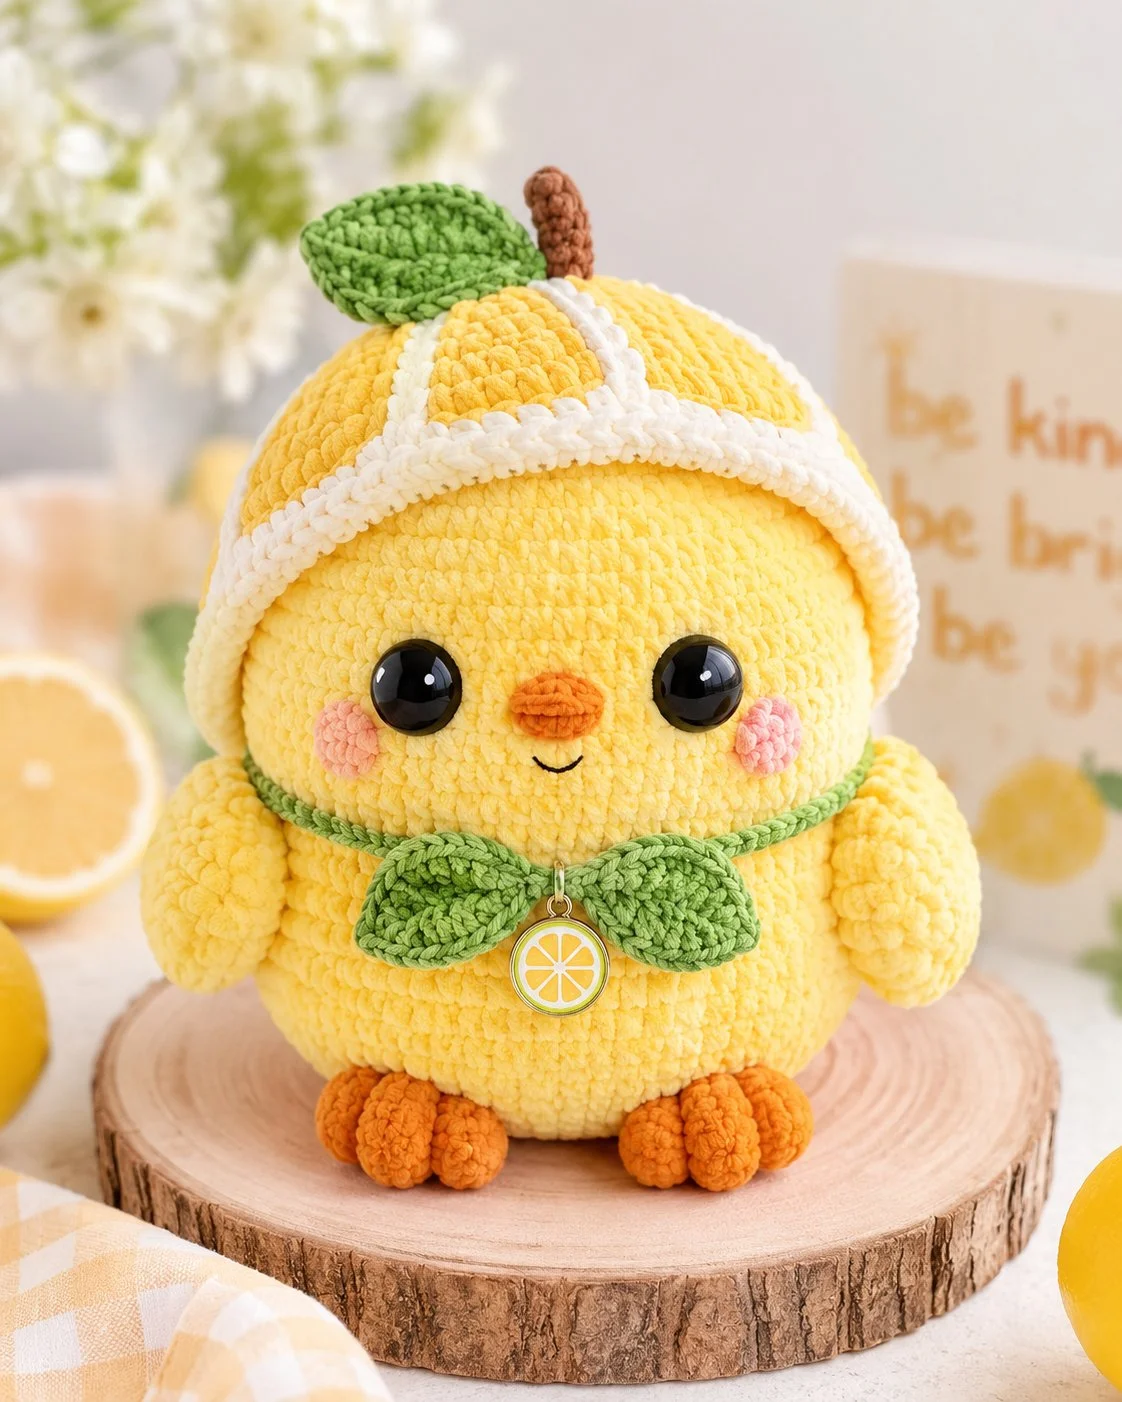
A lemon chick fails fast when the peel hood sits too high and turns the face into a yellow ball with no frame. This lemon chick amigurumi crochet pattern fixes that with plush chenille yarn, a medium-size build, and a shaped brim that holds the eyes in view. You will need chunky yarn, a 4.5 mm hook, and intermediate stitch control. The finished toy works well as shelf decor or a market sample.
The Design: What Makes Lemon Chick Different
You are not shaping a plain chick here. The lemon peel hood changes the silhouette first, then the face proportions. A deep brim was chosen so the eyes sit under a white frame instead of floating on a wide yellow dome. The body stays nearly spherical because a citrus theme looks better on a compact volume than on a tall egg shape. The leaf bow at the neck repeats the top leaf and ties the whole piece together visually. A common mistake with a plush chick crochet pattern like this is placing the wings too low, which makes the chick look wider and shorter than intended. Another is flattening the beak too much, which weakens the lemon hat chick crochet pattern profile from the front.
Project Info at a Glance
Skill LevelTimeFinished SizeHookBest ForIntermediate5–7 hours 15 cm verified comparable size; larger in chunky chenille, 2–2.5 mm verified on cotton references; sample below uses 4.5 mm plush adaptation. Decor, gift display, market table sample
Comparable finished-size and hook references come from published chick patterns in fine cotton, with plush builds scaling larger by yarn choice.
Materials and Tools
Yarn
- Yellow — chunky chenille / velvet-style — about 120 g — Himalaya Dolphin Baby or similar plush yarn
- White — chunky chenille / velvet-style — about 35 g — matching plush yarn
- Leaf green—chunky chenille/velvet-style—about 25 g—matching plush yarn
- Orange—chunky chenille/velvet style—about 12 g—matching plush yarn
- Pink—chunky chenille/velvet-style—about 6 g—matching plush yarn
- Brown — chunky chenille / velvet-style — about 5 g — matching plush yarn
- Black embroidery thread — small amount — smile detail
- Metal or acrylic lemon-slice charm — 1 piece
Tools
- Hook 4.5 mm
- Safety eyes 18 mm for the plush sample look; fine-yarn references often use 6–8 mm eyes.
- Stuffing
- Yarn needle
- Stitch markers
- Pins
- Small jump ring or thread loop for the charm
Abbreviations
MR / sc / inc / dec / sl st / ch / BLO / FLO / hdc
Use invisible decrease for all shaping rounds on visible plush sections; standard front-loop decreases leave a sharper line in chenille.
Pattern—Step by Step
Continuous spiral unless noted.
Head (Make 1)
Yarn: yellow — Source: Standard amigurumi math for original construction
R1: 6 sc in MR (6)
R2: inc x6 (12)
R3: (1 sc, inc) x6 (18)
R4: (2 sc, inc) x6 (24)
R5: (3 sc, inc) x6 (30)
R6: (4 sc, inc) x6 (36)
R7-R11: sc around (36)
R12: (4 sc, dec) x6 (30)
R13: sc around (30)
R14: (3 sc, dec) x6 (24)
Insert eyes between R9 and R10, spaced 8 stitches apart.
R15: (2 sc, dec) x6 (18)
Stuff firmly.
R16: (1 sc, dec) x6 (12)
R17: dec x6 (6)
Fasten off. Leave a 20 cm tail.
Body (Make 1)
Yarn: yellow — Source: Standard amigurumi math for original construction
R1: 6 sc in MR (6)
R2: inc x6 (12)
R3: (1 sc, inc) x6 (18)
R4: (2 sc, inc) x6 (24)
R5: (3 sc, inc) x6 (30)
R6: (4 sc, inc) x6 (36)
R7-R12: sc around (36)
R13: (4 sc, dec) x6 (30)
R14: (3 sc, dec) x6 (24)
R15: (2 sc, dec) x6 (18)
Stuff into a round, squat shape. Keep the base slightly flatter than the head.
R16: (1 sc, dec) x6 (12)
R17: dec x6 (6)
Fasten off. Leave a 25 cm tail.
Wings (Make 2)
Yarn: yellow—Source: Peach Unicorn wing reference adapted to plush scale.
R1: 6 sc in MR (6)
R2: inc x6 (12)
R3-R4: sc around (12)
R5: (4 sc, dec) x2 (10)
R6: sc around (10)
Flatten.
R7: sc through both sides across (5)
Fasten off. Leave an 18 cm tail.
Feet Toes (Make 6)
Yarn: orange — Source: Standard amigurumi math for original construction
R1: 6 sc in MR (6)
R2: sc around (6)
Fasten off. Leave a 12 cm tail.
Ears or Wings Slot
Not applicable. This chick uses wings.
Beak (Make 1)
Yarn: orange — Source: Standard amigurumi math for original construction
R1: 6 sc in MR (6)
R2: sc around (6)
Flatten lightly.
R3: sl st through both layers across 3 stitches (3)
Fasten off. Leave a 20 cm tail.
Cheek Patches (Make 2)
Yarn: pink — Source: Standard amigurumi math for original construction
R1: 6 sc in MR (6)
R2: inc x6 (12)
Fasten off. Leave a 12 cm tail.
Lemon Hood Crown (Make 1)
Yarn: yellow — Source: Standard amigurumi math for original construction
R1: 6 sc in MR (6)
R2: inc x6 (12)
R3: (1 sc, inc) x6 (18)
R4: (2 sc, inc) x6 (24)
R5: (3 sc, inc) x6 (30)
R6: (4 sc, inc) x6 (36)
R7: BLO sc around (36)
R8-R10: sc around (36)
Fasten off. Leave a 35 cm tail.
Lemon Hood Brim (Make 1)
Yarn: white — Source: Standard amigurumi math for original construction
Ch 37: Join carefully without twisting.
R1-R3: sc around (36)
R4: BLO sc around (36)
R5: (5 sc, inc) x6 (42)
R6: sc around (42)
Fasten off. Leave a 35 cm tail.
Lemon Segment Ridges (Make 4)
Yarn: white — Source: Standard amigurumi math for original construction
Ch 9.
Row 1: starting in 2nd ch, 8 sc (8)
Row 2: ch 1, turn, 8 sc (8)
Fasten off. Leave a 15 cm tail.
Top Leaf (Make 1)
Yarn: green — Source: Standard amigurumi math for original construction
Ch 9.
Row 1: Starting in the 2nd ch, sl st, sc, hdc, 2 dc, hdc, sc, sl st.
Work on opposite side of chain: sl st, sc, hdc, 2 dc, hdc, sc, sl st.
Fasten off. Leave an 18 cm tail.
Stem (Make 1)
Yarn: brown — Source: Standard amigurumi math for original construction
R1: 4 sc in MR (4)
R2-R4: sc around (4)
Fasten off. Leave a 15 cm tail.
Neck Cord (Make 1)
Yarn: green — Source: Standard amigurumi math for original construction
Ch 46.
Fasten off.
Leave 12 cm tails on both ends.
Bow Leaves (Make 2)
Yarn: green — Source: Standard amigurumi math for original construction
Ch 8.
Row 1: starting in 2nd ch, sc, hdc, dc, dc, hdc, sc (7)
Work opposite side: sc, hdc, dc, dc, hdc, sc.
Fasten off. Leave an 18 cm tail.
Accessory: Lemon Charm Loop (Make 1)
Yarn: green sewing thread — Source: Original assembly detail
Ch 6, join to the first ch with sl st.
Fasten off. Leave an 8 cm tail.
Assembly
- Sew the head to the body, centered, with the face looking forward.
- Attach the beak midway between the eyes, projecting slightly outward rather than flat.
- Sew the cheek patches one round lower than the beak base and 1 stitch outward from each eye edge.
- Embroider a short smile under the beak with black thread.
- Sew the wings to the body sides, with the top edge beginning about 2 rounds below the head seam.
- Stitch the six toe pieces under the front base as two groups of three.
- Sew the white brim to the yellow hood crown, then place the hood on the head with the brim sitting just above eye level.
- Attach four white segment ridges from the crown top down toward the brim, spacing them evenly across the visible front half.
- Sew the leaf and stem to the top center of the hood.
- Tie the neck cord around the neck, stitch the bow leaves at the center, and hang the lemon charm from the loop.
The build is complete when the hood frames both eyes evenly and the toy stands in a stable seated position.
7 Technical Tips
- Mark round 1 and the eye line early. On chenille, missed counting at round 8 usually shifts the eyes by 1–2 stitches, and that is enough to make the face look crossed.
- Stuff the head firmer than the body. A soft head lets the hood collapse inward by about 0.5–1 cm, which hides the upper eye edge.
- Use invisible decreases on all yellow visible shaping rounds. Standard decreases create a dotted seam line that shows clearly once the plush pile separates.
- Place the eyes before the last two decrease rounds. Trying to force 18 mm posts through dense plush after closure can stretch a hole wider than the washer plate.
- Keep the brim one round longer than you think it needs to be. A shallow brim rides up, and the face loses the lemon-peel frame that makes the design read correctly.
- Pin the wings with the front edge slightly tilted forward. If both wings sit flat on the side seam, the toy gains width and loses the tucked-chick profile from the photo.
- Weave tails back through at least 4 cm of interior stitches. Chenille sheds under friction, and short, buried tails can slip out after repeated handling.
Conclusion
This build works because the chick stays simple while the citrus details do the heavy lifting. The rounded body, framed face, and leaf repeats are the parts that keep the lemon theme readable from across the room. For the next step, crochet the hood first and test it on the stuffed head before sewing any facial pieces in place. Post your result to Pinterest and Instagram with a front view, side view, and top view so the peel structure is visible. Use #LemonChickPattern when you share your lemon chick amigurumi crochet pattern. Did you keep the brim shallow, or did you drop it low enough to cover the forehead like a real lemon peel?









