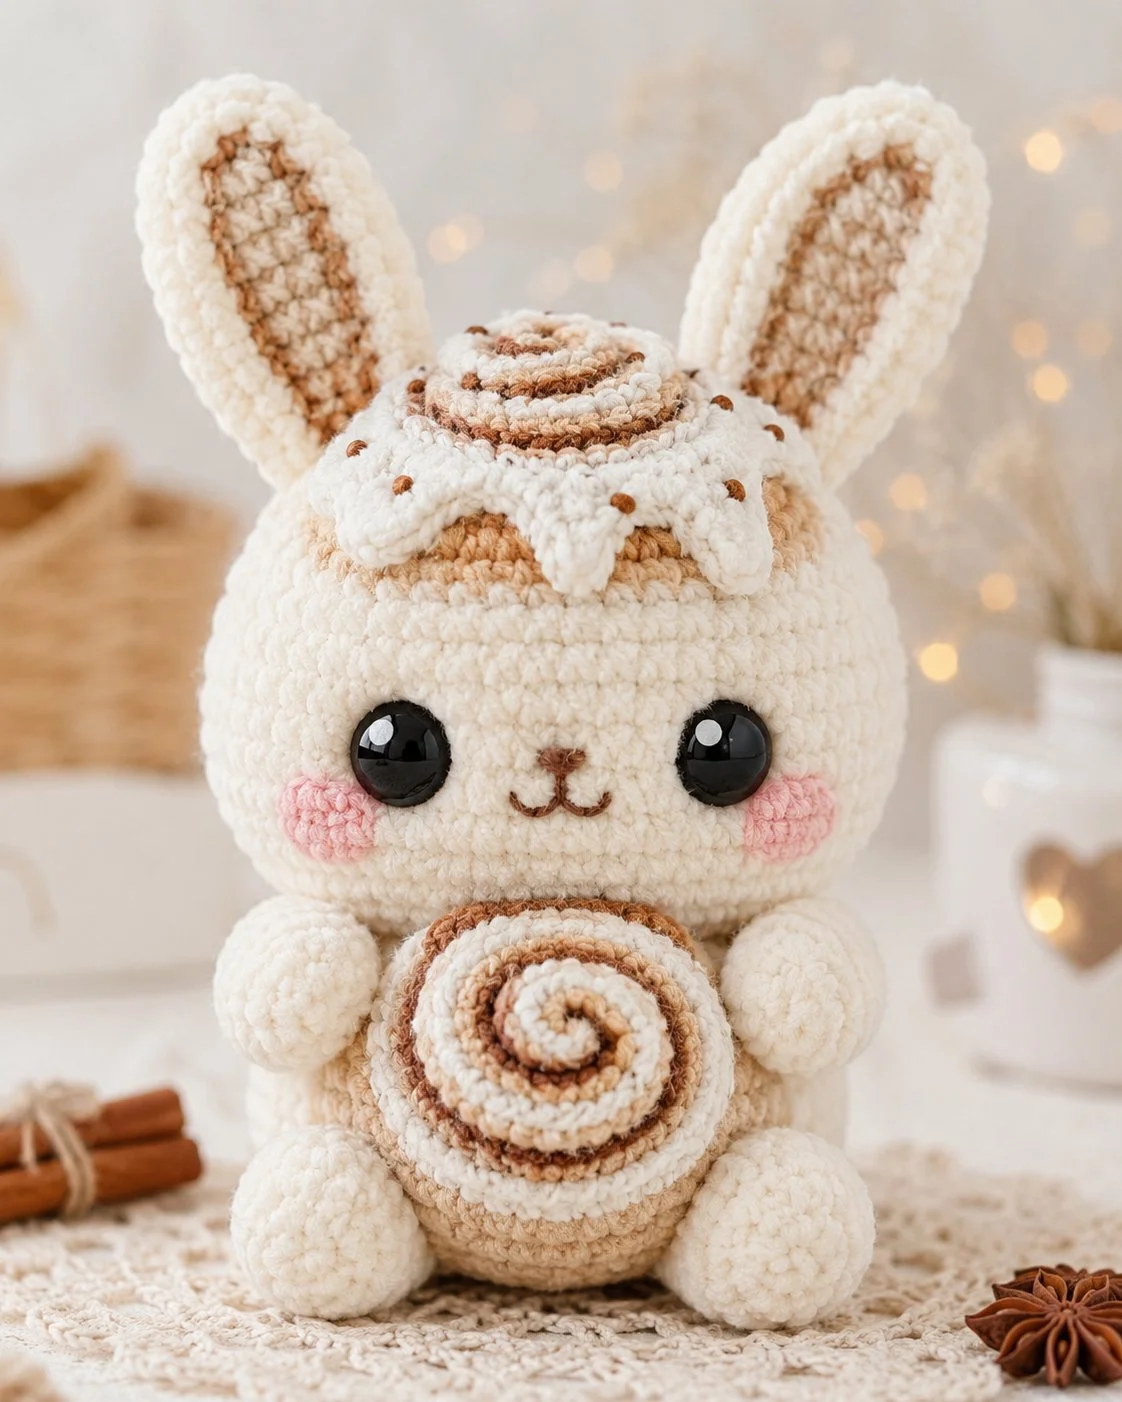
A cinnamon bun sitting between two rabbit ears throws the center of gravity upward. That is the first construction issue in this cinnamon bunny amigurumi crochet pattern. You need plush chenille yarn, a 4.5 mm hook, and medium-to-large safety eyes to build a seated bunny around 22 cm tall, aimed at an intermediate maker. The design works well as shelf decor because the belly swirl reads clearly from across the room.
The Design: What Makes Cinnamon Bunny Different
This bunny is not built like a plain plush rabbit. The head is oversized on purpose, because the photo shows a face-first composition with short limbs and a compressed torso. That proportion shifts visual weight upward, so the body has to stay broad enough to act like a base. The second structural choice is the separate cinnamon-roll belly piece. It breaks the cream body visually and gives the front a spiral focal point that standard plush bunny amigurumi designs do not use. The third choice is the frosted topper, which functions almost like a cap. It fills the space between the ears and explains the bakery theme instantly. A common mistake with a bunny cinnamon roll amigurumi is making the ears too narrow. Then the topper looks oversized, and the silhouette loses balance. In a chenille bunny crochet pattern, width matters more than ear length.
Project Info at a Glance
Skill LevelTimeFinished SizeHookBest ForEasy on source patterns; intermediate on this photo-based adaptation Quickly make one source pattern. Approx. 22 cm in this version; published Cinnamon Bunny baseline is 10.2 cm tall 4.5 mm. Decor, market stock, themed gifts
Materials and Tools
Yarn
- Cream / ivory chenille—super bulky—60 g main body baseline—Premier Just Chenille or similar plush yarn
- Warm beige chenille — super bulky — 20–30 g — belly and ear inner color
- Medium brown chenille — super bulky — 10–15 g — cinnamon swirl lines and topper accents
- Pink yarn—small amount—cheek patches
- Brown embroidery yarn — small amount — nose and mouth
Tools
- Hook 4.5 mm
- Safety eyes: 14 mm for the photo scale; 12 mm is the published Cinnamon Bunny baseline
- Polyfill stuffing
- Yarn needle
- Stitch markers
- Pins
Abbreviations
MR = magic ring
sc = single crochet
inc = increase
dec = invisible decrease
sl st = slip stitch
ch = chain
BLO = back loop only
FO = fasten off
An invisible decrease keeps the front of chenille fabric cleaner than a standard decrease and reduces the gaps that show stuffing.
Pattern—Step by Step
Continuous spiral unless noted.
Head (Make 1)
Yarn: cream — Source: Standard amigurumi math, scaled to the photo and aligned with 36-stitch plush-bunny head references
R1: 6 sc in MR (6)
R2: inc x6 (12)
R3: (sc, inc) x6 (18)
R4: (2 sc, inc) x6 (24)
R5: (3 sc, inc) x6 (30)
R6: (4 sc, inc) x6 (36)
R7: sc around (36)
R8: sc around (36)
R9: sc around (36)
R10: sc around (36)
R11: (4 sc, dec) x6 (30)
R12: (3 sc, dec) x6 (24)
Insert eyes between R8 and R9, spaced 8 sts apart. Embroider nose between eyes 2 rounds lower.
R13: (2 sc, dec) x6 (18)
Stuff firmly.
R14: (sc, dec) x6 (12)
R15: dec x6 (6)
FO. Leave a 15 cm tail.
Body (Make 1)
Yarn: cream — Source: Standard amigurumi math, adapted to a stable seated base
R1: 6 sc in MR (6)
R2: inc x6 (12)
R3: (sc, inc) x6 (18)
R4: (2 sc, inc) x6 (24)
R5: (3 sc, inc) x6 (30)
R6: sc around (30)
R7: sc around (30)
R8: sc around (30)
R9: sc around (30)
R10: (3 sc, dec) x6 (24)
R11: sc around (24)
R12: (2 sc, dec) x6 (18)
Stuff the lower half firmly and the upper half medium.
R13: (sc, dec) x6 (12)
FO. Leave a 20 cm tail.
Arms / Front Legs (Make 2)
Yarn: cream — Source: Standard amigurumi math
R1: 6 sc in MR (6)
R2: inc x6 (12)
R3: sc around (12)
R4: sc around (12)
R5: (2 sc, dec) x3 (9)
R6: sc around (9)
R7: sc around (9)
Stuff hand only.
Flatten opening. FO. Leave an 18 cm tail.
Back Legs / Feet (Make 2)
Yarn: cream — Source: Standard amigurumi math
R1: 6 sc in MR (6)
R2: inc x6 (12)
R3: (sc, inc) x6 (18)
R4: sc around (18)
R5: sc around (18)
R6: (sc, dec) x6 (12)
R7: sc around (12)
R8: sc around (12)
Stuff the foot firmly, the upper section lightly. Flatten top.
FO. Leave a 20 cm tail.
Ears (Make 2)
Yarn: cream outer, beige inner—Source: Photo adaptation using plush-bunny ear proportions from chenille bunny references
With beige:
R1: ch 7, starting in 2nd ch from hook: 5 sc, 3 sc in last ch, working on opposite side 4 sc, inc in last st (14)
R2: inc, 4 sc, 3 inc, 4 sc, 2 inc (20)
Change to cream.
R3: BLO sc around (20)
R4: sc around (20)
R5: (3 sc, dec) x4 (16)
R6: sc around (16)
R7: (2 sc, dec) x4 (12)
Do not stuff. Flatten base.
FO. Leave a 25 cm tail.
Cinnamon Swirl Belly Piece (Make 1)
Yarn: beige, cream, brown — Source: Standard amigurumi math with color-striping to match photo
R1: with brown, 6 sc in MR (6)
R2: with cream, inc. x6 (12)
R3: with beige, (sc, inc) x6 (18)
R4: with brown, (2 sc, inc) x6 (24)
R5: with cream, (3 sc, inc) x6 (30)
R6: with beige, sc around (30)
R7: with brown, (3 sc, dec) x6 (24)
R8: with cream, sc around (24)
Lightly stuff into a flat dome. FO. Leave a 30 cm tail.
For the raised spiral, embroider one continuous swirl from the center outward in brown.
Frosted Bun Topper (Make 1)
Yarn: beige, cream, brown — Source: Standard amigurumi math inspired by published cinnamon-bun construction using BLO icing sections.
Base swirl
R1: with brown, 6 sc in MR (6)
R2: with cream, inc. x6 (12)
R3: with beige, (sc, inc) x6 (18)
R4: with brown, (2 sc, inc) x6 (24)
R5: with cream, sc around (24)
FO.
Icing flap
With cream, join in BLO of R4 front edge.
R1: (sl st, ch 2, sl st in next st) repeat around to create drip points.
FO. Leave the tail for sewing.
Pin the topper between ears before sewing. It should sit slightly forward, not centered and flat.
Cheek Patches (Make 2)
Yarn: pink — Source: Standard amigurumi math
R1: 6 sc in MR (6)
R2: inc x6 (12)
FO. Flatten lightly. Leave a 12 cm tail.
Assembly
- Sew the head to the body with the face centered over the widest part of the torso.
- Attach the belly swirl to the front body, covering the join area and sitting low enough to touch both legs.
- Place the eyes if not already inserted, and then embroider the nose and mouth between them.
- Sew the cheek patches one round below each eye, angled slightly outward.
- Pin the ears to the top sides of the head, leaving about 6 stitches between them.
- Sew the frosted bun topper between the ears, slightly forward so the icing hangs over the forehead line.
- Attach the arms at the upper body seam so they hug the belly swirl from both sides.
- Sew the legs at the lower front body, spread wide enough to make a seated base.
- Check the bunny from the front and side, then adjust ear tilt and arm angle before weaving in the last tufts.
- Weave all ends deep into the stuffing and shape the cheeks, topper, and swirl by hand.
The finished piece should sit upright with the belly roll centered and the topper resting securely between the ears.
7 Technical Tips
- Mark the first stitch of every round. Losing the round start on chenille usually shifts the face center by 1–2 stitches, and that misaligns the eyes with the nose.
- Stuff the head firmer than the body. A soft head collapses around 14 mm eyes and makes the icing topper lean forward.
- Use invisible decreases only on visible shaping rounds. Standard decreases leave wider holes, and cream chenille shows dark shadowing through those gaps.
- Insert safety eyes before the head drops below 24 stitches. Waiting until 18 stitches makes the backing washers hard to place without distorting the face.
- Keep ear bases at 12 stitches before flattening. Narrower bases twist inward and no longer frame the frosted topper.
- Pin the belly swirl before sewing. Even a 5 mm drift off center is visible because the spiral becomes the front focal point.
- Weave each tail through at least 4 cm of stuffing path. Short-tail burying slips out faster on plush yarn because the pile reduces friction.
Conclusion
This cinnamon bunny amigurumi crochet pattern works because the shaping stays disciplined: a 36-stitch head, a broad seated body, wide ears, and two bakery details that read instantly from the front. The next step is practical. Crochet the head and belly swirl first, then test the eye size before committing to the topper. Post the result to Pinterest and Instagram with a front view and a side view so the swirl depth and ear angle are visible. Use #CinnamonBunny when you share it. One question matters with this character more than most: Did you place the frosted bun topper centered or slightly forward over the forehead?









