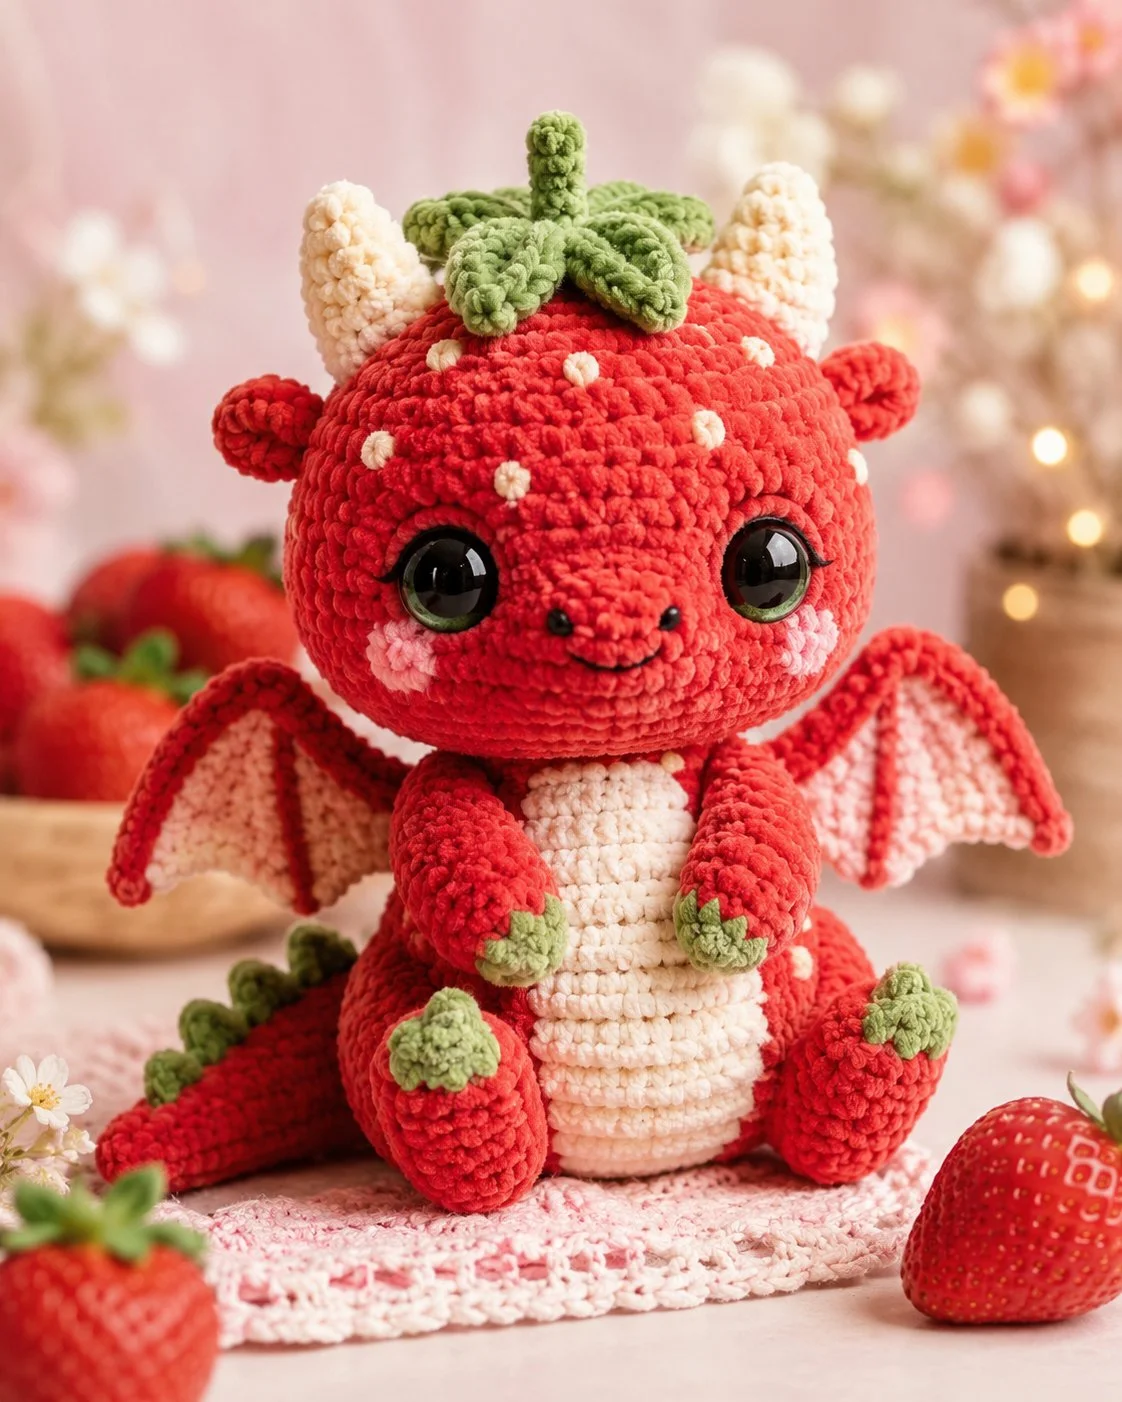
A strawberry dragon needs horns that read as fruit calyx, not goat points. This strawberry dragon amigurumi crochet pattern builds that look with plush yarn, a 24 cm target height, a 4 mm hook reference, and intermediate shaping. You will make it for shelf display, market stock, or a themed gift that combines fantasy structure with familiar fruit cues.
The Design: What Makes Strawberry Dragon Different
You need three reads to happen at once: dragon, strawberry, and plush toy. The first structural choice is the oversized sphere head, because the seed dots and leaf cap need a broad surface. The second is a separate cream belly panel, which stops the red body from reading as a dinosaur. The third is short-seated limbs, so the dragon stays upright and the wings remain visible from the front.
That balance matters. The piece reads as a fruit dragon because the green top sits like a calyx, not a crown, and the horns stay compact so they do not compete with the leaves. A common mistake with any strawberry dragon crochet pattern is adding long horns or a narrow snout; that pushes the silhouette back toward standard fantasy plush. For fruit dragon amigurumi, proportion does more work than surface detail.
Project Info at a Glance
Skill Level: Time Finished, Size: Hook, Best For: Intermediate, 6–8 hours, 24 cm, 4 mm, Display plush, gift, themed market make
The finished size and hook reflect the closest verified plush strawberry-dragon reference. Skill level also aligns with the free Ribblr pattern listing.
Materials and Tools
Yarn
- Red chenille plush—bulky/plush—approx. 120 g—Premier Basix Chenille or a similar plush yarn style matches the look best. Plush yarn is the closest verified material family for this style.
- Cream chenille plush — bulky/plush — approx. 35 g
- Leaf green chenille plush — bulky/plush — approx. 20 g
- Light pink chenille plush — bulky/plush — approx. 15 g
- White yarn — small amount for seed spots and optional eye highlights
Tools
- Hook 4 mm
- 20 mm safety eyes
- Polyester stuffing
- Yarn needle
- Stitch markers
- Black embroidery thread for nostrils and smile
The 4 mm hook and 20 mm eyes come from the closest verified plush strawberry-dragon reference. Other public strawberry-dragon listings show different yarn systems and hooks, which is why gauge and yarn choice shift the final size.
Abbreviations
MR = magic ring
sc = single crochet
inc = increase
dec = invisible decrease
sl st = slip stitch
ch = chain
BLO = back loop only
FLO = front loop only
Use invisible decrease instead of a standard two-stitch decrease on all closing rounds; it keeps chenille shaping cleaner and reduces the laddering that shows around the muzzle and belly edge.
Pattern—Step by Step
Continuous spiral unless noted.
Head (Make 1)
Yarn: red—Standard amigurumi math, adapted for the photographed large round head using a 42-st plateau. Related dragon head/body shaping references confirm the general increase and decrease structure.
R1: 6 sc in MR (6)
R2: inc x6 (12)
R3: (sc, inc) x6 (18)
R4: (2 sc, inc) x6 (24)
R5: (3 sc, inc) x6 (30)
R6: (4 sc, inc) x6 (36)
R7: (5 sc, inc) x6 (42)
R8–R14: sc around (42)
Insert safety eyes between R10 and R11, spaced 10 stitches apart.
R15: (5 sc, dec) x6 (36)
R16: (4 sc, dec) x6 (30)
R17: (3 sc, dec) x6 (24)
Stuff firmly. Keep the lower front slightly fuller for the muzzle.
R18: (2 sc, dec) x6 (18)
R19: (sc, dec) x6 (12)
R20: dec x6 (6)
Fasten off. Leave a 20 cm tail.
Body (Make 1)
Yarn: red—Standard amigurumi math for a seated oval body with a 36-st plateau.
R1: 6 sc in MR (6)
R2: inc x6 (12)
R3: (sc, inc) x6 (18)
R4: (2 sc, inc) x6 (24)
R5: (3 sc, inc) x6 (30)
R6: (4 sc, inc) x6 (36)
R7–R12: sc around (36)
R13: (4 sc, dec) x6 (30)
R14: sc around (30)
R15: (3 sc, dec) x6 (24)
R16: sc around (24)
Stuff firmly, but flatten the base a little so it sits.
R17: (2 sc, dec) x6 (18)
R18: sc around (18)
R19: (sc, dec) x6 (12)
R20: sc around (12)
Fasten off. Leave a 20 cm tail.
Belly Panel (Make 1)
Yarn: cream—Original flat oval adapted to the visible front panel.
Ch 7.
R1: Starting in 2nd ch from hook, 5 sc, 3 sc in last ch; working on opposite side, 4 sc, inc (14)
R2: inc, 4 sc, 3 inc, 4 sc, 2 inc (20)
R3: sc, inc, 4 sc, (sc, inc) x3, 4 sc, (sc, inc) x2 (26)
R4: sc around (26)
R5: (12 sc, dec) x2 (24)
Fasten off. Leave a 25 cm tail.
Arms / Front Legs (Make 2)
Yarn: red, then green claws—adapted from standard limb math and related dragon limb references.
With green:
R1: 6 sc in MR (6)
R2: sc around (6)
Change to red.
R3: (sc, inc) x3 (9)
R4–R8: sc around (9)
Light stuffing only at the paw.
R9: flatten and sc through both sides across 4 stitches (4)
Fasten off. Leave an 18 cm tail.
Back Legs (Make 2)
Yarn: red, then green claws
With green:
R1: 6 sc in MR (6)
R2: inc x6 (12)
R3: sc around (12)
Change to red.
R4: BLO sc around (12)
R5: (2 sc, dec) x3 (9)
R6–R8: sc around (9)
Stuff the foot firmly, the upper leg lightly.
R9: flatten and sc through both sides across 4 stitches (4)
Fasten off. Leave a 20 cm tail.
Wings (Make 2)
Yarn: red outer edge, pink inner membrane—Row structure adapted from a verified dragon wing reference, resized for this seated plush.
With pink, ch. 2.
R1: 3 sc in 2nd ch from hook, turn (3)
R2: ch 1, inc, sc, inc (5)
R3: ch 1, inc, 3 sc, inc (7)
R4: ch 1, inc, 5 sc, inc (9)
R5: ch 1, inc, 7 sc, inc (11)
R6: ch 1, inc, 9 sc, inc (13)
R7: ch 1, inc, 11 sc, inc (15)
R8–R9: ch 1, sc across (15)
Do not fasten off. Switch to red and crochet evenly around the wing edge. At the lower edge, work (sl st, sc, hdc, sc) into each point to create a soft scallop.
Fasten off. Leave a 22 cm tail.
Horns (Make 2)
Yarn: cream—The photo shows short upright horns that sit under the leaf cap.
R1: 6 sc in MR (6)
R2: sc around (6)
R3: (sc, inc) x3 (9)
R4–R5: sc around (9)
Stuff lightly.
R6: flatten and sc through both sides across 4 stitches (4)
Fasten off. Leave a 15 cm tail.
Tail (Make 1)
Yarn: red
R1: 6 sc in MR (6)
R2: (sc, inc) x3 (9)
R3: sc around (9)
R4: (2 sc, inc) x3 (12)
R5–R12: sc around (12)
R13: (2 sc, dec) x3 (9)
R14–R18: sc around (9)
Stuff the base half only. Keep the tip flexible.
Fasten off. Leave a 22 cm tail.
Back Spikes (Make 4)
Yarn: green—Based on simple spike shaping used across dragon patterns.
R1: 6 sc in MR (6)
R2: sc around (6)
R3: (sc, inc) x3 (9)
R4: sc around (9)
Fasten off. Do not stuff. Leave a 12 cm tail.
Leaf Crown (Make 5)
Yarn: green—Adapted to mimic strawberry calyx leaves noted in strawberry-dragon mod guides.
Ch. 7.
R1: Starting in 2nd ch from hook, sl st, sc, hdc, dc, hdc, sc (6)
Fasten off. Leave a 12 cm tail.
Stem (Make 1)
Yarn: green
R1: 6 sc in MR (6)
R2–R4: sc around (6)
Fasten off. Leave a 12 cm tail.
Cheek Patches (Make 2)
Yarn: light pink
R1: 6 sc in MR (6)
R2: inc x6 (12)
Fasten off. Leave a 15 cm tail.
Seed Spots (Make 10–12)
Yarn: white — Surface embroidery
Make small straight stitches or French-knot style seed dots scattered across the upper head. Concentrate them above the eyes and across the forehead, not near the muzzle.
Face Embroidery
Black thread
Embroider two nostrils between the eyes, about 3 stitches apart. Add a short, curved smile one round below.
Assembly
- Sew the head to the body, centering it slightly forward so the dragon keeps a seated pose.
- Pin and sew the belly panel to the front body from the neck base to the lower belly.
- Attach the cheek patches two rounds below the eyes and one stitch outside each eye edge.
- Embroider the nostrils and smile before adding horns or leaves.
- Sew the arms to the upper body, aligning paw tips to meet near the belly center.
- Sew the back legs low on the body so the feet angle outward and support the seated silhouette.
- Attach the wings to the upper back, one to two rounds below the head seam.
- Sew the tail to the lower back center and curve it to one side.
- Stitch the back spikes along the tail and upper back, spacing them evenly.
- Attach the horns, then sew the five leaves in a ring on top of the head and place the stem in the center. Add the seed spots last.
The piece is complete when it sits without rolling and the leaf cap stays centered between the horns.
7 Technical Tips
- Mark the first stitch of every round on the head. Losing one increase round on a 42-st plateau shifts eye spacing by up to 2 stitches, and the face will lean.
- Stuff the head with a firm, springy fill, then add 10 percent more. Understuffed chenille heads collapse between 20 mm eyes and create a dent above the muzzle.
- Work every dec as an invisible decrease. Standard decreases leave horizontal bars that show most on red plush yarn near the snout.
- Insert the eyes before the last three decrease rounds of the head. After R17, chenille pile and stuffing pressure make 20 mm backs much harder to seat.
- Keep wing tension one half step tighter than body tension. Loose rows in the membrane sag, and the lower scallop curls inward instead of outward.
- Pin the leaf crown first with the stem in place. If the leaves are sewn before the stem is centered, one horn usually ends up visually shorter.
- Weave limb tails back through the body for at least 4 cm. Short tail burying slips in plush yarn and a seated dragon lose paw angle after handling.
Conclusion
This build works because the fruit signals stay structural: leaf cap, seed spots, compact horns, and a short seated body. That is what makes the strawberry dragon amigurumi crochet pattern read clearly from the front before any close detail shows. Next, swatch your red chenille with the 4 mm hook, confirm the eye scale against the head after R10, and then start the full plush. Share the finished piece on Pinterest and Instagram with the tag #StrawberryDragonPattern. One question remains useful for future versions: should the leaf cap sit flat like a calyx or stand higher to frame the horns more sharply?









