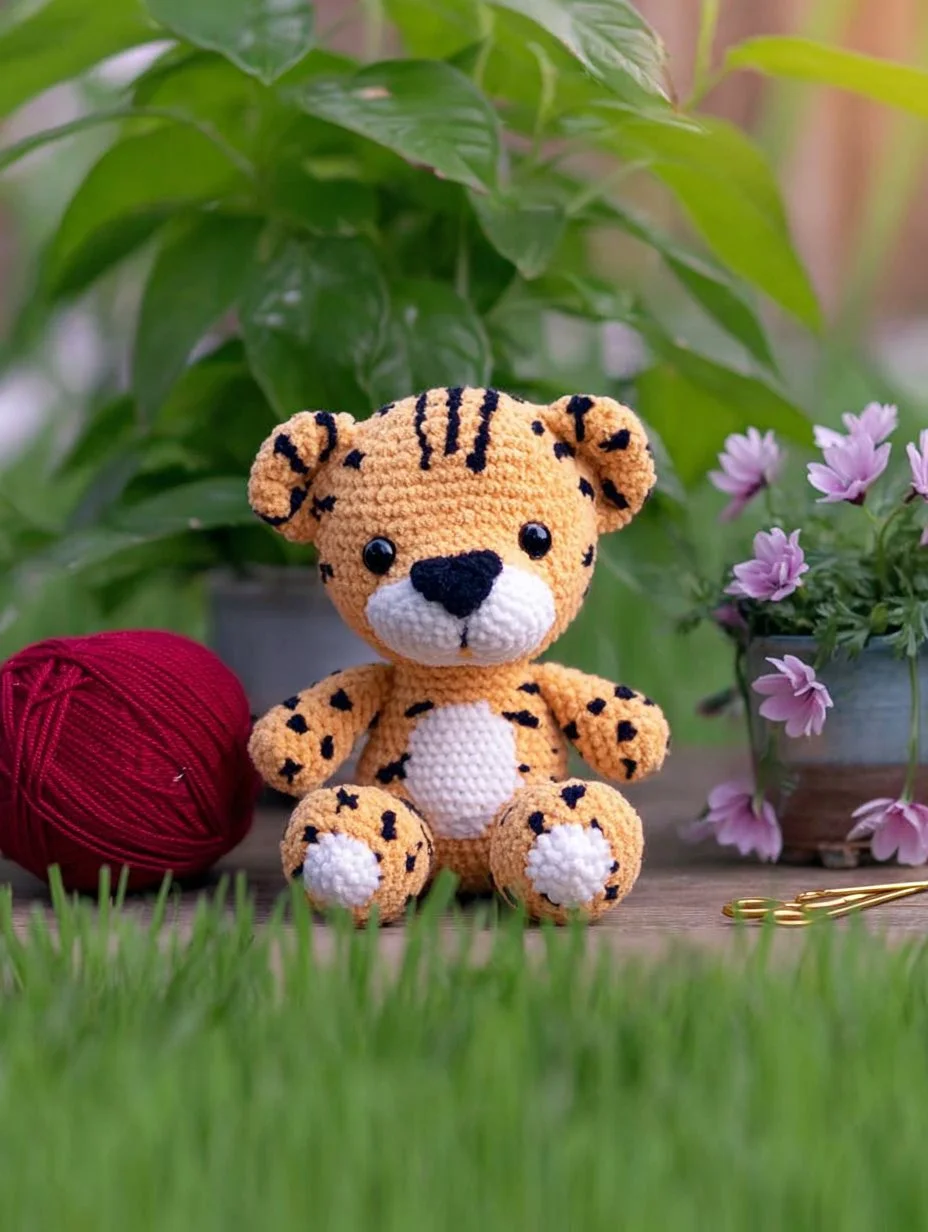
Jade the Jaguar: A Fierce and Free Crochet Pattern
A jaguar pattern requires a unique structure that exhibits both strength and grace, making it an interesting project for crocheters. This Jade the Jaguar crochet pattern results in a plush companion approximately 25 cm tall, utilizing super bulky yarn, which adds a soft texture and enhances the plush toy’s overall appearance. This project is suited for those with basic crochet skills and will take about 5 to 6 hours to complete. This handmade amigurumi toy can serve as a decorative piece or a playful companion for children.
The Design: What Makes Jade the Jaguar Different
The primary body shape of Jade the Jaguar emphasizes a sturdy yet streamlined form, allowing the plush to stand with stability. The head is proportionally larger than the body to give it that cartoonish charm, while still retaining the fierce look associated with jaguars. The limbs are strategically placed; the front legs sit slightly forward to mimic a natural stalking position, while the hind legs are parallel to support a confident stance.
One of the key special features of this design is Jade’s large, pointed ears and distinctive cheek patches that echo the patterns found in a real jaguar’s fur. These features must be incorporated thoughtfully during assembly to maintain the character’s iconic look. The plush yarn’s bulky texture complements the rounded shapes that give the toy its cuddly appeal.
A common maker mistake with this design is neglecting to stuff the limbs firmly, which can lead to a floppy appearance. To avoid this, ensure that you provide even stuffing throughout, particularly at the tips of the legs to help maintain a well-defined shape. This design effectively translates into a handmade amigurumi toy through its balanced dimensions, emphasizing both realism and plush comfort, making it a delightful creation for anyone who enjoys crochet.
Project Info at a Glance
| Skill Level | Time | Finished Size | Hook | Yarn |
|——————|———–|—————|——–|————–|
| Beginner Plus | 5–6 hours | 25 cm | 4.5 mm | Super Bulky |
Materials and Tools
For this project, it is vital to choose materials that suit the plush character and its expected durability. The super bulky yarn not only helps create a squishy texture but also supports a significant structure to withstand play.
Yarn
- Main color super bulky yarn — 150 g for head, body, and limbs
- Accent color super bulky yarn — 80 g for special features such as the spots on the fur
- Detail color yarn — 30 g for face embroidery and any additional patterns
When selecting your main color, consider a strong, contrasting accent that will bring out the beauty of the design. This flexibility allows you to express your creativity; even changing the primary color can lead to a different character interpretation.
Tools
- 4.5 mm crochet hook
- 18 mm safety eyes
- Polyester fiberfill
- Yarn needle
- Locking stitch marker
- Pins
- Scissors
- Embroidery thread
Using locking stitch markers will help you keep track of your rounds, especially when working in continuous spirals. Pins are essential for positioning the limbs and features before sewing, ensuring that your plush has the correct proportions and symmetry.
Abbreviations
MR = magic ring
sc = single crochet
inc = increase
dec = invisible decrease
sl st = slip stitch
ch = chain
BLO = back loop only
FO = fasten off
Invisible decrease means working through the front loops of the next two stitches before completing one single crochet.
Pattern Notes
This pattern is worked in a continuous spiral style unless specified otherwise. Always use a stitch marker to track the beginning of each round. When stuffing, aim for a firm fill, but avoid stretching the stitches too tightly to maintain the plush’s softness.
Be sure to place the safety eyes before closing the head to avoid making the process cumbersome later. For effective assembly, it’s best to pin all limbs and special features first, allowing you to visualize the final product before sewing them into place. Plush yarn can cause some stitch visibility to be less defined; thus, count your stitches to ensure consistency.
The exact finished size can vary slightly based on your tension, so keep this in mind while making adjustments to maintain balance. Ensure the character remains stable by paying close attention to the placement of limbs and features, preserving Jade’s distinct look.
Pattern — Step by Step
Head Make 1
R1: 6 sc in MR (6)
R2: inc ×6 (12)
R3: [sc, inc] ×6 (18)
R4: [2 sc, inc] ×6 (24)
R5: [3 sc, inc] ×6 (30)
R6: [4 sc, inc] ×6 (36)
R7: [5 sc, inc] ×6 (42)
R8: [5 sc, dec] ×6 (36)
R9: [4 sc, dec] ×6 (30)
R10: [3 sc, dec] ×6 (24)
R11: [2 sc, dec] ×6 (18)
R12: [sc, dec] ×6 (12)
R13: dec ×6 (6)
FO, leaving a long tail for sewing.
Stuff the head firmly, ensuring the shape maintains a rounded appearance. Attach eyes securely at the end of R6 before continuing so they are well-anchored once the head is fully closed.
Body Make 1
R1: 6 sc in MR (6)
R2: inc ×6 (12)
R3: [sc, inc] ×6 (18)
R4: [2 sc, inc] ×6 (24)
R5: [3 sc, inc] ×6 (30)
R6: [4 sc, inc] ×6 (36)
R7: [5 sc, inc] ×6 (42)
R8: [6 sc, inc] ×6 (48)
R9-21: [sc] ×48 (48)
R22: [6 sc, dec] ×6 (42)
R23: [5 sc, dec] ×6 (36)
R24: [4 sc, dec] ×6 (30)
R25: [3 sc, dec] ×6 (24)
R26: [2 sc, dec] ×6 (18)
R27: [sc, dec] ×6 (12)
R28: dec ×6 (6)
FO, leaving a long tail for sewing.
Firmly stuff the body, paying particular attention to the neck area, ensuring enough support for the head. The body joins naturally with the head to create a solid connection that enables Jade to sit upright with stability.
Front Legs Make 2
R1: 6 sc in MR (6)
R2: inc ×6 (12)
R3-6: [sc] ×12 (12)
R7: [1 sc, dec] ×4 (8)
R8: dec ×4 (4)
FO, leaving a long tail for sewing.
The front legs should be stuffed lightly to maintain their proportionate size in relation to the body. Position them slightly forward on the body for a natural look.
Back Legs Make 2
R1: 6 sc in MR (6)
R2: inc ×6 (12)
R3-7: [sc] ×12 (12)
R8: [1 sc, dec] ×4 (8)
R9: dec ×4 (4)
FO, leaving a long tail for sewing.
These back legs are larger than the front legs. When sewing them onto the body, ensure they are aligned properly for balance and visual appeal.
Cheek Patches Make 2
R1: 6 sc in MR (6)
R2: inc ×6 (12)
sl st to close.
FO, leaving a tail for sewing.
Attach cheek patches below the eyes to give them a fuller appearance. The patches should curve outward slightly to capture the character’s essence.
Tail Make 1
R1: 6 sc in MR (6)
R2: inc ×6 (12)
R3-4: [sc] ×12 (12)
R5: [1 sc, dec] ×4 (8)
R6: dec ×4 (4)
FO, leaving a long tail for sewing.
This jaguar tail is short, but it adds to the overall aesthetic. Position the tail to the rear to give balance, preventing the plush from tipping.
Face Embroidery
For the facial features, you’ll need to focus on the spacing and positioning for each element to ensure a symmetrical and appealing design.
- Eye Spacing: Position the safety eyes about 6 stitches apart, aligned centrally on the head.
- Nose Placement: Use the detail color yarn to create a small triangle-shaped nose centered between the eyes about 2 rows below.
- Mouth Stitch: Add a simple straight stitch or small "u" shape beneath the nose to create the mouth.
- Cheek Position: The cheek patches should fall just below the eyes and could be made with a contrasting yarn to enhance their visibility.
- Avoiding a Crooked Expression: Regularly check symmetry while stitching. If one side seems off, adjust the stitches accordingly before finishing off.
- Securing Embroidery Tails: Weave in the ends of your embroidery thread securely to avoid them coming loose or showing through the plush yarn.
Assembly
- Attach the head to the body using the long tail from the head. Position it centrally and ensure it’s secure.
- Attach the largest back feature, which in this case can be the tail, to maintain balance and symmetry in the design.
- Attach the front legs, making sure they align slightly forward on the body.
- Attach the back legs, positioning them straight down from the body to ensure stability.
- Add smaller special features, like the cheek patches, directly onto the head.
- Add safety eyes if they were not already secured during the head assembly.
- Embroider the nose and mouth carefully, ensuring they appear balanced.
- Sew the cheek patches in place, securing them firmly against the head.
- Check balance from the front, side, and back to make any necessary adjustments.
- Weave in ends and shape the plush, making sure it stands correctly.
This assemblage provides a complete and sturdy plush that reflects the character of Jade the Jaguar.
7 Technical Tips
-
Stitch Marker Drift: Always check your stitch marker after each round; if it slides, it could lead to unexpected results. This applies particularly to limbs which need to be uniform in count. Losing track can mean lopsided legs.
-
Stuffing Firmness: Aim for a firm stuffing throughout the entire piece, especially the limbs. If they are under-stuffed, they may droop and not support the plush’s overall look. This is particularly crucial for the front legs to maintain the jaguar’s poised stance.
-
Invisible Decrease Gaps: Ensure that you maintain tight tension during invisible decreases, as gaps must be avoided. This is particularly relevant on the head, where the shape will be more noticeable. Gaps can lead to uncharacteristic indentations that diminish the plush’s appeal.
-
Eye Placement Timing: Attach safety eyes before the head is completely closed; once stuffed, repositioning can be challenging. Be mindful of their placement regarding the mouth and overall expression. Incorrect positioning can give a skewed appearance.
-
Plush Yarn Tension: Maintain consistent tension throughout your project, as plush yarn can behave unpredictably. Uneven tension can result in varying sizes or shapes that may not fit together well. Regularly check your stitches to ensure uniformity.
-
Pinning Before Sewing: Always pin all parts before sewing to visualize placement. This is crucial to prevent misalignment which can affect the character’s posture. Check the placement from multiple angles for balanced assembly.
-
Tail Weaving: Make sure to weave in the ends throughout your assembly process, especially on the tail. If left loose, they can cause it to fluff or lose desirable shape. Check the tail’s firmness to retain clarity in its shape.
Related Patterns
-
Cacique the Capybara — This bucolic creature utilizes similar color schemes and yarn types, perfect for creating a cohesive collection. [INTERNAL LINK NEEDED: capybara pattern]
-
Pico the Parrot — A vibrant, feathered friend that pairs well with Jade, sharing the same joy of vibrant colors and plush construction. [INTERNAL LINK NEEDED: parrot pattern]
-
Misty the Manatee — With its round body and soft features, this pattern complements Jade well in appearance and texture, creating a delightful underwater ambiance. [INTERNAL LINK NEEDED: manatee pattern]
-
Kiki the Kiwi — This bird pattern adds a whimsical touch to your collection. It emphasizes the fun shapes and playful construction seen in the jaguar pattern. [INTERNAL LINK NEEDED: kiwi pattern]
Conclusion
This Jade the Jaguar crochet pattern provides a clear and engaging project for those looking to create a striking plush toy. By following these detailed steps, you can produce an impressive handmade amigurumi toy that showcases both design and craftsmanship. Save this pattern on Pinterest for future reference and don’t forget to share your finished creation on Instagram using #JadeTheJaguar. What colors will you choose to give your own jaguar a unique twist?









