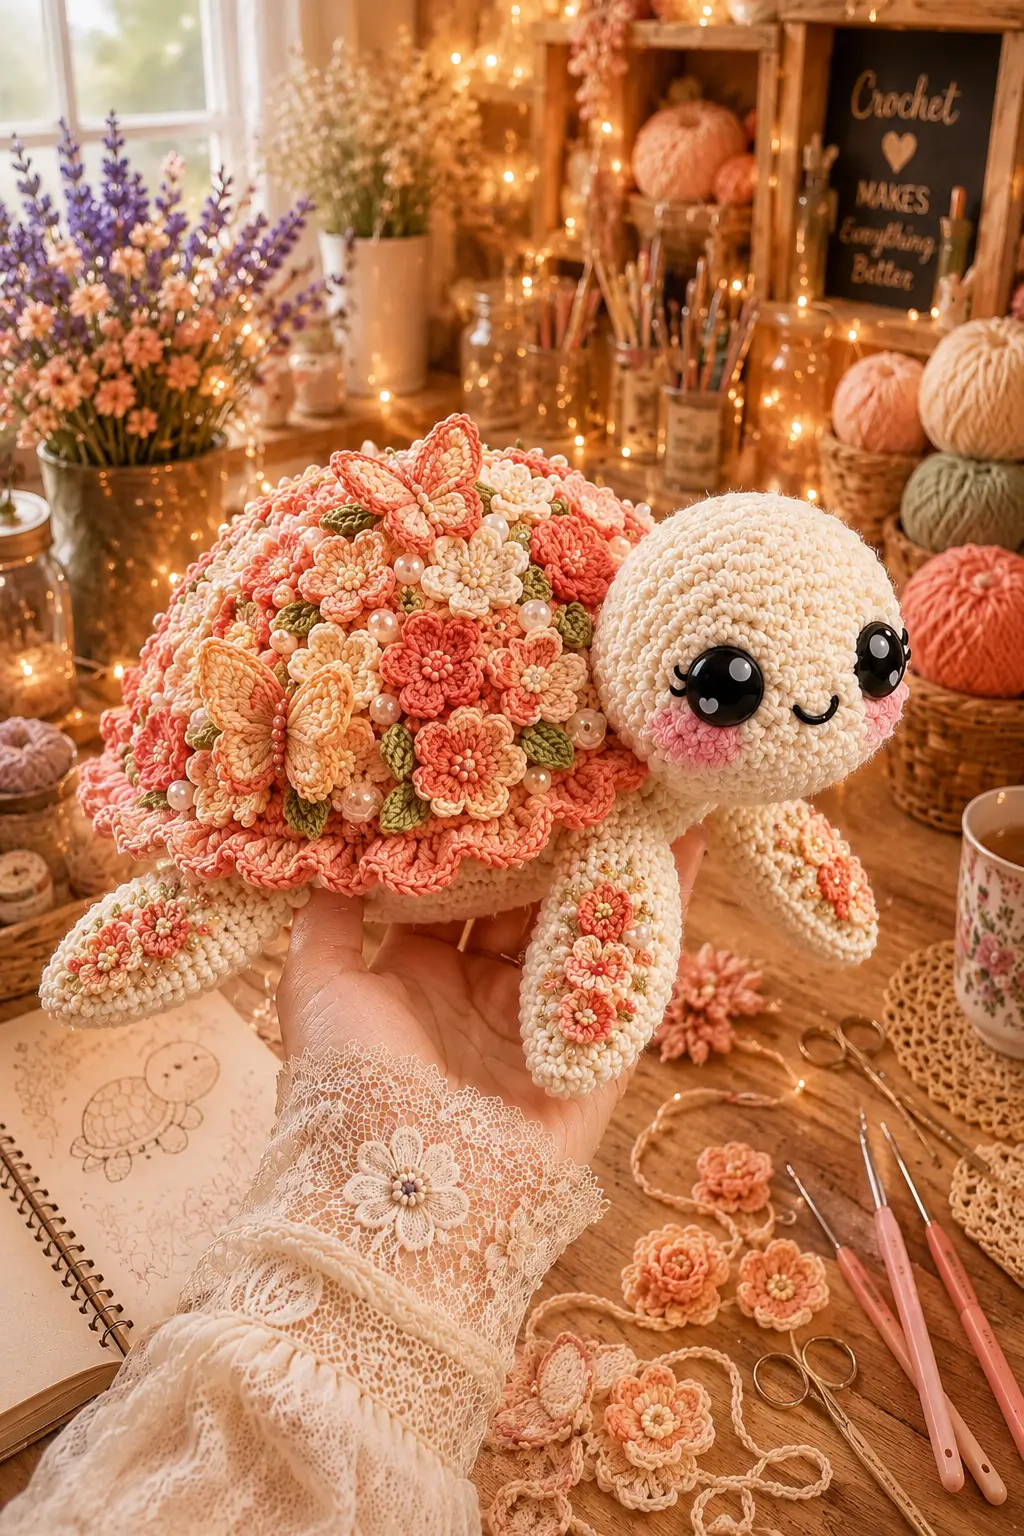
A turtle shell is a roof, but this one has to carry a garden. This turtle amigurumi crochet pattern builds a cream sea turtle with a floral shell, pearl accents, and butterfly appliqués using chunky yarn, a 4 mm hook, and 20 mm safety eyes. At about 32 cm long, it is an intermediate display piece with enough surface area for controlled flower placement.
The Design: What Makes This Floral Turtle Different
The design starts with a broad shell dome rather than a round animal body. Turtles read from the shell first, so the body is kept low and stable while the head stays smooth and cream. A 42-stitch shell plateau gives a flat landing field for the rose clusters; a smaller 36-stitch head prevents the toy from tipping forward. Flippers are flattened, not stuffed tubes, because stuffed flippers lift the shell and make the turtle rock on the table. The common mistake in a floral turtle amigurumi is placing every blossom at the crown. That makes the shell look like a bouquet, not a carapace. This crochet sea turtle amigurumi spreads large blossoms along the top line, then uses leaves, pearl beads, and two butterflies to break the coral mass.
Project Info at a Glance
| Skill Level | Time | Finished Size | Hook | Best For |
|---|---|---|---|---|
| Intermediate | 2–3 hours before decoration; longer with flowers | About 32 cm | 4 mm | Display, craft-table sample, spring décor |
Materials and Tools
Yarn
- Cream — super bulky chenille/velvet — 45 g from a 75 g two-color allowance — Premier Parfait Chunky or similar
- Coral pink — super bulky chenille/velvet — 30 g — shell flowers and larger blossoms
- Light peach — super bulky chenille/velvet — 15 g — flower centers and butterfly wings
- Blush pink — super bulky chenille/velvet — 10 g — cheek patches and small blossoms
- Butter yellow — super bulky chenille/velvet — 5 g — flower centers
- Sage green — super bulky chenille/velvet — 20 g — leaves and optional vines
Tools
- Hook 4 mm
- 20 mm safety eyes
- Polyester fiberfill
- Yarn needle
- Locking stitch markers
- Black embroidery floss
- 8–12 faux pearl beads
- Long sewing pins
Use beads only for display items. For toys handled by small children, replace pearl beads with embroidered French knots.
Abbreviations
MR = magic ring / sc = single crochet / inc = increase / dec = decrease / sl st = slip stitch / ch = chain / BLO = back loop only / hdc = half double crochet / dc = double crochet / tr = treble crochet / FO = fasten off.
Invisible decrease is worked through the front loops of the next two stitches so the fabric loses one stitch without a raised bar.
Pattern — Step by Step
Continuous spiral unless noted.
Head
Yarn: cream
R1: 6 sc in MR (6)
R2: inc ×6 (12)
R3: (sc, inc) ×6 (18)
R4: (2 sc, inc) ×6 (24)
R5: (3 sc, inc) ×6 (30)
R6: (4 sc, inc) ×6 (36)
R7–R12: sc around (36)
Place safety eyes between R9 and R10, 12 stitches apart. Add black embroidery lashes before closing if the back washers block the needle path.
R13: (4 sc, dec) ×6 (30)
R14: (3 sc, dec) ×6 (24)
R15: (2 sc, dec) ×6 (18)
R16: (sc, dec) ×6 (12)
Stuff firmly, especially under the eyes.
R17: dec ×6 (6)
Fasten off. Leave a 25 cm tail for head shaping.
Body and Shell Dome
Yarn: cream
R1: 6 sc in MR (6)
R2: inc ×6 (12)
R3: (sc, inc) ×6 (18)
R4: (2 sc, inc) ×6 (24)
R5: (3 sc, inc) ×6 (30)
R6: (4 sc, inc) ×6 (36)
R7: (5 sc, inc) ×6 (42)
R8–R14: sc around (42)
Hold the dome flat against the table after R10. A tilted dome means one side has gained or lost a stitch.
R15: (5 sc, dec) ×6 (36)
R16: sc around (36)
R17: (4 sc, dec) ×6 (30)
R18: (3 sc, dec) ×6 (24)
Stuff the shell enough to dome upward, not enough to bulge underneath.
R19: (2 sc, dec) ×6 (18)
R20: (sc, dec) ×6 (12)
R21: dec ×6 (6)
Fasten off. Leave a 35 cm tail for closing and anchoring.
Front Flippers ×2
Yarn: cream
R1: 6 sc in MR (6)
R2: inc ×6 (12)
R3: (sc, inc) ×6 (18)
R4–R7: sc around (18)
R8: (sc, dec) ×6 (12)
R9–R10: sc around (12)
Do not stuff. Flatten the opening so the flipper forms a paddle.
R11: sc through both layers across the opening (6)
Fasten off. Leave a 30 cm sewing tail on each front flipper.
Back Flippers ×2
Yarn: cream
R1: 6 sc in MR (6)
R2: inc ×6 (12)
R3: (sc, inc) ×6 (18)
R4–R5: sc around (18)
R6: (sc, dec) ×6 (12)
R7: sc around (12)
Keep these shorter than the front flippers so the turtle sits forward, not backward.
R8: sc through both layers across the opening (6)
Fasten off. Leave a 25 cm sewing tail on each back flipper.
Tail
Yarn: cream
R1: 6 sc in MR (6)
R2–R4: sc around (6)
Do not stuff. Pinch the last round flat.
R5: sc through both layers across the opening (3)
Fasten off. Leave a 20 cm tail.
Cheek Patches ×2
Yarn: blush pink
R1: 6 sc in MR (6)
R2: inc ×6 (12)
R3: sl st around loosely (12)
Fasten off. Leave a 20 cm tail for sewing.
Mini Blossoms ×14
Yarn: coral, peach, blush, butter yellow
R1: 6 sc in MR (6)
R2: [sl st, ch 2, 2 hdc, ch 2, sl st] in each stitch around (6 petals)
Pull the starting tail tight after R2, not before, or the flower center will cup upward.
Fasten off. Leave a 20 cm tail on 8 blossoms and weave in the rest.
Layered Flowers ×6
Yarn: coral outer petals, peach or yellow center
R1: 6 sc in MR (6)
R2: inc ×6 (12)
R3: [sl st, ch 2, hdc, dc, hdc, ch 2, sl st] in every other stitch around (6 outer petals)
R4: working into skipped R2 stitches, [sl st, ch 1, sc, hdc, sc, ch 1, sl st] around (6 inner petals)
Keep the outer petals loose enough to lie over the shell curve.
Fasten off. Leave a 25 cm tail.
Leaves ×10
Yarn: sage green
Ch 6.
Row 1: sc in 2nd ch from hook, hdc, dc, hdc, 3 sc in last ch; working on other side of chain, hdc, dc, hdc, sc (10)
Row 2: sl st around the leaf edge (10)
Pull the beginning tail through the center chain to create a vein.
Fasten off. Leave a 15 cm sewing tail.
Butterfly Appliqués ×2
Yarn: peach and coral
Upper wings, make 4:
R1: 6 sc in MR (6)
R2: inc ×6 (12)
R3: (sc, inc) ×6 (18)
Fold and sl st through 3 edge stitches to pinch one side (3 joined stitches). Fasten off.
Lower wings, make 4:
R1: 6 sc in MR (6)
R2: inc ×6 (12)
Fold and sl st through 2 edge stitches to pinch one side (2 joined stitches). Fasten off.
Body, make 2:
Ch 8.
Row 1: sl st in 2nd ch from hook and across (7)
Use the body strip to cover the wing joins. Sew two upper wings above two lower wings, then wrap the body strip down the middle.
Fasten off. Leave a 20 cm tail.
Pearl Beads and Eyelashes
Materials: faux pearl beads and black embroidery floss
Cut 60 cm of sewing thread or split yarn. Add 8–12 pearls between flowers only after all appliqués are sewn. Stitch each bead twice through the shell fabric. Embroider three lashes at the outer edge of each safety eye before attaching the head to the shell.
Assembly
- Pin the head to the front of the body between R8 and R14 of the shell dome.
- Sew the head with a box-shaped join that catches at least 8 stitches on the head and 8 stitches on the body.
- Place the front flippers at the front lower quarter of the body, angled 25–30 degrees downward.
- Attach the back flippers lower and farther back so the shell still touches the table.
- Sew the tail at the rear center, aligned with the closing point of the shell.
- Add cheek patches below the eyes, leaving 1 stitch of cream fabric between each patch and the mouth line.
- Pin layered flowers first: one at the crown, two on each side of the dome, and one near the rear.
- Fill gaps with mini blossoms, then tuck leaves under flower edges before sewing them down.
- Attach butterfly appliqués on the upper left and rear right shell areas so they do not cover the head seam.
- Sew pearls last, weave every yarn tail through the shell interior, and trim only after the surface passes a light tug test.
The finished turtle has a cream body, low shell profile, floral carapace, pearl accents, and two raised butterflies.
7 Technical Tips
- Stitch marker failure mode: spiral drift. Move the marker on every round of the head and shell; a missed move shifts eye placement by one full stitch column.
- Stuffing failure mode: shell collapse. The shell should compress no more than 3 mm under a fingertip before flowers are added.
- Invisible decrease failure mode: raised bars. Work each decrease through front loops only on R13–R17 of the head and R15–R21 of the body.
- Eye placement measurement: 12 stitches apart. Install 20 mm eyes between R9 and R10 before R13, because the washer will not fit after the head narrows.
- Velvet tension failure mode: hidden skipped stitches. Count R7 of the shell twice; fuzzy yarn can hide a missed stitch and turn the 42-stitch plateau into 41.
- Pinning failure mode: flower crowding at the crown. Pin all 20 flower and leaf pieces before sewing the first one, then leave at least 1 visible cream stitch between large flowers.
- Tail weaving failure mode: bead pull-out. After sewing a pearl, run the thread 2 cm inside the shell, knot around an internal strand, then exit under a flower edge.
Conclusion
The shell decoration is the main control point in this project. Build the turtle first, then treat the flowers as a mapped surface instead of random trim. The next practical step is to crochet the cream head and shell, pin them together, and check whether the turtle sits level before making any blossoms. Save this turtle amigurumi crochet pattern to Pinterest for your project queue, and post the finished shell layout on Instagram with #FloralTurtleAmigurumi. For the next version, would you place the largest butterfly near the head like the sample, or move it toward the rear curve of the shell?









