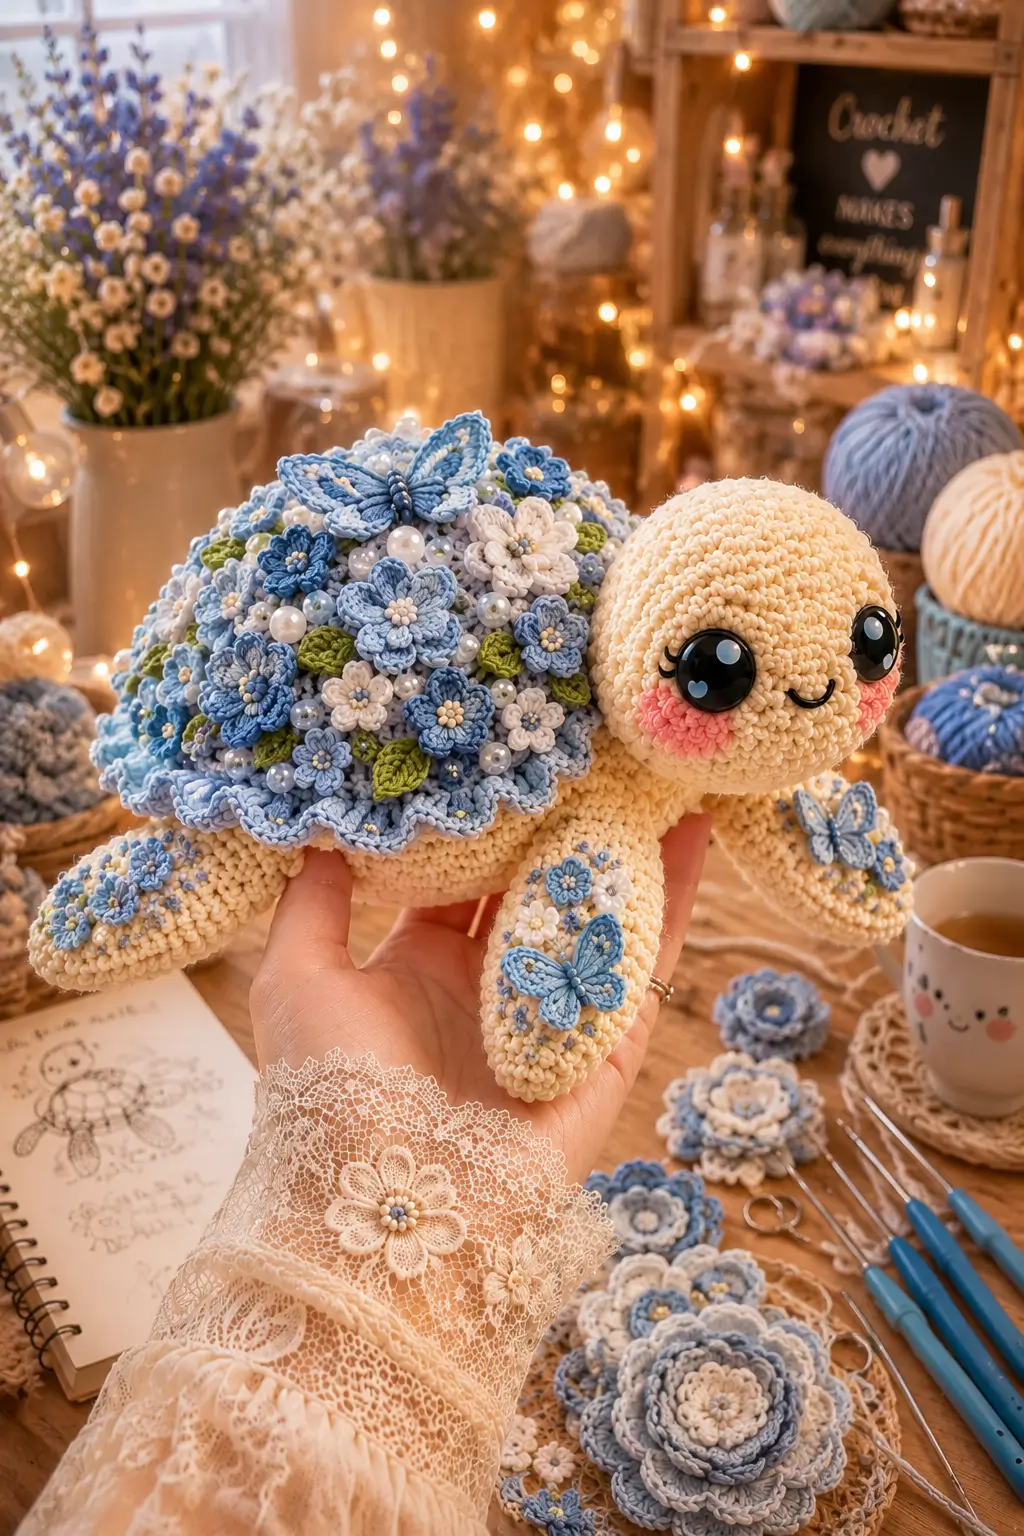
Sea turtles swim with front flippers, not paws, so a sea turtle amigurumi crochet pattern fails fast when the shell traps the paddles. This version uses cream super bulky chenille, blue-and-white floral appliqués, a 5 mm hook, 18 mm eyes, and a 23 cm finished length. The skill level is intermediate because the base is simple but the shell decoration needs ordered placement for display or market photography.
The Design: What Makes This Floral Turtle Different
You are building a swimmer, not a round tortoise. Low body. Wide shell. Flat paddles. This design separates the turtle into a firm underside, a domed shell cap, and sewn-on decoration instead of building every flower into the body. That choice keeps the crochet sea turtle plush stable: the center rests flat, while the cap gives height for the garden shell. The head is larger than a realistic turtle head because the photo uses kawaii eye scale; a 42-stitch plateau prevents a cone and gives enough surface for cheeks. The flippers stay flattened, not stuffed round, so the animal reads as a sea turtle. A common mistake in a floral turtle crochet pattern is loading the shell edge first. The maker who starts there pulls the cap sideways, so the butterfly and middle blossoms go on before the outer ring.
Project Info at a Glance
| Skill Level | Time | Finished Size | Hook | Best For |
|---|---|---|---|---|
| Intermediate | 5–7 hours | 23 cm | 5.0 mm | Display plush, craft-fair sample, supervised decor |
The 23 cm target follows a 9-inch chenille sea turtle benchmark rounded to the nearest centimeter; the hook and eye choices match common chenille-scale turtle data. Source: Sweet Softies.
Materials and Tools
Yarn
- Cream — super bulky chenille / velvet — 130 g — Bernat Blanket, Premier Basix Chenille, or Hobbii Toucan
- Powder blue — super bulky or matched plush yarn — 20 g — shell edge, flowers, butterflies
- Medium blue — super bulky or matched plush yarn — 12 g — contrast flowers and butterfly centers
- White — super bulky or matched plush yarn — 10 g — flowers and shell highlights
- Green — super bulky or matched plush yarn — 8 g — leaves
- Blush pink — small leftover — cheek patches
- Black embroidery yarn — small leftover — mouth and butterfly body
Main and contrast quantities are scaled from a super bulky turtle reference using 130 g main and 40 g contrast yarn. Extra floral pieces use leftover accent yarns. Source: CJ Design Blog.
Tools
- Hook 5.0 mm
- 18 mm black safety eyes, or embroidered eyes for a child-safe toy
- Polyester stuffing
- Yarn needle
- Locking stitch markers
- Pins
- Scissors
- Optional pearl beads for display only; omit beads for toys handled by children
Abbreviations
MR = magic ring; sc = single crochet; inc = 2 sc in one stitch; dec = single crochet decrease; sl st = slip stitch; ch = chain; BLO = back loop only; FLO = front loop only; hdc = half double crochet. Invisible decrease is worked through the front loops of the next two stitches so the decrease line sits inside the fabric.
Pattern — Step by Step
Continuous spiral unless noted. Use the large plateau rule for this photo-matched turtle: 42 stitches on the head, body, and shell cap. Insert a stitch marker in the first stitch of every round.
Head
Yarn: cream — Source: standard amigurumi math, adapted from verified turtle head and shell count references. Source: Stitch by Fay.
R1: 6 sc in MR (6)
R2: inc ×6 (12)
R3: (sc, inc) ×6 (18)
R4: (2 sc, inc) ×6 (24)
R5: (3 sc, inc) ×6 (30)
R6: (4 sc, inc) ×6 (36)
R7: (5 sc, inc) ×6 (42)
R8–R13: sc around (42)
R14: (5 sc, dec) ×6 (36)
R15: (4 sc, dec) ×6 (30)
R16: (3 sc, dec) ×6 (24)
R17: (2 sc, dec) ×6 (18)
R18: (sc, dec) ×6 (12)
R19: dec ×6 (6)
Insert eyes between R10 and R11, about 14–16 stitches apart, before closing. Stuff firmly at the cheeks and lightly at the neck opening.
Fasten off. Leave a 25 cm tail.
Body Underside
Yarn: cream — Source: standard amigurumi math, using the verified 42-stitch turtle shell plateau as scale reference. Source: Stitch by Fay.
R1: 6 sc in MR (6)
R2: inc ×6 (12)
R3: (sc, inc) ×6 (18)
R4: (2 sc, inc) ×6 (24)
R5: (3 sc, inc) ×6 (30)
R6: (4 sc, inc) ×6 (36)
R7: (5 sc, inc) ×6 (42)
R8–R12: sc around (42)
R13: (5 sc, dec) ×6 (36)
R14: (4 sc, dec) ×6 (30)
R15: (3 sc, dec) ×6 (24)
R16: (2 sc, dec) ×6 (18)
R17: (sc, dec) ×6 (12)
R18: dec ×6 (6)
Stuff less than the head. The underside should be oval, not spherical.
Fasten off. Leave a 30 cm tail.
Shell Cap
Yarn: powder blue or cream base, later covered with flowers — Source: standard amigurumi math and verified shell plateau count. Source: Stitch by Fay.
R1: 6 sc in MR (6)
R2: inc ×6 (12)
R3: (sc, inc) ×6 (18)
R4: (2 sc, inc) ×6 (24)
R5: (3 sc, inc) ×6 (30)
R6: (4 sc, inc) ×6 (36)
R7: (5 sc, inc) ×6 (42)
R8–R10: sc around (42)
R11: BLO sc around (42)
R12–R13: sc around (42)
Do not close the cap. It sits over the body like a shallow dome.
Fasten off. Leave a 40 cm sewing tail.
Scalloped Shell Edge
Yarn: powder blue — Source: decorative edge, standard amigurumi math.
Join yarn in any free front loop from Shell Cap R11.
R1: (sl st in next FLO, ch 3, sl st in same FLO, sc in next 2 FLO) ×14 (14 scallops)
Keep the scallops loose. A tight edge curls the shell upward.
Fasten off. Weave in the end.
Front Flippers / Wing Paddles
Make 2. Yarn: cream — Source: verified sea turtle flipper shaping starts from 6 and expands to 24 stitches. Source: Loops & Love Crochet.
R1: 6 sc in MR (6)
R2: inc ×6 (12)
R3: (sc, inc) ×6 (18)
R4: (2 sc, inc) ×6 (24)
R5–R8: sc around (24)
R9: (2 sc, dec) ×6 (18)
R10–R11: sc around (18)
R12: (sc, dec) ×6 (12)
R13: sc around (12)
Do not stuff. Flatten the flipper with the final round centered at the back edge.
Close with 6 sc through both layers (6). Fasten off. Leave a 30 cm tail.
Back Flippers
Make 2. Yarn: cream — Source: verified sea turtle back flipper construction uses a smaller round count than front flippers. Source: Loops & Love Crochet.
R1: 6 sc in MR (6)
R2: inc ×6 (12)
R3: (sc, inc) ×6 (18)
R4–R6: sc around (18)
R7: (sc, dec) ×6 (12)
R8: sc around (12)
Do not stuff. Flatten so the seam sits underneath.
Close with 6 sc through both layers (6). Fasten off. Leave a 25 cm tail.
Side Shell Wings
Make 2. Yarn: powder blue — Source: standard amigurumi math.
R1: 6 sc in MR (6)
R2: inc ×6 (12)
R3: (sc, inc) ×6 (18)
R4: (2 sc, inc) ×6 (24)
Fold the circle in half to make a half-moon. Sew one under each side of the shell to echo the photo’s wide floral spread.
Fasten off. Leave a 20 cm tail.
Tail
Yarn: cream — Source: verified turtle tail references use a short small cone; this photo keeps the tail mostly hidden. Source: Loops & Love Crochet.
R1: 6 sc in MR (6)
R2–R4: sc around (6)
Do not stuff. Pin below the shell center at the rear.
Fasten off. Leave a 20 cm tail.
Cheek Patches
Make 2. Yarn: blush pink — Source: standard flat circle math.
R1: 6 sc in MR (6)
R2: inc ×6 (12)
sl st to first stitch (12)
Flatten with fingers before sewing. Place each cheek one round below the eye.
Fasten off. Leave a 15 cm tail.
Large Five-Petal Flowers
Make 8. Yarn: white, powder blue, and medium blue — Source: standard crochet flower appliqué construction.
R1: 6 sc in MR (6)
R2: (sl st, ch 2, 2 hdc, ch 2, sl st) in each stitch around (6 petals)
Use white flowers near the face side and blue flowers near the rear shell for the photo’s gradient effect.
Fasten off. Leave a 20 cm tail.
Small Flowers
Make 12–16. Yarn: powder blue, medium blue, white — Source: standard crochet flower appliqué construction.
R1: 6 sc in MR (6)
R2: (sl st, ch 1, hdc, ch 1, sl st) in each stitch around (6 petals)
These fill gaps between large flowers. Keep three small flowers for the front flippers.
Fasten off. Leave a 15 cm tail.
Leaves
Make 12. Yarn: green — Source: standard appliqué leaf construction.
Ch 6.
Row 1: sl st in 2nd ch from hook, sc, hdc, sc, sl st (5 sts)
Row 2: working on opposite side of chain, sl st, sc, hdc, sc, sl st (5 sts)
Leaves should sit under flower edges, not on top of petals.
Fasten off. Leave a 12 cm tail.
Butterfly Appliqué
Make 2 butterflies. Yarn: powder blue, medium blue, black or dark blue — Source: standard round-wing appliqué construction.
Upper wings, make 2 per butterfly:
R1: 6 sc in MR (6)
R2: inc ×6 (12)
R3: (sc, inc) ×6 (18)
Lower wings, make 2 per butterfly:
R1: 6 sc in MR (6)
R2: inc ×6 (12)
Body: ch 7, sl st in 2nd ch from hook and across (6).
Sew upper wings above lower wings, then stitch the body over the join. Place the larger butterfly on top of the shell and the smaller butterfly on one front flipper.
Fasten off. Leave a 20 cm tail for each assembled butterfly.
Pearl Spots
Optional accessory from photo. Source: visual match only.
Use pearl beads only for display pieces. Place them between flowers after all sewing is complete. For child-safe work, replace every bead with a French knot made from white yarn.
Assembly
- Pin the head to the front of the body underside with the lower head edge crossing Body R8–R12.
- Sew the head twice around the neck join, then pull the yarn tail through the body and trim it inside the stuffing.
- Sew the cheek patches one round below the eyes, then embroider a shallow curved mouth centered between the cheeks.
- Pin the front flippers at the front-left and front-right sides, angled forward so their tips sit ahead of the shell edge.
- Sew the back flippers lower and farther back, leaving a gap at the rear center for the tail.
- Attach the tail at the rear center under the shell line.
- Place the shell cap over the body, with the scalloped edge covering the upper seam but not covering the flipper bases.
- Sew the shell cap around R12–R13, catching the body fabric every 2 stitches.
- Add the butterfly first, then large flowers, then leaves, then small flowers, working from shell center outward.
- Add flipper flowers and optional pearl spots last, then bury every yarn tail through the body core.
The finished turtle measures about 23 cm from nose to back flipper tip.
7 Technical Tips
- Stitch marker drift: If the marker shifts more than 3 stitches to one side by Head R10, the face will rotate. Move the marker only at the end of a round, never mid-round.
- Stuffing firmness: A head stuffed below 80% firmness collapses when the eyes are pressed in. Add small pieces of stuffing around the eye backs before closing R18.
- Invisible decrease ridges: A standard decrease leaves a visible ladder on chenille. Work every head and body decrease through front loops only to keep the fabric surface closed.
- Eye placement timing: Safety eyes must go in before Head R14 starts tightening. For 18 mm eyes, keep 14–16 stitches between posts or the cheeks will crowd the mouth.
- Velvet tension: Chenille sheds when pulled through tight stitches repeatedly. Use a 5.0 mm hook and redo any round where the yarn core shows across more than 2 stitches.
- Pinning failure: A shell pinned only at the front creeps backward during sewing. Pin at four points first: front center, rear center, left side, and right side.
- Tail weaving: Short chenille tails can work loose under flower weight. Weave every floral tail through at least 3 different shell stitches before trimming.
Conclusion
Check the shell silhouette before adding the last row of flowers. The turtle should still read as a sea turtle from the side: low underside, forward flippers, raised floral carapace, and a head wide enough for the large eyes. Your next step is to pin all shell decorations without sewing, photograph the layout from above, then stitch only after the spacing looks balanced. Share the finished turtle on Pinterest as a shell-placement reference and on Instagram with a close photo of the butterfly crown. Use #FloralSeaTurtle. For this sea turtle amigurumi crochet pattern, would you keep the largest butterfly centered on the shell or move it toward the front flipper?









