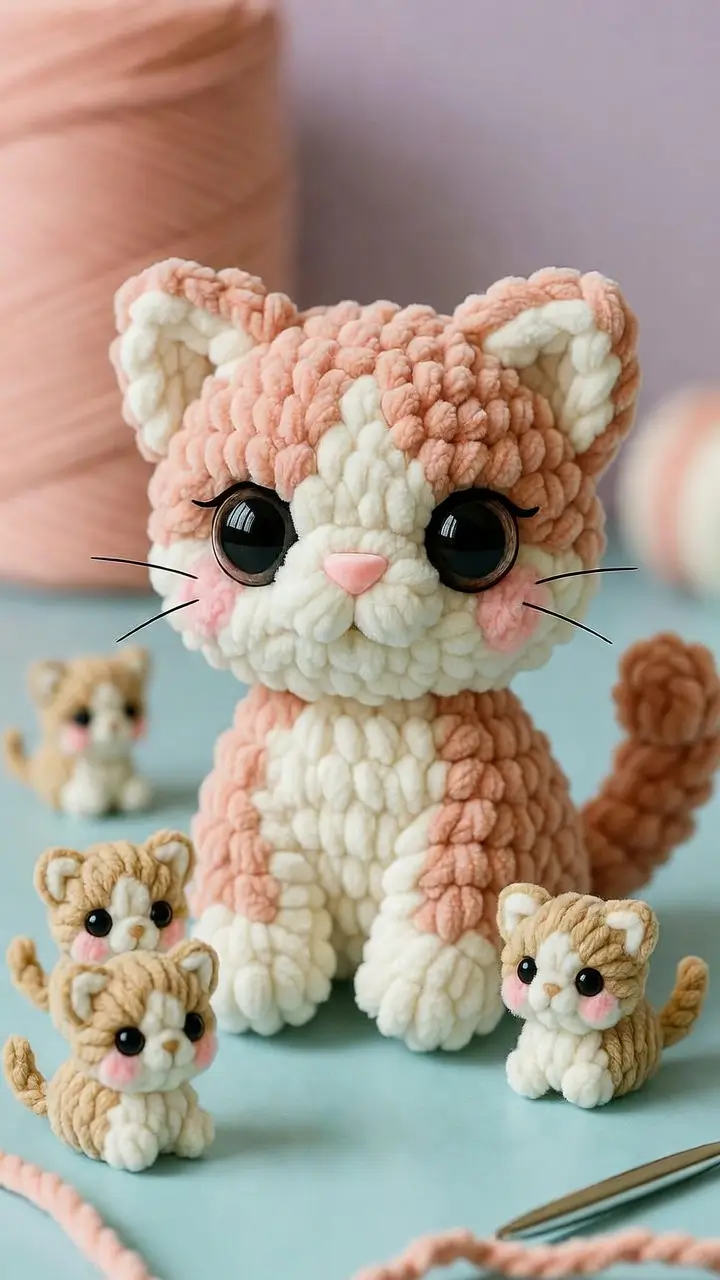
Calico kittens are a patchwork problem before they are a cat: every cream blaze, peach cheek, and upright ear has to land in the right stitch column. This calico cat amigurumi pattern uses chunky chenille, a 4.5 mm hook, 24 mm cat eyes, and large-form shaping. The finished toy sits near 24–30 cm and suits an advanced beginner who can control velvet tension.
The Design: What Makes This Calico Kitten Different
The photo cat is not a simple round kitten with random spots. Its structure depends on three mapped zones: a wide cream face blaze, peach side panels, and a cream belly that visually pulls the head and body into one vertical line. That line matters. Without it, the head reads as a peach ball with eyes, not a calico kitten.
The ears are broad cones, not flat triangles, because velvet yarn needs thickness at the base to stand up. The curled tail also acts as a rear prop, a common choice in plush cat crochet pattern construction when the head is oversized. A frequent error with chenille cat amigurumi is placing eyes too low after stuffing. The maker then loses the kitten face. Here, the eyes are locked before final head decreases, with the muzzle sewn below them.
Project Info at a Glance
| Skill Level | Time | Finished Size | Hook | Best For |
|---|---|---|---|---|
| Advanced beginner | 5–7 hours | 24–30 cm sitting | 4.5 mm | Velvet display cat, nursery shelf, photo prop |
Plush calico references support a 4.5 mm hook with plush yarn and a 30 cm without-tail benchmark, while calico source data also shows multi-color yarn use by grams. Source
Materials and Tools
Yarn
- Peach-apricot — plush chenille, 100 g / 120 m class — 1 ball, suggested: Himalaya Dolphin Baby or similar.
- Cream — plush chenille, 100 g / 120 m class — 1 ball, suggested: Wolans Bunny Baby or similar.
- Blush pink — plush chenille or DK cotton held double — 5 g, for cheeks and nose.
- Black — embroidery thread, fishing line, or fine cotton — 2 m, for whiskers and lashes.
- Tan or darker peach — plush chenille — 15–25 g, for optional calico patches and mini kitten.
Tools
- Hook 4.5 mm
- 24 mm cat-style safety eyes
- Polyester stuffing
- Yarn needle
- Locking stitch markers
- Straight pins
- Scissors
- Disappearing fabric marker
Large cat-style eyes are available in 21–24 mm sizes; use embroidered eyes instead for toys intended for children under 3. Source
Abbreviations
MR = magic ring; sc = single crochet; inc = 2 sc in one stitch; dec = invisible decrease over next 2 stitches; sl st = slip stitch; ch = chain; BLO = back loop only.
Invisible decrease should be worked through the front loops only so the chenille fabric does not leave a visible pucker at the decrease line.
Pattern — Step by Step
Work in a continuous spiral unless a section says otherwise. Counts are written in brackets. Use a stitch marker at the first stitch of every round.
Head
Yarn: peach-apricot, with cream face appliqué added later — Source: standard amigurumi math; comparable cat head count source uses 6-stitch increases and decreases to close. Source
R1: 6 sc in MR [6]
R2: inc ×6 [12]
R3: (sc, inc) ×6 [18]
R4: (2 sc, inc) ×6 [24]
R5: (3 sc, inc) ×6 [30]
R6: (4 sc, inc) ×6 [36]
R7: (5 sc, inc) ×6 [42]
R8–R15: sc around [42]
R16: (5 sc, dec) ×6 [36]
R17: (4 sc, dec) ×6 [30]
Place safety eyes between R10 and R11, 8 stitches apart. Angle the washers slightly upward toward the outer corners before closing them.
R18: (3 sc, dec) ×6 [24]
R19: (2 sc, dec) ×6 [18]
R20: (sc, dec) ×6 [12]
R21: dec ×6 [6]
Fasten off. Close the hole and hide the tail.
Cream Face Blaze
Yarn: cream — Source: image structure + standard flat-circle math.
R1: 6 sc in MR [6]
R2: inc ×6 [12]
R3: (sc, inc) ×6 [18]
R4: (2 sc, inc) ×6 [24]
R5: (3 sc, inc) ×6 [30]
Fasten off with a 35 cm tail. Flatten into a soft shield shape. Pin from the center forehead down between the eyes, ending above the muzzle.
Body
Yarn: peach-apricot — Source: standard amigurumi math; comparable cat body source documents round shaping from 6 to a plateau and down again. Source
R1: 6 sc in MR [6]
R2: inc ×6 [12]
R3: (sc, inc) ×6 [18]
R4: (2 sc, inc) ×6 [24]
R5: (3 sc, inc) ×6 [30]
R6: (4 sc, inc) ×6 [36]
R7: (5 sc, inc) ×6 [42]
R8–R14: sc around [42]
R15: (5 sc, dec) ×6 [36]
R16–R17: sc around [36]
R18: (4 sc, dec) ×6 [30]
R19: (3 sc, dec) ×6 [24]
R20: (2 sc, dec) ×6 [18]
R21: (sc, dec) ×6 [12]
R22: dec ×6 [6]
Stuff firmly at the base and medium-firm at the neck. A soft neck will let the large head tip forward.
Fasten off. Leave a 45 cm tail for sewing.
Cream Belly Patch
Yarn: cream — Source: image read + standard flat-circle math.
R1: 6 sc in MR [6]
R2: inc ×6 [12]
R3: (sc, inc) ×6 [18]
R4: (2 sc, inc) ×6 [24]
R5: (3 sc, inc) ×6 [30]
Fasten off with a 40 cm tail. Stretch vertically while pinning from body R8 to R18. Sew with small bites through the underside of the chenille stitches.
Front Legs
Yarn: cream for paws, peach-apricot for upper leg — Source: standard limb math; comparable cat sources include separate arms and feet. Source
Make 2.
R1: cream, 6 sc in MR [6]
R2: inc ×6 [12]
R3: (sc, inc) ×6 [18]
R4–R5: sc around [18]
R6: change to peach-apricot, sc around [18]
R7–R9: sc around [18]
R10: (sc, dec) ×6 [12]
R11: dec ×6 [6]
Stuff the paw only. Leave the upper section flatter so it sits close to the body.
Fasten off. Leave a 30 cm tail on each leg.
Back Legs
Yarn: cream for paws, peach-apricot for haunches — Source: standard amigurumi math.
Make 2.
R1: cream, 6 sc in MR [6]
R2: inc ×6 [12]
R3: (sc, inc) ×6 [18]
R4: (2 sc, inc) ×6 [24]
R5–R6: sc around [24]
R7: change to peach-apricot, sc around [24]
R8: (2 sc, dec) ×6 [18]
R9: (sc, dec) ×6 [12]
R10: dec ×6 [6]
Fasten off. Leave a 35 cm tail. Stuff the front half of each back leg.
Outer Ears
Yarn: peach-apricot — Source: image read + comparable calico sources that place ears as a key first construction step. Source
Make 2.
R1: 6 sc in MR [6]
R2: sc around [6]
R3: inc ×6 [12]
R4: sc around [12]
R5: (sc, inc) ×6 [18]
R6: sc around [18]
R7: (2 sc, inc) ×6 [24]
R8: sc around [24]
Do not stuff. Flatten the base. Fasten off with a 40 cm tail.
Inner Ears
Yarn: cream — Source: image read + standard cone reduction.
Make 2.
R1: 6 sc in MR [6]
R2: sc around [6]
R3: inc ×6 [12]
R4: sc around [12]
R5: (sc, inc) ×6 [18]
Fasten off. Flatten and sew inside each outer ear before attaching the ears to the head.
Muzzle Pads
Yarn: cream — Source: image read + standard small-sphere math.
Make 2.
R1: 6 sc in MR [6]
R2: inc ×6 [12]
R3–R4: sc around [12]
R5: dec ×6 [6]
Stuff lightly. Fasten off with a 25 cm tail. Sew the two pads side by side under the eyes, touching at the center.
Nose
Yarn: blush pink — Source: image read.
R1: 6 sc in MR [6]
R2: sc around [6]
Fasten off with a 20 cm tail. Flatten into a tiny triangle and sew at the top join of the muzzle pads.
Cheek Patches
Yarn: blush pink — Source: image read + standard flat-circle math.
Make 2.
R1: 6 sc in MR [6]
R2: inc ×6 [12]
Fasten off with a 20 cm tail. Sew one patch below each eye, slightly outside the muzzle pads.
Tail
Yarn: peach-apricot with optional darker peach tip — Source: comparable cat tail construction and balance role. Source
R1: 6 sc in MR [6]
R2: inc ×6 [12]
R3–R18: sc around [12]
R19: change to darker peach, sc around [12]
R20–R24: sc around [12]
R25: dec ×6 [6]
Stuff lightly every 5 rounds. Fasten off with a 45 cm tail. Curve the tail upward while sewing by taking two hidden anchoring stitches between R10 and R18 of the tail.
Calico Forehead and Side Patches
Yarn: cream and darker peach — Source: image read; colorwork demand is visible in calico crochet sources. Source
Make 3 small patches.
R1: 6 sc in MR [6]
R2: inc ×6 [12]
R3: (sc, inc) ×6 [18]
Fasten off with a 25 cm tail. Place one cream patch over the forehead blaze, one peach patch on the viewer’s right head side, and one peach patch on the body side. Sew only around the outer half of each patch first, then adjust shape before closing the seam.
Whiskers and Eyelashes
Material: black fishing line or firm black embroidery thread — Source: comparable cat patterns use fishing line whiskers. Source
Cut six whiskers at 12 cm each. Insert three on each side, starting one round below the eye line. Trim to 7–8 cm after knotting. For eyelashes, make one short curved stitch outside each eye, no longer than 1.5 cm.
Mini Kitten Prop
Yarn: tan and cream — Source: image accessory + standard mini amigurumi math.
R1: tan, 6 sc in MR [6]
R2: inc ×6 [12]
R3: (sc, inc) ×6 [18]
R4–R7: sc around [18]
R8: (sc, dec) ×6 [12]
R9: cream, sc around [12]
R10: dec ×6 [6]
Fasten off and close. Add 6 mm eyes or embroider eyes. Make two tiny ears with R1: 6 sc in MR [6], R2: sc around [6]. Sew to the top. Add a 6-stitch chain tail and tack it upward.
Assembly
- Pin the head to the body first, with the cream blaze centered over the cream belly patch.
- Sew the head to the body using the long body tail and a ladder stitch.
- Attach the cream face blaze before sewing the muzzle so the lower edge is covered.
- Sew the two muzzle pads under the eye line, then attach the pink nose at their top center.
- Add cheek patches 1 round below the eyes and 2 stitches outside the muzzle pads.
- Sew the ears across head rounds R5–R10, with inner ears facing forward.
- Attach front legs to body rounds R10–R17, close to the belly patch.
- Sew back legs low on the body, with the cream paws visible from the front.
- Attach the curled tail at the back across body rounds R8–R14, using two hidden stitches to hold the curve.
- Add whiskers, eyelashes, and the mini kitten prop after all yarn tails are buried.
The finished cat has a large head, stable sitting base, raised tail, cream face blaze, and visible calico patch placement.
7 Technical Tips
- Use a stitch marker on every round because velvet yarn hides the first stitch. A one-stitch drift across the head will move the face blaze off center by R15.
- Stuff the head to medium-firm density, not rock hard. If the head measures more than 1 cm wider on one side, remove stuffing and rebuild the shape before closing R21.
- Work invisible decreases through the front loops only. Standard decreases create six visible dents around R16–R21 on a large chenille head.
- Set the eyes before R18. If you wait until the head is fully stuffed, the 24 mm washers will be hard to seat and may tilt outward.
- Keep velvet tension tight enough that stuffing does not show between stitches. If gaps appear on R7 of the head, drop from a 4.5 mm hook to 4.0 mm for the head only.
- Pin every limb before sewing. A front leg that is 2 rounds too low will cover the belly patch and make the body look shorter.
- Weave tails through at least 4 cm of stuffed fabric before trimming. Chenille tails shorter than 2 cm can back out after handling.
Conclusion
This calico cat amigurumi pattern is built around proportion first: a 42-stitch head, a matching large body, broad ears, raised muzzle pads, and a curled tail that helps the toy sit. Work the cream blaze and belly patch before final limb sewing so the vertical color line stays centered. For the next step, pin the head, body, and face pieces together under strong light and photograph the front view before sewing. Save the finished project to Pinterest, then post the front and side views on Instagram with #ChunkyCalicoKitten. Which side patch will you make darker on this calico kitten: the forehead spot or the tail tip?









