Introduction
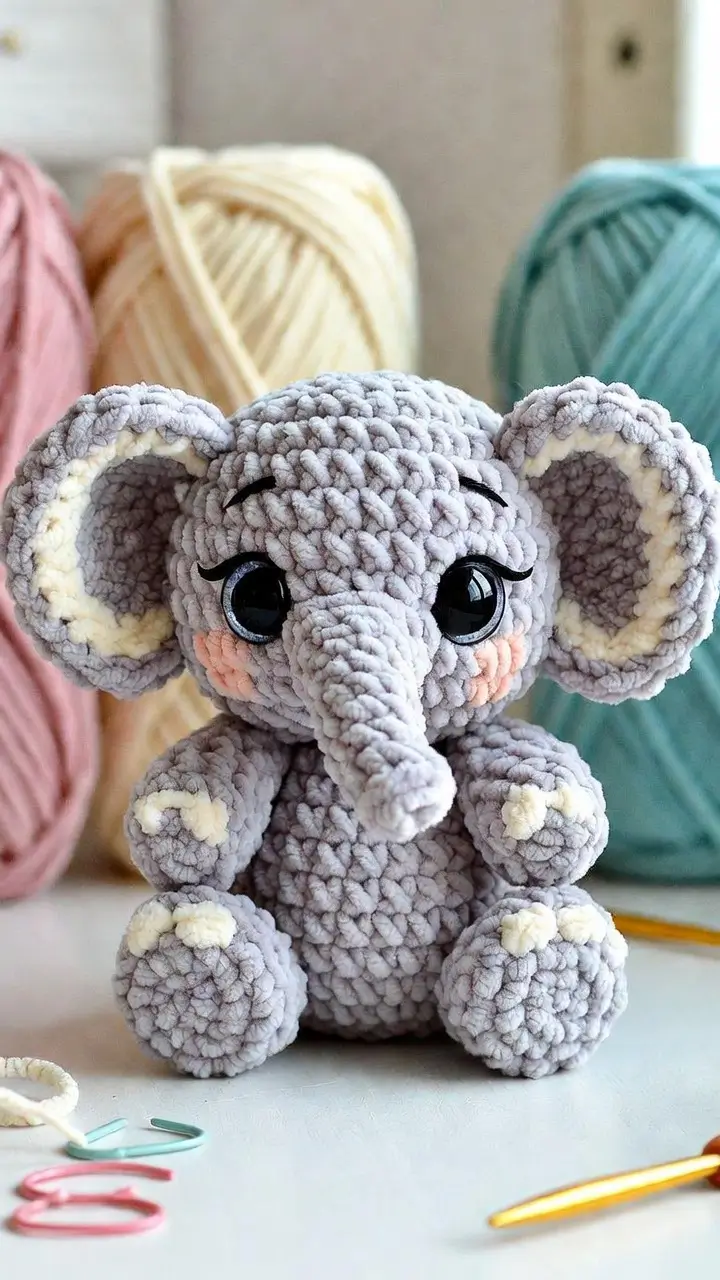
An elephant trunk must taper without twisting off center. This elephant amigurumi crochet pattern builds a 20 cm sitting plush with chunky gray yarn, cream accents, 12 mm eyes, and a 5 mm hook. The skill level is intermediate because the ears, trunk, and face need controlled shaping. Make it when a nursery shelf needs a stable animal that sits without support.
The Design: What Makes This Elephant Different
The head is larger than the body because the photo depends on a baby-elephant proportion: wide face, short torso, and forward-set trunk. The ears are worked as large flat circles, then edged in cream so they read as soft cupped ears instead of plain discs. The trunk starts narrow and gains width only near the face; that keeps the front from pulling downward after stuffing. In this plush elephant crochet pattern, the legs are round and compact, which makes the crochet elephant stuffed animal sit without a hidden weight. A common mistake is placing the ears too high. The maker gets a mouse-like silhouette when the ear tops sit above the crown instead of framing the eyes.
Project Info at a Glance
| Skill Level | Time | Finished Size | Hook | Best For |
|---|---|---|---|---|
| Intermediate | 3.5–4.5 hours | 20 cm | 5.0 mm | Chunky nursery plush |
The 20 cm size, super bulky yarn choice, and 5 mm hook are based on comparable elephant and chenille amigurumi references.
Materials and Tools
Yarn
- Pale gray — super bulky chenille — 100 g — Himalaya Dolphin Baby, YarnArt Dolce, or similar plush yarn
- Cream — super bulky chenille — 15 g — for ear edging and paw clusters
- Blush pink — super bulky chenille or velvet scrap — 5 g — for cheek patches
- Black — embroidery yarn or smooth cotton — 1 g — for eyelash arcs
Tools
- Hook 5.0 mm
- 12 mm black safety eyes
- Polyester stuffing
- Yarn needle
- Locking stitch markers
- Pins
- Scissors
Abbreviations
MR = magic ring; sc = single crochet; inc = 2 sc in same stitch; dec = invisible decrease over next 2 stitches; sl st = slip stitch; ch = chain; BLO = back loop only; FO = fasten off. An invisible decrease should catch the front loops only so the gray chenille does not form a raised bar.
Pattern — Step by Step
Continuous spiral unless noted. Stitch counts are shown at the end of every round.
Head
Yarn: pale gray — Source: Standard amigurumi math.
R1: 6 sc in MR (6)
R2: inc ×6 (12)
R3: (1 sc, inc) ×6 (18)
R4: (2 sc, inc) ×6 (24)
R5: (3 sc, inc) ×6 (30)
R6: (4 sc, inc) ×6 (36)
R7: sc around (36)
R8: sc around (36)
R9: sc around (36)
R10: sc around (36)
R11: sc around (36)
R12: sc around (36)
R13: (4 sc, dec) ×6 (30)
R14: (3 sc, dec) ×6 (24)
R15: (2 sc, dec) ×6 (18)
Place safety eyes between R9 and R10, 8 stitches apart. Start stuffing before the opening narrows.
R16: (1 sc, dec) ×6 (12)
R17: dec ×6 (6)
Fasten off. Leave 20 cm tail and close through front loops.
Body
Yarn: pale gray — Source: Standard amigurumi math.
R1: 6 sc in MR (6)
R2: inc ×6 (12)
R3: (1 sc, inc) ×6 (18)
R4: (2 sc, inc) ×6 (24)
R5: (3 sc, inc) ×6 (30)
R6: (4 sc, inc) ×6 (36)
R7: sc around (36)
R8: sc around (36)
R9: sc around (36)
R10: sc around (36)
R11: sc around (36)
R12: sc around (36)
R13: (4 sc, dec) ×6 (30)
R14: sc around (30)
R15: (3 sc, dec) ×6 (24)
R16: sc around (24)
R17: (2 sc, dec) ×6 (18)
Stuff the lower body firmly and the neck lightly.
R18: (1 sc, dec) ×6 (12)
R19: dec ×6 (6)
Fasten off. Leave 30 cm tail for sewing to the head.
Front Legs / Arms
Make 2. Yarn: cream, then pale gray — Source: Standard amigurumi math.
R1: with cream, 6 sc in MR (6)
R2: inc ×6 (12)
R3: BLO with pale gray, sc around (12)
R4: sc around (12)
R5: sc around (12)
R6: dec ×6 (6)
Fasten off. Leave 18 cm tail. Stuff only the paw end.
Back Legs
Make 2. Yarn: cream, then pale gray — Source: Standard amigurumi math.
R1: with cream, 6 sc in MR (6)
R2: inc ×6 (12)
R3: BLO with pale gray, sc around (12)
R4: (1 sc, inc) ×6 (18)
R5: sc around (18)
R6: sc around (18)
R7: (1 sc, dec) ×6 (12)
R8: dec ×6 (6)
Fasten off. Leave 25 cm tail. Stuff to a round pad, not a ball.
Ears
Make 2. Yarn: pale gray — Source: Standard amigurumi math.
R1: 6 sc in MR (6)
R2: inc ×6 (12)
R3: (1 sc, inc) ×6 (18)
R4: (2 sc, inc) ×6 (24)
R5: (3 sc, inc) ×6 (30)
R6: sc around (30)
Do not stuff. Fasten off and leave 35 cm tail. Press flat with the wrong side slightly cupped inward.
Cream Ear Edging
Make 2. Yarn: cream — Source: Standard edging.
Join cream yarn at the lower inside edge of one ear.
R1: sl st around the outer 24 stitches only, leaving the head-seam edge gray (24)
Fasten off. Weave the cream tail into the back of the ear.
Trunk
Yarn: pale gray — Source: Standard amigurumi math.
R1: 6 sc in MR (6)
R2: sc around (6)
R3: sc around (6)
R4: sc around (6)
R5: sc around (6)
R6: inc ×6 (12)
R7: sc around (12)
R8: sc around (12)
R9: sc around (12)
R10: sc around (12)
Lightly stuff R6–R10 only. Fasten off and leave 30 cm tail.
Cheek Patches
Make 2. Yarn: blush pink — Source: Standard flat circle.
R1: 6 sc in MR (6)
R2: inc ×6 (12)
Sl st to first stitch (12)
Fasten off. Leave 15 cm tail. Do not stuff.
Cream Paw Clusters
Make 4. Yarn: cream — Source: Standard flat circle.
R1: 6 sc in MR (6)
Sl st to first stitch (6)
Fasten off. Leave 12 cm tail. Flatten into a small oval before sewing.
Tail
Yarn: pale gray and cream — Source: Standard chain tail.
R1: ch 7 (7)
R2: starting in second ch from hook, sl st 6 (6)
Add three short cream strands at the end and knot them once. Leave 15 cm gray tail for sewing.
Eyelash Arcs
Make 2. Yarn: black embroidery yarn — Source: Standard embroidery.
Cut two 20 cm strands. Stitch one curved line above each eye, then add a short outer lash angled upward. Keep each arc 1 stitch above the safety eye rim.
Fasten and bury the black ends inside the head.
Assembly
- Pin the body under the head with the body opening centered on R15–R17 of the head.
- Sew the head to the body using the long body tail and add stuffing through the seam before the final quarter closes.
- Place the trunk between the eyes with the top edge crossing R10 and the lower edge crossing R13.
- Sew the trunk base with small stitches and leave the narrow tip unstuffed so it angles downward.
- Position the cheek patches beside the trunk, one stitch below each eye, then sew them flat.
- Set the ears on the sides of the head between R7 and R14, with the cream edging facing forward.
- Attach the front legs to the upper body, 6 stitches apart, angled toward the trunk.
- Attach the back legs to the lower body, 10 stitches apart, so the elephant sits level.
- Sew one cream paw cluster to each limb and stitch the tail to the back center of R10 on the body.
- Add eyelash arcs last, then weave every yarn tail through at least 3 cm of dense stuffing.
The finished toy is a sitting gray elephant with large edged ears, a tapered trunk, blush cheeks, and cream paw details.
7 Technical Tips
- Stitch marker drift: Chenille makes the round start hard to read after R7. Move the marker on every round, not every second round, or the trunk seam will lean left.
- Stuffing firmness: The body should compress by about 1 cm when pressed. Softer stuffing makes the 20 cm elephant slump backward.
- Invisible decrease ridge: A standard decrease leaves a visible gray bar on chunky yarn. Use front-loop invisible decreases on R13–R19 of the head and body.
- Eye placement timing: Insert the eyes before closing R16 of the head. After R17, the washer cannot be pressed flat without distorting the cheek area.
- Velvet tension failure: Loose tension creates white stuffing spots between stitches. Drop to a 4.5 mm hook when gaps wider than 2 mm appear.
- Pinning error: Large ears can rotate while sewing. Use three pins per ear: top, lower front, and lower back.
- Tail weaving: Short tails pull out of chenille faster than cotton. Weave every limb tail through the body twice and trim only after a 3 cm buried path.
Conclusion
Block the ears with your fingers, not steam, because chenille can flatten under heat. The next concrete step is to crochet one test ear and compare it to the head before making the second ear. That single check prevents a narrow mouse shape and keeps the elephant profile correct. Rework this elephant amigurumi crochet pattern in DK yarn only after reducing the eye size and hook to match the new gauge. Pin the finished gray version on Pinterest, then post the side view on Instagram so the trunk angle is visible. Use hashtag #VelvetElephantAmigurumi. Which ear position looks more elephant-like on your toy: level with the eyes or one round lower?









