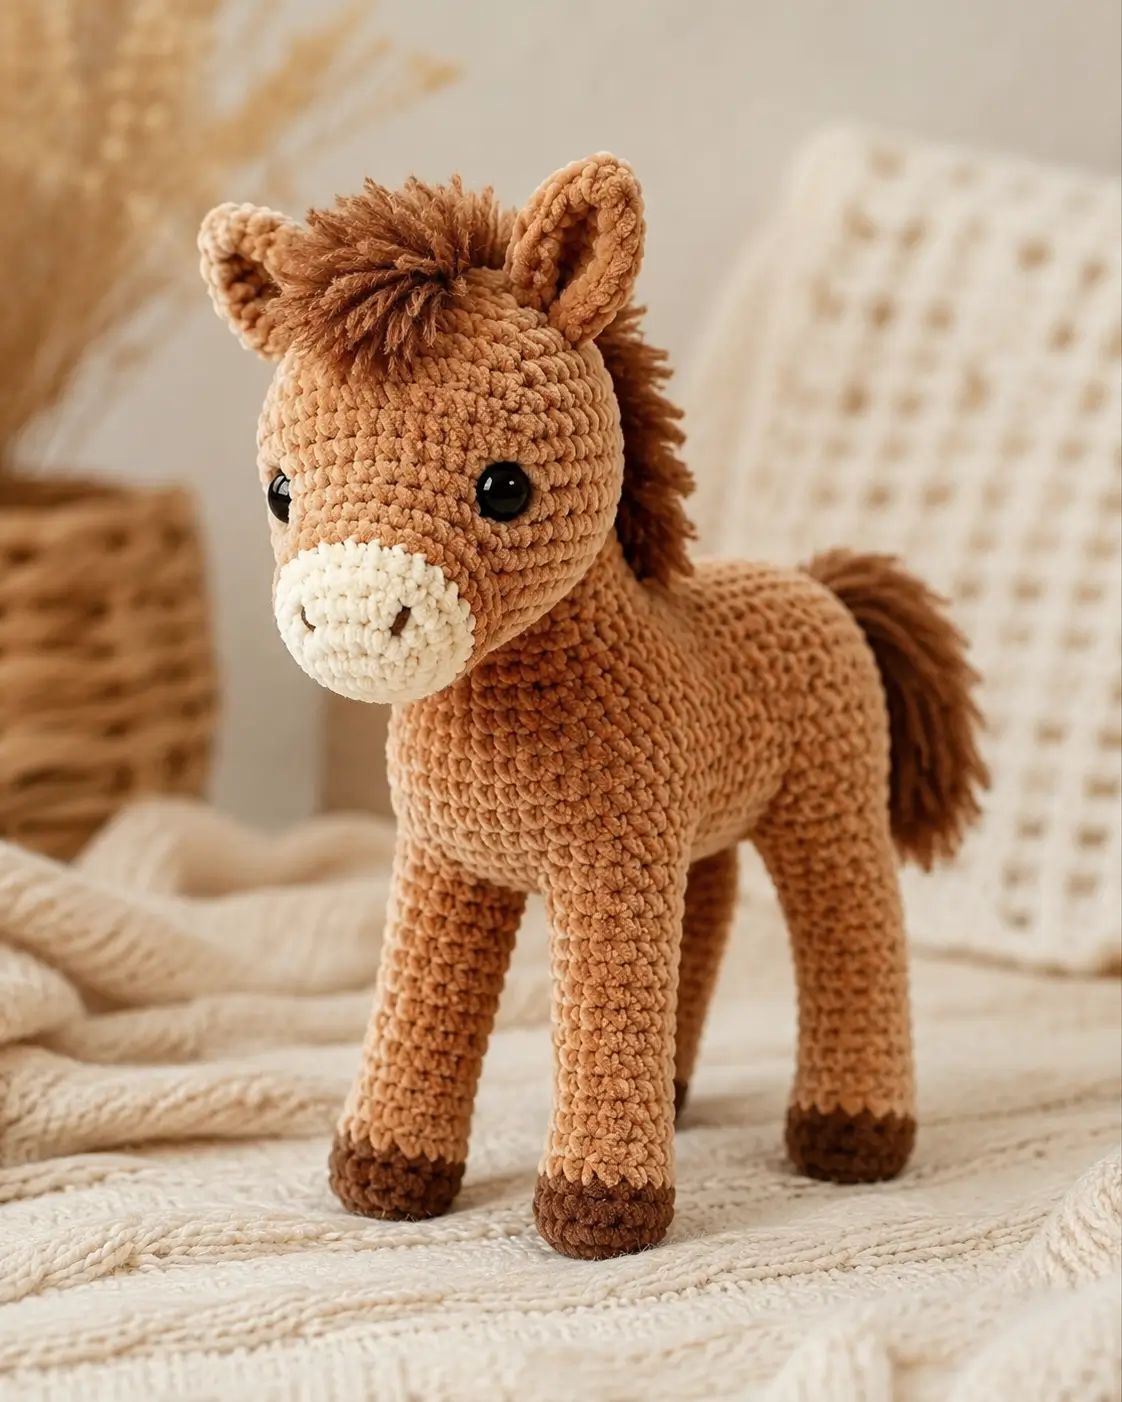
A horse carries its eyes to the sides, so this horse amigurumi crochet pattern must widen the muzzle before the head closes. You will make a 24 cm standing plush pony with chenille or velvet yarn, a 4 mm hook, safety eyes, and intermediate shaping. The structure suits display toys because the long legs need firm pinning before final sewing.
The Design: What Makes This Horse Different
This design is built around three visible horse traits: a projecting cream muzzle, a vertical neck, and a separate strand mane. The muzzle is not embroidered flat because the photo shows a rounded nose pad that sits forward from the tan head. The neck is worked as its own cylinder so the head can tilt slightly down, which keeps the standing body balanced instead of top-heavy.
The mane uses tied strands, not loop stitch, because velvet yarn sheds when overworked and a cut-strand mane better matches the shaggy forelock in the reference photo. A common error in a standing horse amigurumi is placing all four legs directly under the belly center. That makes a plush horse crochet pattern wobble. The front legs need to sit just ahead of the neck join, while the back legs sit under the rear third.
Project Info at a Glance
| Skill Level | Time | Finished Size | Hook | Best For |
|---|---|---|---|---|
| Intermediate | Not verified in source data | 24 cm tall | 4.0 mm | Standing plush display; use embroidered eyes for children under 3 |
Comparable chenille horse listings verify a 24 cm finished size with a 4 mm hook and chenille or velvet yarn. Safety-eye warnings also apply because plastic eyes can be a choking hazard for young children.
Materials and Tools
The material plan follows verified chenille horse references: velvet or chenille yarn, a smaller-than-label hook, polyester stuffing, and 10–16 mm safety eyes depending on yarn thickness. The photo scale is closest to a 24 cm standing toy, so this draft uses the 4 mm hook benchmark and a large 42-stitch plateau.
Yarn
- Caramel tan — chenille / velvet, #6 super bulky — 140 g — Himalaya Dolphin Baby, Premier Basix Chenille Brights, or similar.
- Cream — chenille / velvet, #6 super bulky — 15–20 g — for muzzle and cheek patches.
- Dark brown — chenille / velvet, #6 super bulky — 35–40 g — for hooves, mane, and tail.
- Black embroidery yarn — small amount — for nostrils.
Tools
- Hook 4.0 mm for dense velvet stitches.
- Safety eyes 10–12 mm, or 16 mm if your yarn is extra thick.
- Polyester stuffing, 40–60 g.
- Yarn needle, long doll needle, stitch markers, pins, sharp scissors.
- Cardboard strip, 10 cm wide, for cutting mane and tail strands.
Abbreviations
MR = magic ring; sc = single crochet; inc = 2 sc in one stitch; dec = invisible decrease; sl st = slip stitch; ch = chain; BLO = back loop only; FO = fasten off. An invisible decrease works through the front loops of the next two stitches before the final yarn-over, reducing bulk on closed velvet pieces.
Pattern — Step by Step
Continuous spiral unless noted. This is an original photo-based draft using standard amigurumi increase and decrease math. The head and body use a large 42-stitch plateau to match the chunky standing horse scale.
Head
Yarn: caramel tan
R1: 6 sc in MR (6)
R2: inc ×6 (12)
R3: [sc, inc] ×6 (18)
R4: [2 sc, inc] ×6 (24)
R5: [3 sc, inc] ×6 (30)
R6: [4 sc, inc] ×6 (36)
R7: [5 sc, inc] ×6 (42)
R8–R13: sc around (42)
R14: [5 sc, dec] ×6 (36)
R15: [4 sc, dec] ×6 (30)
R16: [3 sc, dec] ×6 (24)
R17: [2 sc, dec] ×6 (18)
R18: [sc, dec] ×6 (12)
Insert safety eyes between R10 and R11, 11–12 stitches apart, before the opening becomes small. Stuff firmly, especially behind the eye line.
R19: dec ×6 (6)
Fasten off. Close the remaining stitches and weave in the tail.
Muzzle / Snout
Yarn: cream
R1: 6 sc in MR (6)
R2: inc ×6 (12)
R3: [sc, inc] ×6 (18)
R4: [2 sc, inc] ×6 (24)
R5–R7: sc around (24)
Stuff lightly. Overstuffing will push the muzzle into a ball instead of a short oval.
Fasten off. Leave a 35 cm tail for sewing.
Body
Yarn: caramel tan
R1: 6 sc in MR (6)
R2: inc ×6 (12)
R3: [sc, inc] ×6 (18)
R4: [2 sc, inc] ×6 (24)
R5: [3 sc, inc] ×6 (30)
R6: [4 sc, inc] ×6 (36)
R7: [5 sc, inc] ×6 (42)
R8–R18: sc around (42)
R19: [5 sc, dec] ×6 (36)
R20: [4 sc, dec] ×6 (30)
R21: [3 sc, dec] ×6 (24)
R22: [2 sc, dec] ×6 (18)
R23: [sc, dec] ×6 (12)
Stuff into a horizontal oval. Add more fill at the rear than at the neck end so the body does not pitch forward.
R24: dec ×6 (6)
Fasten off. Close the opening and hide the tail.
Neck
Yarn: caramel tan
R1: 6 sc in MR (6)
R2: inc ×6 (12)
R3: [sc, inc] ×6 (18)
R4–R11: sc around (18)
R12: [sc, dec] ×6 (12)
Stuff firmly in small sections. Leave the top and bottom open for sewing, with the narrower end toward the head.
Fasten off. Leave a 40 cm tail.
Front Legs
Yarn: dark brown for hoof, caramel tan for leg
Make 2.
R1: dark brown, 6 sc in MR (6)
R2: inc ×6 (12)
R3: [sc, inc] ×6 (18)
R4: BLO sc around (18)
R5: sc around (18)
R6: change to caramel tan, sc around (18)
R7–R16: sc around (18)
R17: [sc, dec] ×6 (12)
R18: sc around (12)
Stuff the hoof and lower two-thirds firmly. Leave the top lightly filled so the leg sits flat against the body.
R19: flatten opening and sc through both layers across (6)
Fasten off. Leave a 35 cm tail.
Back Legs
Yarn: dark brown for hoof, caramel tan for leg
Make 2.
R1: dark brown, 6 sc in MR (6)
R2: inc ×6 (12)
R3: [sc, inc] ×6 (18)
R4: BLO sc around (18)
R5–R6: sc around (18)
R7: change to caramel tan, sc around (18)
R8–R15: sc around (18)
R16: [sc, dec] ×6 (12)
R17: sc around (12)
Stuff more firmly at the hoof than at the thigh. The back legs must support the rear body curve without forcing the toy to lean backward.
R18: flatten opening and sc through both layers across (6)
Fasten off. Leave a 35 cm tail.
Ears
Yarn: caramel tan
Make 2.
R1: 6 sc in MR (6)
R2: inc ×6 (12)
R3: [sc, inc] ×6 (18)
R4–R5: sc around (18)
R6: [sc, dec] ×6 (12)
R7: sc around (12)
R8: flatten and sc through both layers across (6)
Do not stuff. Fold the base slightly inward before sewing so the ear stands upright rather than lying flat.
Fasten off. Leave a 30 cm tail.
Cheek Patches
Yarn: cream
Make 2.
R1: 6 sc in MR (6)
R2: inc ×6 (12)
Sl st to first stitch (12)
Fasten off. Leave a 25 cm tail. Do not stuff.
Mane
Yarn: dark brown
Cut 12 strands at 10 cm for the forelock. Cut 32–36 strands at 18 cm for the neck mane. Insert the hook into one stitch along the center head line between the ears, fold one strand in half, pull the loop through, and pass the two loose ends through the loop. Tighten once. Repeat across a 4-stitch-wide band for the forelock.
For the neck mane, attach strands down the back center of the neck in two close columns. Work from head to body. Trim only after assembly, because the final neck angle changes the apparent length.
Tail
Yarn: dark brown
Cut 18–24 strands at 20 cm. Mark a circle 2 cm wide on the rear body. Attach strands by the same folded-loop method used for the mane. Fill the center first, then add a second outer ring if the tail looks thin. Tie one strand around the tail base twice to gather it.
Nostrils
Yarn: black embroidery yarn
Make 2 short vertical stitches on the lower cream muzzle, 5–6 stitches apart. Each nostril should cover about 1.5 chenille stitches. Knot inside the muzzle seam line if the muzzle has not been fully sewn down yet.
Assembly
- Sew the neck to the front top of the body across a 5 cm oval, angled slightly forward.
- Pin the head to the neck before sewing; the muzzle should point forward and slightly down.
- Sew the head to the neck with two passes around the join, adding stuffing through the gap before closing.
- Center the cream muzzle on the lower front of the head, with its top edge just below the eyes.
- Sew the cheek patches to the left and right lower head, touching the muzzle edge or sitting one stitch away.
- Place the front legs under the shoulder line, 2–3 cm apart, and sew around each flattened top.
- Place the back legs under the rear third of the body, matching hoof bottoms to the front-leg height.
- Sew ears between head R4 and R6 from the top center, leaving 5–6 stitches between their inner bases.
- Attach the mane from forehead to neck, then trim the forelock to sit above the eyes.
- Attach the tail to the rear body and weave every sewing tail through at least 4 cm of stuffing before cutting.
The finished horse stands when all four hoof bottoms touch the table before the final sewing knots are buried.
7 Technical Tips
- Stitch marker drift: Velvet yarn hides the first stitch of each round, so marker drift can shift the muzzle off center by 3–4 stitches. Move the marker every round, not every few rounds.
- Stuffing firmness: A standing horse fails at the legs when the hooves are soft. Pack each hoof to firm resistance, then leave the top 1.5 cm of each leg slightly softer for sewing.
- Invisible decrease holes: Chenille gaps show most on R14–R19 of the head. Work every decrease through front loops only and pull the working yarn down, not outward.
- Eye placement timing: Insert eyes before closing past 18 stitches, or the washers may not fit inside the head. For this scale, place eyes between R10 and R11 with 11–12 stitches between them.
- Velvet tension: Loose velvet tension can add 2 cm to the finished height and make the neck collapse. If you can see stuffing between stitches, go down from 4.0 mm to 3.5 mm.
- Pinning legs: Do not sew one leg at a time from guesswork. Pin all four legs first, then check the hoof rectangle from below; the front-to-back spacing should be about 7–8 cm.
- Tail weaving: Dark tail strands can pull out if only looped through one stitch. Anchor strands across a 2 cm circle and weave the tying strand through the body at least 4 cm before cutting.
Conclusion
This horse amigurumi crochet pattern is drafted for the plush standing pony shown in the photo: caramel body, cream muzzle, dark hooves, upright ears, and a cut-strand mane. The next step is to make the head, muzzle, and one test leg before cutting all mane strands, because velvet yarn scale changes the final face spacing. Pin the finished horse in natural light, photograph the side view, and share the result on Pinterest and Instagram with #StandingPlushPony. For the next version, should the mane stay shaggy over the forehead, or should the neck section be trimmed into a cleaner show-pony line?









