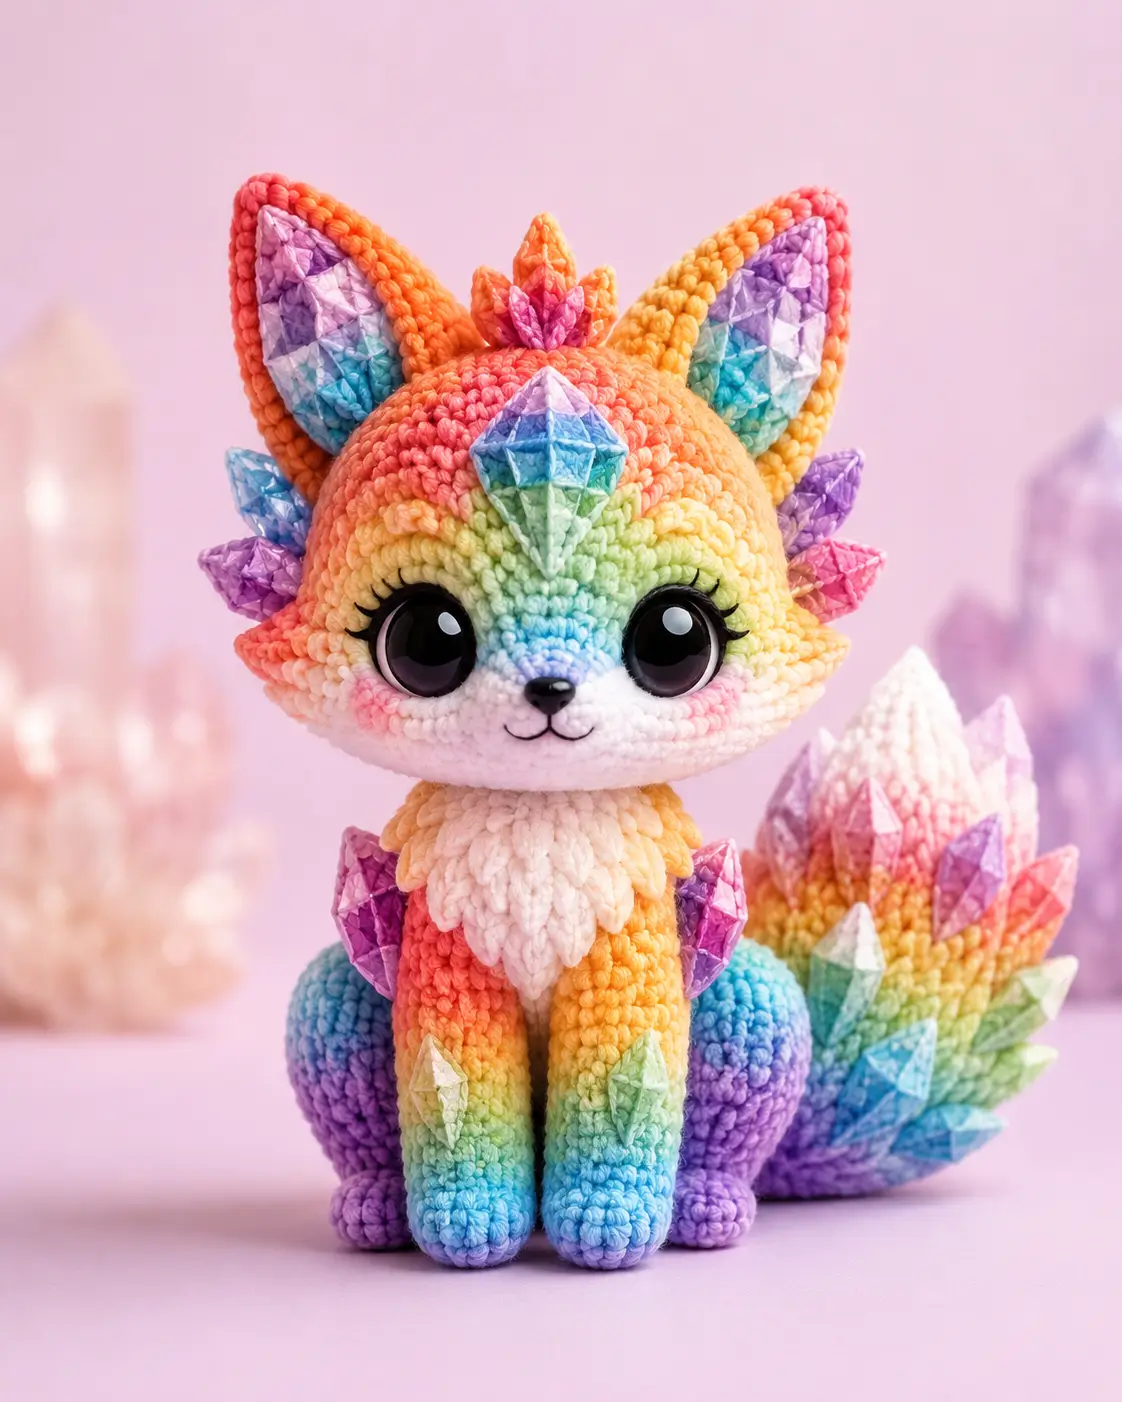
A fox with forehead crystals needs a wider brow than a plain woodland fox. This crystal fox amigurumi crochet pattern uses worsted rainbow yarn, white accents, a 3.5 mm hook, 16 mm safety eyes, and firm stuffing to make a 16 cm intermediate project. Make it to test color transitions, mirrored ears, and cone-shaped crystal add-ons in one controlled build.
The Design: What Makes This Crystal Fox Different
This fox is built around three structural choices: a large 36-stitch head, tall triangular ears, and a side-weighted tail. The head needs enough width for 16 mm eyes, cheek patches, a muzzle, and a forehead crystal without crowding the face. The ears use an outer cone plus a flat inner patch, because a single thin triangle usually folds backward after stuffing. The tail is worked as a separate stuffed form, then anchored high enough to help the toy sit.
A common maker mistake with a fantasy fox crochet pattern is treating crystals like flat appliqués. That makes the profile read as flowers instead of faceted mineral points. Use short cone pieces for the forehead, crown, and tail. The result reads closer to a rainbow fox amigurumi with intentional crystal structure, not a plain fox with random decoration.
Project Info at a Glance
| Skill Level | Time | Finished Size | Hook | Best For |
|---|---|---|---|---|
| Intermediate | 5–7 hours | 16 cm sitting | 3.5 mm | Color placement, fantasy details, crystal add-ons |
Materials and Tools
Yarn
- Rainbow gradient yarn — worsted / 8-ply DK-compatible — 35 g — Paintbox Yarns Cotton DK, Hobbii Friends Cotton 8/6, or similar
- White yarn — same weight — 10 g — for muzzle, cheeks, chest ruff, and tail tip
- Pink yarn — same weight — 3 g — for cheek blush and small crown crystal
- Purple yarn — same weight — 5 g — for side and tail crystals
- Blue yarn — same weight — 5 g — for forehead and tail crystal points
- Black yarn or embroidery thread — small amount — for nose and mouth
Tools
- Hook 3.5 mm
- 16 mm safety eyes
- Polyester stuffing
- Yarn needle
- Stitch markers
- Pins
- Small scissors
- Black embroidery needle
Abbreviations
MR = magic ring; sc = single crochet; inc = 2 sc in one stitch; dec = single crochet decrease; sl st = slip stitch; ch = chain; BLO = back loop only; FLO = front loop only.
Work the invisible decrease through the front loops of the next two stitches, then draw up and finish one single crochet so the decrease loses bulk on the right side.
Pattern — Step by Step
Continuous spiral unless noted.
Head — Make 1
Yarn: rainbow gradient
R1: 6 sc in MR (6)
R2: inc ×6 (12)
R3: (sc, inc) ×6 (18)
R4: (2 sc, inc) ×6 (24)
R5: (3 sc, inc) ×6 (30)
R6: (4 sc, inc) ×6 (36)
R7: sc around (36)
R8: sc around (36)
R9: sc around (36)
R10: sc around (36)
R11: sc around (36)
R12: sc around (36)
R13: sc around (36)
R14: (4 sc, dec) ×6 (30)
R15: (3 sc, dec) ×6 (24)
R16: (2 sc, dec) ×6 (18)
R17: (sc, dec) ×6 (12)
R18: dec ×6 (6)
Place eyes between R9 and R10, 8 stitches apart. Add stuffing firmly after R15 and top up before closing.
Fasten off. Leave a 20 cm tail.
Body — Make 1
Yarn: rainbow gradient
R1: 6 sc in MR (6)
R2: inc ×6 (12)
R3: (sc, inc) ×6 (18)
R4: (2 sc, inc) ×6 (24)
R5: (3 sc, inc) ×6 (30)
R6: (4 sc, inc) ×6 (36)
R7: sc around (36)
R8: sc around (36)
R9: sc around (36)
R10: sc around (36)
R11: sc around (36)
R12: sc around (36)
R13: (4 sc, dec) ×6 (30)
R14: sc around (30)
R15: (3 sc, dec) ×6 (24)
R16: sc around (24)
R17: (2 sc, dec) ×6 (18)
R18: (sc, dec) ×6 (12)
R19: dec ×6 (6)
Stuff the base firmly and the neck lightly so the head can settle flat.
Fasten off. Leave a 35 cm tail for sewing.
Front Legs — Make 2
Yarn: blue-to-rainbow section or matching rainbow yarn
R1: 6 sc in MR (6)
R2: inc ×6 (12)
R3: (sc, inc) ×6 (18)
R4: BLO sc around (18)
R5: sc around (18)
R6: sc around (18)
R7: sc around (18)
R8: sc around (18)
R9: (sc, dec) ×6 (12)
R10: sc around (12)
R11: sc around (12)
R12: sc around (12)
R13: sc around (12)
R14: sc around (12)
R15: sc around (12)
R16: dec ×6 (6)
Stuff the paw section only. Leave the upper leg soft enough to sit against the body.
Fasten off. Leave a 25 cm tail.
Back Legs — Make 2
Yarn: purple or blue-purple section
R1: 6 sc in MR (6)
R2: inc ×6 (12)
R3: (sc, inc) ×6 (18)
R4: BLO sc around (18)
R5: sc around (18)
R6: sc around (18)
R7: (sc, dec) ×6 (12)
R8: sc around (12)
R9: sc around (12)
R10: dec ×6 (6)
Stuff firmly at the foot and lightly at the top.
Fasten off. Leave a 25 cm tail.
Outer Ears — Make 2
Yarn: orange/yellow rainbow section
R1: 6 sc in MR (6)
R2: inc ×6 (12)
R3: (sc, inc) ×6 (18)
R4: (2 sc, inc) ×6 (24)
R5: sc around (24)
R6: sc around (24)
R7: sc around (24)
Do not stuff. Flatten each ear with the round join line at the back.
Fasten off. Leave a 35 cm tail.
Inner Ear Crystal Panels — Make 2
Yarn: blue, purple, or pastel scrap
R1: 6 sc in MR (6)
R2: inc ×6 (12)
R3: (sc, inc) ×6 (18)
Flatten into a soft triangle while sewing by pinching three points: top, lower left, lower right.
Fasten off. Leave a 20 cm tail.
Snout — Make 1
Yarn: white
R1: 6 sc in MR (6)
R2: inc ×6 (12)
R3: (sc, inc) ×6 (18)
R4: sc around (18)
Stuff only enough to raise the center. Overstuffing makes the muzzle push the eyes apart.
Fasten off. Leave a 25 cm tail.
Nose — Make 1
Yarn: black
R1: 6 sc in MR (6)
R2: sc around (6)
Flatten into a small oval before sewing to the top of the snout.
Fasten off. Leave a 15 cm tail.
Cheek Patches — Make 2
Yarn: pale pink or white-pink
R1: 6 sc in MR (6)
R2: inc ×6 (12)
R3: (sc, inc) ×6 (18)
Keep these flat. Do not stuff.
Fasten off. Leave a 20 cm tail.
Chest Ruff — Make 1
Yarn: white
Row 1: ch 7, sc in 2nd ch from hook and across (6)
Row 2: ch 1, turn, dec, 2 sc, dec (4)
Row 3: ch 1, turn, dec ×2 (2)
Row 4: ch 1, turn, dec (1)
Make two more small points if a fuller chest is wanted, then overlap the three points during assembly.
Fasten off. Leave a 25 cm tail.
Tail — Make 1
Yarn: start white, change to rainbow at R5
R1: 6 sc in MR (6)
R2: inc ×6 (12)
R3: (sc, inc) ×6 (18)
R4: (2 sc, inc) ×6 (24)
R5: (3 sc, inc) ×6 (30)
R6: sc around (30)
R7: sc around (30)
R8: sc around (30)
R9: sc around (30)
R10: sc around (30)
R11: sc around (30)
R12: (3 sc, dec) ×6 (24)
R13: sc around (24)
R14: (2 sc, dec) ×6 (18)
R15: sc around (18)
R16: (sc, dec) ×6 (12)
R17: dec ×6 (6)
Stuff gradually. Curve the tail by packing one side slightly firmer than the other before closing.
Fasten off. Leave a 40 cm tail.
Forehead Crystal — Make 1
Yarn: blue or blue-purple
R1: 6 sc in MR (6)
R2: sc around (6)
R3: inc ×6 (12)
R4: sc around (12)
R5: (sc, inc) ×6 (18)
R6: sc around (18)
Stuff with a small pinch only. The base should stay flat against the forehead.
Fasten off. Leave a 25 cm tail.
Crown Crystals — Make 3
Yarn: pink, orange, purple
R1: 6 sc in MR (6)
R2: sc around (6)
R3: inc ×6 (12)
R4: sc around (12)
Make one pink center crystal and two shorter side crystals by stopping the side pieces after R3.
Fasten off. Leave a 20 cm tail on each.
Side Crystals — Make 4
Yarn: purple and pink
R1: 6 sc in MR (6)
R2: sc around (6)
R3: inc ×6 (12)
Use two crystals behind each cheek, angled backward toward the ear base.
Fasten off. Leave a 20 cm tail.
Tail Crystals — Make 5
Yarn: blue, green, pink, purple, white
R1: 6 sc in MR (6)
R2: sc around (6)
R3: inc ×6 (12)
R4: sc around (12)
Leave all five lightly stuffed. Pin them along the outside curve of the tail before sewing.
Fasten off. Leave a 25 cm tail on each.
Assembly
- Pin the head to the body with the face centered over the narrowest body round.
- Sew the head to the body through two full circles, then add stuffing under the chin before closing the seam.
- Sew the snout between the eyes, covering the lower center of R10–R14 on the head.
- Attach the black nose to the upper snout and embroider a short vertical line plus two small mouth curves.
- Sew the cheek patches flat on both sides of the snout, keeping their outer edges below the eye centers.
- Attach the front legs to the front body seam, with the feet touching the table at the same line.
- Sew the back legs to the lower sides of the body and check that the fox sits without tipping.
- Attach outer ears from head R3 to R8, then sew the inner ear crystal panels inside them.
- Sew the tail to the back-right side of the body, adding three support stitches higher up the back.
- Add the forehead crystal, crown crystals, side crystals, tail crystals, and chest ruff last.
The finished fox is a seated rainbow crystal fox with a 36-stitch head, separate tail support, and raised crystal details.
7 Technical Tips
- Marker drift over 2 stitches: Spiral rounds will lean, especially on the head plateau. Reset your visual center at R7, R10, and R13 instead of trusting the marker for face placement.
- Loose stuffing under the chin: A head this wide can wobble if the neck seam is hollow. Add a thumb-sized amount of stuffing under the front seam before the second sewing pass.
- Eye placement error: Install the eyes between R9 and R10 with 8 stitches between the posts. A 6-stitch gap makes the fox look cross-eyed once the snout is sewn on.
- Visible gaps with velvet yarn: Velvet and chenille need a smaller hook than the ball band suggests. Test 12 sc across a flat swatch; stuffing should not show when the fabric is stretched.
- Crystal base flare: Cone crystals lean if their bases are not pinned in three points. Pin at the front, left, and right of each base before taking the first sewing stitch.
- Tail base collapse: A heavy tail pulls the body backward if it is sewn only at the bottom. Add a second anchor line 2 cm higher on the back to lock the curve in place.
- Tail weaving failure: Crystal tails pop loose when ends are woven only through surface stitches. Bury each tail through the stuffed tail for at least 4 cm, then reverse direction once.
Conclusion
This crystal fox keeps the standard fox outline but adds measurable fantasy structure: a 36-stitch head, balanced ears, a heavy side tail, and small cone crystals placed after pinning. For the crystal fox amigurumi crochet pattern, the next step is to swatch the rainbow yarn with the same hook and check that stuffing does not show between stitches. Save one front-facing photo for Pinterest and one angled tail photo for Instagram before giving it away or listing it as a finished toy. Use #CrystalFox when posting. For your version, will the forehead crystal point straight down the muzzle line or lean toward one ear like a natural mineral cluster?









