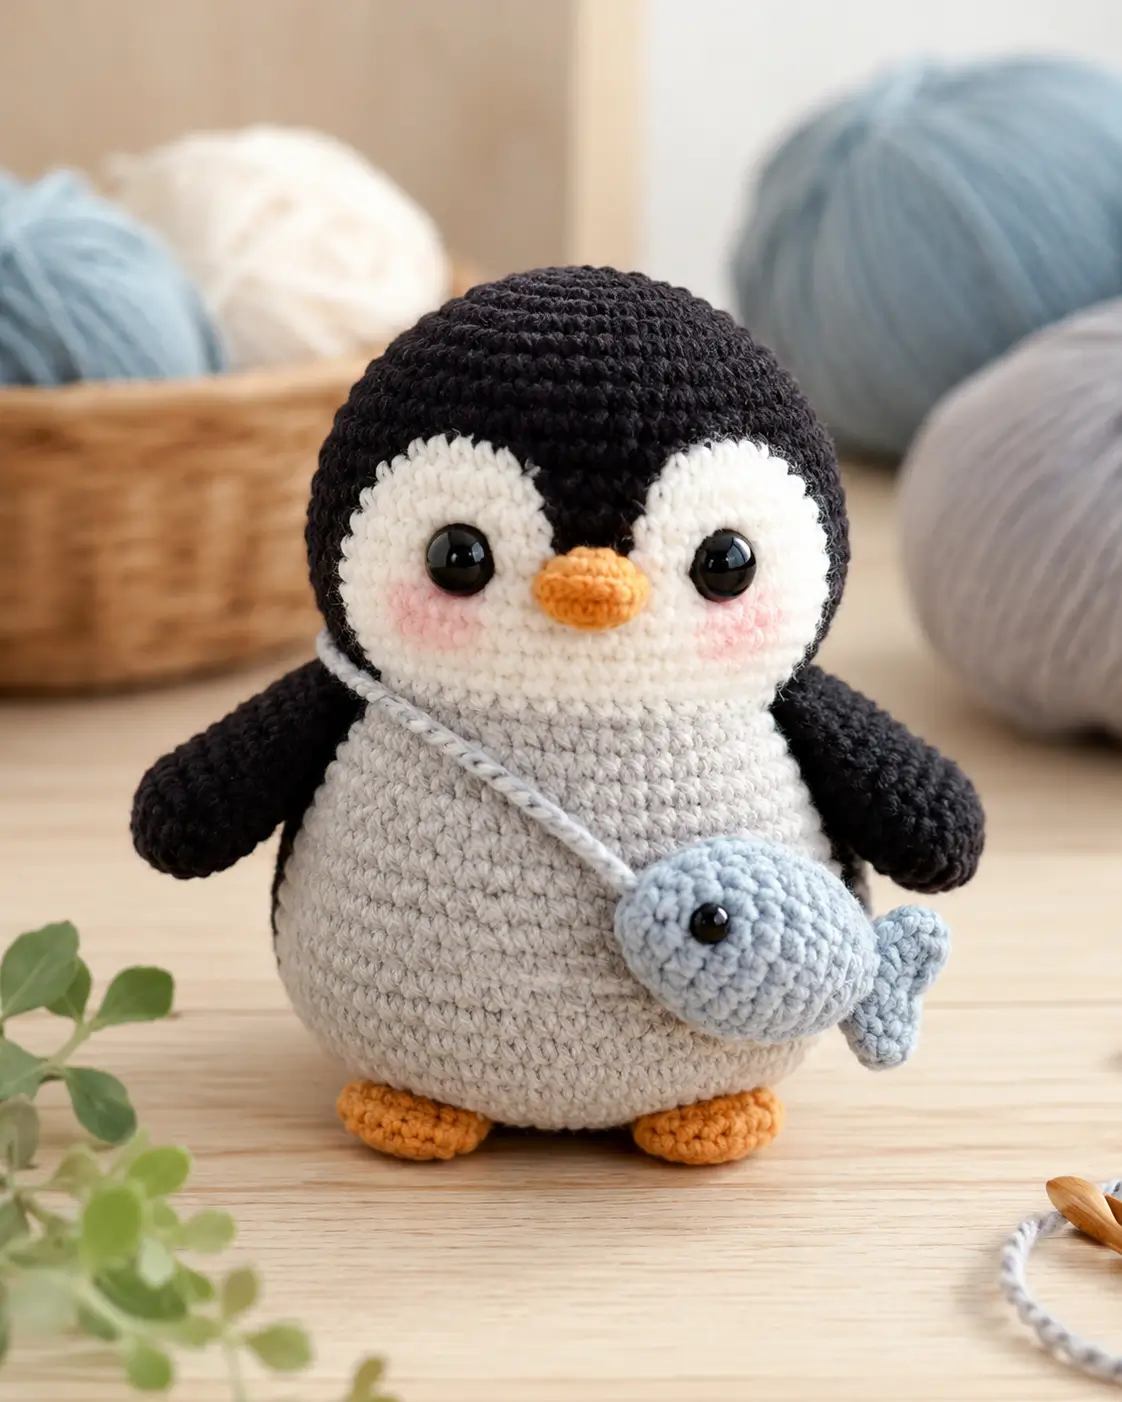
Penguins carry their wings like flippers, so this penguin amigurumi crochet pattern has to hang black side pieces low, not like bird wings. Use worsted yarn, a 3.5mm hook, 12mm eyes, and firm stuffing for a 23cm seated toy. Skill level is intermediate because the face patches and fish bag need exact placement. The finished penguin works as a desk sample or nursery shelf piece.
The Design: What Makes Pip the Penguin Different
The shape is a stacked oval, not a tall bird column. A penguin’s weight sits in the belly, so the body uses a 36-stitch plateau and the head stays slightly smaller visually because the black cap compresses the face. For this crochet penguin pattern, the white face is sewn as two circles instead of carried colorwork; that keeps the eye posts flat and reduces black yarn showing through the cheeks. The fish crossbody bag adds a diagonal line that breaks the round silhouette, but it also needs a light strap so the head does not tilt. One common mistake in an amigurumi penguin pattern is placing wings too high. The maker reads them as arms, while the animal’s flippers need to sit below the head seam and angle down.
Project Info at a Glance
| Skill Level | Time | Finished Size | Hook | Best For |
|---|---|---|---|---|
| Intermediate | 4–5 hr editor sample timing | 23 cm comparable worsted scale | 3.5 mm | Photo-matched penguin plush with fish bag |
Materials and Tools
Yarn
- Black — worsted 4-medium — 40–50 g — suggested: Caron Simply Soft or similar smooth acrylic
- Light gray — worsted 4-medium — 45–50 g — suggested: soft acrylic or cotton-blend
- White — worsted 4-medium — 18–25 g — suggested: same yarn family as the main yarn
- Orange — worsted 4-medium — 10–15 g — for beak and feet
- Pale blue — worsted 4-medium — 12–18 g — for fish bag and strap
- Pale pink — worsted or DK scrap — under 5 g — for cheek patches
Tools
- Hook 3.5 mm
- 12 mm black safety eyes
- 4–5 mm black safety eye or black embroidery thread for fish eye
- Polyester stuffing
- Yarn needle
- Stitch markers
- Pins
- Scissors
Abbreviations
MR = magic ring; sc = single crochet; inc = 2 sc in one stitch; dec = invisible decrease; sl st = slip stitch; ch = chain; BLO = back loop only; FLO = front loop only.
An invisible decrease catches the front loops of the next two stitches, reducing bulk on the black cap and gray belly.
Pattern — Step by Step
Continuous spiral unless noted. Every magic ring starts with 6 sc. Main parts use the medium 36-stitch plateau.
Head
Yarn: black.
R1: 6 sc in MR (6)
R2: inc ×6 (12)
R3: (sc, inc) ×6 (18)
R4: (2 sc, inc) ×6 (24)
R5: (3 sc, inc) ×6 (30)
R6: (4 sc, inc) ×6 (36)
R7–R13: sc around (36)
R14: (4 sc, dec) ×6 (30)
R15: (3 sc, dec) ×6 (24)
R16: (2 sc, dec) ×6 (18)
R17: (sc, dec) ×6 (12)
R18: dec ×6 (6)
Pause after R15. Pin the white face patches in place before locking safety-eye backs. Stuff firmly.
Fasten off. Leave 25 cm tail for closing.
Body
Yarn: light gray.
R1: 6 sc in MR (6)
R2: inc ×6 (12)
R3: (sc, inc) ×6 (18)
R4: (2 sc, inc) ×6 (24)
R5: (3 sc, inc) ×6 (30)
R6: (4 sc, inc) ×6 (36)
R7–R15: sc around (36)
R16: (4 sc, dec) ×6 (30)
R17: sc around (30)
R18: (3 sc, dec) ×6 (24)
R19: (2 sc, dec) ×6 (18)
R20: (sc, dec) ×6 (12)
R21: dec ×6 (6)
Stuff the lower body more firmly than the neck.
Fasten off. Leave 30 cm tail for sewing head to body.
White Face Patches
Yarn: white. Make 2.
R1: 6 sc in MR (6)
R2: inc ×6 (12)
R3: (sc, inc) ×6 (18)
R4: (2 sc, inc) ×6 (24)
R5: sc around (24)
Sl st to finish. Leave 30 cm tail on each patch. Pin the circles so they overlap slightly at the lower center of the face. Place eyes through the patches and the head between R10 and R11 of the head, about 10–11 stitches apart.
Side Flippers / Wings
Yarn: black. Make 2.
R1: 6 sc in MR (6)
R2: inc ×6 (12)
R3–R8: sc around (12)
R9: sc around (12)
R10: flatten opening; sc through both layers across (6)
Do not stuff.
Fasten off. Leave 25 cm tail. The wings should angle down, not straight out.
Back Feet
Yarn: orange. Make 2.
R1: 6 sc in MR (6)
R2: inc ×6 (12)
R3: (sc, inc) ×6 (18)
R4: sc around (18)
R5: (sc, dec) ×6 (12)
R6: dec ×6 (6)
Stuff lightly.
Fasten off. Leave 22 cm tail. Flatten the top edge before sewing so each foot sits under the body front.
Beak
Yarn: orange.
R1: 6 sc in MR (6)
R2: inc ×6 (12)
R3: sc around (12)
R4: dec ×6 (6)
Stuff with a pinch of fiberfill.
Fasten off. Leave 25 cm tail. Press into a horizontal oval before sewing.
Cheek Patches
Yarn: pale pink. Make 2.
R1: 6 sc in MR (6)
R2: inc ×6 (12)
Sl st to finish. Leave 20 cm tail. Sew one cheek under each eye, one round lower than the eye center.
Fish Bag Body
Yarn: pale blue.
R1: 6 sc in MR (6)
R2: inc ×6 (12)
R3: (sc, inc) ×6 (18)
R4–R7: sc around (18)
R8: (sc, dec) ×6 (12)
R9: dec ×6 (6)
Insert a 4–5 mm safety eye between R3 and R4, or embroider one black dot. Stuff lightly.
Fasten off. Leave 20 cm tail.
Fish Tail Fins
Yarn: pale blue. Make 2.
R1: 6 sc in MR (6)
R2: inc ×6 (12)
R3: sc around (12)
R4: dec ×6 (6)
Flatten each fin.
Fasten off with 18 cm tail. Sew both fins to the closed end of the fish bag, forming a forked tail.
Fish Bag Strap
Yarn: pale blue.
Ch 58 (58)
Row 1: sl st in second ch from hook and across (57)
Fasten off. Leave 20 cm tails at both ends. Adjust by adding or removing 4 chains if your penguin is taller or shorter than 23 cm.
Assembly
- Sew the head to the body with the head centered over the narrow end of the body.
- Pin both white face patches on the lower front of the head, overlapping them by 1–2 stitches at the center.
- Insert or attach the eyes through the face patches before the head opening is fully closed.
- Sew the beak between the eyes, with its top edge sitting slightly below the eye line.
- Attach the cheek patches under the eyes, keeping both patches at the same round height.
- Sew the wings to the body sides between body R10 and R14, angled down toward the feet.
- Attach the feet under the body front, spaced 8–10 stitches apart.
- Sew the fish tail fins to the fish body, then secure or embroider the fish eye.
- Attach one strap end near the penguin’s right shoulder and the other end behind the fish bag.
- Pin the fish bag on the lower left belly, sew it in place with small stitches, and bury all yarn tails inside the body.
The finished piece is a seated penguin plush with a fixed fish crossbody bag.
7 Technical Tips
- Round drift: Place the stitch marker in the first stitch of every round. If the beak leans more than 2 stitches off center, move the face patches before sewing, not after.
- Stuffing firmness: Understuffing at body R15 makes the penguin slump backward. Pack fiberfill until the 36-stitch plateau resists a finger press without showing gaps.
- Invisible decrease ridges: A visible decrease ridge on the black head will pull attention away from the face. Work dec stitches through FLO only and keep the hook angle shallow.
- Eye placement timing: Safety eyes must go in before closing head R16–R18. Place them through the white patches and head together so the face appliqué cannot rotate.
- Wing height failure: Wings sewn above the body midpoint look like raised arms. Set the top of each wing near body R10 and the lower tip near body R14.
- Strap measurement: A strap shorter than 54 chains pulls the fish into the beak area on a 23 cm toy. Test the 58-chain strap with pins before sewing either end.
- Tail weaving: Fish-bag tails can show through the pale blue stitches. Weave each tail through at least 5 stitches inside the bag before trimming.
Conclusion
Check the head before final sewing: the white face patches should meet under the beak, and the strap should cross from the penguin’s right shoulder to the fish at the lower left belly. That diagonal is the detail most likely to shift during handling. After the sample is assembled, photograph it from the front and one side, then compare wing height against the cheek line. Save this penguin amigurumi crochet pattern to Pinterest and post the finished penguin on Instagram with #PenguinFishBag. For the next sample, change only the fish color or strap length. Should the fish sit beside the left flipper or centered on the belly?









