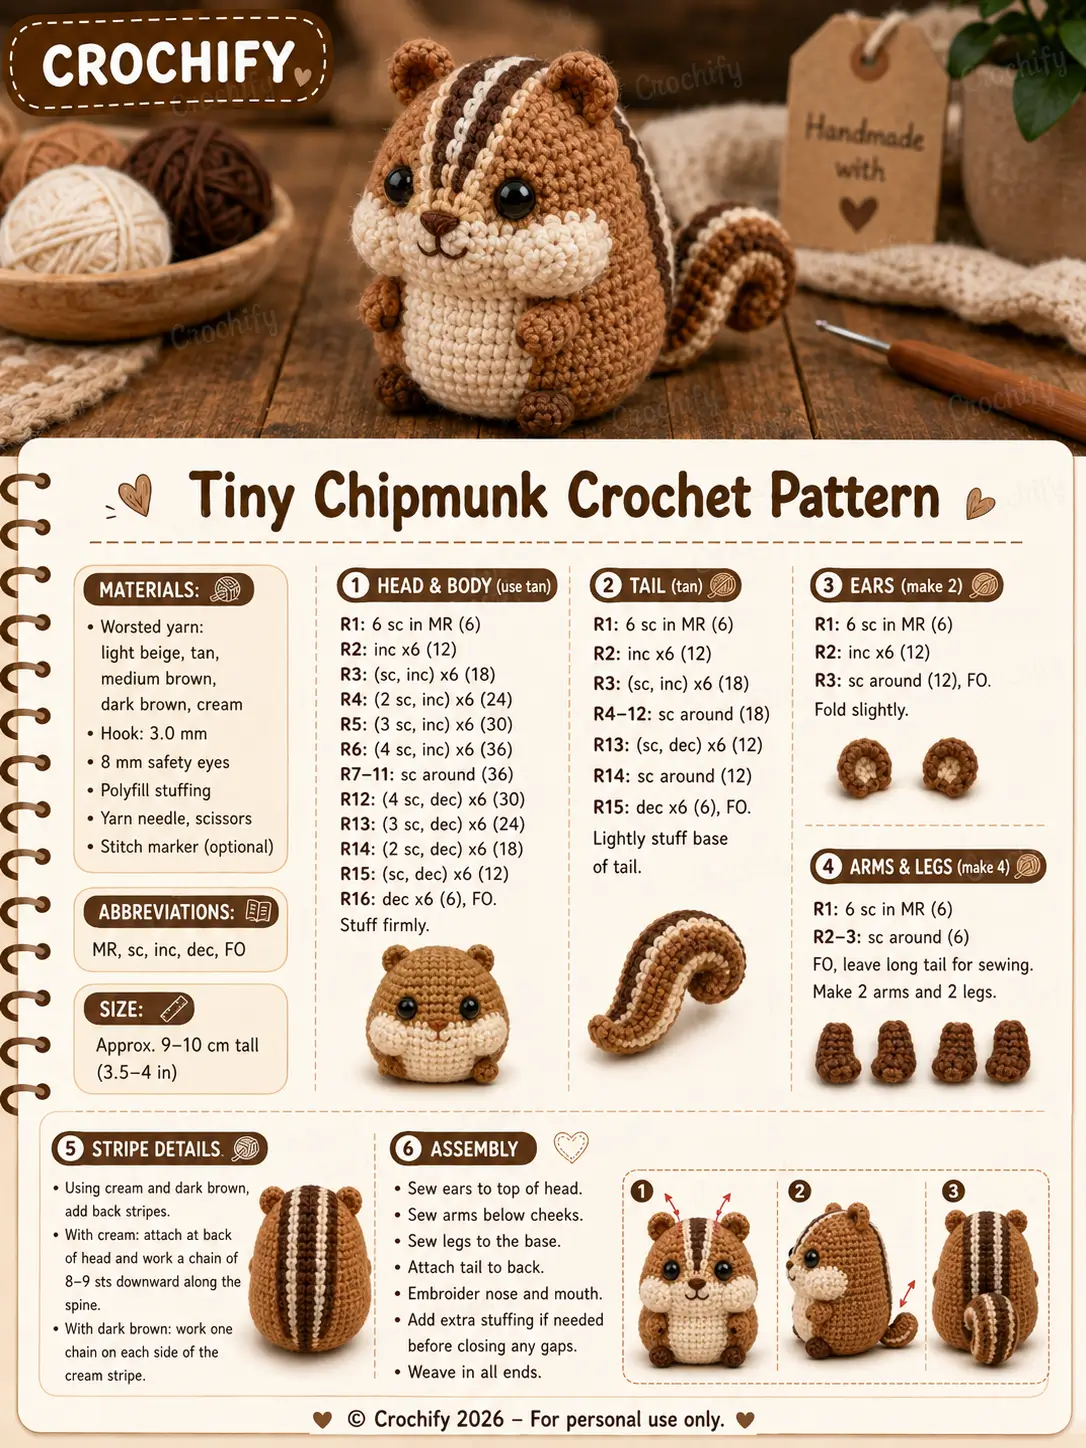
Chipmunks carry their stripes on the head, back, and tail, so stripe placement comes before round shaping. This chipmunk amigurumi crochet pattern uses worsted yarn, a 3.0 mm hook, 8 mm safety eyes, and a compact 9–10 cm sitting body for an intermediate-beginner make. The form suits desk displays because the wide cream belly, low feet, and curled tail create a stable base without a wire frame.
The Design: What Makes This Chipmunk Different
The photo reads as a chipmunk because three features are controlled: cheek width, dorsal stripes, and tail curl. You need the cream cheek patches to sit below the eyes, not on the snout, because chipmunks have a broad face with a short muzzle. The center stripe starts between the ears and travels down the head; the maker then continues the stripe onto the back so the toy still identifies as a crochet chipmunk amigurumi when viewed from behind. The tail is built as a firm tube, then bent while stitched to the lower back, because a flat tail loses the squirrel-family silhouette. A common error in a tiny chipmunk crochet pattern is placing the eyes too high; that turns the face into a bear before the stripes can correct it.
Project Info at a Glance
Published chipmunk sizes vary from 9 cm pocket toys to 20 cm larger toys, with hook and yarn choice controlling scale. This version targets the small photo style with a 3.0 mm hook and worsted/DK-range yarn.
| Skill Level | Time | Finished Size | Hook | Best For |
|---|---|---|---|---|
| Intermediate beginner | 2–3 hours | 9–10 cm sitting | 3.0 mm | Woodland set, desk display, craft-fair table |
Materials and Tools
Yarn
- Tan / caramel brown — worsted — 40 g — Paintbox Simply Aran, Stylecraft Special DK doubled lightly, or similar.
- Cream — worsted — 10 g — same yarn family for cheeks, belly, and stripe accents.
- Dark brown — worsted — 5 g — stripe lines, nose embroidery, and tail detail.
- Medium brown — worsted — 5–8 g — ears, paws, and tail shadow accents.
Tools
- Hook 3.0 mm
- 8 mm black safety eyes
- Polyfill stuffing
- Yarn needle
- Embroidery needle
- Stitch markers
- Pins
- Scissors
Abbreviations
- MR = magic ring
- sc = single crochet
- inc = 2 sc in one stitch
- dec = single crochet 2 stitches together
- sl st = slip stitch
- ch = chain
- BLO = back loop only
- FO = fasten off
- surface sl st = slip stitch worked on the outside surface of finished crochet fabric
For an invisible decrease, insert the hook through the front loops of the next 2 stitches, yarn over, pull through both front loops, yarn over, and pull through both loops.
Pattern — Step by Step
Continuous spiral unless noted. Place a marker in the first stitch of every round.
Head
Yarn: tan
R1: 6 sc in MR (6)
R2: inc ×6 (12)
R3: (sc, inc) ×6 (18)
R4: (2 sc, inc) ×6 (24)
R5: (3 sc, inc) ×6 (30)
R6: (4 sc, inc) ×6 (36)
R7: sc around (36)
R8: sc around (36)
R9: sc around (36)
R10: sc around (36)
R11: sc around (36)
R12: (4 sc, dec) ×6 (30)
R13: (3 sc, dec) ×6 (24)
R14: (2 sc, dec) ×6 (18)
Insert 8 mm safety eyes between R8 and R9, 7 stitches apart. Stuff firmly before the opening gets narrow.
R15: (sc, dec) ×6 (12)
R16: dec ×6 (6)
Fasten off. Leave a 20 cm tail and close through the front loops.
Body
Yarn: tan, with cream belly patch added later
R1: 6 sc in MR (6)
R2: inc ×6 (12)
R3: (sc, inc) ×6 (18)
R4: (2 sc, inc) ×6 (24)
R5: (3 sc, inc) ×6 (30)
R6: (4 sc, inc) ×6 (36)
R7: sc around (36)
R8: sc around (36)
R9: sc around (36)
R10: sc around (36)
R11: (4 sc, dec) ×6 (30)
R12: (3 sc, dec) ×6 (24)
R13: (2 sc, dec) ×6 (18)
Stuff the base firmly. Add more stuffing near the front belly than the back so the chipmunk sits upright.
R14: (sc, dec) ×6 (12)
R15: dec ×6 (6)
Fasten off. Leave a 25 cm tail for sewing head to body.
Arms / Front Legs
Yarn: medium brown or tan
Make 2.
R1: 6 sc in MR (6)
R2: sc around (6)
R3: sc around (6)
R4: sc around (6)
Do not stuff. Flatten the opening before sewing.
Fasten off. Leave a 15 cm tail.
Back Legs
Yarn: medium brown or tan
Make 2.
R1: 6 sc in MR (6)
R2: inc ×6 (12)
R3: sc around (12)
R4: sc around (12)
Stuff only the front half of each foot.
R5: dec ×6 (6)
Fasten off. Leave an 18 cm tail.
Ears
Yarn: tan outer, optional cream center by duplicate stitch
Make 2.
R1: 6 sc in MR (6)
R2: inc ×6 (12)
R3: sc around (12)
R4: dec ×6 (6)
Flatten slightly. Add 3–4 cream duplicate stitches inside each ear if you want the lighter center from the photo.
Fasten off. Leave a 15 cm tail.
Snout
Yarn: cream
R1: 6 sc in MR (6)
R2: inc ×6 (12)
R3: sc around (12)
Lightly stuff. The snout sits between the cheek patches, with its top edge just below the eyes.
Fasten off. Leave a 20 cm tail.
Cheek Patches
Yarn: cream
Make 2.
R1: 6 sc in MR (6)
R2: inc ×6 (12)
R3: (sc, inc) ×6 (18)
Sl st to finish. Fasten off. Leave a 20 cm tail for sewing.
Belly Patch
Yarn: cream
R1: 6 sc in MR (6)
R2: inc ×6 (12)
R3: (sc, inc) ×6 (18)
R4: (2 sc, inc) ×6 (24)
R5: sc around (24)
Keep this piece flat. Block with pins if the edge cups before sewing.
Fasten off. Leave a 25 cm tail.
Curled Tail
Yarn: tan base; cream and dark brown surface stripes
R1: 6 sc in MR (6)
R2: inc ×6 (12)
R3: (sc, inc) ×6 (18)
R4: sc around (18)
R5: sc around (18)
R6: sc around (18)
R7: sc around (18)
R8: sc around (18)
R9: sc around (18)
R10: sc around (18)
R11: sc around (18)
R12: sc around (18)
R13: (sc, dec) ×6 (12)
R14: sc around (12)
R15: dec ×6 (6)
Stuff the base only. Leave the outer half flexible so it can curl without buckling.
Fasten off. Leave a 30 cm tail.
Bend the tail into a loose “C” shape. Tack the inner curve with 3 hidden stitches. Add one cream surface sl st line along the outside curve for 14–16 stitches. Add one dark brown surface sl st line on each side of the cream line for 12–14 stitches.
Dorsal and Face Stripes
Yarn: cream and dark brown
With cream, work a surface sl st line from the forehead center to the back of the head, 9–11 sl st total (9–11). Continue on the body for 8–10 sl st down the back (8–10).
With dark brown, make one stripe 2 stitches to the left of the cream line and one stripe 2 stitches to the right. Each head stripe should be 8–10 sl st (8–10). Each back stripe should be 8–10 sl st (8–10).
Keep the cream stripe centered between the ears. The dark stripes must stop before the cheek patches so the face stays open.
Nose and Mouth
Yarn: dark brown embroidery thread or split worsted strand
Embroider a small triangle nose over the top center of the snout, 3 stitches wide. Work one vertical stitch down from the nose, then two short curved mouth stitches. Knot inside the head if the head is still open; otherwise bury the thread through the side of the snout.
Handmade Tag Prop
Yarn: light beige or tan — optional photo accessory
Row 1: ch 9, sc in 2nd ch from hook and across (8)
Row 2: ch 1, turn, sc across (8)
Row 3: ch 1, turn, sc across (8)
Row 4: ch 1, turn, sc across (8)
Row 5: ch 1, turn, sc 3, ch 2, skip 2, sc 3 (8 including ch space)
Row 6: ch 1, turn, sc across, working 2 sc into the ch space (8)
Fasten off. Weave ends. Add a short scrap-yarn tie through the hole.
Assembly
- Pin the head to the body with the face centered above the cream belly area.
- Sew the head to the body using the 25 cm body tail, passing through both pieces twice around the neck.
- Sew the snout between the eyes, with its top edge one round below the eye line.
- Sew one cheek patch on each side of the snout, letting the patches touch at the lower center.
- Attach the belly patch to the front body from R5 to R12, keeping the lower edge above the back legs.
- Sew the arms under the cheek patches at body R8–R10.
- Sew the back legs to the lower front body at R12–R14 so the toy sits without tipping forward.
- Sew the ears to the top of the head between R3 and R5, spaced 8–10 stitches apart.
- Attach the curled tail to the back body at R8–R11, then add dorsal stripes after the tail angle is fixed.
- Weave all tails through stuffed sections, trim only after checking front, side, and back balance.
The finished chipmunk measures about 9–10 cm when worked with worsted/DK-range yarn and a 3.0 mm hook.
7 Technical Tips
- Stitch-marker drift: The failure mode is a spiral seam walking into the face stripe line. Move the marker to the first stitch of every round and keep the center cream stripe within 1 stitch of the head midpoint.
- Stuffing firmness: The failure mode is flat cheeks and a collapsing belly. The head should rebound slowly when pressed, while the body base should feel firmer than the upper body.
- Invisible decrease lumps: The failure mode is a visible knot at the final 6-stitch closure. Pull the yarn through the front loops of all 6 stitches once, tighten, then bury the tail across the head rather than straight down.
- Eye placement timing: The failure mode is installing eyes after the opening is too small. Place 8 mm eyes between R8 and R9, 7 stitches apart, before R15 closes the head.
- Velvet substitution tension: The failure mode is worming loops when velvet yarn is pulled too tight. Go up to a 3.5–4.0 mm hook only for velvet, and reduce stuffing pressure near the cheeks.
- Pinning accuracy: The failure mode is a tail that pulls the chipmunk backward. Pin the tail base across body R8–R11 and test the sitting angle before sewing through all layers.
- Tail weaving: The failure mode is stripe tails showing on the outer curve. Leave 18–20 cm ends for the cream and dark stripe yarns, then weave each end inside the tail tube for at least 3 cm.
Conclusion
This build works best when the stripes are treated as structural guides rather than decoration. Keep the center cream stripe aligned with the nose, mirror the dark stripes at equal distance, and sew the curled tail low enough to counterbalance the head. The next step is to pin every limb and stripe for a full front-back check before final stitching. Save the chipmunk amigurumi crochet pattern to Pinterest, then post the finished front and back views on Instagram so the stripe placement can be checked by other makers. Use #TinyChipmunkAmigurumi. Which stripe layout will you choose for the tail: cream center with dark sides, or dark center with cream sides?









